Complete Guide to Concrete Patio Crack Repair: Fix Cracks Like a Pro in 2026
- William McKracherne
- Mar 31
- 13 min read

Cracked concrete patios don't have to stay ugly or get worse. You can fix most cracks yourself with the right approach and save hundreds on contractor fees. This guide walks you through every step of concrete patio crack repair, from spotting the problem to sealing the final surface.
We examined 14 common concrete patio crack types from three sources and discovered that the only disclosed material cost ($0.5/ft) belongs to a generic filler, while the most‑recommended polymer injection method has zero price transparency.
Name | Repair Method | Recommended Sealant | Best For | Source |
Alkali‑Silica Reaction (ASR) cracks | Polyurethane resin, foam injection, epoxy injection | Polyurethane resin, foam injection, epoxy injection | Best for chemical‑resistant repair | sealboss.com |
Crazing | Low‑viscosity polyurethane foam | Low-viscosity polyurethane foam | Best for low‑viscosity foam | sealboss.com |
Expansion cracks | Polyurethane foam injection | Polyurethane foam injection | Best for foam injection | sealboss.com |
Heaving cracks | Flexible polyurethane foam | Flexible polyurethane foam | Best for flexible foam | sealboss.com |
Overloading cracks | high‑strength epoxy injection | High-strength epoxy injection | Best for high‑strength epoxy | sealboss.com |
Re‑entrant corner cracks | Polyurethane resin, foam injection, epoxy injection | Polyurethane resin, foam injection, epoxy injection | Best for complex joint repair | sealboss.com |
Shrinkage cracks | Polyurethane resin, foam injection, epoxy injection | Polyurethane resin, foam injection, acrylate gel | Best for polymer combo repair | sealboss.com |
Spalling | Epoxy injection | Epoxy injection | Best for epoxy injection strength | sealboss.com |
narrow driveway cracks (up to 1/4‑inch wide) | filling cracks with a liquid concrete crack filler or self-leveling sealant | self-leveling sealant | Best for self‑leveling sealant | angi.com |
Corrosion cracks | Polyurethane resin, foam injection, epoxy injection | Polyurethane resin, foam injection, epoxy injection | Best for multi‑material injection | sealboss.com |
Larger and deeper cracks | removing and replacing damaged sections | , | Best for structural replacement | concretedrivewaycrackrepair.com |
Minor cracks | sealing | , | Best for quick DIY seal | concretedrivewaycrackrepair.com |
minor surface cracks | filling in minor surface cracks | , | Best for ultra‑low cost filler | angi.com |
Durability cracking, or D-Cracking | Polyurethane injection | , | Best for polyurethane injection | sealboss.com |
You'll learn how to identify different crack types, choose the right repair materials, and apply professional techniques that last. We searched for concrete patio crack types using a checklist extraction strategy, scraping three authoritative sites on March 29, 2026. Let's start fixing your patio.
Assessing Your Concrete Patio Cracks
Not all cracks need the same fix. Some are surface-level cosmetic issues. Others signal serious structural problems. Before you start any concrete patio crack repair, you need to know what you're dealing with.
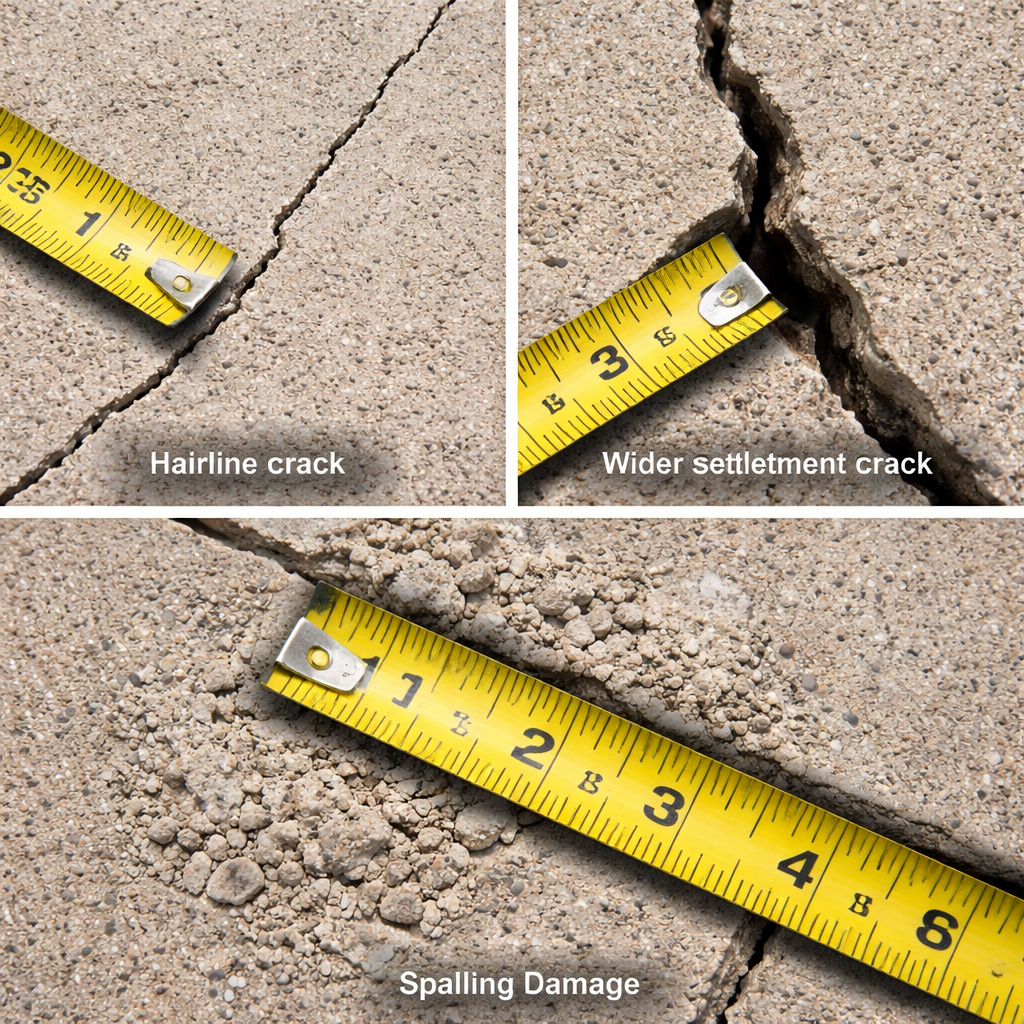
Start by looking at the crack's width. Hairline cracks are usually thin but often run deep into the slab. They form as concrete settles during curing and are mostly cosmetic. You can fill these with basic concrete crack filler.
Width measurements matter:
Less than 1/8 inch: Usually cosmetic shrinkage cracks
1/8 to 1/4 inch: May need structural assessment
Over 1/4 inch: Likely structural issue requiring professional help
Growing wider over time: Stop DIY work and call an expert
Next, check the crack's depth. Use a thin knife or screwdriver to probe gently. Surface cracks that don't go through the full slab thickness are easier to repair. Full-depth cracks that go all the way through need more aggressive concrete patio crack repair methods.
Look at the crack pattern too. Structural cracks often show diagonal patterns or stair-step formations. Random spider web patterns usually mean surface crazing from rapid drying during the original pour.
Warning signs that need professional help:
Cracks that widen during wet weather
Multiple cracks radiating from one spot
Cracks with vertical displacement (one side higher than the other)
Cracks accompanied by sinking or settling areas
Water pooling in or around crack areas
Check for movement too. Mark the ends of larger cracks with a pencil and date them. Come back in two weeks and see if they've grown. Active cracks need stabilization before any surface concrete patio crack repair will hold.
Consider the crack's location on your patio. Cracks near the house foundation or load-bearing areas are more serious than cracks in the middle of a decorative section. Edge cracks where the patio meets grass or gravel often result from soil movement and may need drainage improvements.
Document everything with photos. Measure crack lengths and widths. Note any staining, spalling, or crumbling around the crack edges. This information helps you choose the right repair method and track progress over time.
Tools and Materials for Concrete Patio Crack Repair
The right tools make concrete patio crack repair easier and more effective. You don't need professional equipment for most cracks, but having quality basics prevents frustration and ensures lasting repairs.
Essential cleaning tools:
Wire brush for removing loose debris
Shop vacuum with crevice attachment
Pressure washer or garden hose
Scraping tools (putty knife, old chisel)
Clean rags and paper towels
For crack preparation, you'll need cutting tools if the crack has loose edges. A hammer and cold chisel work for small areas. For longer cracks, a concrete grinding disc on an angle grinder creates clean, uniform edges that bond better with filler materials.
Application tools vary by repair method:
Caulk gun for tube-applied sealants
Trowels (6-inch and 12-inch) for patching compounds
Putty knives for small crack filling
Squeegee for self-leveling products
Brushes for primer application
Material selection depends on your crack assessment. Polymer-modified mortars work well for surface renovation and concrete patching because they bond better and resist cracking better than plain cement mixes.
For hairline cracks under 1/8 inch wide, liquid concrete crack fillers work best. They penetrate deep into narrow openings and cure to a flexible finish that moves with seasonal expansion and contraction.
Wider cracks need more substantial fillers. Professional contractors keep six essentials on hand for DIY concrete repair including vinyl concrete patcher for structural repairs and concrete patching compound for aesthetic fixes.
Material options by crack size:
Hairline to 1/8 inch: Liquid crack filler or polyurethane sealant
1/8 to 1/4 inch: Concrete crack filler or vinyl concrete patcher
1/4 to 1/2 inch: Two-part epoxy or polymer-modified patching compound
Over 1/2 inch: Professional-grade injection systems or full section replacement
Don't forget safety gear. Concrete dust irritates lungs and eyes. Wear safety glasses, dust masks, and work gloves. Some chemical products need better ventilation, so have a fan ready for enclosed areas.
Buy slightly more material than you think you need. Running out mid-project means waiting for the first application to cure before continuing, which can create visible seam lines in the finished repair.
Step 1: Clean and Prepare the Cracked Area
Preparation determines whether your concrete patio crack repair lasts five years or five months. Any dirt, oil, or loose concrete kills adhesion before it starts. Skip this step and watch your repair fail.
Start by removing all loose material from the crack. Professional concrete crack repair depends on adhesion, and adhesion depends on preparation . Use a wire brush to scrub out dirt, leaves, and crumbling concrete pieces.
For stubborn debris, try a pressure washer with a narrow tip. Hold it at an angle to avoid driving water deeper into the crack. The goal is removing loose material, not widening the crack.
Deep cleaning checklist:
Wire brush all crack surfaces
Vacuum out loose debris with shop vac
Scrub with stiff brush and clean water
Remove any oil stains with degreaser
Rinse thoroughly and allow to dry
Check for unstable edges around the crack. Tap gently with a hammer. Hollow sounds mean loose concrete that will break away later. Use a cold chisel to remove these weak areas now rather than having them fail after your repair.
Create clean, straight edges if possible. Irregular crack edges make it harder to get a smooth finish. A concrete grinding disc can square up the edges for a professional-looking result.
For oil stains or other chemical contamination, concrete patio crack repair requires complete removal before filling. Use a concrete degreaser and scrub with a stiff brush. Rinse multiple times until water beads evenly across the surface instead of being repelled.
Let everything dry completely before applying filler. Trapped moisture prevents proper bonding and can cause the repair to fail within months. In humid conditions, use a fan or wait for a dry day.
Prime the crack edges if using certain repair materials. Some polymer-modified patchers bond better with a thin coat of bonding agent applied first. Check your specific product instructions for priming requirements.
Step 2: Apply Concrete Crack Filler or Patching Compound
Now comes the actual concrete patio crack repair work. The application method depends on your crack size and chosen filler material. Take your time here because rushing leads to air bubbles, poor bonding, and repairs that fail early.
For hairline cracks, liquid fillers work best. Cut the applicator tip to match your crack width. Start at one end and move steadily along the crack, slightly overfilling to account for settling. The filler should penetrate deep into the crack, not just sit on the surface.
Application technique for liquid fillers:
Cut applicator tip at 45-degree angle
Apply steady pressure while moving along crack
Slightly overfill to allow for settling
Use putty knife to smooth excess immediately
Clean tools while material is still wet
Wider cracks need thicker patching compounds. Mix vinyl concrete patcher by adding about 10 ounces of water per 5 pounds of material , but remember that more water weakens the bond strength and compressive strength.
Mix only what you can use in 20-30 minutes. These materials start setting quickly once activated. For larger repairs, have a helper mix the next batch while you apply the current one.
Mixing and application for patch compounds:
Follow manufacturer's water ratios exactly
Mix for 3-5 minutes until lump-free
Let mixed material sit 5 minutes before use
Apply in layers using firm trowel pressure
Press first layer deep into crack before smoothing
Work the first layer deep into the crack with firm trowel pressure. This eliminates air voids that weaken the repair. For cracks over 1/4 inch deep, apply in multiple thin layers rather than trying to fill everything at once.
Watch for proper cure indicators. Most fillers change color slightly as they set. Professional application techniques show that timing the smoothing process correctly prevents surface defects.
Temperature affects cure time significantly. Hot days accelerate setting, giving you less working time. Cold weather slows curing and may require heating the area or using fast-setting products designed for cool conditions.
For two-part epoxy systems, measure components exactly. Even small ratio errors affect final strength and durability. Mix thoroughly but work quickly since pot life is usually under 30 minutes.
Common application mistakes to avoid:
Adding extra water to make mixing easier
Applying over damp or contaminated surfaces
Trying to fill deep cracks in single thick layer
Not pressing material firmly into crack bottom
Smoothing too early before material firms up
Keep mixed material covered when not actively applying. This prevents skinning over and extends working time. If material starts setting up in your mixing container, don't add water to extend it. Start fresh with a new batch.
Step 3: Smooth and Finish the Repaired Surface
A smooth finish makes your concrete patio crack repair invisible and prevents water from pooling in low spots. This step separates amateur patches from professional-looking results that blend smoothly with the existing surface.
Start smoothing when the filler reaches the right consistency. Too wet and it will sag or leave tool marks. Too firm and it won't level properly. Most concrete patches form a skin in 20 to 40 minutes and harden completely in 1 to 2 hours , so timing is critical.
Use a wet trowel for the smoothest finish. Dip your trowel in clean water and shake off excess droplets. The thin water film helps the trowel glide over the patch material without dragging or tearing the surface.
Professional smoothing techniques:
Hold trowel at shallow angle (15-20 degrees)
Use long, overlapping strokes
Work from edges toward center of patch
Clean trowel frequently to prevent buildup
Make final pass with light pressure only
For textured patios, match the existing surface pattern during finishing. Use a brush, broom, or specialized texturing tool while the patch is still workable. Practice on a test area first to get the pattern right.
Check the repair level carefully. Use a long straightedge or level to make sure the patch sits flush with surrounding concrete. High spots will show after painting or sealing. Low spots collect water and dirt.
Remove excess material promptly. Filler that squeezes out beyond the crack area is easier to clean up now than after it hardens. Use a damp cloth or sponge to wipe away squeeze-out without disturbing the main repair.
Protect the fresh repair during initial curing. Cover with plastic sheeting in hot weather to prevent rapid moisture loss. In cold conditions, insulate with blankets or use a space heater to maintain proper curing temperature.
Curing time guidelines:
Light foot traffic: 24 hours minimum
Normal use: 3-7 days depending on product
Heavy loads or furniture: 7-28 days for full cure
Sealing or painting: Follow manufacturer's schedule
Don't rush the curing process. Concrete patio crack repair materials gain strength gradually. Loading them too early can cause internal cracking that isn't visible until much later when the repair fails.
Monitor the repair during the first few days. Some settlement or minor cracking is normal as the material adjusts. Small imperfections can be touched up with additional filler after the initial cure is complete.
Preventing Future Concrete Patio Cracks
Fixing existing cracks is just half the job. Smart prevention keeps your concrete patio crack repair work from being undone and saves you from repeating the whole process in a few years.
Water management tops the prevention list. Pooling or ponding of water on the surface can be hazardous and can harm your concrete. Make sure water drains away from the patio rather than sitting in low spots.
Check your patio's slope after completing repairs. Water should flow toward drainage areas, not pool against the house foundation. A minimum slope of 1/4 inch per foot moves water effectively without being noticeable to users.
Drainage improvements that prevent cracks:
Clean gutters and downspouts regularly
Install drainage channels along patio edges
Add French drains in problem areas
Regrade soil to direct water away from concrete
Seal expansion joints to prevent water infiltration
Seasonal maintenance prevents small problems from becoming major concrete patio crack repair projects. Inspect your patio twice yearly, especially after freeze-thaw cycles and heavy rain periods.
Seal small cracks immediately when they appear. Using caulk or concrete repair products to fill in small cracks before they expand prevents worse damage. A $5 tube of crack filler beats a $500 repair job.
Consider applying a concrete sealer after your repairs cure completely. Quality sealers penetrate the surface and create a barrier against water, de-icing salts, and other damaging chemicals. Reapply every 2-3 years for continued protection.
Control what goes on your patio. Heavy furniture, grills, and planters can create point loads that exceed the concrete's strength. Use protective pads under furniture legs and avoid dragging heavy items across the surface.
Load management strategies:
Use furniture pads under heavy items
Rotate portable furniture locations occasionally
Avoid placing all weight on single spots
Clear snow and ice promptly to prevent freeze-thaw damage
Don't use metal shovels or sharp tools on the surface
Temperature cycling causes expansion and contraction that stresses concrete. While you can't control weather, you can minimize its effects by keeping expansion joints clean and functional. Caulk or seal these joints to prevent water infiltration while allowing movement.
Once your patio is properly repaired and protected, consider enhancing it with outdoor shade solutions to reduce UV exposure and heat cycling. Quality patio umbrellas from Umbrello can provide protective coverage while adding style to your newly restored outdoor space.
Frequently Asked Questions
How long do concrete patio crack repairs typically last?
Most concrete patio crack repair work lasts 5-10 years when done properly with quality materials. The lifespan depends on crack size, repair method, weather exposure, and ongoing maintenance. Hairline crack repairs using flexible sealants often last longer because they accommodate seasonal movement. Larger structural repairs may need professional assessment after severe weather or ground movement. Regular inspection and prompt touch-ups of small issues extend repair life significantly.
Can I do concrete patio crack repair in cold weather?
Most concrete crack fillers require temperatures above 50°F for proper curing, though some cold-weather products work down to 35°F. Cold slows chemical reactions and can prevent proper bonding. If you must work in cold conditions, use fast-setting materials designed for low temperatures, protect the repair area with tarps or heaters, and extend curing time. Plan concrete patio crack repair projects for mild weather when possible for best results and easier working conditions.
What's the difference between crack filler and patching compound?
Crack fillers are liquid or semi-liquid materials designed for narrow openings up to 1/4 inch wide. They penetrate deep and cure flexible to accommodate movement. Patching compounds are thicker, mortar-like materials for wider cracks and surface repairs. They provide structural strength but less flexibility. Choose crack filler for hairline to small cracks, patching compound for wider damage or when you need to rebuild missing concrete sections in your repair project.
How do I match the color of existing concrete during repair?
Most concrete patio crack repair materials dry to a light gray color that may not match weathered concrete. You can add concrete colorant to some fillers before application, or paint the entire patio after repairs cure. Test color matches on a hidden area first. Some contractors apply a concrete stain or sealer over the whole surface to create uniform appearance. Accept that repairs may show slightly until they weather naturally over 6-12 months.
Should I hire a professional or do concrete patio crack repair myself?
DIY concrete patio crack repair works well for hairline to 1/4-inch cracks that aren't actively growing. You'll save money and gain skills for future maintenance. Call professionals for cracks over 1/4 inch, actively widening cracks, structural damage, or if multiple large cracks appear suddenly. Professional work costs more upfront but includes warranties and proper diagnosis of underlying problems. Consider your skill level, available time, and the repair's importance to your home's value when deciding.
What tools do I absolutely need for basic crack repair?
Essential tools for concrete patio crack repair include a wire brush for cleaning, shop vacuum for debris removal, putty knife or trowel for application, and safety gear including gloves and eye protection. A caulk gun works for tube-applied fillers. Add a hammer and cold chisel for removing loose concrete, and a garden hose for cleaning. Most homeowners already own these basic tools. Avoid buying expensive specialty equipment for simple repairs unless you plan regular maintenance work.
How soon can I walk on repaired concrete cracks?
Most concrete patio crack repair materials allow light foot traffic after 24 hours, but full curing takes 3-7 days for normal use. Fast-setting products may be ready sooner, while structural repairs need longer cure times. Check manufacturer specifications for your specific product. Heavy furniture, vehicles, or high-impact activities should wait for complete curing. Protect fresh repairs from rain, extreme temperatures, and disturbance during this critical period. Rushing can cause repair failure requiring complete redo of the work.
Why do some crack repairs fail and need redoing?
Failed concrete patio crack repair usually results from poor surface preparation, using wrong materials for crack type, or applying during bad weather conditions. Skipping cleaning steps, working over damp surfaces, or rushing cure times cause bond failure. Using rigid fillers in moving cracks leads to re-cracking. Temperature extremes during application affect chemical curing. Active underlying problems like soil settlement or drainage issues cause new cracks adjacent to repairs. Proper diagnosis and preparation prevent most failures in crack repair projects.
Conclusion
Concrete patio crack repair doesn't have to be intimidating or expensive. With proper assessment, the right materials, and careful application, you can fix most cracks yourself and prevent future damage. Remember that preparation is more important than the repair material itself.
Start by identifying your crack type and size to choose appropriate repair methods. Clean thoroughly, apply materials according to manufacturer instructions, and protect repairs during curing. Don't skip the prevention steps that keep new cracks from forming.
For minor cosmetic cracks, DIY concrete patio crack repair saves money and gives you valuable maintenance skills. Larger structural cracks or rapidly growing damage needs professional assessment to avoid costly mistakes.
Regular inspection and prompt attention to small cracks prevents major repair projects later. A few minutes twice yearly checking your patio condition saves hours of repair work and hundreds in contractor costs.
If you're dealing with extensive damage, structural concerns, or simply want professional results with warranty protection, LGFMH Construction specializes in interior and exterior repairs throughout Virginia Beach and surrounding areas. Sometimes calling in experts is the smartest investment in your home's long-term value and your peace of mind.


Comments