Drywall Installation and Finishing: A Complete Guide for Homeowners
- William McKracherne
- Feb 25
- 18 min read

Ever walked into a room and felt that something's off—like the walls just aren't smooth, or there's a faint echo when you tap the corner? That uneasy feeling is the moment most homeowners realize they're staring at a drywall dilemma.
Maybe you just moved into a place with patchy seams, or perhaps a recent renovation left you with a few unsightly cracks. You know the drill: you grab a paintbrush, hope for the best, and end up with a lopsided finish that screams "DIY gone wrong." Sound familiar?
And that's the whole reason drywall matters. It's the canvas behind every coat of paint, the backdrop for your furniture, and the barrier that keeps your home insulated and safe. When it's done right, you barely notice it. When it's off, every imperfection jumps out.
So, what can you actually do to turn that frustration into a flawless wall? In this guide, we'll walk through everything from picking the right type of drywall for your project to mastering joint tape and mud, plus a few pro tips we’ve picked up at LGFMH Construction over the years.
Think about it way: imagine a weekend where you finally finish that bedroom makeover without a single drip of mud on the floor, and the walls look like they were installed by a seasoned pro. That's the kind of result we’re aiming for.
We'll cover how to assess your space, choose between standard, moisture‑resistant, or fire‑rated sheets, and the tools that make the job smoother. Then we'll dive into the step‑by‑step process of hanging, taping, and sanding—so you can avoid common pitfalls like visible seams or sagging panels.
By the end, you'll have a clear roadmap that demystifies drywall, gives you confidence to tackle the job yourself, and lets you know when it's smarter to call in a professional. Ready to get those walls looking picture‑perfect?
TL;DR
Drywall may look simple, but picking the right board, mastering taping and mud, and sanding properly can mean the difference between a flawless wall and rework.
Follow our guide to assess your space, choose moisture‑resistant or fire‑rated sheets, and apply pro techniques that LGFMH Construction trusts for smooth, paint‑ready results.
Choosing the Right Drywall Type
Picture this: you’re standing in a half‑finished room, sheetrock panels stacked like cardboard boxes, and you’re wondering which one actually belongs on the wall. It’s a surprisingly common snag – the wrong drywall can turn a smooth finish into a nightmare of cracks, moisture, or even fire worries.
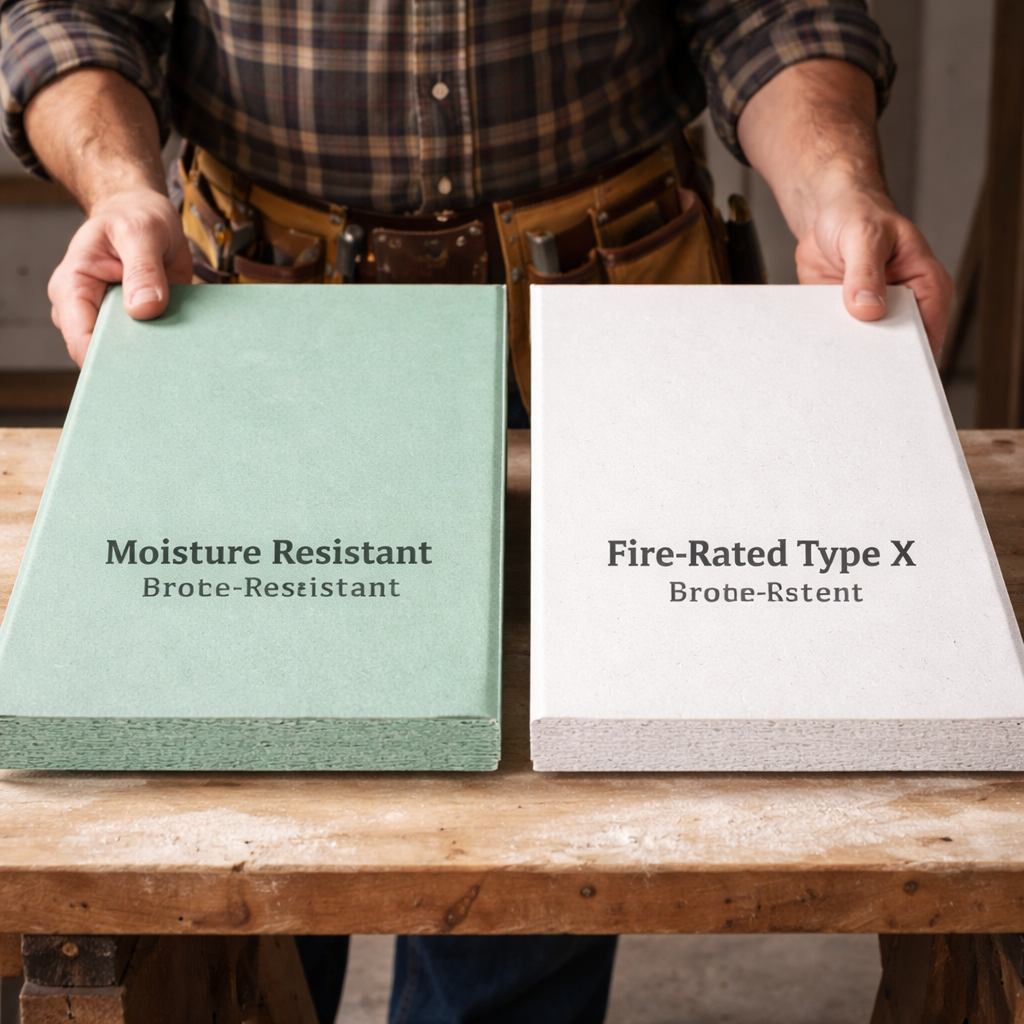
First off, ask yourself what the space will see day‑to‑day. A bathroom or a laundry room? A kitchen that steams up? Or a living room that just needs a fresh canvas? The answer steers you toward the two heavy hitters:green board(moisture‑resistant) andtype X(fire‑rated).
Moisture‑Resistant Drywall (Green Board)
If you’ve got any splash zone – think showers, tub surrounds, or even a basement that sees occasional puddles – green board is your friend. It’s engineered with a water‑repellent core that won’t swell the way regular drywall does when it gets damp.
We’ve seen homeowners in coastal Virginia Beach swear by it when a leaky pipe tried to ruin a fresh paint job. The board held up, and the repair cost stayed low. Just remember: green board isn’t waterproof; it still needs proper vapor barriers behind it.
Fire‑Rated Drywall (Type X)
Living rooms, hallways, or any area that code demands a fire‑resistance rating – that’s where Type X shines. It contains glass fibers that slow flame spread, buying you precious minutes in the event of a fire.
Our crew at LGFMH often recommends it for garages attached to homes. The extra half‑inch of thickness isn’t a big deal, but the peace of mind? Priceless.
And what about the good‑old regular white board? It’s perfect for interior spaces that stay dry and don’t need fire protection, like bedrooms or closets. It’s lighter, cheaper, and easier to cut.
So, how do you decide? Make a quick checklist: moisture exposure? fire code? budget? If you tick both moisture and fire, you might even layer green board over Type X – a combo some pros use for bathrooms that double as fire‑rated zones.
Here’s a tip that saves time: before you even buy the sheets, measure the square footage of each room and add 10 % for waste. That way you won’t be stuck on a job site with half a pallet and no place to store the rest.
We also like to point folks to our Comprehensive Sheet Rock Guide for a deep dive on installation tricks. It walks you through hanging patterns, screw spacing, and why a “staggered” layout can reduce future cracking.
While you’re watching that video, think about the finish you want. Do you prefer a perfectly flat surface for modern art, or a slightly textured look for a rustic vibe? The choice of drywall can affect how easy it is to achieve that finish.
Another angle to consider is the partnership angle. After the drywall is up, many homeowners add ambient lighting to highlight their new walls. If you’re in the Tampa Bay area, you might check out LED Artistry’s outdoor lighting solutions – they complement interior work nicely and can turn a simple wall into a design statement.
And don’t forget the aftermath of a fire. If you ever face that scenario, a solid fire‑rated wall is just the first step. You’ll need a restoration crew to clean up soot and smoke before you can re‑hang new panels. A trusted partner for that is Disaster911’s fire‑damage restoration guide, which walks you through safe assessment and the rebuild process.
Bottom line: the “right” drywall isn’t a one‑size‑fits‑all answer. It’s a match between environment, code, and budget. Take a moment, list the room’s demands, and pick the board that checks the most boxes.
Essential Tools and Materials for Drywall Projects
Alright, you’ve picked the right type of drywall, now it’s time to talk about the gear that actually makes the job doable. I know the idea of a toolbox can feel overwhelming—especially when you’re staring at a wall that’s begging for a smooth finish. Trust me, we’ve been there, and the right kit can turn "meh" into "wow" faster than you can say "joint compound".
So, what should you have on hand before you even step onto the job site? Below is the "must‑have" list we rely on at LGFMH Construction, broken down into three practical buckets: cutting, mudding, and finishing.
Cutting and Measuring Essentials
First things first: a good tape measure and a sharp utility knife. It sounds basic, but a dull blade is the single biggest time‑waster. We like the 12‑inch utility knives with replaceable blades—they’re cheap, and you’ll never fight a stubborn cut again.
Next up, a drywall saw or jab saw for those odd‑shaped openings around windows and outlets. If you’re dealing with larger sheets, a cordless rotary cut‑out tool saves you from hand‑saw fatigue. Pair it with a straight edge or T‑square for accurate, straight cuts.
Pro tip: mark your cut line with a pencil, then score with the knife before snapping. It gives you a clean edge without chipping the paper face.
Tools for Mudding (Joint Compound)
Now we get to the fun part—applying mud. A sturdy mud pan is your workstation. For most DIYers the plastic Edward Tools pan works fine, but if you’re doing a full‑scale remodel, the stainless‑steel ProRock 12" pan offers durability and a non‑slip grip that keeps the mud from sliding off your knuckles.
When it comes to knives, you’ll want a 6‑inch taping knife for the first coat, a 10‑inch knife for the second, and a 12‑inch knife for the final skim. The Goldblatt Drywall Hand Tool Kit bundles these sizes with ergonomic handles that reduce hand fatigue over long sessions.
For a smoother, faster finish, consider a drywall mud pump like the LEVEL5 2‑Inch Compound Pump. It delivers consistent pressure and cuts down on the number of passes you need to make. We’ve seen crews cut their sanding time by up to 30% when they switch to a pump.
Need a reliable joint compound? The DAP 10100 3‑pound all‑purpose mud is a fan favourite for both pros and DIYers, thanks to its minimal shrinkage and easy sanding. Read the full review of top drywall mud brands for more options.
Finishing Gear
Once the mud is dry, you’ll need a sanding block or a pole sander for those high ceilings. A fine‑grit (120‑150) sanding screen works well for the final skim; just remember to wear a respirator—drywall dust is no joke.
Corner beads are another hidden hero. Metal beads give you a crisp edge, but for older homes with plaster underneath, a flexible vinyl bead prevents cracking.
Don’t forget a quality screwdriver or drill with a drywall bit set. Driving screws at the right depth (just below the paper surface) prevents nail pops later on.
Here’s a quick checklist you can print and take to the store:
12‑inch utility knife + replaceable blades
Tape measure (25‑ft)
Drywall saw or jab saw
Rotary cut‑out tool (optional)
Sturdy mud pan (plastic or stainless)
6‑, 10‑, and 12‑inch taping knives
Goldblatt or similar ergonomic hand‑tool kit
LEVEL5 compound pump (for larger jobs)
DAP 10100 joint compound (or preferred brand)
Sandpaper or sanding screen (120‑150 grit)
Corner beads (metal or vinyl)
Drywall screw set and drill/driver
Respirator and safety glasses
Does this feel like a lot? It does at first, but think of it as an investment: the right tools cut your labor time in half and keep the finish looking professional.
And just to make sure you’re not missing anything visual, check out this short video that walks through the basic tool setup and a quick mud‑application demo.
Notice how the presenter uses a 6‑inch knife for the first coat and then follows with a wider knife for the skim? That’s the same technique we teach our crew because it levels the surface without over‑building the mud.
Pro Tips from the Field
1. Mix only the amount of mud you can use in 30‑45 minutes. It thickens quickly, and working with a thick batch makes sanding harder.
2. Before the first coat, lightly dust the drywall surface with talc. It reduces suction and helps the mud adhere better.
3. When you’re sanding the final coat, use a light‑touch motion and keep the sander moving. Holding still creates low spots that will show up after paint.
4. If you’re installing drywall in a high‑humidity basement, pair moisture‑resistant green board with a vapor barrier. It’s a small extra cost that pays off in durability.
5. Finally, always have a spare set of knives. The edges dull fast, and a dull blade can gouge the paper, leaving you with a patchy finish.
Ready to gather your kit? With the right tools in hand, the drywall process becomes less of a mystery and more of a satisfying craft. Grab this list, head to the supply store, and you’ll walk away feeling like you’ve got a professional’s toolbox—without the professional price tag.
Step‑by‑Step Drywall Installation
You’ve got the walls to cover. You want drywall that sits flat, seams that vanish, and paint that goes on easy. Let’s walk through a practical, field‑tested sequence for hanging, taping, mudding, and finishing.
In our experience at LGFMH Construction, prep is 80% of the job. Skip it and you’ll see the flaws later. So we’ll start with a simple, sensible plan you can actually follow this weekend.
1. Plan, protect, and prep
Protect floors with old sheets, and mask nearby trim. Do a quick stud check with a magnetic finder; mark lines where the studs are so you know where to drive fasteners. If you’re working in a damp space, decide now whether you’ll need a vapor barrier behind the panels.
Measure twice, cut once. A clean layout reduces waste and makes the install look professional from day one.
2. Hang the drywall sheets
Team up for lifting—two people makes this painless. Start at a corner, bring the sheet to the lines you marked, then fasten along the studs. Space the screws about every 8 inches along edges and roughly 16 inches in the field for standard 1/2" drywall. For ceilings, keep edges around 7‑8 inches apart and the field within 12 inches. These spacing guidelines help prevent ridges and sag later on.
Tip: drive screws just below the paper surface, then wipe off any dust and counter‑sink only if you’re using premium drywall screws.
For a quick visual primer on hanging and mudding, you can check this drywall installation technique video here: drywall installation technique video .
3. Tape the seams
With the sheet in place, apply a thin bead of joint compound over the seam. Press the paper tape into the mud with a 6" knife, work from the center outward to remove air. Let it dry per the compound’s instructions, usually a few hours in normal conditions.
Two more coats are typical: a wider first skim and a final feathered coat. A common mistake is rushing the mud and leaving ridges; take it slow and smooth.
4. Sand and clean
Lightly sand the first skim with a fine grit, wearing a respirator. Check for low spots; if you see any, apply a touch‑up mud and re‑sand. Keep your sander moving to avoid creating new ridges.
Pro tip: sand dust goes everywhere—cover adjacent surfaces and vacuum often during this stage.
5. Second coat, final skim, and finish
Apply a second coat that’s even softer and wider than the first. The goal is a seamless surface that’s ready for primer. Feather edges to blend into the wall, then do a last light sand. This is the moment paint sees the smooth finish you worked so hard for.
What we’ve seen: taking the time now saves hours in sanding and repainting later. If you’re unsure about achieving a flawless finish, we can handle the mudding and finishing.
Want to double‑check your approach? The drywall screw spacing guidelines are a helpful reference: drywall screw spacing guidelines .
Finishing Techniques for a Smooth Surface
You’ve hung, taped, and skimmed through the tougher steps, and now you're at the finishing phase. This is the moment that decides whether your walls look glassy smooth or just a little rough around the edges.
In our experience at LGFMH Construction, taking a careful feathering approach saves hours of touch‑ups later. You want the mud to fade into the drywall, not sit as a visible ridge under paint.
Feather the seams, not plaster a thick edge
Feathering is the secret sauce. Work the seam with a wide knife to blend the joint into the surrounding wall, then ease off so the mud tapers away. If you can see a seam under light, you probably didn’t feather enough. You’ll thank yourself when the primer goes on and the edge disappears.
Does this really make a difference? Yes—a well‑feathered edge catches light evenly and eliminates that “stair-step” look you’ve probably battled before.
Sand smart, not hard
Final sanding is all about control. Use 120–150 grit sanding screens and keep the sander moving with light passes. Let the dust settle, then wipe the surface to confirm you’ve got a flat plane. Over‑sanding can dull the texture and create new imperfections you’ll notice once the paint dries.
One quick trick: a tack cloth or damp microfiber sweep helps verify high spots without turning the room into a dust bowl. So you’re really seeing the wall, not the sanding residue.
Environment and timing matter
Mudding dries differently with humidity and temperature. If the room is especially humid or cold, extend drying times before a light re‑sand. Rushing this step often means you’ll be chasing pinholes and tiny ridges after you prime.
Plan for a calm day to finish, and don’t skip the final wipe‑down. A clean surface is the foundation for a flawless paint job.
Prime, then paint with confidence
Prime to reveal true surface texture and to seal the mud. If you’ve got water stains or a high‑humidity space, choose a primer designed for damp walls and stain‑blocking properties. This simple step makes a big difference in how paint looks when it cures.
For a quick visual guide, you can check two concise walkthroughs: drywall finishing techniques video and practical finishing walkthrough .
So, what’s next? If you’re aiming for near‑perfect drywall, commit to feathering, use smart sanding, and give the surface a proper primer. If you’d rather have us tackle the mudding and finishing, LGFMH Construction can handle the smooth finish so you can focus on painting with confidence.
Common Drywall Mistakes and How to Fix Them
Ever stood back after a day of mudding and thought, "Why does this seam still look like a ridge?" You're not alone. Most DIYers hit the same snags – over‑driven screws, rushed taping, or forgetting to let mud cure properly. The good news? Each of those hiccups has a simple fix, and you can spot them before they turn into costly re‑work.
1. Screws too deep or not deep enough
If you drive a screw so far it tears the paper, the drywall surface will dip once the mud dries. On the flip side, a screw that’s barely in the board leaves a weak point that can pop later. The sweet spot is just below the paper surface – you should see a tiny dimple, not a crater.
How to fix it:
Use a drywall screw setter or a drill with a clutch set to 1‑1.5 mm.
After all screws are in, run a drywall knife over the dimple to flatten it before the first coat of mud.
USG’s fastener‑related installation guide even recommends checking screw depth with a feeler gauge to keep consistency across the wall USG fastener guide .
2. Rushed joint‑taping
We’ve all been tempted to slap the tape on a wet seam and move on. The result? Air bubbles, ridges, and a surface that never truly flattens. Think about it like trying to smooth out a wrinkle in a shirt while it’s still damp – you’ll just push the wrinkle around.
Step‑by‑step fix:
Apply a thin coat of joint compound (the “breaker” coat) and let it set until it’s tacky, not fully dry.
Press the paper tape into the mud using a 6‑inch knife, working from the center outward to squeeze out air.
Let that coat dry completely before moving to the wider skim coat.
Patience here saves you hours of sanding later.
3. Skipping the “feather” coat
Imagine you’ve just sanded a wall and there’s still a faint line where the seam meets the sheet. If you go straight to a final skim, that line will stay visible under paint. The feather coat is the bridge that blends the seam into the surrounding drywall.
What to do:
After the first skim, sand lightly with 120‑grit screen – just enough to knock down high spots.
Apply a second, wider coat (10‑12 inch knife) and feather the edges out 6‑8 inches beyond the seam.
Finish with a light skim to create a uniform plane.
4. Ignoring humidity and temperature
Drywall mud dries slower in humid or cold rooms, which can cause cracking or shrinkage. One of our Virginia Beach projects went sideways because the basement stayed at 55 °F and 80 % humidity for two days. The mud never set right, and we ended up with hairline cracks.
Pro tip: Use a portable heater or de‑humidifier to keep the space around 70 °F and 50‑60 % humidity. If you can’t control the environment, extend drying times and do a gentle re‑sand before the next coat.
5. Using the wrong type of joint compound
All‑purpose mud is versatile, but it’s not always the best choice for every step. For the first “breaker” coat, a setting‑type compound (often called “hot mud”) dries faster and shrinks less. For the final skim, a lightweight all‑purpose mud gives you a smooth finish with less sanding.
Quick checklist:
First coat – setting‑type (e.g., 45‑minute or 90‑minute).
Second and skim coats – lightweight all‑purpose.
6. Not cleaning dust between coats
Dust is the silent saboteur. A thin layer of dust on a wet coat will cause the next layer to lift or bubble. Wipe the wall with a tack cloth or a damp microfiber rag after each sanding pass.
That tiny step makes a world of difference when you finally prime and paint.
Common Mistake Quick‑Fix Table
Mistake | Typical Cause | How to Fix |
Over‑driven or under‑driven screws | Incorrect drill depth or lack of a screw setter | Use a clutch‑drill set to 1‑1.5 mm; flatten dimples before mudding |
Rushed taping | Applying tape on wet mud or skipping the breaker coat | Apply a thin tacky coat, embed tape, let dry fully before skim |
Missing feather coat | Going straight from first skim to final coat | Sand lightly, apply wider second coat, feather edges 6‑8 in |
So, what’s the next move? Grab a screwdriver, check your screw depth, and give that first coat a little extra drying time. It feels like a small extra step, but the payoff is a wall that looks ready for paint on the first try.
If you’d rather skip the guesswork, LGFMH Construction can handle the mudding and finishing – we’ve seen those common pitfalls vanish under a pro’s hands.
Drywall Maintenance and Repair Tips
Drywall is surprisingly tough, but it wears differently than the rest of your walls. It hates moisture, hates leaks, and hates being poked by a heavy chair leg. Left unchecked, a small stain can turn into a soft spot that bounces when you press on it.
Watch for the quiet signs: water stains that spread, paint that bubbles, seams that start to curl, or a musty smell creeping along a baseboard. These aren’t cosmetic queen bees; they’re a warning that moisture is moving behind the surface.
In our experience, catching trouble early saves you both money and headaches. If you suspect hidden moisture or mold behind the wall, check out SERVPRO's guidance on water-damage signs and response. SERVPRO water damage guide.
So, what should you do first after you notice a leak or dampness? Start with control: stop the water at the source if you can, dry the area thoroughly with towels, fans, and a dehumidifier, and remove any surface coverings that trap moisture. This isn't glamorous, but it's the move that keeps the repair simple.
Keep the space ventilated; run exhaust fans in bathrooms and kitchens to stop moisture from hanging around.
Document the extent with photos so you know what you’re dealing with later.
If the wet area is larger than a couple of square feet, plan on cutting out and replacing the damaged drywall rather than patching repeatedly.
For a localized dent or small patch, you can repair like this: cut a clean square around the damaged area, replace with the same thickness sheet, secure it, then tape the joints and mud carefully. Start with a thin breaker coat to embed the tape, let it dry, then add a wider skim coat and feather the edges 6–8 inches. Sand lightly and wipe with a tack cloth before priming. If you want a step-by-step visual, a drywall finishing techniques video can help you see the feathering and sanding in action. drywall finishing techniques video .
What about bigger damage or hidden concerns? If there’s sagging, crumbling paper, or mold growth behind the surface, you’re probably looking at replacement rather than patching. In those cases, we recommend cutting back to solid studs, installing a fresh sheet of drywall (1/2" standard or 5/8" if fire-rating is needed), applying joint compound with proper tape, and then finishing with gentle sanding and primer. This is where a pro approach pays off—consistent screw depth, proper ventilation, and a clean, smooth plane that’s ready for paint.
Moisture control matters most after repair. If humidity stays high, even a perfect patch can fail early. Consider moisture-resistant or mold-resistant drywall in damp spaces and pair it with a vapor barrier behind the panels. And if you’d rather we handle the mudding and finishing, LGFMH Construction can take care of the whole process—from patch to paint—so you don’t have to worry about rework.
Drywall maintenance isn’t a one-off task. It’s a habit. Check for stains, test for softness, and keep humidity in check with a dehumidifier or better ventilation. It’ll save you time, money, and the drama of a wall that’s never quite right.
Conclusion
We've walked through everything from picking the right board to sanding a feather‑light finish, so you now have a clear roadmap for any drywall project.
Remember, the biggest enemy is moisture – a tiny leak can turn a perfect seam into a soft spot in weeks. Keep humidity in check, use a vapor barrier where needed, and choose moisture‑resistant panels for bathrooms or basements.
Tool‑wise, a sharp utility knife, a set of taping knives, and a reliable sand‑screen are the minimum. If you can add a mud pump for larger jobs, you’ll shave hours off sanding time.
And what about the finishing touches? A light coat of primer reveals any low spots before paint, so you avoid surprise ridges later.
So, what’s the next move? Grab your checklist, double‑check screw depth, and give the mud enough time to cure. A little patience now saves a lot of sanding later.
In our experience, homeowners who stick to these basics see a smoother wall and fewer touch‑ups. If you’d rather skip the guesswork, LGFMH Construction can handle the mudding, sanding, and painting for you.
Ready to turn that rough wall into a show‑ready surface? Give us a call or drop a note on our website – we’ll help you finish strong.
FAQ
What’s the best way to choose the right drywall thickness for my project?
Start by looking at the room’s purpose. For most ceilings and interior walls, 1/2‑inch works fine, but if you’re hanging drywall over a garage, a furnace room, or a high‑traffic hallway, bump up to 5/8‑inch. The thicker sheet adds fire‑rating (Type X) and helps level out stud gaps. Measure the stud spacing, add a little extra for waste, and run the numbers before you buy.
How can I tell if my drywall needs a moisture‑resistant board?
If the space sees any splash, steam, or high humidity—think bathrooms, kitchens, basements, or laundry rooms—go with green board or a mold‑resistant variant. A quick visual test: tap the surface; a hollow sound usually means standard gypsum, while a denser feel hints at a moisture‑ready core. Pair the board with a vapor barrier behind it, and you’ll dodge future soft spots.
Why do my screw heads leave dimples, and how do I fix them?
Over‑driven screws tear the paper, creating tiny valleys that show up after mudding. The sweet spot is just below the paper surface—a shallow dimple you can’t see without a magnifier. Use a drill with a clutch set to 1‑1.5 mm, or a dedicated screw‑setter. After you’ve driven all screws, run a 6‑inch taping knife over the dimples to flatten them before the first mud coat.
What’s the difference between “all‑purpose” mud and “setting‑type” mud?
All‑purpose mud is ready‑to‑mix and stays workable for a while, making it great for the final skim coat. Setting‑type (sometimes called “hot mud”) comes in powder, you add water, and it hardens in a set time—45, 90, or 120 minutes. Because it shrinks less, it’s perfect for the first “breaker” coat, especially when you need a strong base on high‑humidity walls.
How often should I sand between coats, and what grit is ideal?
Lightly sand after every coat except the final skim. Use a 120‑150 grit sanding screen for the first and second coats; it removes high spots without gouging the paper. For the last skim, a finer 180‑220 grit screen smooths the surface just enough for primer. Always wear a respirator and wipe the wall with a tack cloth before moving on.
Can I install drywall myself in a small bathroom, or should I call a pro?
If you’re comfortable with basic carpentry—measuring, cutting, driving screws—you can tackle a half‑bath on your own. The trickier part is getting those tight corners and waterproofing right. A mis‑aligned joint or missing vapor barrier can lead to mold down the line. When in doubt, a quick consult with LGFMH Construction can save you headaches; we’ll spot‑check the install and handle the mudding if you prefer.
What maintenance steps keep drywall looking fresh for years?
First, control humidity: run exhaust fans in wet rooms and consider a de‑humidifier in basements. Second, inspect seams yearly—look for cracks, bulges, or paint bubbling. If you spot a soft spot, cut out the damaged area, replace with the same thickness board, and feather the joints with lightweight mud. Finally, a high‑quality primer before repainting seals the surface and catches any lingering imperfections.


Comments