How to Fix a Leaky Patio Door Seal: A Step-by-Step Guide
- William McKracherne
- 3 days ago
- 8 min read

Ever watched a rainstorm turn your patio into a mini pool and wondered why water sneaks in through that sleek sliding door? You're not alone. A leaky patio door seal is one of the most common and annoying home issues. But here's the good news: fixing it is doable. In this guide, you'll learn exactly how to fix a leaky patio door seal, from finding the leak to testing your repair. Whether you're a DIY rookie or have some experience, these steps will help you stop the water for good.
Step 1: Identify the Source of the Leak
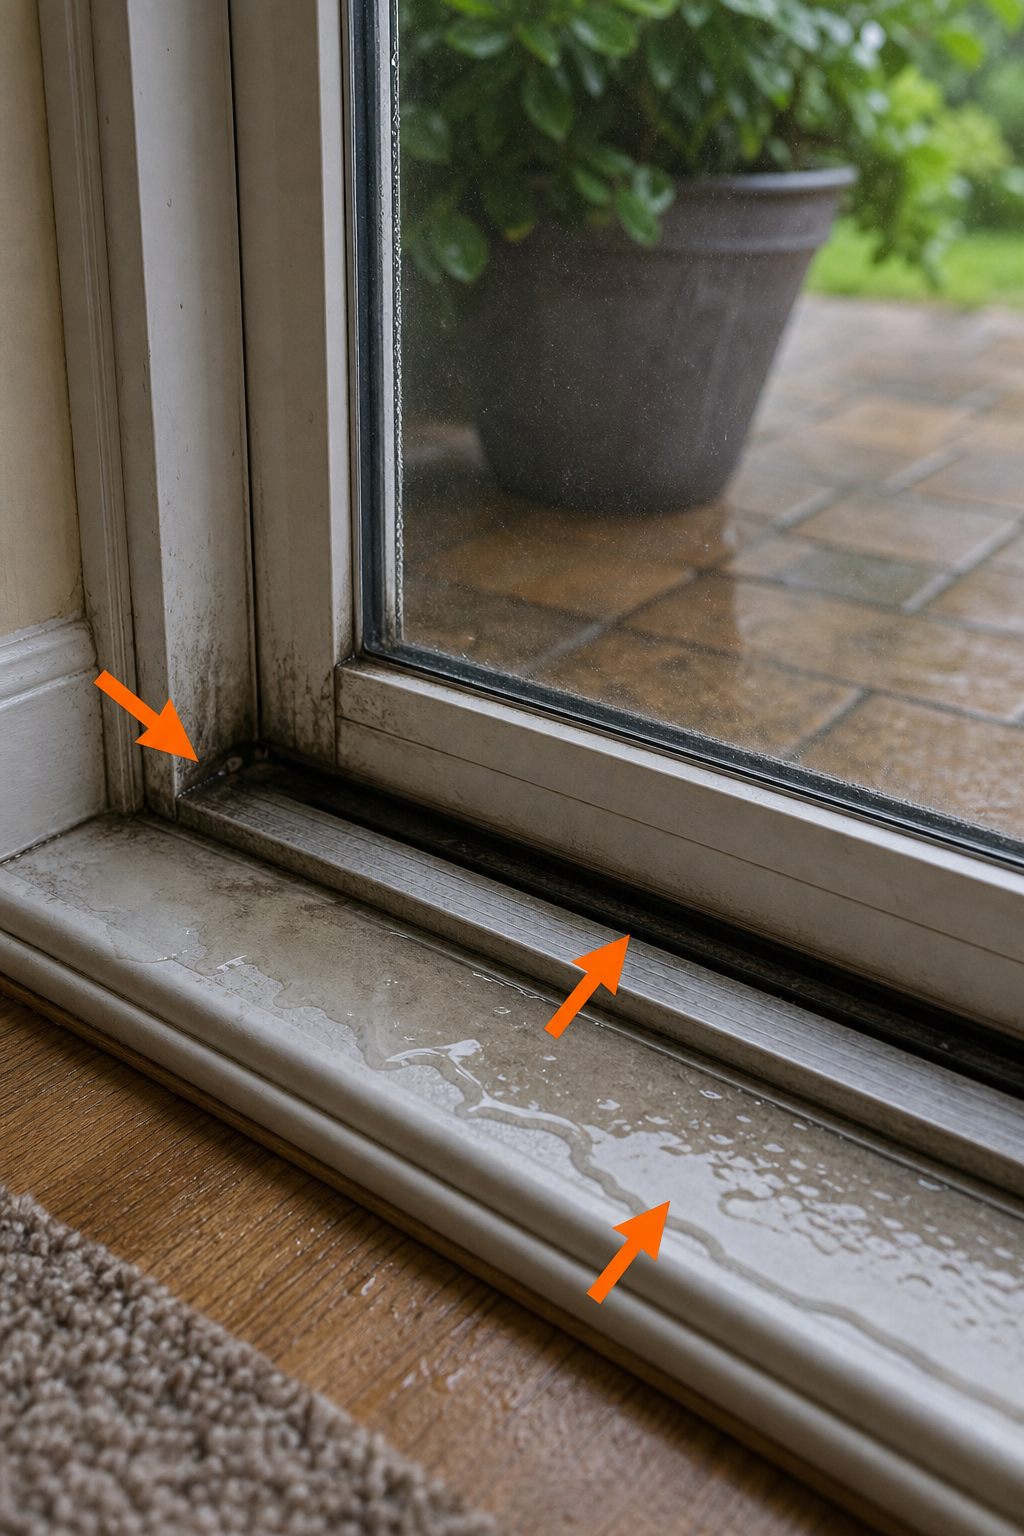
Before you can fix a leaky patio door seal, you need to know exactly where the water is coming from. Start by inspecting the door during a rainstorm or simulate one with a garden hose. Spray water at the top, sides, and bottom of the door while someone inside watches for drips. Common trouble spots include the corners where the door meets the frame, the bottom track, and the drain holes.
Pay special attention to the drain holes along the bottom track. These holes let water escape, but if they're plugged with debris, water can pool and leak inside. As shown in a popular YouTube repair video, weatherstripping failure often happens at the corners. Use a flashlight to look for gaps or daylight between the door and the seal.
Check the Drain Plugs
Some sliding doors have removable drain plugs at the bottom. If the door was installed upside down, those plugs might be in the wrong holes, blocking drainage. Check the bottom track for small plastic plugs. If you see one, try moving it to the other hole to allow water to escape. This simple fix can stop leaks without replacing any seal.
Key Takeaway:Finding the exact leak location saves time. Focus on corners, the bottom track, and drain holes first.
Step 2: Gather the Right Tools and Materials
To fix a leaky patio door seal, you'll need a few tools and materials. Most of these you probably already have. Having everything ready before you start makes the job smoother. Here's what you'll need:
Utility knife, for cutting old weatherstripping and trim.
Flat screwdriver, to pry off old seals and gently lift stops.
Putty knife, for scraping off old adhesive without scratching the frame.
Caulk gun and silicone caulk, for sealing gaps around the frame or using as a secondary seal.
Hammer and block of wood, to tap in kerf-style bottom seals without damaging them.
Tape measure, to measure the door perimeter for new weatherstripping.
Rubbing alcohol and clean rags, to clean the frame before applying new seal.
Sandpaper (fine grit), to smooth rough spots.
Replacement weatherstripping, choose the type that matches your door (foam tape, V-strip, kerf-in, or tube silicone).
If you're a contractor managing multiple repairs, simplifying your workflow can save time. That's where automation tools like EdgeLancer's n8n workflow templates come in handy for scheduling and client communication.
Pro Tip:Use a tongue depressor or thin piece of wood to work sealant into narrow cracks. It's a trick from the pros.
Step 3: Remove the Old Weatherstripping Safely
Now it's time to pull off the old, worn-out seal. Start at a corner of the door frame. Use a utility knife to cut a small piece (about 2 inches) of the old weatherstripping. This gives you a starting point. Then, using a flat screwdriver, gently pry the seal away from the frame. Be careful not to scratch the paint or damage the door.
If your door has a parting stop (common on sliding doors), you may need to remove it first. from Kolbe Windows & Doors, you must tap the metal base with a screwdriver to separate the cap from the base. Remove the screws holding the base, then lift the stop off with pliers. Repeat on the side jamb.
For bottom seals, look for kerf-style strips that snap into a groove. You can often pop them out with a screwdriver. If the seal is glued on, use a putty knife to scrape it off. Remove any leftover adhesive with rubbing alcohol.
Tips for Stubborn Seals
If the old weatherstripping is stuck tight, apply heat from a hair dryer to soften the adhesive. Work slowly. Rushing can crack the frame. Once all pieces are removed, inspect the area for silicone residue that needs cleaning before you install the new seal.
Step 4: Clean and Prepare the Door Frame
A clean surface is critical for a new seal to stick. After removing the old weatherstripping, wipe down the entire frame with rubbing alcohol or a mild detergent. This removes dirt, oil, and leftover adhesive. Use fine-grit sandpaper to smooth any rough spots or old caulk residue. Focus on the edges where the new seal will sit.
Don't forget the track. Vacuum out any debris from the bottom track. Dirt can prevent the new seal from seating properly. s like EPB's energy tips , cleaning the track also improves door operation. Dry everything thoroughly before moving on.
If you notice any gaps or damage to the frame itself, fill them with wood filler or silicone caulk. Let it dry completely before applying the new seal. A little prep now saves headaches later.
Step 5: Apply the New Seal , Three Effective Methods
Now comes the main event: installing your new weatherstripping. There are three common methods, each best for different door styles. Choose the one that matches your door's design.
Method | Best For | How To | Pros | Cons |
Foam Tape (adhesive-backed) | Even gaps around the door | Cut to length, peel and stick onto the frame | Easy, cheap, works for irregular gaps | Lasts only 1-3 years |
Kerf-In Weatherstripping | Doors with a groove (kerf) in the frame | Insert the strip into the groove and tap with a wood block | Durable, clean look, stays in place | Requires exact fit |
Silicone Caulk | Sealing small cracks or as a backup | Apply bead of caulk, smooth with finger or tool | Flexible, waterproof, bonds well | Messy, hard to remove later |

For foam tape, measure the perimeter of the door frame. Cut the tape slightly longer than needed. Press it firmly into place, starting at one corner and working your way around. Close the door to check the compression. The door should close snugly without forcing.
For kerf-in seals, align the strip with the groove. Use a block of wood and a hammer to tap it in evenly. A YouTuber named Grain to Glow demonstrated using a slanted wood block to apply pressure. This method works well for bottom seals on hinged doors.
Silicone caulk is ideal for sealing stationary parts like the frame-to-wall joint or corners where other seals meet. Apply a continuous bead, then smooth it with a wet finger or tongue depressor. Let it cure for 24 hours before testing.
Pro Tip:For a professional finish, use a caulk smoothing tool or an ice cube to create a neat bead.
Step 6: Reinstall the Door and Adjust the Track
If you removed the door to work on it, now it's time to put it back. Lift the door onto the track, making sure the rollers align with the grooves. For most sliding doors, you'll need to tilt the door upward to slide it into the top track first, then lower it onto the bottom track.
Once the door is on the track, check the alignment. If the door is hard to slide or gaps appear, adjust the rollers. Look for adjustment screws on the bottom edge of the door. Turning them clockwise usually raises the door; counterclockwise lowers it. Make small adjustments and test the slide each time.
A poorly aligned door can cause your new seal to compress unevenly, leading to leaks. Use a level to ensure the door is plumb. If the track itself is bent, you may need to tap it back into shape with a rubber mallet.
Common Adjustment Issues
If the door still drags or gapes, check the threshold. Sometimes the threshold is too high or too low. Adjust it by removing screws and repositioning. For bottom leaks, a new door sweep or kerf-in seal can compensate for a worn threshold.
Step 7: Test the Repair and Prevent Future Leaks
After reinstalling the door and seal, it's time to test your work. Use the dollar bill test: close the door on a dollar bill. If you can pull it out without resistance, the seal is too loose. Adjust or add more weatherstripping. For light leaks, perform a light test at night. Have someone shine a flashlight from outside while you look for light inside. Any light is a potential leak.
Spray the door again with a hose. Focus on the areas you repaired. Wait a few minutes and check for moisture inside. If you see any, pinpoint the exact spot and reapply caulk or adjust the seal.
To prevent future leaks, maintain your door regularly. Clean the tracks every few months with a vacuum and a damp cloth. Lubricate the rollers with silicone spray. Inspect weatherstripping annually for cracks or wear. Replace it before it fails.
For major repairs or if you'd rather leave it to the pros, LGFMH Construction offers interior and exterior repairs like this. They can handle the whole job from start to finish.
Frequently Asked Questions
How often should I replace my patio door weatherstripping?
Most weatherstripping lasts 3 to 5 years. Foam tape may need replacement every 2 years. Inspect it yearly for cracks, gaps, or compression. If you notice drafts or water, it's time to replace it. Regular maintenance extends the life of the seal.
Can I just use silicone caulk to fix a leaky patio door seal?
Silicone caulk works well for small gaps and as a temporary fix. But it's not a replacement for proper weatherstripping on moving parts. Use caulk along stationary edges, and use tape or kerf-in strips on the door itself. Combined, they provide the best protection.
What if my door is still leaking after replacing the seal?
Check the door alignment. A misaligned door can crush the new seal or leave gaps. Adjust the rollers. Also inspect the threshold for damage. Sometimes water comes from the frame itself, not the seal. Caulk the frame-to-wall joint if needed.
Do I need to remove the door to replace the bottom seal?
Not always. Some bottom seals snap in from the outside without removing the door. But for a thorough job, especially with kerf-in strips, it's easier to take the door off. Hinged doors can be lifted off; sliding doors need to be tilted out of the track.
What type of weatherstripping is best for sliding glass doors?
A V-strip or tension seal works well for the top and sides. For the bottom, a kerf-in sweep or adhesive-backed foam is common. The best choice depends on your door model and the gap size. Measure the gaps and buy accordingly.
Can I use expanding foam spray to seal the door?
No. Expanding foam is meant for gaps in walls, not for moving doors. It can expand too much and stick to the door, making it impossible to open. Stick to weatherstripping and silicone caulk for doors.
How much does it cost to have a professional fix a leaky patio door seal?
Professional labor typically runs $100 to $250, plus materials. If the door needs replacement, costs go up. Some homeowners finance larger repairs. For example, Jack Frost Heating & Air offers HVAC financing that could be applied to home improvement projects.
Won't the new seal make it hard to close the door?
It might feel tight at first, but that's normal. The seal should compress slightly when the door is closed. If it's too hard to close, adjust the door rollers or trim the weatherstripping a bit. Most new seals compress enough to still slide smoothly.
Conclusion
Fixing a leaky patio door seal is a usable DIY project that can save you from water damage and high energy bills. By following these steps, you can locate the leak, remove the old seal, clean the frame, and install a new one that keeps water out. Remember to test your repair thoroughly and perform regular maintenance to extend the life of the seal.
If the job seems too big or you run into unexpected problems, LGFMH Construction is here to help. We handle interior and exterior repairs, from window seals to full door replacements. Don't let a small leak turn into a big headache. Take action today and enjoy a dry, comfortable home.


Comments