How to Repair a Damaged Porch Railing in 5 Steps
- William McKracherne
- 1 day ago
- 8 min read

Hey there, notice that porch railing wobbling or looking a little rotten? You're not alone. Over time, weather and wear take a toll on wood, metal, and even composite railings. The good news is you can fix most problems yourself with a few basic tools and some patience. In this guide, we'll walk you through five straightforward steps to repair a damaged porch railing. We'll cover how to spot the real damage, safely remove the bad parts, pick the right replacement material, install it securely, and seal everything so it lasts. By the end, you'll have a solid, safe railing that looks great. And if you decide the project is too big, we'll mention a professional option that bundles all the work into one quick visit.
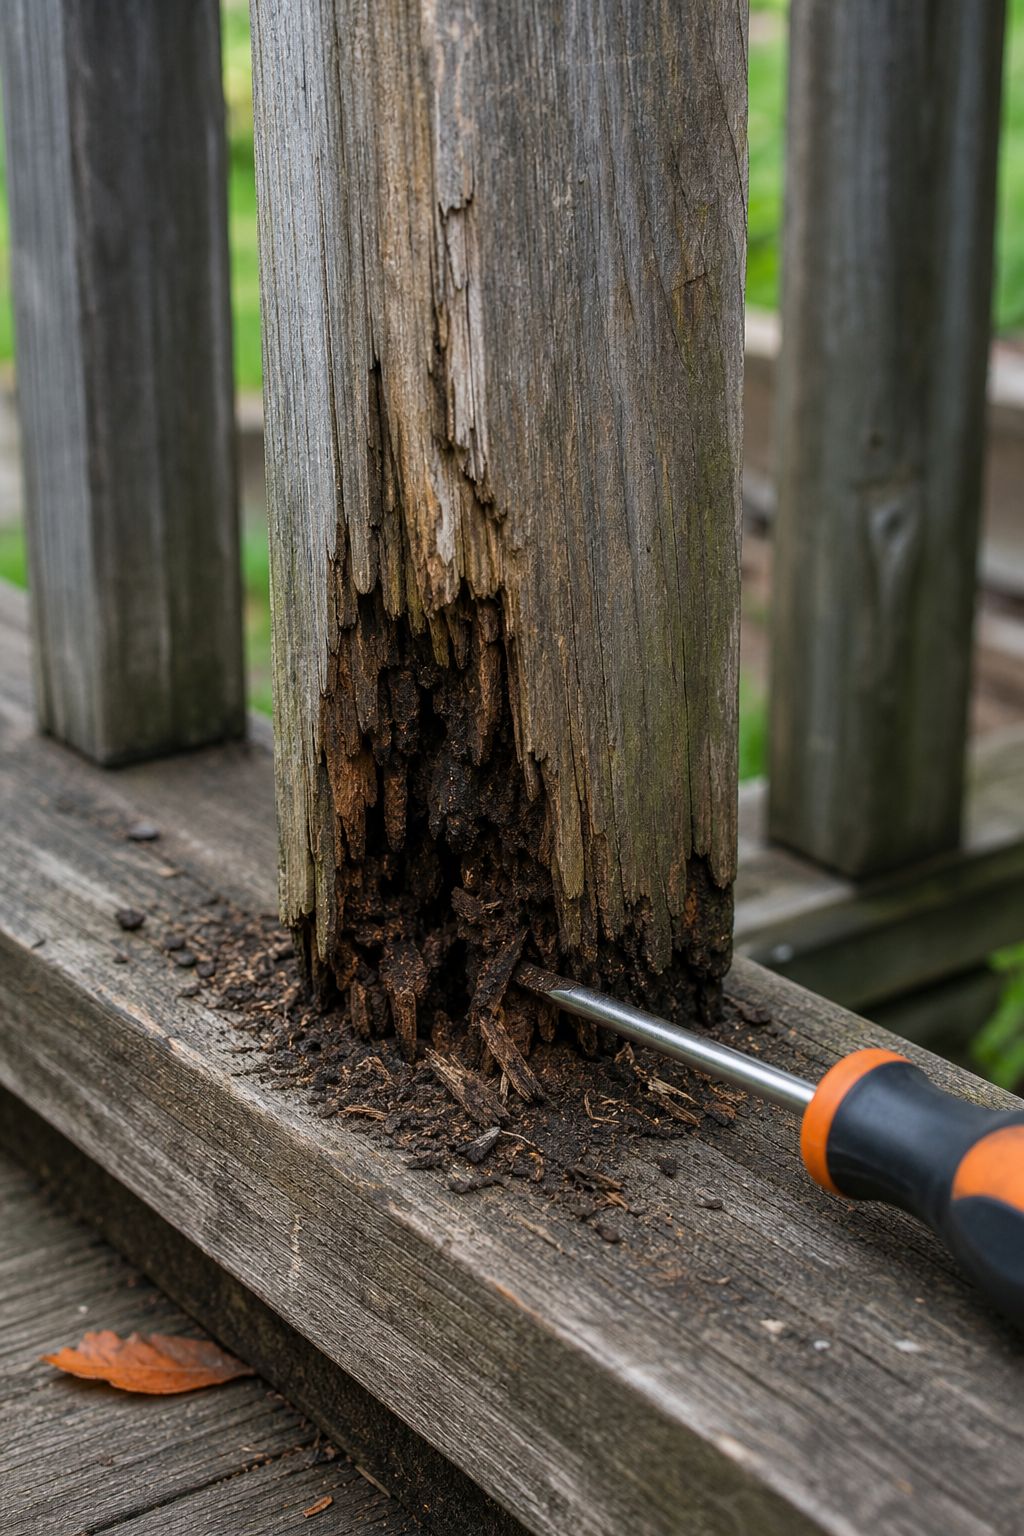
Step 1: Assess the Damage , Diagnose Rot, Cracks, and Loose Connections
Before you grab any tools, take a close look at your railing. You need to figure out what's broken and why. Start by checking for rot. Use a screwdriver or an awl to gently probe the wood near the bottom of posts and rails. If the tip sinks in easily, the wood is soft and rotted. Also look for discoloration, peeling paint, or dark spots, these are signs of moisture damage. For metal railings, check for rust, especially at joints. For composite, look for cracks or warping.
Next, check for loose connections. Grab the top rail and try to shake it. If it moves a lot, the posts might not be fastened properly. Look at the brackets and screws, are any missing or rusted? According to one YouTube repair expert, many wobbly railings are due to undersized fasteners at the post base. He recommends checking the lag bolts or carriage bolts that secure the posts to the deck. If they're loose, you may only need to tighten them. But if the wood is split or the bolts are stripped, you'll need to replace them.
Finally, inspect the balusters (the vertical pieces). They should be spaced no more than 4 inches apart per building code. If one is cracked or broken, it's a safety hazard. Use a tape measure to check gaps. Also look for nails or screws that have popped out. Make a list of all the damaged parts you find. This will help you plan what materials to buy.
Key Takeaway:A thorough inspection saves you time and money. You'll know exactly which parts to replace and whether you can do a simple fix or need a full section rebuild.
Once you've assessed the damage, you might realize it's more than a small repair. For bigger jobs, consider a professional service. For example, LGFMH Construction's repair service covers interior and exterior repairs, including full railing replacements, with a set timeline and built-in safety precautions. But for most DIYers, a few simple tools and a weekend can get the job done.
Step 2: Remove the Damaged Railing Sections
Now it's time to take out the bad parts. Start by removing any screws or nails holding the damaged section. Use a claw hammer or a pry bar to gently lift the rail. If nails are stubborn, a cat's paw (about $15) helps gouge out the heads. For screws, use the right bit, usually a Phillips or square drive.
Work carefully to avoid breaking adjacent pieces that are still good. If you're replacing a whole section, you may need to cut the rail near the posts using a reciprocating saw. Wear safety glasses and gloves. As noted in one DIY tutorial, only 12% of online repair guides mention safety gear, so don't skip it. Also, watch out for splinters and rusted nails.
Once the rail is loose, set it aside. Check the posts underneath. If the post is rotted at the bottom, you may need to cut it off and splice in a new piece. But sometimes the damage is only in the rail itself. For balusters, you might be able to tap them out from the bottom or cut them with a sawzall. Remove all the damaged pieces completely. Clean up debris so you have a clear workspace.
If you find that the underlying structure is more damaged than expected, you might consider a full replacement. Some homeowners turn their DIY repair skills into a side hustle. If that interests you, check out online business ideas like those at Shusharya for inspiration. But for now, focus on clearing the way for the new parts.
Step 3: Choose Your Replacement Material , Wood, Composite, or Metal
Picking the right material is key to a long-lasting repair. The most common choices are pressure-treated wood, composite, and metal. Here's a quick comparison to help you decide.
Material | Pros | Cons | Best For |
Pressure-treated wood | Low cost, easy to work with, widely available | Prone to rot if not sealed, needs periodic staining | Budget repairs, matching existing wood |
Composite (PVC/plastic) | Rot-resistant, low maintenance, long lifespan | Higher cost, can sag over long spans, may fade | High-moisture areas, low maintenance |
Metal (aluminum/steel) | Strong, durable, never rots | Can rust (steel), harder to cut, may dent | Modern looks, high-traffic areas |
If you're replacing a single board, try to match the existing material. For wood, get pressure-treated lumber that's rated for ground contact if the railing is close to the soil. For composite, many brands offer color-matched replacements. For metal, check the gauge, thicker is better.
Remember to buy extra fasteners. Pressure-treated wood requires corrosion-resistant screws (galvanized or stainless steel). Composite may need special hidden fasteners. Metal uses self-tapping screws or bolts. Plan your purchase accordingly.
Step 4: Install the New Railing , Fastening, Pre-Drilling, and Securing
Now the fun part: putting everything together. Start by cutting your new rail to the correct length. Use a miter saw for clean cuts. If you have angled corners, cut miters accordingly. Always measure twice.
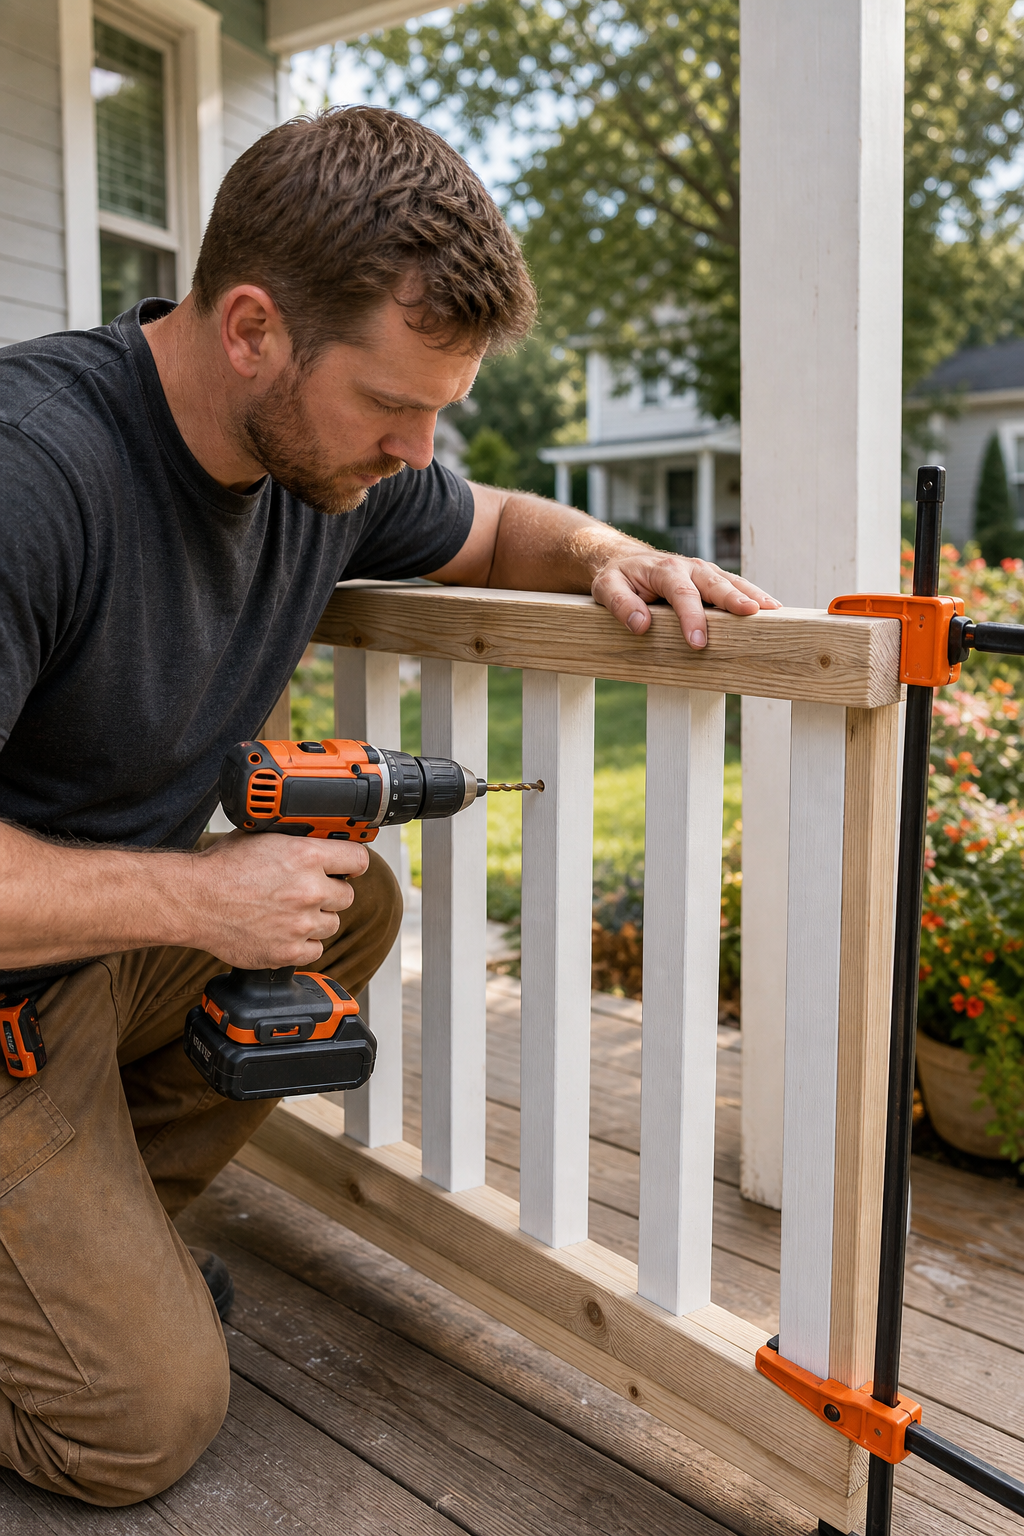
Before fastening, pre-drill all holes. This prevents the wood from splitting and makes driving screws easier. Use a drill bit slightly smaller than your screw diameter. For lag bolts, you need a spade bit or paddle bit to create a pilot hole. As shown in several YouTube tutorials, pre-drilling is especially important for treated lumber, which is wet and can split easily.
Position your new rail on top of the posts or the horizontal rail below. Use clamps to hold it steady. Drive screws at an angle through the rail into the post, this is called toe-nailing. Or you can screw through the top of the rail into the post below. For a stronger joint, use carriage bolts that go through the post and rail, with washers and nuts on the other side.
Space your fasteners every 16 to 24 inches. Countersink the screw heads slightly below the surface so you can fill them later with wood putty. For composite or metal, follow the manufacturer's instructions. For example, composite often requires special clips that hide the screws. For aluminum, use stainless steel screws to prevent galvanic corrosion.
Once all fasteners are in, test the railing for stability. Push and pull on it. It should not move more than a fraction of an inch. If it wobbles, add more fasteners or use larger ones. According to building codes, a railing must withstand 200 pounds of force in any direction, so make it solid.
Step 5: Seal, Prime, and Maintain for Long-Lasting Protection
The final step is protecting your work from the elements. If you installed wood, apply a wood preservative, primer, and paint or stain. Pay special attention to end cuts, they absorb moisture the fastest. Use a brush to seal all exposed surfaces, including the bottom edges that face the deck.
For composite, you usually don't need to seal it, but do clean it regularly to prevent mildew. For metal, touch up any scratches with rust-inhibiting paint. A clear coat can help preserve the finish.
Maintenance is easy. Once a year, inspect your railing for cracks, rot, or loose fasteners. Tighten any screws that have come loose. Reapply sealant or paint as needed, usually every 2-3 years for wood. Keeping the railing clean and dry will triple its lifespan.
Pro Tip:To avoid future damage, make sure your porch roof or gutters direct water away from the railing. Water is the enemy of wood. A simple gutter fix can save you from repeating this repair.
If the idea of annual maintenance sounds like a hassle, consider a composite or metal railing. They last longer with less upkeep. But if you enjoy the look of wood, a little TLC goes a long way. And if you ever feel overwhelmed, you can always hire LGFMH Construction to handle the whole job, they offer interior and exterior repairs with a guaranteed timeline.
Conclusion
Repairing a damaged porch railing isn't as hard as it looks. You just need to take it step by step: assess the damage, remove the bad parts, choose the right material, install it securely, and protect it from the weather. Most homeowners can finish the job in a weekend with basic tools. And you'll save money compared to hiring a pro.
But if you run into trouble, rot deep in the posts, tricky angles, or just no time, remember that professional help is available. LGFMH Construction specializes in interior and exterior repairs, including railing replacements, and they bundle everything into one efficient day. Whether you DIY or call in the experts, the goal is the same: a safe, sturdy, and good-looking porch railing.
So grab your tape measure, put on those safety glasses, and get started. Your porch will thank you.
Frequently Asked Questions
How do I know if my porch railing needs repair?
Look for wobbling when you push on it, visible rot or cracks, rusted brackets, broken balusters, or peeling paint. Use a screwdriver to probe suspicious spots, if it sinks in, the wood is rotten. Also check that baluster spacing is under 4 inches. Any of these signs mean it's time to repair a damaged porch railing.
Can I replace just one baluster or do I need to replace the whole section?
If the rest of the railing is in good shape, you can replace a single baluster. Remove the damaged one by cutting or prying it out, then install a new one. You may need to route a groove or use a mending plate. But if multiple parts are bad, it's easier to replace the whole section. Assess the overall condition first.
What's the best material for a porch railing repair?
It depends on your climate and budget. Pressure-treated wood is cheap and easy to work with but needs regular sealing. Composite is low maintenance and rot-resistant but costs more. Metal is strong and durable but can dent. Match the existing material if possible, or choose composite for a long-term, low-upkeep solution.
Do I need a permit to repair a porch railing?
In most areas, you don't need a permit for repairs that don't change the structure. But if you're replacing large sections or altering the design, check with your local building department. They may require an inspection to ensure the railing meets safety codes, like height and baluster spacing. Better safe than sorry.
How do I fix a wobbly railing without replacing it?
Often wobbling is due to loose fasteners at the post base. First, try tightening the existing lag bolts or carriage bolts with a ratchet. If that doesn't work, add more fasteners, install additional lag bolts or screws near the bottom of the post. For stubborn wobbles, reinforce the post with metal brackets or a concrete anchor.
How long does it take to repair a porch railing?
For a small section, plan on 2-4 hours. A full railing replacement might take a full day. The client site lgfmh.com lists 1 day 19 hours for a complete interior and exterior repair service. DIY will be faster if you have experience, but don't rush, proper sealing takes time.
Can I paint over old railing instead of replacing it?
Only if the damage is superficial. Scrape off loose paint, sand rough spots, prime, and repaint. But if the wood is rotted or the railing is structurally unsound, paint won't fix it. You'll need to replace the damaged parts first. Painting over rot is a temporary cover-up that will fail quickly.
What tools do I need to repair a porch railing?
Basic tools include a claw hammer, pry bar, tape measure, miter saw or circular saw, cordless drill with bits, screwdriver set, and safety gear (glasses, gloves). For stubborn nails, a cat's paw helps. For lag bolts, a ratchet and socket set. You may also need a level, clamps, and a reciprocating saw for tough removals.


Comments