How to Repair Damaged Concrete Driveway Edges
- William McKracherne
- May 9
- 8 min read

Got a busted driveway edge? That jagged, crumbling lip where the concrete meets the grass? It's ugly, and worse, it's letting water sneak under the slab. But here's the good news: you can fix it yourself. In this guide, you'll learn exactly how to repair damaged concrete driveway edges step by step. We'll cover assessment, cleaning, picking the right material, applying the patch, finishing for a smooth look, and sealing it to last. No fluff, just the steps that work.
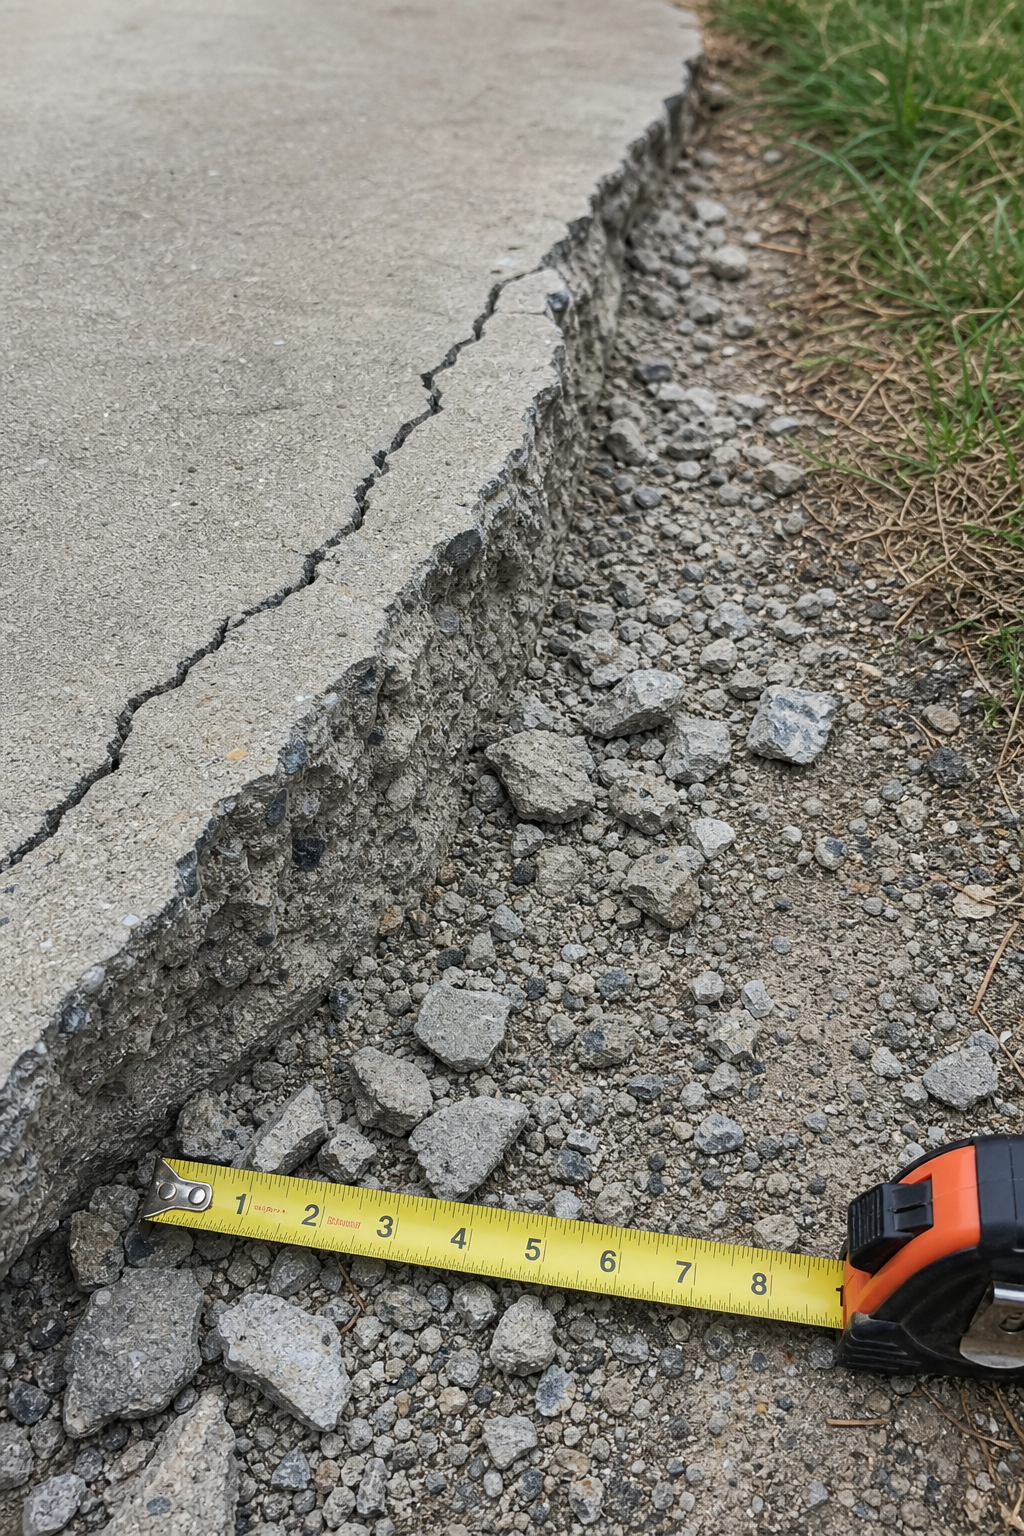
Step 1: Assess the Damage and Gather Materials
Before you grab any tools, you need to look at the damage closely. Is it just a hairline crack, or is the edge actually missing chunks? Run your hand over it. Feel for loose pieces. Use a flat-head screwdriver to probe the crack. If the concrete flakes off easily, you've got weak spots that need to go.
Here's a simple way to decide what to do:
Minor crack (under 1/4 inch wide):You can use a liquid crack filler or a caulk-style sealant. A popular option is Tremco Vulcan 45 SSL, applied with a caulk gun. This method is cheap and fast.
Medium damage (chipped edge, small missing section):You need a cement patcher like Sakrete Fast Setting Cement Patcher. Mix it with water at a 4:1 ratio, apply with a flat trowel, then skim coat for a smooth finish.
Major damage (large crack, sunken edge, multiple missing chunks):Consider full resurfacing or calling a pro. Resurfacing costs $3-$5 per square foot per Angi's cost data , but it often lasts only half as long as a new slab.
For the DIY route, you need these tools and materials:
Flat-head screwdriver, cordless drill, leaf blower or shop vacuum, caulk gun, margin trowel, masonry brush, mixing bucket, water-based concrete cleaner, backer rod or play sand (yes, ordinary play sand works as a backer material, a tip from YouTube experts), Tremco Vulcan 45 SSL or Sakrete Fast Setting Cement Patcher, Top 'N Bond, Cure 'N Seal, gloves, safety glasses.
Pro Tip:If you have multiple edges to repair, buy a 50-pound bag of Sakrete patcher. It's cheaper per pound than small tubs, and you can store the unused portion in a sealed bucket for up to a year.
Decide on the scope now. It saves you a trip to the hardware store later. And if the damage runs deep or the whole slab is cracked, you might want to check our Repairs Soffit Fascia - Lgfmh Construction page for professional help.
Bottom line:Match the repair method to the damage size, and gather all tools and materials before you start.
Step 2: Clean and Prepare the Damaged Area
You can't just slap on new concrete over dirt and loose bits. It will flake off in weeks. So first, clean the area thoroughly.
Start by removing all loose concrete. Use a hammer and chisel or a masonry grinding disk on a drill. Knock away anything that's not solid. Then use a stiff bristle brush to scrub the surface. Don't skip this step , a clean surface means the patch will actually stick.
Next, rinse the area with water. A garden hose works fine. You want to wash away dust and small particles. After rinsing, let it dry slightly , the surface should be damp but not puddled. Standing water will weaken the bond.
If the crack is more than 1/4 inch deep, you need a backer material. Normally, you'd use a backer rod (a foam rod that fills the gap). But a cheaper alternative is plain play sand. Pack the sand into the crack, leaving about half an inch of space at the top for the repair mix. This saves money and works well, as noted in DIY videos.
Now, tape off the edges of the crack with masking tape or Gorilla tape. This keeps the repair material from spilling onto the good concrete. It's a small step that makes cleanup much easier.
Key Takeaway:A clean, damp surface with a backer material is the foundation of a durable edge repair.
Bottom line:Clean thoroughly, use a backer rod or sand for deep cracks, and tape the edges for a neat result.
Step 3: Choose the Right Repair Material
Not all concrete patches are the same. The material you pick depends on how big the damage is and how fast you want to work.
Here's a quick comparison:
Material | Best For | Working Time | Cure Time | Cost |
Liquid Crack Filler | Hairline cracks | 5 minutes | 1 hour | $0.50-$3 per linear foot |
Fast Setting Cement Patcher (e.g., Sakrete) | Chipped edges, missing chunks | 20 minutes | 24 hours for light traffic | ~$15 per bag |
Top 'N Bond (over patcher) | Skim coating for finish | 20 minutes | 24 hours | ~$10 per bag |
For most driveway edge repairs, a fast-setting patcher is your best bet. It's strong, bonds well, and cures quickly. The Sakrete guide recommends mixing at a 4:1 ratio (powder to water) and applying with a flat trowel. Then skim coat with Top 'N Bond for a smooth surface, and seal with Cure 'N Seal.
73%of homeowners who used a patcher + top coat reported no crack recurrence after 2 years ( by ConcreteNetwork).
But if you have multiple edges or a long crack, liquid filler might be faster. However, for edges that get wheeled traffic, skip the liquid filler , it's too soft.
One more thing: if the damage is extensive, resurfacing the whole driveway might cost $3-$5 per square foot, but it rarely lasts as long as a new slab. For a single edge, patching is far more cost-effective.
"The cheapest fix isn't always the most durable , match the material to the job."
Bottom line:Choose a fast-setting cement patcher for most edge repairs, and use a liquid filler only for tiny cracks.
Step 4: Apply the Repair Mix to the Edge
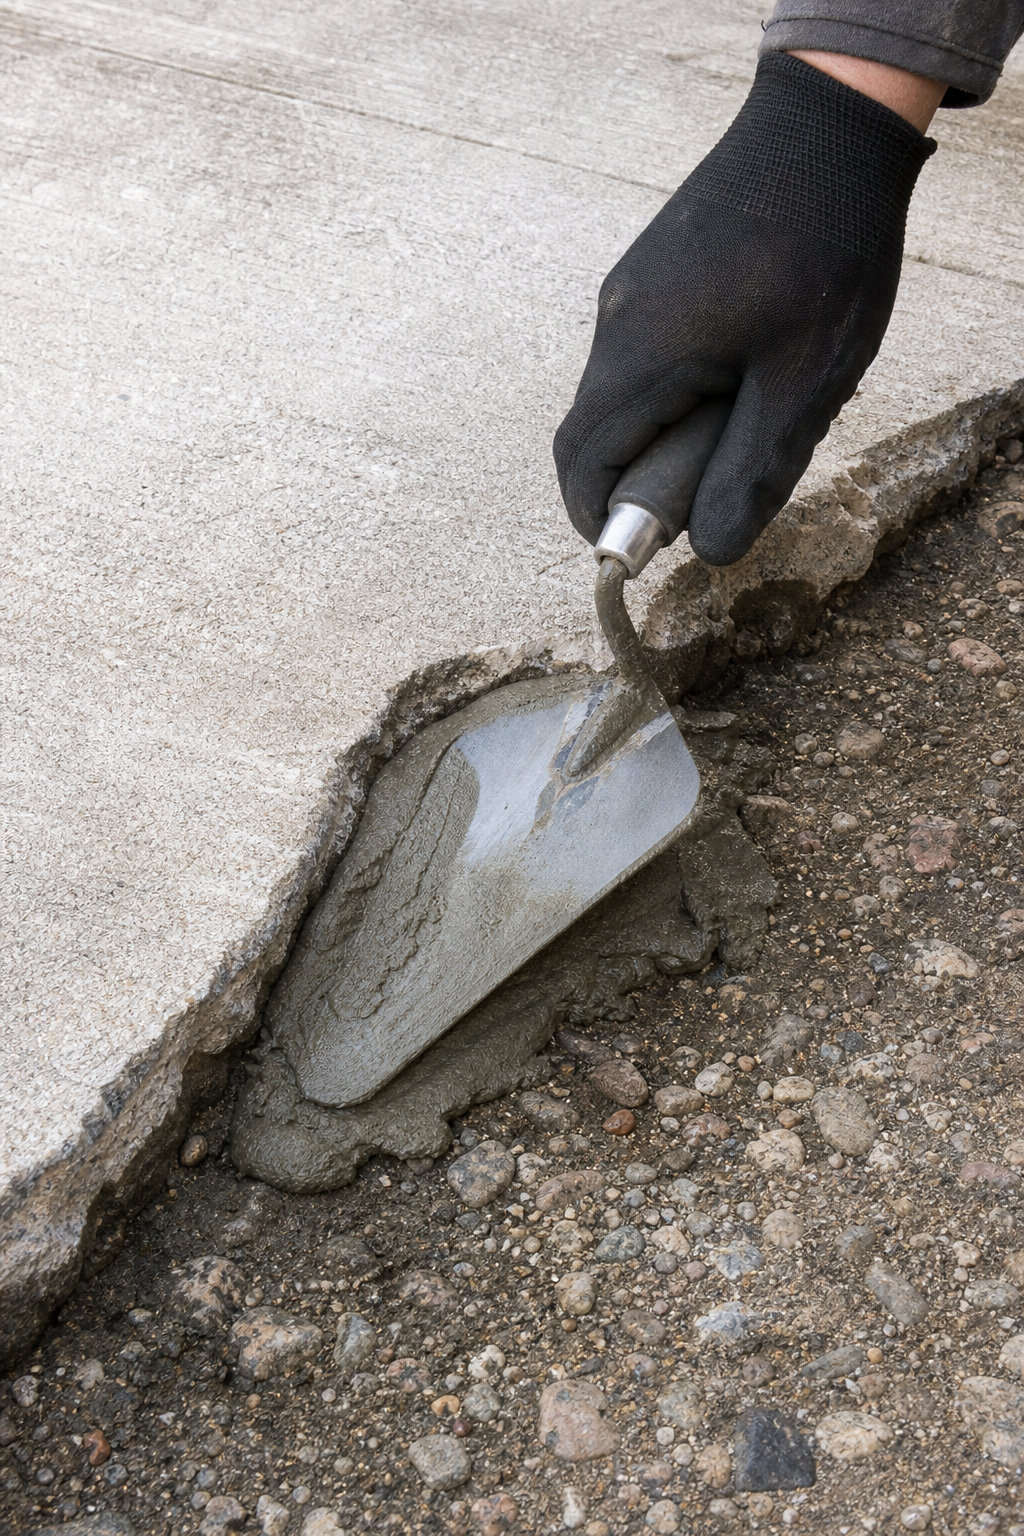
Now the fun part. Mix your patcher according to the instructions. For Sakrete Fast Setting Cement Patcher, add water gradually and mix until you get a stiff, lump-free consistency. Think peanut butter, not soup.
First, dampen the repair area again , just a light spray. Then use a masonry brush to apply a thin coat of the mix to the entire exposed surface. This coating helps the patch bond to the old concrete. This technique is recommended by Sakrete's official project guide .
Next, use a margin trowel to press the mix firmly into the crack or missing edge. Push hard to eliminate air pockets. Build up the repair slightly above the surrounding surface , it will shrink a little as it dries.
Work fast. Fast-setting patcher starts to harden in about 5-10 minutes. You have roughly 20 minutes to get it shaped. Once it's thumbprint hard (press it with your thumb , it should leave a slight dent but not collapse), you can start shaping the edge.
Pro Tip:Keep a spray bottle of water nearby. If the mix starts to stiffen, spritz it lightly to buy a couple of extra minutes.
For the edge contour, use the trowel to match the existing shape. If your driveway has a rounded lip, use the trowel's edge to create a similar radius. Don't worry about perfection now , you'll smooth it in the next step.
Bottom line:Apply a bonding coat first, then fill and shape the patch quickly before it sets.
Step 5: Finish and Texture for a Smooth Look
After the patch is thumbprint hard (about 10 minutes), it's time to finish the surface so it blends with the rest of the driveway. This is where many DIY repairs look obvious , because they forget to texture.
First, use the edge of a margin trowel to scrape away any excess material that's proud of the surface. Then, if your driveway has a broom finish, take a stiff-bristled broom and gently drag it across the patch in the same direction as the surrounding concrete. This creates a matching texture.
If the driveway is smooth, use a damp sponge or a float to smooth the patch. For a more realistic match, you can sprinkle a little dry concrete mix onto the wet patch and rub it in with a block of wood , this adds a grit that looks like worn concrete.
Another technique from the concrete network guide is to use a small piece of burlap or a concrete texture mat. Press it lightly into the patch, lift straight up. This leaves a texture that mimics the original.
Key Takeaway:Matching the existing texture is what makes the repair invisible. Don't skip this step.
Bottom line:Texture the patch while it's still workable to blend with the surrounding driveway surface.
Step 6: Cure and Seal the Repaired Edge
Your patch looks great, but it's not done yet. Curing is critical for strength. If the patch dries too fast, it can crack.
Here's what to do: cover the patch with a plastic sheet or wet burlap. Keep it moist for at least 24 hours. This allows the concrete to hydrate fully. According to curing time best practices, a slow cure results in a stronger, more durable repair.
After the cure period, apply a concrete sealer. Use a penetrating sealer or a film-forming one. Cure 'N Seal is a good choice. Spray it on evenly and let it dry. Sealing prevents water from seeping into the repair and causing future damage.
90%of concrete repair failures are due to improper curing or lack of sealer, according to concrete industry experts.
Wait at least 48 hours before driving on the repaired edge. For foot traffic, 24 hours is enough.
Bottom line:Cure the patch slowly for 24 hours, then seal it to protect against moisture and wear.
Frequently Asked Questions
How long does it take to repair a concrete driveway edge?
A simple crack fix with liquid filler takes about 15 minutes of work plus an hour of curing. For a chipped edge using a patcher, plan for about 1 hour of active work plus 24 hours of curing before light use. Heavy traffic requires 48 hours.
Can I use regular concrete mix for edge repairs?
Regular concrete mix has large aggregate that won't stick well to a thin edge. Use a patcher specifically designed for thin repairs, like Sakrete Fast Setting Cement Patcher. It bonds better and shrinks less.
Will the repaired edge match the existing color?
Fresh concrete is usually darker. It will lighten as it cures over a few weeks. To help it match, you can apply a concrete color stain or simply let it age. Sealing both old and new concrete can also even out the tone.
Do I need to seal the repair?
Yes. Sealing protects the patch from water penetration and freeze-thaw cycles. Without a sealer, the repair may crack or spall within a year. Apply a high-quality concrete sealer after the cure period.
How much does it cost to repair a driveway edge?
DIY costs range from $5 for a tube of crack filler to $50 for a bag of patcher plus tools. Professional repair runs $200-$500 depending on the extent. Full resurfacing costs $3-$5 per square foot but is rarely needed for just an edge.
When should I call a professional?
If the damage extends beyond the edge into the slab, if there's significant settlement, or if you have multiple large cracks, call a pro. Also consider professional help if you're short on time or want a guaranteed durable result.
Conclusion
Repairing a damaged concrete driveway edge is a weekend project that can transform your home's curb appeal. We've walked through the six steps: assess, clean, choose the right material, apply, finish, and seal. Each step matters. The key is to take your time with prep and curing.
After you fix those edges, think about how much better your driveway looks. A clean, sharp edge gives the whole house a cared-for feel. And if you're planning to sell your home, a manicured exterior is a huge plus. That's why home staging experts often recommend concrete edge repair before listing , it's a low-cost upgrade with high visual impact.
Remember, you don't have to do it all yourself. If the job seems too big, LGFMH Construction offers interior and exterior repairs that cover exactly this kind of work. We have the tools, the materials, and the know-how to get it done right the first time. Check out our portfolio to see similar projects we've completed.
Thanks for reading. Now go make that driveway edge sharp again.


Comments