How to Replace Rotted Deck Post: Step‑by‑Step Guide
- William McKracherne
- Mar 21
- 9 min read

Imagine you’re sipping coffee on a sunny morning. You hear a soft crack under the table. You look down. One of the deck posts is soft, a little brown, and it wiggles when you push. That post is rotted. If you ignore it, the whole deck could sag or even collapse. You need to act fast, but you also want to do it right. This guide will walk you through how to replace rotted deck post step by step. We’ll show you how to spot the damage, gather the right tools, take the old post out, and fit a new one that will hold up for years. By the end, you’ll feel ready to fix that post yourself or know exactly what to ask a pro.
Step 1: How to Replace Rotted Deck Post – Assess the Damage and Plan the Replacement
First thing you do when you learn how to replace rotted deck post is to see how bad the rot is. Look for soft spots, cracks, or mold on the wood. Press a screwdriver into the post. If it sinks, the wood is rotted.
Next, check the surrounding structure. Use a gentle shake on railings and joists. If they move, the rot may have spread. A deck that is older than 15 years often shows more wear.
Here’s what I mean: you might find a post that is half rotten, but the beam it sits on is still solid. In that case, you only need to replace the post. If the beam is also soft, you’ll need a bigger fix.
Make a quick checklist before you start:
Identify all rotted posts.
Note any loose fasteners.
Measure the depth of the footing.
Check for water pooling near the base.
Why does this matter? Knowing the scope helps you buy the right amount of lumber and avoids surprise trips to the store.
For a deeper look at common deck warning signs, see the decking checklist article. It explains how to test railings, boards, and fasteners for rot.
Another useful resource is the same guide that talks about how moisture can cause mold under the deck. Spotting mold early can save you from replacing more than one post.
Once you’ve noted the problem spots, sketch a simple plan. Mark each post’s location, note the size of the new post, and decide if you need concrete footings or just a post base. Planning now cuts down on guesswork later.
Step 2: How to Replace Rotted Deck Post – Gather Materials and Tools
Now that you know how to replace rotted deck post, it’s time to get the right stuff. The right tools make the job safer and faster.
Materials you’ll need
Pressure‑treated 4×4 post (or a larger size if your deck calls for it).
Gravel for drainage.
Concrete mix (quick‑set works well).
Metal post brackets or a post‑base plate.
Galvanized lag bolts, carriage bolts, and washers.
Wood preservative or sealant.
Tools you’ll need
Shovel and post‑hole digger.
Reciprocating saw or handsaw.
Level and framing square.
Drill with long bits.
Hammer or rubber mallet.
Safety gear – gloves, goggles, ear protection.
Pro tip: If the old post sits in a concrete footing, bring a sledge hammer and a pry bar to break it up.
For safety tips on handling power tools, you can read more at the decking checklist site. It also warns about wearing eye protection when cutting wood.
Another quick read on the same site covers how to check for rust on fasteners. Rust can weaken the whole deck, so replace any corroded bolts when you install the new post.
When you buy the post, look for a straight grain and no splits. A straight post will sit level and take the load evenly.
Step 3: How to Replace Rotted Deck Post – Remove the Rotted Deck Post
Start by clearing the area around the post. Pull away any decking boards that sit on the post. Use a pry bar to lift the boards, then set them aside.
If the post is set in concrete, you’ll need to break the concrete out. Use a sledge hammer to chip away at the top. Work your way down until the post can be pulled out.
Here’s a simple way to loosen a stubborn post: run a pipe wrench around the base and give it a firm turn. If it still won’t budge, cut the post off just above the concrete with a reciprocating saw.
Once the post is free, clean the hole. Remove loose soil, old gravel, and any broken concrete. A clean hole helps the new post sit level.
Check the depth. Most deck posts need to sit at least 12 inches below the frost line, but a depth of 24 inches is safer in colder areas.
While you’re cleaning, look for signs of water damage in the surrounding soil. If the soil stays wet, consider adding a layer of gravel for better drainage.
Tip: Take a photo of the old post’s position and the surrounding joists. This will help you align the new post correctly.
For more on spotting rot in joists, the decking checklist guide explains how to use a screwdriver to test joist hardness.
Another tip from the same source: check the fasteners on nearby joists. If they’re rusted, replace them when you install the new post.
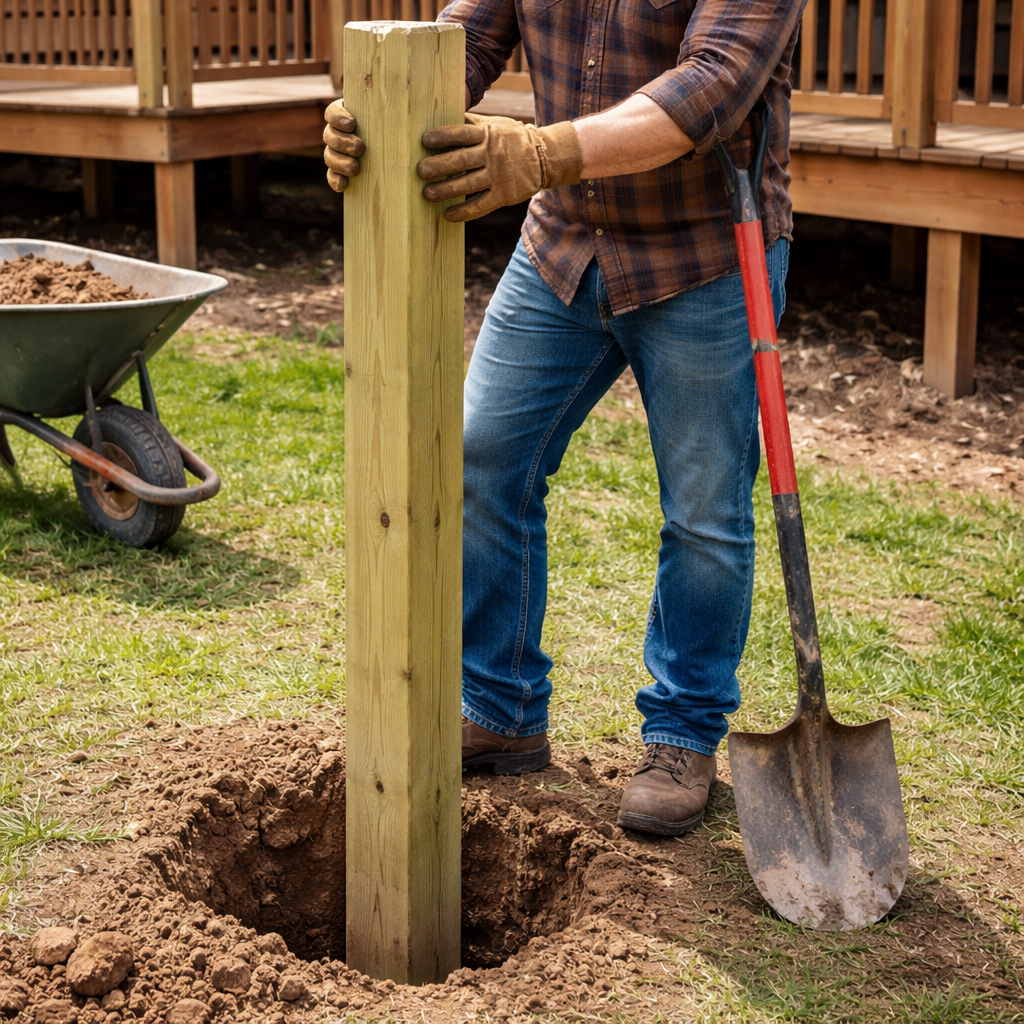
Step 4: How to Replace Rotted Deck Post – Install the New Deck Post
Now we get to the fun part of how to replace rotted deck post: putting the fresh post in place.
First, set a base of 2‑3 inches of gravel at the bottom of the hole. This lets water drain away from the wood.
Next, drop the new post into the hole. Use a level to make sure it stands straight. If it leans, add or remove gravel until it’s plumb.
When the post is level, brace it with temporary supports. A 2×4 nailed to the post and the deck frame works well.
Now pour concrete around the post. Fill the hole in layers, tapping each layer with a piece of wood to remove air pockets.
Smooth the top of the concrete with a trowel. Let it set for the time the mix recommends—usually 30 minutes for quick‑set.
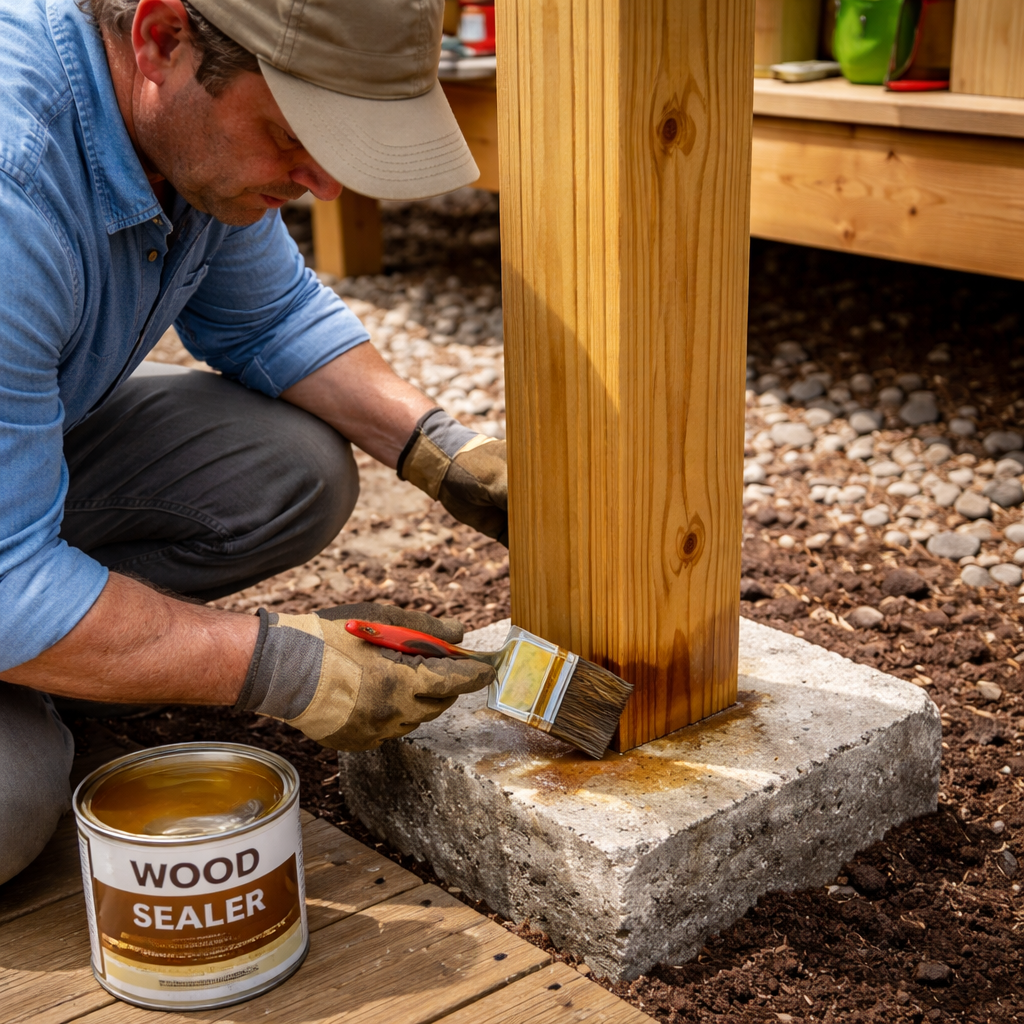
After the concrete cures, attach a metal post bracket or post‑base plate to the post. Secure it with galvanized lag bolts. This metal piece will hold the deck joists and railing fasteners.
Here’s a quick table that shows the pros and cons of using a metal bracket versus a direct post‑base plate:
Option | Pros | Cons |
Metal Bracket | Easy to align, adds extra strength | Costs a bit more |
Post‑Base Plate | Simple, fewer parts | May need extra bolts for big loads |
Watch this short video for a visual of the installation steps:
When the concrete is set and the bracket is secure, you can remove the temporary braces.
Now the post is ready to take the weight of the deck. The next step is to re‑attach the decking.
For extra guidance on fastening the new post to the deck frame, check the same deck checklist resource. It walks through the right bolt sizes and spacing.
Another helpful tip from that site: apply a coat of wood preservative to the post before the concrete sets. This adds a layer of protection against future moisture.
For a deeper dive into post‑base installation, see the guide on How to Repair Rotted Deck Joist: A Step‑by‑Step Guide. Though it talks about joists, the method for securing a post is similar.
Step 5: How to Replace Rotted Deck Post – Secure the Post and Re‑attach Decking
Now that the new post is set, you need to lock it into the deck frame. Start by tightening the lag bolts in the metal bracket. Use a wrench to pull each bolt snugly, but don’t over‑tighten.
Next, line up the joists that sit on the post. Use a framing square to make sure the joist is level with the rest of the deck.
Secure each joist with carriage bolts or structural screws. Space the fasteners about 12 inches apart for a solid hold.
If you had to remove decking boards, lay them back down. Check each board for rot before you nail it back. Replace any board that feels soft or splinters.
Fasten the boards with deck screws rather than nails. Screws hold tighter and won’t pop out over time.
When you’re done, walk the deck. Feel for any wobble. If something still moves, tighten the bolts a little more or add a shim under the post.
Pro tip: Use a piece of scrap wood as a shim if the post sits a fraction low. This keeps the deck level without re‑digging the footings.
For a checklist on fastening methods, the decking checklist article lists the best screw sizes and spacing.
Another quick read on the same site tells you how to spot loose railings after you finish. Tight railings are key to safety.
Step 6: How to Replace Rotted Deck Post – Maintenance Tips to Prevent Future Rot
Now that you know how to replace rotted deck post, you also want to stop new rot from showing up.
Keep water away
Make sure the ground slopes away from the deck.
Leave at least a half‑inch gap between the post and any soil.
Use gravel or a drainage mat around footings.
Seal and protect
Apply a water‑repellent sealant every year.
Check the sealant after heavy rain.
Touch up any cracks right away.
Inspect regularly
Look for soft spots with a screwdriver.
Check fasteners for rust each spring.
Walk the deck and listen for squeaks.
Why does this matter? Small steps now stop big repairs later. A sealed post can last 20 years or more.
For more on spotting early signs of rot, read the decking checklist guide. It has a section on mold and mildew.
Another tip from the same source: keep the deck clean. Leaves and debris hold moisture against the wood.
Conclusion
Learning how to replace rotted deck post doesn’t have to be scary. You start by checking the damage, gather the right tools, pull out the bad post, set a new one in concrete, and lock everything together. A few simple maintenance habits keep the new post strong for years. If you ever feel stuck, you can call a pro, but most homeowners can finish the job with the steps we’ve laid out. A safe, sturdy deck means more time enjoying coffee, BBQs, and sunsets. Ready to get started? Grab your tools and take the first step today.
FAQ
What signs tell me a deck post is rotted?
Look for soft wood that gives when you press a screwdriver, cracks that run deep, and a brown or mushy texture. If fasteners near the post rust or the post wiggles when you shake it, those are strong clues that you need to replace the post.
Do I need a permit to replace a deck post?
Most small repairs, like swapping out a single post, don’t need a building permit, but rules differ by city. Check with your local building department. If the post supports a large portion of the deck or you’re changing the footings, a permit may be required.
Can I use a metal post instead of wood?
Yes, metal posts work well and don’t rot. They’re heavier, so you’ll need a deeper footing. Make sure the metal is coated to resist rust, and use brackets designed for metal to attach joists.
How deep should the new post’s footing be?
Aim for at least 12 inches below the frost line in your area. In milder climates, 12‑18 inches is often enough. Deeper footings give extra stability, especially on sloped ground.
What type of concrete should I use?
Quick‑set concrete is handy for fast work. It cures in about an hour, letting you re‑attach decking sooner. For larger jobs, a standard mix that cures over 24‑48 hours gives a stronger bond.
How often should I seal my deck posts?
Seal the posts once a year, preferably in the dry season. After a heavy rain, check the sealant for wear and touch up any spots where water might get in.
Can I reuse the old concrete footing?
If the old concrete is solid and not cracked, you can clean it out and pour new concrete around the new post. If it’s crumbling or has water stains, remove it and start fresh for a stronger base.
What safety gear do I need for this job?
Wear work gloves, safety glasses, and ear protection when using power tools. A dust mask helps when cutting wood or mixing concrete. Keep a first‑aid kit nearby just in case.


Comments