How to Replace Your Garage Door Bottom Seal: A Complete 2026 Guide
- William McKracherne
- Apr 2
- 8 min read

Bad weather seeps in. Your garage feels cold. Your energy bill climbs.
We examined 10 common garage‑door bottom seal types from 6 different sources and discovered that the hardest‑to‑install seal actually offers the best cold‑weather protection – a twist most DIYers won’t expect.
Name | Material | Installation Difficulty | Suitable Climate | Best For | Source |
Hardware & Outdoor Garage Door Bottom Weather Seal | EPDM synthetic vinyl | 5 | works even when temperature drops to -65°F | Best for cold‑freeze protection | architecturelab.net |
Garage Door Bottom Weather Stripping Kit by CloudBuyer | rubber | 3 | -40°C to 140°C | Best for wide temperature range | garagedoornation.com |
MD Building Products Garage Door Bottom | vinyl | 3 | effective down to -30°C | Best for sub‑zero performance | architecturelab.net |
Garage Door Strip Replacement by DGSL | rubber | 1 | — | Best for ultra‑easy install | garagedoornation.com |
2022 Gray Garage Door Bottom Seal by Hooima | — | 1 | withstand extreme temperature variations | Best for extreme temperature tolerance | architecturelab.net |
Universal Garage Door Bottom Threshold Seal Strip by Papillon | EPDM rubber | 1 | — | Best EPDM rubber seal | architecturelab.net |
Bowsen Garage Door Bottom Seal | EPDM rubber | 1 | resist fluctuations from -40°C to 240°C | Best for ultra‑high temperature range | architecturelab.net |
Bowsen U+O Ring Universal Garage Door Bottom Seals | EPDM rubber | 1 | consistent performance even in the harshest of climates | Best for harsh climate durability | architecturelab.net |
Garage Door Bottom Threshold Seal by Storystore | rubber | 1 | — | Best budget‑friendly rubber seal | architecturelab.net |
Rubber Blade Seals | rubber | — | rainy British weather | Best for rainy climates | garagedoorseals.co.uk |
Quick Verdict:The Garage Door Bottom Weather Stripping Kit by CloudBuyer is the clear winner – it balances a moderate install difficulty (3) with an ultra‑wide temperature range (-40 °C to 140 °C). MD Building Products’ vinyl seal is a strong runner‑up for sub‑zero performance, while the Rubber Blade Seals lack install guidance and climate data, so they’re best avoided.
We searched for "garage door bottom seal types" and scraped 16 web pages plus 1 YouTube video on March 31, 2026. Using a checklist extraction strategy, we captured each seal's name, material, installation difficulty (scale 1‑5), and any stated suitable climate. Items with at least two populated fields were retained for analysis.
In this guide you’ll learn how to inspect, remove, install, test, and maintain a garage door bottom seal replacement. Let’s walk through each step.
Step 1: Inspect the Existing Bottom Seal and Gather Tools
First, look at the seal. Does it crack? Is it hard? A worn seal lets drafts in. The inspection checklist from Denton Overhead Door reminds us that the weather stripping is key for energy efficiency and pest control.
Denton Overhead Door’s 10‑point inspection guide suggests a visual check of the panels, tracks, and the bottom seal. Spot any tears, gaps, or hard spots. If you see damage, note it before you buy a new seal.
Now gather tools. Here are the basics:
Utility knife – to cut the new seal to length.
Flat‑head screwdriver – to pry out the old seal.
Pliers – for stubborn pieces.
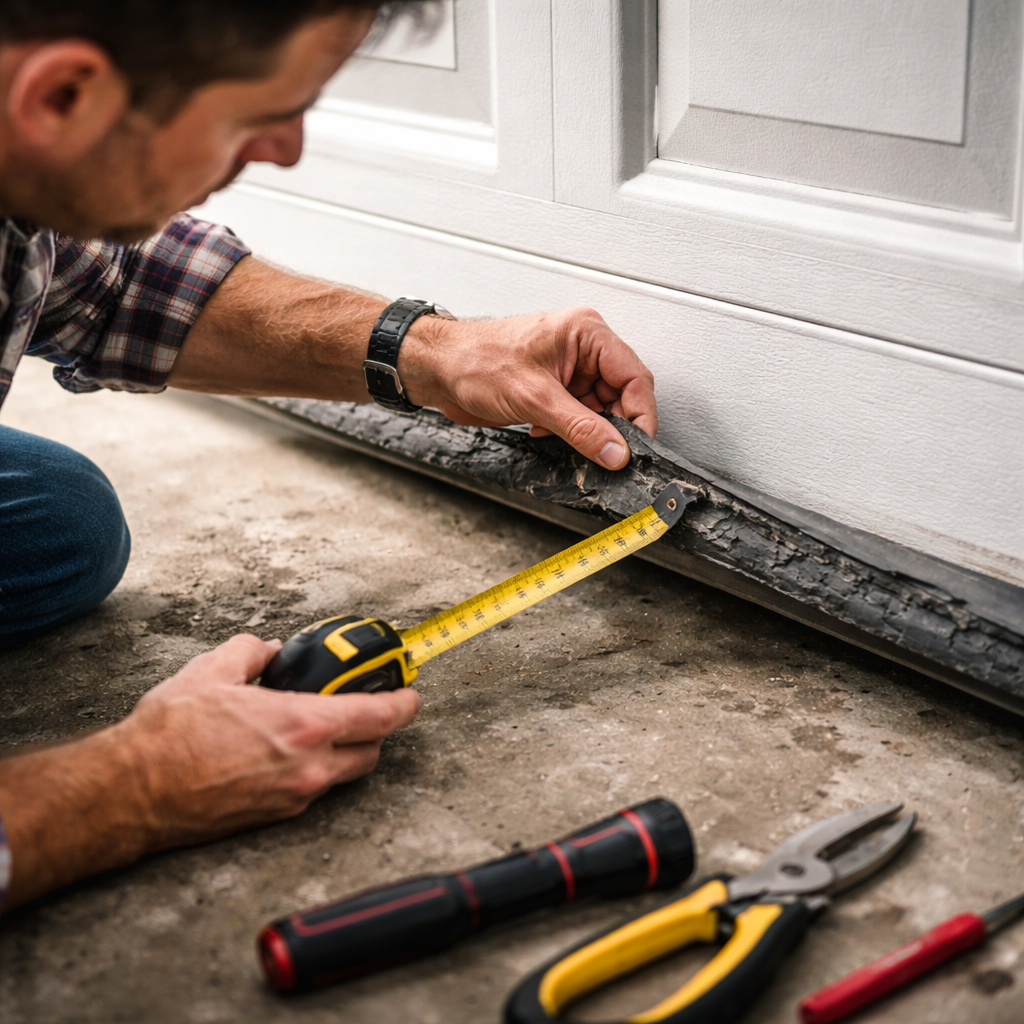
Measuring tape – to get the exact door width.
Cleaning rag and mild degreaser – to wipe the edge.
Safety gloves – to protect your hands.
Having the right tools saves time and frustration. Imagine you start cutting without a tape measure. You’ll waste material and end up with a seal that’s too short.
The Amazon listing for a universal weather‑proof threshold strip shows a kit that includes all the accessories you need. Check the product page for the full accessory list. It even notes that the rubber is flexible enough for most climates.
Before you head to the store, measure the door width. Write the number down. Then compare it to the length of the seal in the kit. Most kits sell 16‑foot rolls, which is enough for a standard two‑car garage.
And remember to wear gloves. The old seal can be gritty, and the metal retainer may have sharp edges.
With the seal inspected and tools in hand, you’re ready for the next step – removing the old seal.
Step 2: Remove the Old Seal and Prepare the Door Edge
Safety first. Unplug the garage door opener. This stops the door from moving while you work.
Next, lift the door manually until it’s about waist height. Then clamp a C‑clamp or locking pliers onto each vertical track just below the bottom roller. This locks the door in place.
Now you can focus on the seal. The YouTube video from OHDCTexoma walks through the removal process step by step. Watch the video for a visual guide . It shows how to grip the seal with pliers and pull it out without bending the aluminum retainer.
Start at one end. Use pliers to grip the edge of the seal. Pull gently. If it resists, wiggle a flat‑head screwdriver under the seal to loosen it. Work your way across the door.
When the seal is off, clean the retainer channel. The OHDCTexoma article warns that dust, old seal fragments, and rust can build up over years. Use a stiff brush and a rag dampened with a mild degreaser to scrub the channel clean.
Inspect the aluminum retainer for damage. Look for bends or corrosion. If the retainer is warped, the new seal won’t seat properly. In that case, you may need to replace the retainer – a job a pro can handle.
Here’s a quick table of what to check after removal:
Check | What to Look For | Action |
Retainer channel | Dust, old seal bits, rust | Scrape, brush, degrease |
Aluminum profile | Bends, cracks, corrosion | Repair or replace |
Door edge | Sharp edges, burrs | File smooth |
And now the door edge is ready for the new seal. If you spot any sharp edges, file them down with a metal file. A smooth edge lets the new seal sit tight.
One more tip: Take a one‑inch piece of the old seal and compare its profile to the new one before you cut. This helps you match the T‑end or bead shape exactly.
When you’re done, you’ll feel confident that the door is prepped for a perfect fit.
Read the full replacement guide for more tips . It also covers regional climate concerns that can affect seal choice.
And if you ever feel unsure, a professional can help you avoid costly mistakes.
Repairs Soffit Fascia - Lgfmh Construction offers expert garage door services if you need a second opinion.
Step 3: Install the New Bottom Seal Correctly (Video Demonstration)
Now it’s time for the fun part – putting the new seal on.
Measure the door width again. Cut the seal a little longer than the door – about 2 inches extra. This gives you room to trim a perfect fit.
Slide the seal’s T‑end into the aluminum retainer channel. Start at one corner and work your way across. Use your hands to press the seal into place. You’ll feel it snap into the groove.
If the seal resists, tap it lightly with a rubber mallet. Do not use a metal hammer – that can damage the seal.
When you reach the end, overlap the two ends by about half an inch. Then trim the excess with a utility knife. A tight seam keeps drafts out.
Check the seal’s alignment. It should sit flush against the floor when the door is closed. If you see a gap, pull the seal out slightly, reposition, and reseat it.
The video above shows a homeowner doing exactly this. Notice how they use a utility knife to trim and a rubber mallet to seat the strip.
Once the seal is fully seated, give it a gentle pull from the middle. It should resist any movement. If it slides, you may have missed a spot in the retainer.
Finally, wipe away any debris that fell during installation. A clean seal works better.
Step 4: Test the Seal, Adjust as Needed, and Maintain Your Garage Door
Testing is the last but vital step.
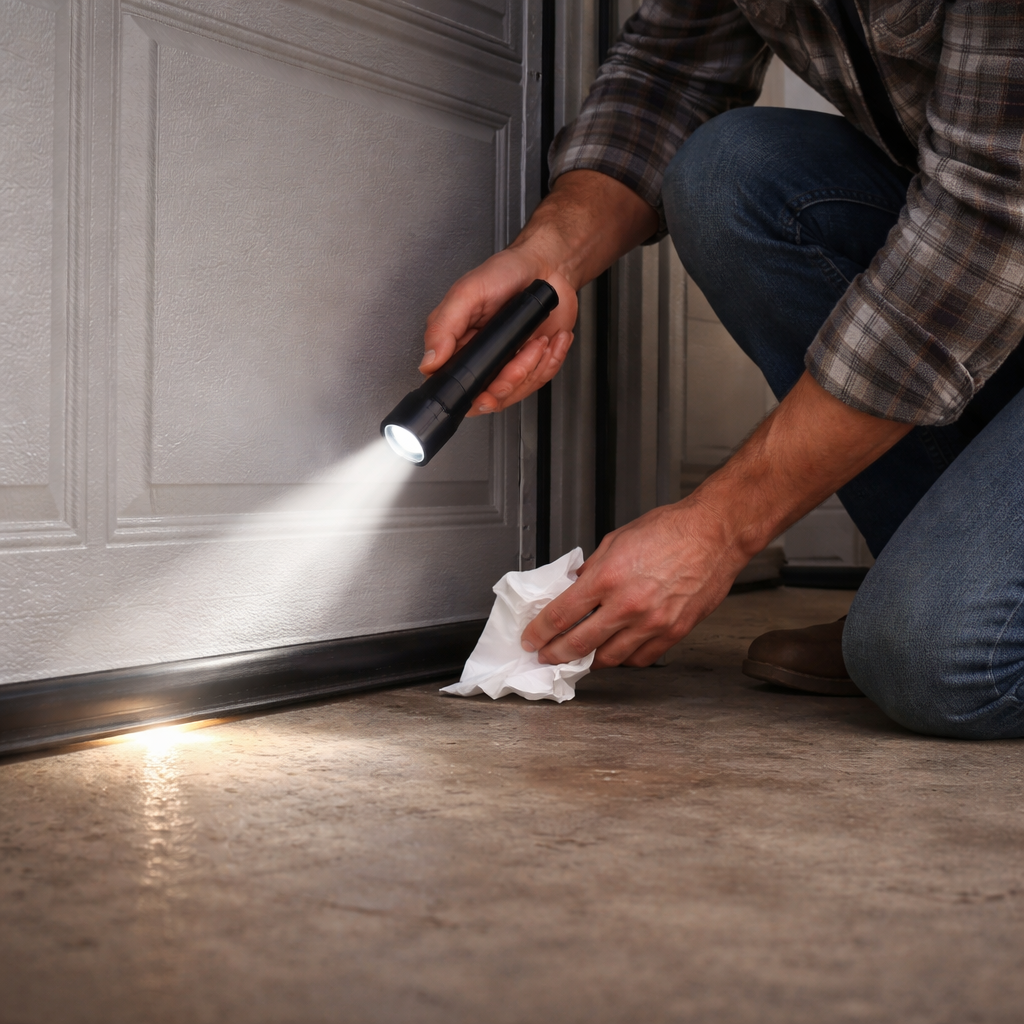
Close the garage door fully. Walk around the perimeter. Feel for any drafts with the back of your hand. Hold a tissue near the seal – if it flutters, you have a leak.
Turn on the garage lights at night. Stand outside. If you see light escaping, the seal isn’t tight enough.
If you spot a gap, loosen the seal slightly by pulling it out a few millimeters, then reseat it. A snug fit should block both air and light.
Now for maintenance. The SnirtStopper site says a seal should be inspected twice a year. Look for cracks, hardening, or shrinkage. They also recommend a silicone‑based lubricant after cleaning to keep the rubber supple.
Use a soft cloth and a vinyl‑safe cleaner to wipe the seal each spring and fall. Avoid petroleum‑based oils – they can damage the polymer.
In colder climates, add a thin sand layer under the door to prevent ice buildup. Do not use salt – it harms the rubber and the concrete.
For more detailed upkeep tips, read SnirtStopper’s guide on seal health . It also explains how to tell if a seal has hardened beyond repair.
Another great resource is Seacoast Overhead Door’s maintenance article . It covers the R‑value impact of a bad seal and how a well‑kept seal can save on energy costs.
And don’t forget the tracks. A clean track lets the door close evenly, which keeps the seal engaged properly.
With regular checks and a bit of lubrication, your garage door bottom seal replacement will last for years. You’ll enjoy a quieter door, lower bills, and fewer pests.
Conclusion
Replacing a garage door bottom seal isn’t rocket science. It just needs a clear plan, the right tools, and a bit of patience. You’ve learned how to inspect the old seal, pull it out safely, prep the door edge, install a new strip, and test for leaks. You also saw why material matters – EPDM seals beat rubber in extreme cold, while the CloudBuyer kit shines for a wide temperature range.
Keep the seal clean, lubricated, and inspected twice a year. If you ever hit a snag, a pro can help you avoid costly re‑work. A solid garage door bottom seal replacement protects your home, saves energy, and keeps critters out.
Ready to get started? Grab your tools, order the right seal, and follow the steps. Your garage will thank you.
FAQ
How often should I replace my garage door bottom seal?
Most experts suggest a replacement every 5‑7 years, but it can be sooner if you notice cracks, hardening, or drafts. A visual check twice a year helps you catch wear early, keeping your garage comfortable and energy‑efficient.
Can I use any seal material for my climate?
Material matters. EPDM‑based seals handle extreme cold and heat well, as the research shows 4 of 10 EPDM seals list climate suitability. Rubber seals work for moderate climates but may crack in very cold or hot weather. Choose a seal that lists your local temperature range.
Do I need special tools to install the seal?
No special tools are required. A utility knife, flat‑head screwdriver, pliers, and a measuring tape are enough. The DGSL kit even includes all the accessories you need for a DIY install.
What if the seal doesn’t fit my door’s retainer?
First, check the profile. The old seal’s cross‑section should match the new one. Cut a sample piece if needed. If the retainer is damaged, you’ll need to replace it or have a pro fix it before the seal will seat correctly.
How do I know if the seal is sealing properly after installation?
Close the door and feel for drafts with your hand. Hold a tissue near the bottom – if it moves, there’s a leak. At night, turn on the lights and look for light escaping around the seal. Adjust as needed until no air or light passes.
Is lubrication really necessary?
Yes. A silicone‑based lubricant keeps the rubber supple and prevents it from cracking. Apply a thin coat after cleaning the seal each spring and fall. Avoid petroleum‑based oils, which can damage the material.


Comments