How to Use a Foundation Wall Crack Sealing Product
- William McKracherne
- 1 day ago
- 8 min read

A crack in your foundation wall isn't just cosmetic. Left unsealed, it lets in water, radon, and cold air that slowly damage your home from the inside out. The good news is that most foundation wall cracks are fixable with the right sealing product and the right technique. Here's how to do it properly, start to finish.
Step 1: Identify the Type and Severity of the Crack
Before you buy anything, you need to know what kind of crack you're dealing with. The type determines the product. The wrong match wastes your money and leaves the problem unsolved.
There are four main crack types to recognize:
- Hairline cracks, thin surface cracks, usually under 1/16 inch wide. Common in new concrete as it cures. Low urgency.
- Vertical cracks, run straight up and down the wall. Often caused by normal concrete shrinkage. Usually non-structural, but they can let water in.
- Horizontal cracks, run side to side. These signal serious lateral soil pressure against the wall. Often structural. Do not DIY these.
- Diagonal or stair-step cracks, angle across the wall or follow mortar joints in block foundations. Can indicate differential settlement. Severity varies.
Width matters as much as direction. A crack under 1/8 inch wide is generally non-structural and can be sealed with a DIY kit. Anything wider than 1/4 inch, or any crack that's actively shifting, deserves a professional evaluation before you apply product. If the crack has water actively pushing through it right now, that's a different category entirely and needs an urgent-response product, which we'll cover in Step 2.
Run your finger across the crack. If one side sits higher than the other, the wall is moving. That's not a sealing job. That's a structural repair, and LGFMH Construction handles exactly that kind of assessment.
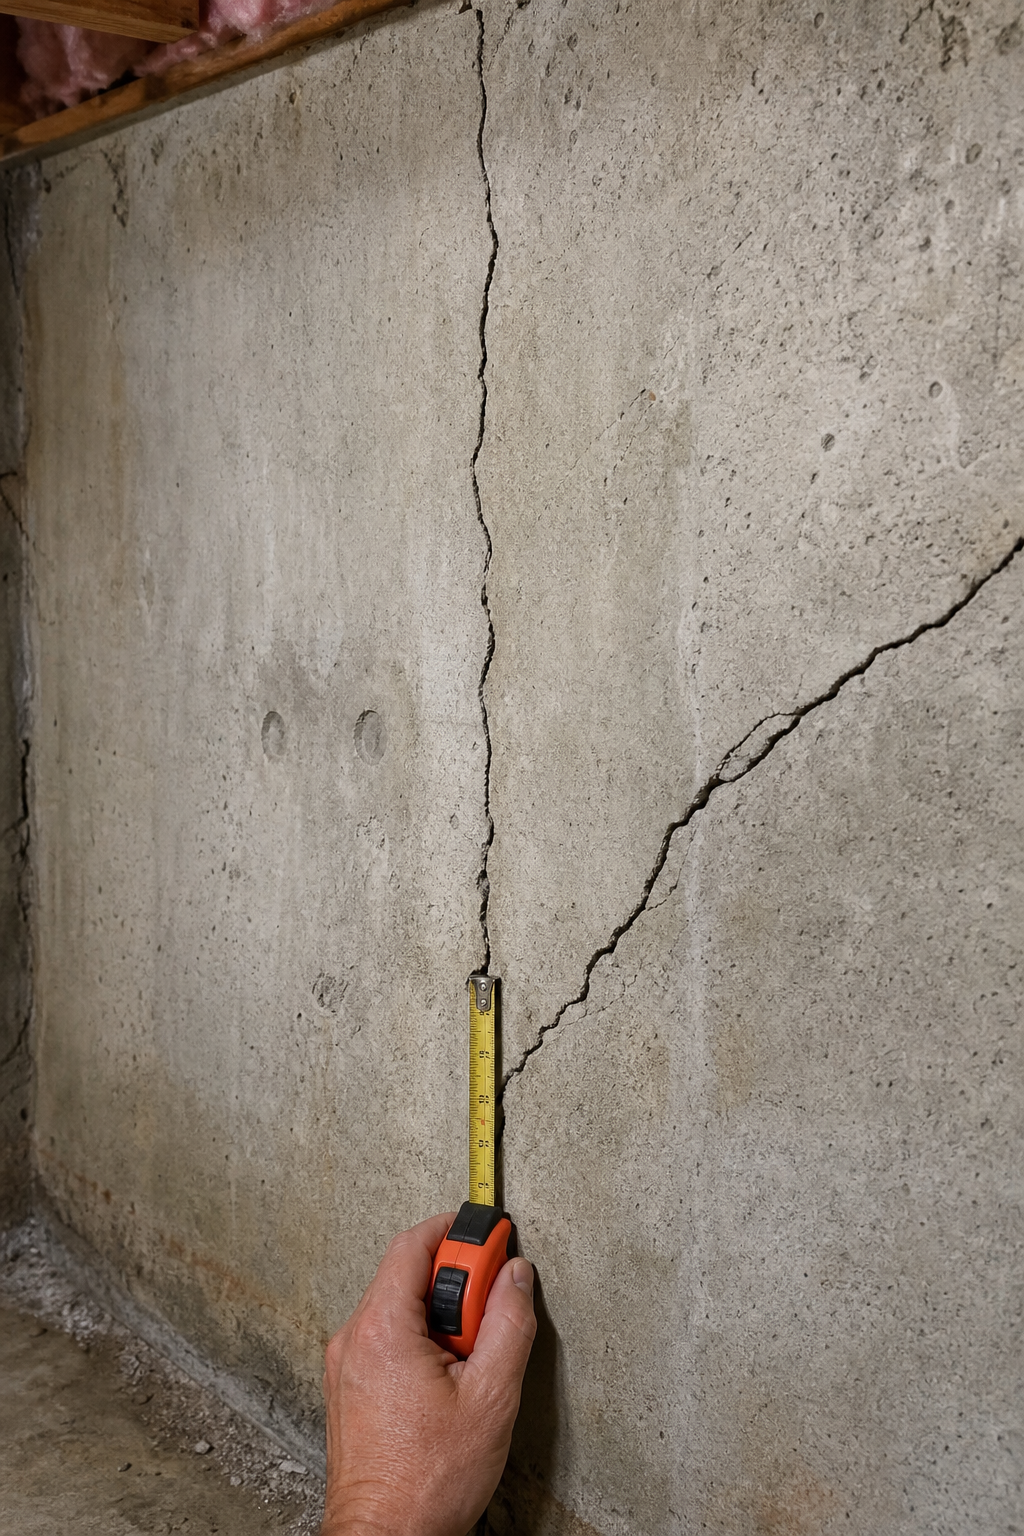
By the end of this step, you should know the crack's direction, width, whether it's actively wet or dry, and whether it's moving. Those four answers drive every product decision that follows.
Step 2: Choose the Right Foundation Wall Crack Sealing Product
Two material families cover nearly every residential foundation crack repair: epoxy and polyurethane. Despite the common belief that epoxy is always the go-to structural fix, a look at leading crack repair kits tells a more nuanced story. Only about one-third of top kits on the market are epoxy-based. Polyurethane makes up roughly half, and a single polyurethane foam product is the only option built for emergency active leaks.
Here's how the main categories stack up:
Product / Type | Material | Best For | Max Crack Length | Active Leak Use |
Hydra Stop 300 | Polyurethane foam | Urgent active leaks | — | Yes |
RadonSeal Basement Crack Repair Kit | Polyurethane | Long cracks, radon-prone homes | 10 ft | No |
DRICORE Pro Kit | Polyurethane | Expanding fill, wet conditions | — | Yes |
Sikaflex Crack Flex Sealant Kit | Polyurethane | Quick, flexible non-structural repairs | — | No |
Simpson Strong-Tie Crack-Pac Injection Kit | Epoxy | Structural crack bonding | 8 ft | No |
Epoxy forms a rigid, high-strength bond. It's the right call when the crack is dry and you need to restore structural continuity to the wall. The Simpson Strong-Tie Crack-Pac Injection Kit works on cracks up to 8 feet, which covers most residential situations. The catch is that epoxy doesn't flex. If the crack moves even slightly after curing, the epoxy bond can break.
Polyurethane stays flexible after it cures. That makes it better for cracks that may expand and contract with temperature swings. Polyurethane kits like the RadonSeal Basement Crack Repair Kit handle cracks up to 10 feet, giving you more reach than any epoxy kit currently on the market. If your home is in a radon-prone area, RadonSeal is worth noting specifically: it's the only kit that addresses both water infiltration and radon gas sealing in one product.
For a crack with water actively pushing through it right now, water-activated polyurethane foam is the only material that works. Hydra Stop 300 is the standout here. It reacts with moisture to expand into the crack, stopping the flow. Epoxy will not bond to a wet surface, and standard polyurethane won't cure fast enough under active water pressure.
Key Takeaway:Match the product to the condition: dry structural crack gets epoxy, dry non-structural crack gets flexible polyurethane, active leak gets polyurethane foam.
If you're unsure which product fits your specific crack after reading this, the team at LGFMH Construction's guide on basement waterproofing covers complementary waterproofing steps that work alongside crack sealing for a more complete moisture defense.
Step 3: Gather Your Tools and Prep the Work Area
Good prep is what separates a seal that lasts ten years from one that fails in two. The product can only bond to a clean, sound surface. If there's dust, efflorescence (the white chalky residue from mineral deposits), or loose concrete in the crack, the sealant won't grip.
Gather these before you start:
- Wire brush or stiff-bristle brush
- Shop vacuum or compressed air
- Chisel and hammer (for loose concrete edges)
- Concrete cleaner or muriatic acid solution (for efflorescence)
- Safety glasses and gloves
- Mixing paddle or stir sticks (for two-part epoxy)
- Caulk gun (for cartridge-style kits)
- Plastic sheeting or drop cloth
- Injection ports (most kits include these)
Ventilate the space. Both epoxy and polyurethane products release fumes during mixing and injection. Open any basement windows and run a fan directed outward. Polyurethane chemistry involves isocyanates, which are respiratory irritants. A half-face respirator with organic vapor cartridges is worth wearing for any job longer than 20 minutes.
Now prep the crack itself. Use the wire brush to scrub out loose material along the full length of the crack. Run the shop vac nozzle along the crack to pull out dust. If you see white deposits, scrub them with a diluted acid cleaner, then rinse and let the wall dry fully before applying any product. For dry-condition epoxy kits, the crack must be dry. For foam kits used on active leaks, moisture is actually required for the foam to react and cure.
Mark injection port locations along the crack before you drill. Most kits space ports every 8 to 12 inches. Use a pencil to mark each spot so you stay consistent when drilling.
Step 4: Apply the Crack Sealing Product Correctly
This is where most DIY repairs go wrong. People rush the injection, overfill the first port, or skip ports entirely. Follow the sequence and the product will do its job.
For Injection-Style Kits (Epoxy or Standard Polyurethane)
First, install the injection ports. Drill a hole at each mark you made in Step 3, angle the drill slightly toward the crack's center. Tap in the plastic port fittings until they sit flush with the wall surface. Then mix and apply the surface paste (included in most kits) over the crack between the ports. This paste seals the crack face so pressure builds inside and drives the resin into the crack rather than out the front. Let it cure to a tacky or firm state before injecting, usually 20 to 40 minutes depending on temperature.
Start injecting at the lowest port on the wall. Insert the cartridge tip, pull the trigger steadily, and hold pressure until you see resin appear at the port directly above. That's your signal the resin has filled that section. Cap the lower port, move up, and repeat. Work from bottom to top for vertical cracks so gravity aids the fill. Epoxy resins have low viscosity before curing, which lets them penetrate hairline voids when injected under even light pressure.
Pro Tip:If resin leaks out at the surface paste before you see it at the next port up, the paste hasn't cured enough. Stop, wait another 15 minutes, then try again.
For Polyurethane Foam (Active Leak Kits)
Water-activated foam like Hydra Stop 300 works differently. You inject the two-component foam directly into the wet crack using the ports. The foam contacts moisture and expands, filling the void and blocking the water path. Inject quickly because the reaction starts fast, usually within 30 to 90 seconds of contact with water. Don't overfill the first port. Move along the crack and let the foam expand to meet itself between ports.
Once the foam cures, any excess that bulged out at the surface can be trimmed flush with a utility knife. The surface doesn't need to be perfect for the seal to work. The real seal is inside the crack, not on the face.
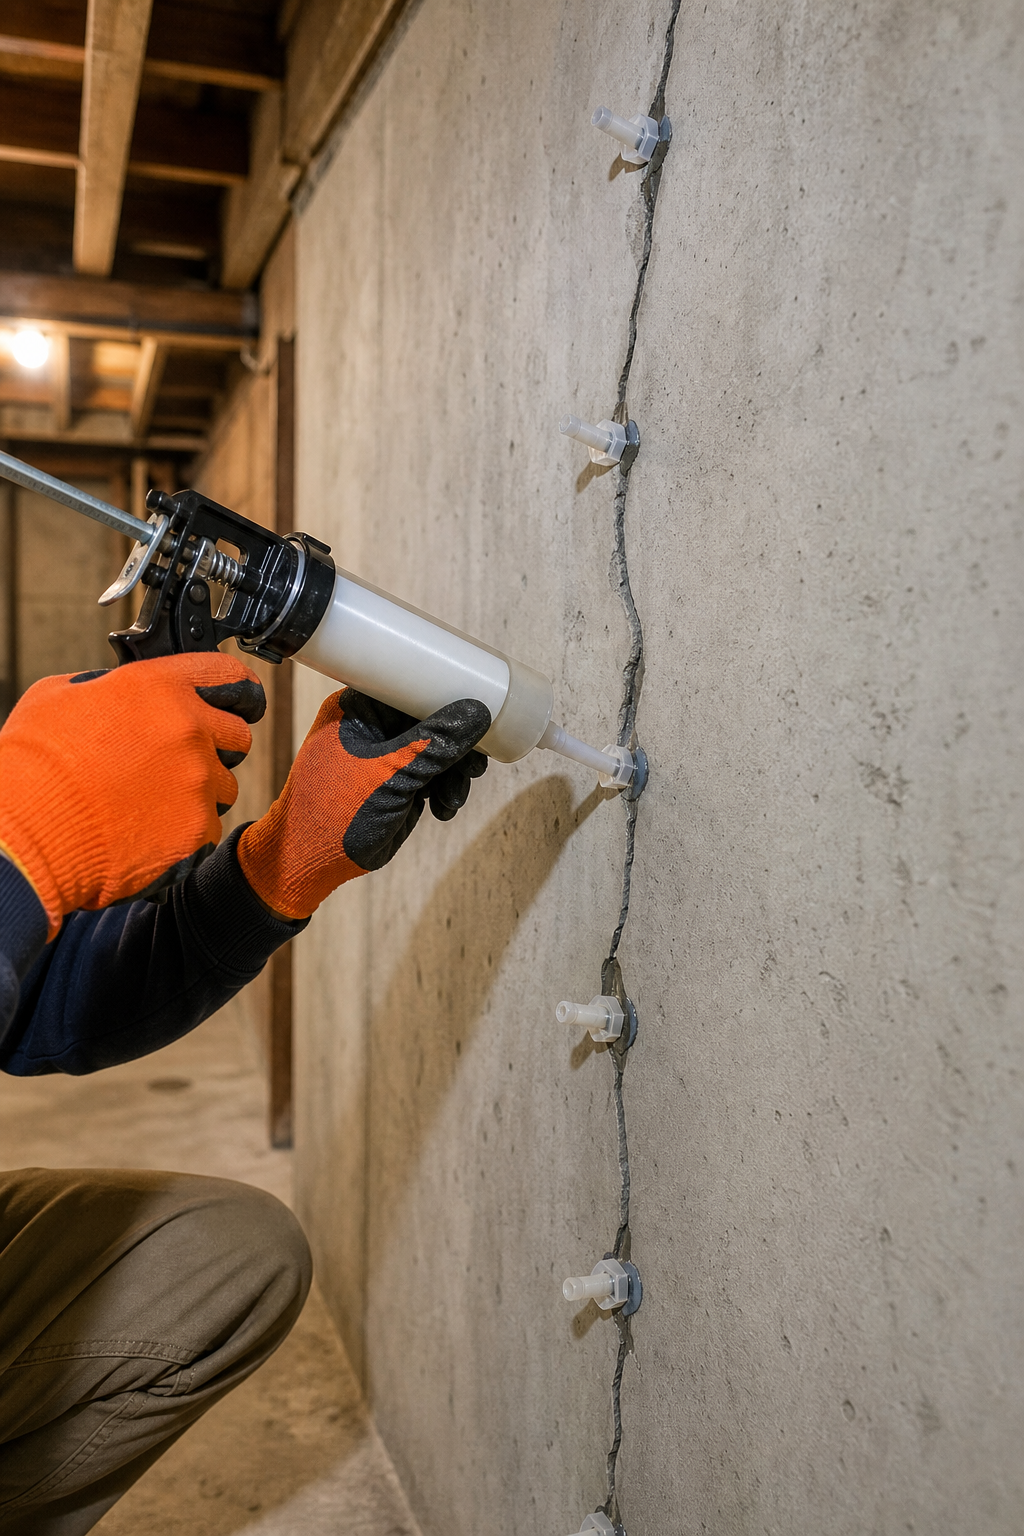
After the last port, remove the fittings and pack any surface holes with hydraulic cement or the remaining surface paste. Smooth everything flat with a putty knife. If you're working on a block foundation, pay attention to the mortar joints adjacent to the crack. Water that can't get through the crack will find the next weakest point.
Step 5: Cure, Inspect, and Waterproof After Sealing
The product needs time to reach full strength. Epoxy typically reaches handling strength within 24 hours but achieves full cure closer to 72 hours. Polyurethane foam cures faster, often within a few hours, but full chemical crosslinking can take longer in cold or dry conditions. Don't pressure-test the repair or wet the wall on purpose before the manufacturer's stated cure time.
Once cured, run a close inspection. Look at every port location. Press on the surface paste around each one. If any section feels hollow or sounds different when tapped, there's a void the resin didn't reach. That section needs a secondary injection. For foam repairs, check the foam face for any paths where water is still seeping through. Small voids can be re-injected or packed with hydraulic cement.
Sealing a crack stops one water path. It doesn't fix the underlying pressure if groundwater is consistently high around your foundation. The next layer of protection is a penetrating concrete sealer or interior waterproofing membrane applied over the repaired area. This adds a secondary barrier and also protects the concrete from freeze-thaw damage, which is the most common cause of crack expansion in cold climates.
If the crack re-opens within a few months, or if you see new cracks forming nearby, the structure may be shifting from soil pressure or settlement. That's the point to call a professional. LGFMH Construction specializes in both interior and exterior foundation repairs, and an on-site assessment will tell you whether sealing is enough or whether reinforcement is needed.
For routine maintenance after any property repair, keeping the surrounding area clean and well-maintained reduces long-term stress on the structure. A professional move-out cleaning service that includes basement and utility space cleanup can catch signs of new moisture before it becomes a problem.
FAQ
What's the difference between epoxy and polyurethane for sealing foundation cracks?
Epoxy forms a rigid, high-strength bond and is best for dry, stable structural cracks. Polyurethane stays flexible after curing and handles temperature movement better. For active water leaks, only water-activated polyurethane foam will work , epoxy won't bond to a wet surface. Match the product to the crack condition, not just the crack size.
Can I seal a foundation crack myself, or do I need a contractor?
Most vertical or hairline cracks under 1/4 inch wide on a poured concrete wall are DIY-friendly with a standard injection kit. Horizontal cracks, cracks wider than 1/4 inch, or any crack where one side sits higher than the other should be professionally evaluated first. LGFMH Construction can assess whether a crack is structural before you invest in materials.
How long does a foundation crack sealant last?
A properly applied epoxy or polyurethane injection into a stable crack can last 20 years or more. Lifespan drops if the crack continues to move, if the surface was dusty when sealed, or if water pressure wasn't fully managed. Regular visual inspection twice a year, and resealing any area that shows new separation, keeps the repair effective long-term.
Does the crack need to be dry before I apply the sealing product?
It depends on the product. Epoxy and standard polyurethane kits require a dry crack for proper bonding. Water-activated polyurethane foam actually needs moisture to cure and is the right choice when water is actively flowing through. Never apply a dry-condition product to a wet crack and expect it to hold.
When should I use a radon-rated crack repair kit?
If your home has tested above the EPA action level of 4 pCi/L, or if you're in a radon-prone region, choose a kit that specifically addresses radon infiltration alongside water sealing. RadonSeal Basement Crack Repair Kit is currently the only widely available product that addresses both concerns in a single application.
Conclusion
Start by identifying the crack type and picking the right product for what you're dealing with: epoxy for dry structural cracks, flexible polyurethane for standard non-structural repairs, and foam for active leaks. Prep matters as much as product choice. If you follow these steps and the crack keeps coming back, or if you're facing horizontal cracking or wall movement, get a professional set of eyes on it. LGFMH Construction handles exactly these repairs , reach out for an assessment before the problem gets worse.


Comments