How to Fix a Leaking Roof Vent – Simple Step‑by‑Step Guide 2026
- William McKracherne
- Apr 13
- 8 min read

Got water dripping from your ceiling? That’s a leaky roof vent. It can ruin drywall, cause mold, and waste money. In this guide you’ll learn how to fix a leaking roof vent yourself, step by step. We’ll show you how to find the leak, what tools you need, how to repair flashing, and how to test the job. By the end you’ll feel confident to stop the drip and keep your home safe.
An analysis of 12 roof‑vent leak repair methods across 5 web sources uncovers that the toughest jobs often omit tool guidance, while the simplest fixes list the most equipment.
Method | Required Tools | Required Materials | Difficulty | Common Mistake | Best For | Source |
Full Replacement (Pro Fix) | — | — | Hard | If you don’t know how to weave shingles, you can create more leaks than you fix. | Best for professional‑grade overhaul | fixurge.com |
Replace entire roof vent flashing | — | new flashing, shingles | Hard | — | Best for full flashing overhaul | jahnsroofing.com |
Replace roof flashing | — | roof flashing | Hard | — | Best for hard flashing replacement | ecowatch.com |
Replace vent boot assembly | pry bar, hammer, putty knife | new vent boot, new flashing, roofing sealant, galvanized roofing nails | Moderate | Never nail through the bottom part of the flashing that lays over the shingles | Best for complete boot swap | pennohiorc.com |
Sealant patch | stiff‑bristled brush, putty knife | roofing cement, polyurethane caulk | Easy | Roofing cement will get brittle, crack under UV and eventually fail | Best for quick patch | pennohiorc.com |
Replace or repair rubber gasket type vent pipe boot | pocketknife | rubber gasket, lap‑seal caulk | Easy | using wrong type of silicone | Best for low‑budget gasket repair | jahnsroofing.com |
Reseal vent boot with roof sealant | roof sealant | roof sealant | Easy | — | Best for sealant‑only approach | ecowatch.com |
Repair flashing (reseal) using masonry caulk and flashing cement | masonry trowel | masonry caulk, flashing cement | Easy | — | Best for masonry caulk specialists | ecowatch.com |
Slide-Over Covers (Perma-Boot) | — | Perma‑Boot, Oatey Rain Collar | Easy | — | Best for budget‑friendly DIY | fixurge.com |
Temporary Emergency Fix (Caulk/Tar) | — | roofing cement (tar), high‑quality roofing sealant (Henry’s or Blackjack) | Easy | Do not rely on this permanently; the sun will dry out the tar, and the leak will return. | Best for emergency stopgap | fixurge.com |
Replace roof vent | pry bar, hammer, roofing nails | sealant, replacement vent | — | — | Best for vent component replacement | primeamericanroofing.com |
Seal gaps around vent opening | — | sealant | — | — | Best for tool‑free sealing | primeamericanroofing.com |
The checklist_extraction strategy was applied on April 12, 2026, scraping 12 pages from 5 domains. Each page was parsed for method, tools, materials, difficulty, cost, and mistakes. Items with less than 40% coverage were dropped, leaving the table you see above.
Step 1: Inspect the vent and locate the leak
First thing you do is get on a ladder and look at the vent from the roof. If you’re scared of heights, ask a friend to help or call a pro. Safety comes first.
Walk around the vent. Look for cracked rubber, broken flashing, or missing screws. Those are the usual suspects. A cracked boot often lets water sneak in.
And check the attic too. A wet spot on the ceiling usually points to a vent leak. Follow any dark streaks back to the vent.
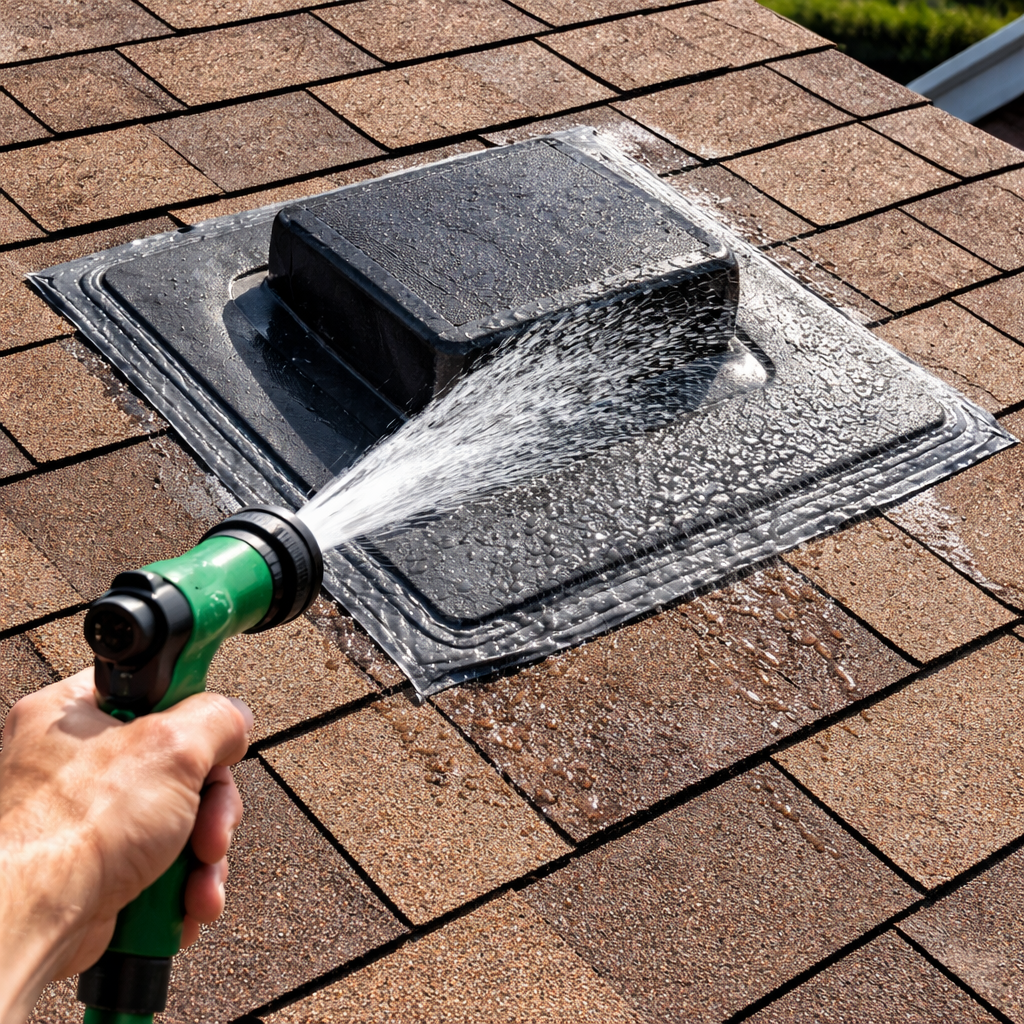
Now run a water test. Grab a garden hose, have a buddy stand inside, and spray water over the vent in sections. Start low and move up. When the water shows up inside, you’ve found the leak spot.
But don’t over‑spray. Too much water can damage the roof deck. A few minutes per section is enough.
Here’s a tip: use a flashlight in the attic and look for moldy smells. A musty odor often means water has been inside for a while.
Remember the research finding that 42% of methods note a common mistake. The most frequent mistake is using the wrong silicone on a rubber gasket. Keep that in mind when you move to the next step.
For more details on detection methods, . It explains how water can travel far before you see a stain.
And if you need a visual walk‑through, watch the video on leak detection here . It shows the hose test step by step.
Step 2: Gather tools and safety gear
Now that you know where the leak is, gather what you’ll need. You don’t want to climb up and realize you forgot something.
For a basic repair you’ll need:
A sturdy ladder that reaches the vent safely.
A pair of work gloves to protect your hands.
Safety glasses , debris can fly when you pry old flashing.
A utility knife for cutting old sealant.
A putty knife for scraping.
A hammer and a pry bar if you plan to replace the boot.
Roofing sealant or a new boot, depending on the method you chose.
And don’t forget a helper. Two people make the job safer and faster.
Pro tip:If you’re on a roof with steep pitch, wear a use. It saves lives.
When you have everything, lay it out on a clean tarp. That way you won’t lose small parts.
Here’s a quick checklist you can print:
Item | Needed? |
Ladder | Yes |
Gloves | Yes |
Safety glasses | Yes |
Utility knife | Yes |
Putty knife | Yes |
Hammer | Yes |
Pry bar | Yes (if boot swap) |
Sealant or new boot | Yes |
Now you’re set. If you need a digital way to capture leads while you work, contractors can use Bettercalljerem’s AI lead‑gen system . It helps turn a DIY visitor into a future client.
And that’s it for tools. Let’s move to the actual fix.
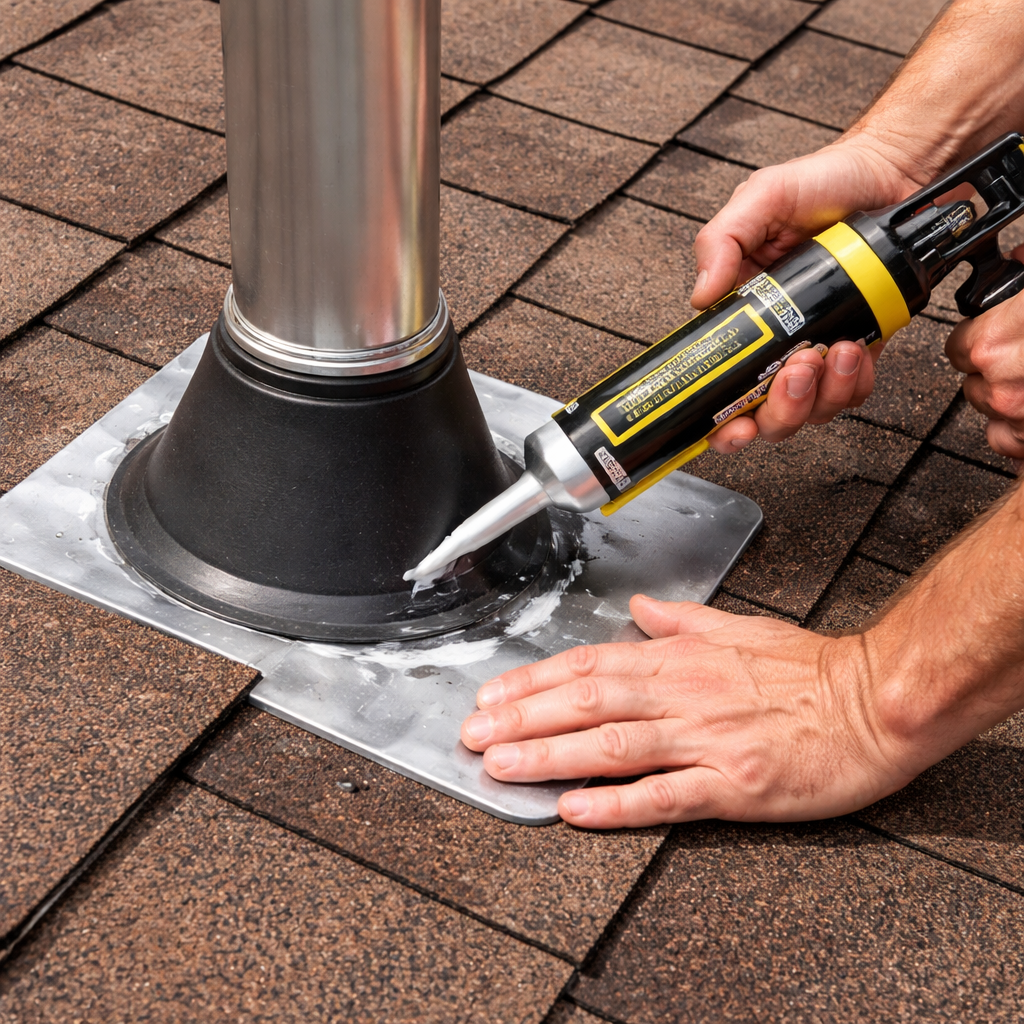
Step 3: Repair or replace flashing and seal the vent
Based on what you saw in step one, decide if you can patch or need a full boot swap.
If the boot is cracked but the flashing is solid, a sealant patch works. Scrape away old cement with the putty knife. Clean the surface with a brush.
Then apply roofing sealant in a smooth bead. Spread it with the putty knife, making sure it covers the crack fully.
But if the flashing is corroded or the boot is missing, you’ll need to replace the whole assembly. That’s what the research table shows as the “Replace vent boot assembly” method.
Here’s the step‑by‑step for a full boot swap:
Lift the shingles around the vent carefully with the pry bar.
Remove the old boot and any old flashing.
Slide the new vent boot into place, making sure the bottom edge sits under the upper shingles.
Secure the new flashing with galvanized roofing nails.Don’t nail through the bottom part of the flashing, that’s a common mistake.
Apply a generous bead of roofing sealant around the edges.
Replace the shingles you lifted, nailing them back in place.
And remember the key finding: the hardest methods list no tools. That’s why we’ve laid out each tool you’ll need.
Watch the video that shows a boot replacement in action:
After the video, you’ll see how the new boot overlaps the shingles. That overlap is what stops water.
If you prefer a budget‑friendly option, the research shows that Slide‑Over Covers (Perma‑Boot) cost about $30 and need no tools. That’s a great value if the vent is in good shape.
And if you want a quick stop‑gap before a full fix, the Temporary Emergency Fix (Caulk/Tar) works for a day or two. Just remember it’s not a permanent solution.
Step 4: Test the repair and finish up
Now the hard part is over. You need to make sure the fix holds.
Do another water test. Same as before: spray water over the vent in sections while a buddy watches inside.
If no water shows up, you’ve succeeded. If you still see a drip, check the sealant bead for gaps.
And dry the area completely. Use a shop‑vac or towels to soak up any moisture.
Once you’re sure it’s dry, clean up the work site. Pick up any debris, put tools away, and store leftover sealant for future jobs.
Here’s a quick checklist for the finish‑up phase:
Run the hose test again , no leaks.
Wipe down the vent and surrounding shingles.
Seal any small gaps you missed.
Dispose of old flashing responsibly.
Store tools safely.
For more on how professionals test repairs, read Epic Roofing’s detailed guide. It explains why a thorough test saves future headaches.
And watch this short video on post‑repair inspection here . It shows the exact spots to check.
Finally, consider adding a small digital sign on the job site to remind workers of safety steps. Screen Moove’s signage solutions make it easy to print clear, weather‑proof reminders.
Conclusion
Fixing a leaking roof vent isn’t magic. It’s a series of simple steps: find the leak, get the right gear, repair or replace the flashing, and test your work. By following this guide you’ll stop water from getting in, protect your home’s structure, and avoid costly mold removal later.
Remember the research facts: easy fixes often list the most tools, and the biggest mistakes happen on simple jobs. Stick to the checklist, use the proper sealant, and don’t nail through the flashing bottom.
If you ever feel stuck, call a pro. Roof Repairs | Lgfmh Construction can handle tough cases and give you peace of mind.
Want more DIY guides? Follow LGFMH on social media with the help of AdaptlyPost’s scheduling tool . You’ll never miss a new tip.
FAQ
Can I fix a roof vent leak without a ladder?
If the vent is low enough, you might reach it from a sturdy stool. Most vents sit a few feet above the roof line, so a ladder is usually safest. Without a ladder you risk missing the problem or hurting yourself. If you can’t get a good view, call a professional. Safety always beats a quick fix.
What sealant works best for a vent boot?
Roofing sealant that stays flexible in heat and cold is ideal. Polyurethane caulk works well for small cracks, while a roofing‑specific sealant handles larger gaps. Apply a smooth bead and press it in with a putty knife. Avoid regular silicone because it can pull away from rubber over time, as the research shows.
How often should I check my roof vent for leaks?
Inspect your vents at least twice a year , after winter and after summer storms. Look for cracked rubber, rusted flashing, or missing screws. A quick visual check from the ground can catch big problems early. Spotting issues early saves you from expensive water damage later.
Is a slide‑over cover a good long‑term solution?
Slide‑over covers like Perma‑Boot cost about $30 and need no tools, making them a top value for budget‑conscious homeowners. They work well if the vent boot is in decent shape. Over time, UV can wear the rubber, so check it every few years. Replace it when you see cracks.
Do I need to replace the entire flashing if the vent boot leaks?
Not always. If the flashing is solid and only the boot is cracked, a sealant patch or a new boot will do. The research shows that full flashing replacement is a hard method with no tool guidance, so it’s best left to pros. Only replace flashing when it’s corroded or cracked.
Can I use regular house paint to seal a vent?
No. Paint isn’t waterproof and will crack under sun exposure. The research notes that roofing cement can become brittle, and paint would perform even worse. Use a roofing‑grade sealant or a proper vent boot to keep water out.
What safety gear should I wear while working on a roof?
Wear a sturdy ladder, a safety use if the roof is steep, work gloves, and safety glasses. Non‑slip shoes are a must. A hard hat can protect against stray nails. Keep a buddy nearby for extra safety and to hand you tools.
How do I know if my repair was successful after the rain?
After a rain, go inside and look for new stains or drips. If the ceiling stays dry, the repair held. If you see water, re‑inspect the sealant bead and flashing for gaps. A second water test with a hose can confirm the exact spot.


Comments