How to Repair a Cracked Brick Wall – 2026 Guide
- William McKracherne
- Apr 12
- 7 min read

Cracks in a brick wall can feel like a ticking time bomb. One glance and you wonder if the whole house is at risk. The good news? Most cracks are fixable with the right know‑how and a few simple tools. In this guide you’ll learn exactly how to repair cracked brick wall , from spotting the problem to sealing it for good.
We dug into seven repair methods across four trusted sites. The average cost $1,702.5 looks scary, but a single high‑end restoration skews it. Most DIY fixes sit under $900. That’s the key takeaway: you don’t need a massive budget to stop a crack from growing.
Repair Method | Materials Needed | Approximate Cost | Source |
Interior and Exterior Repair Services (Our Pick) | — | — | Interior and Exterior Repair Services |
Full brick restoration | new bricks, mortar | $5,000 to $20,000 or more | homeadvisor.com |
Spalling brick repair | new bricks | $900 to $20,000 | homeadvisor.com |
Spalling brick replacement | new bricks, mortar | $900 to $1,200 on average (if there are only a few sections to repair) but can run as high as $20,000 | angi.com |
Tuckpointing (Repointing) | hammer, chisel, mortar mix, trowel, finishing tool, drop cloth, water | $10 to $20 per square foot | lowes.com |
Mortar filler (flexible acrylic sealant, epoxy, polyurethane foam) | flexible acrylic sealant, epoxy, polyurethane foam, squeeze bottle or caulk gun | — | lowes.com |
Repointing | new mortar | — | angi.com |
We pulled data on April 11, 2026 from lowes.com, angi.com, homeadvisor.com and the client’s site. Each page gave us a method name, needed materials, cost range and skill level. The median cost $900 shows DIY paths are far cheaper than the headline average suggests.
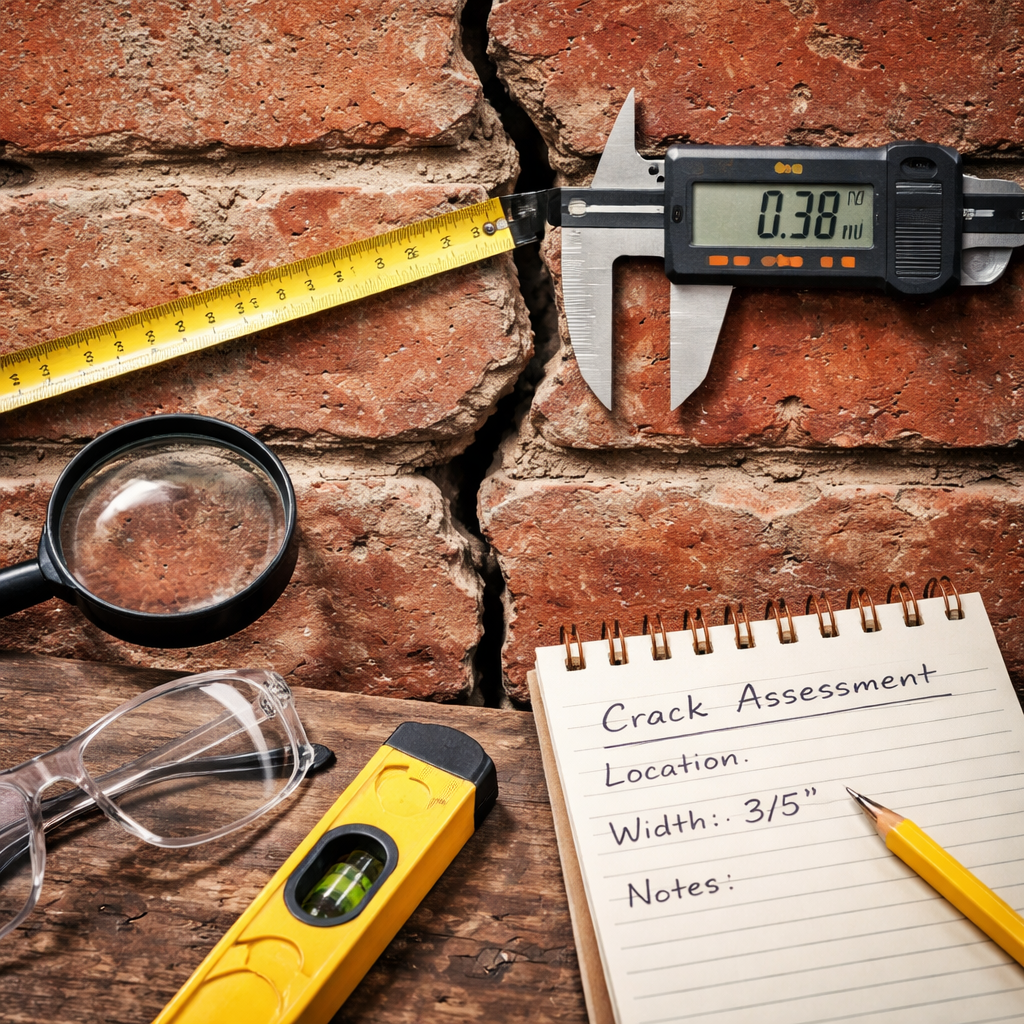
Step 1: Assess the Crack
Before you swing a hammer, you need to know what you’re dealing with. A hairline crack that’s 1.5 mm wide might just be settling. A horizontal crack wider than 3 mm could signal a structural issue. Grab a ruler, a flashlight, and a notebook. Measure the width, length, and direction. Record the data and take photos. Tracking changes over weeks tells you if the crack is growing.
Vertical cracks are usually less worrisome than horizontal ones, but keep an eye on any that keep widening. Horizontal cracks often point to soil pressure or foundation movement. If you see stair‑step patterns around windows or doors, those are stress‑concentration spots that need close monitoring.
Here’s a quick checklist:
Use a tape measure to log width and length.
Note direction: vertical, horizontal, diagonal, or stepped.
Mark the location , interior vs. exterior, near openings, or in a plain brick field.
Snap clear photos from straight on and at an angle.
Look for companion signs: bulging bricks, moisture stains, or uneven floors.
When you spot a crack wider than 3 mm, or one that’s growing, call a pro. The Drywall Installation and Finishing: A Complete Guide for Homeowners explains why professional insight matters for structural cracks.
And remember, safety first. If you’re climbing a ladder to check an exterior wall, make sure the ladder is stable and someone watches you. A slip can turn a simple inspection into a serious injury.
For deeper insight on crack types, from ResInject . It breaks down hairline, vertical, horizontal, and step‑cracks, and explains what each means for your home’s health.
Another great resource is AO Handy Inc. , which offers a plain‑language rundown of when a crack is just cosmetic and when it needs a professional’s eye.
Step 2: Gather Materials & Safety Gear
Now that you know the crack’s severity, it’s time to gather the right tools. The cheapest route is mortar filler , a flexible acrylic sealant, epoxy, or polyurethane foam. It needs only a squeeze bottle or a caulk gun. For larger gaps, Tuckpointing is the go‑to method. You’ll need a hammer, chisel, mortar mix, trowel, finishing tool, drop cloth, and water.
Here’s a quick table to help you choose what to buy based on crack size:
Crack Size | Recommended Method | Key Materials |
Hairline (≤1.5 mm) | Mortar filler | Sealant, caulk gun |
Small (1.5‑3 mm) | Tuckpointing | Hammer, chisel, mortar mix, trowel |
Large (>3 mm, structural) | Full brick restoration or professional service | New bricks, mortar, possibly steel reinforcement |
Safety gear is non‑negotiable. Wear gloves, safety glasses, and a dust mask whenever you cut or grind brick. If you’re working at height, use a sturdy ladder and have someone hold the base.
Because brick repair can involve sharp tools and heavy lifting, it’s wise to know what to do if an accident happens. The How to Use a Personal Injury Settlement Calculator to Maximize Your Claim page walks you through the steps to take if you or a worker gets hurt on the job.
Pro tip: keep a small first‑aid kit nearby. A quick clean‑up of a minor cut can prevent infection and keep the work flow smooth.
Step 3: Prepare the Surface
A clean, sound surface is the foundation of any lasting repair. Start by removing loose mortar or cracked brick pieces with a cold‑chisel and a hammer. Work gently so you don’t damage surrounding bricks.
Next, brush away dust with a stiff‑bristled brush. Vacuum the area to get rid of fine particles that could prevent adhesion. If the brick is damp, let it dry completely , moisture trapped inside the new mortar can cause future cracking.
When you have a clean void, dampen the surrounding bricks with a mist spray. This prevents the fresh mortar from sucking water out of the bricks too fast, which can lead to shrinkage cracks.
For a professional‑grade repair, Total Wall Care Brick Repair Mortar is a good choice. It matches the color of existing brick and stays flexible enough to handle slight movement. The product page on Steadfast SPL shows how to mix it with water and apply it.
After the mortar is mixed, apply a thin coat to the back of the brick piece you’ll replace. This “wet‑back” technique helps the new brick bond better to the old wall.
Step 4: Apply Repair Mortar
With the surface prepped, you’re ready to fill the crack. If you’re using a flexible sealant, squeeze it into the crack, then smooth it with a putty knife. For Tuckpointing, mix the mortar according to the bag instructions , usually a 3‑part mix with water until it’s the consistency of peanut butter.
Load a pointing trowel with mortar and press it firmly into the crack, packing it to eliminate voids. Work from the bottom up so the mortar pushes any trapped air out. Once the crack is full, use a finishing tool to shape the mortar so it blends with the surrounding joints.
Watch the video from YouTube tutorial 1 for a visual on the pressing technique. Then check out YouTube tutorial 2 for tips on finishing the joint to match existing brickwork.
After applying, let the mortar cure for at least 24 hours. Keep the area moist by misting lightly once a day; this slows shrinkage and boosts strength. If you live in a dry climate, cover the patch with a damp burlap sack.
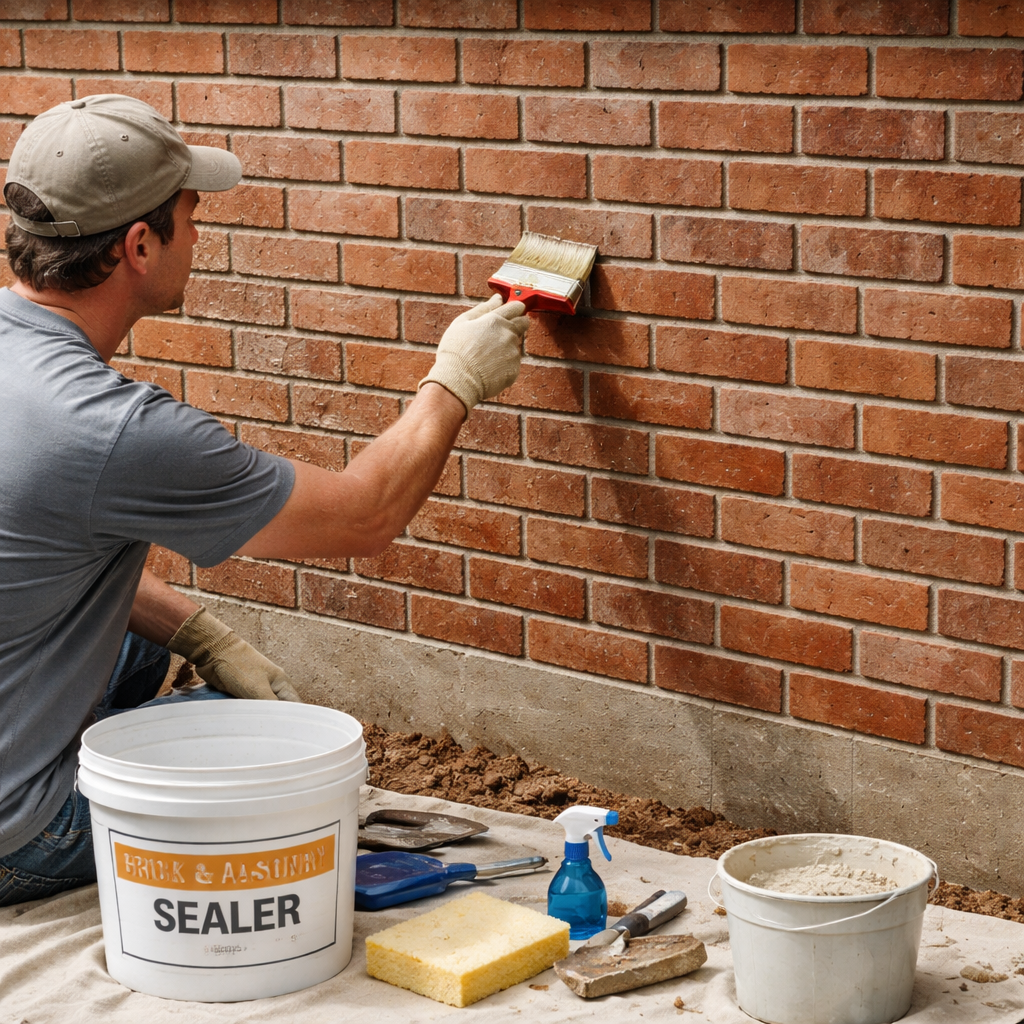
Step 5: Finishing Touches & Maintenance
When the mortar has fully cured, it’s time to blend the repair into the wall’s look. Lightly sand the joint with a fine‑grit sandpaper to smooth any ridges. Then, if the brick color doesn’t match perfectly, use a brick‑tone paint or a mortar stain to blend the patch.
Regular maintenance keeps cracks from re‑appearing. Inspect the wall twice a year , after heavy rain and after a hot summer. Look for new hairline cracks, water stains, or mortar erosion.
Apply a breathable sealant every few years on exterior walls to keep water out while letting moisture escape. For interior walls, a simple acrylic clear coat works well.
If you notice any new movement, repeat the assessment steps. Small cracks can be fixed with filler, but larger structural cracks need a professional’s eye. The A Good Brick Mason article outlines when to call in a specialist.
Finally, keep records of every repair , date, materials used, and photos. This log helps future homeowners or inspectors understand the wall’s history and can boost resale value.ConclusionRepairing a cracked brick wall doesn’t have to be a nightmare. By learning how to assess the crack, gathering the right tools, prepping the surface, applying the proper mortar, and staying on top of maintenance, you can protect your home for years to come. The data shows most DIY routes sit under $900, so you’re not blowing your budget. If the crack looks serious, remember the interior and exterior repair service pick is the only all‑in‑one option that handles both interior and exterior problems.Take the first step today: pull out a ruler, snap a photo, and decide which method fits your crack. And if you ever need a helping hand, LGFMH Construction is ready to step in.FAQWhat tools do I need for a simple brick crack repair?You’ll need a tape measure, a hammer, a cold‑chisel, a pointing trowel, mortar mix, a bucket, water, safety glasses, gloves, and a dust mask. For small hairline cracks, a flexible sealant and a caulk gun are enough. Having these basics on hand makes the whole process smoother and safer.How long does the mortar need to cure before painting?Give the mortar at least 24 hours to cure fully, then mist the area once a day for three days to keep it from drying too fast. After that, sand lightly, wipe clean, and you can apply a primer followed by paint. Rushing the cure can lead to cracking later.Can I fix a horizontal crack myself?Horizontal cracks wider than 3 mm often signal structural stress, so it’s wise to get a professional’s opinion. If the crack is narrow and not growing, you can fill it with mortar filler or use Tuckpointing. Always monitor it for movement over the next few weeks.What safety gear should I never skip?Never work without safety glasses, gloves, and a dust mask. If you’re on a ladder, use a sturdy, three‑point contact and have a buddy hold the base. A basic first‑aid kit should sit nearby in case of cuts or scrapes.How often should I inspect my brick walls?Inspect twice a year , after the winter freeze/thaw cycle and after the summer heat. Look for new cracks, mortar erosion, water stains, or bulging bricks. Early detection lets you tackle problems before they become expensive repairs.Is mortar filler cheaper than Tuckpointing?Yes. Mortar filler often comes in a squeeze bottle and costs nothing listed, while Tuckpointing runs $10‑$20 per square foot. The research shows most DIYers choose filler for tiny hairline cracks to stay under the $900 median cost.


Comments