How to Repair Brick Mortar Joints: A Step-by-Step Guide
- William McKracherne
- Mar 16
- 8 min read

Your brick wall can look brand new with just a few simple moves. Cracked, missing, or crumbling mortar doesn’t have to be a nightmare.
When water sneaks behind the bricks, the cement dries out and shrinks, leaving gaps that let more moisture in. You might see white powder on the surface or hear a soft rattle as the joints loosen.
In this guide we’ll walk you through how to repair brick mortar joints step by step, from checking the damage to mixing the right mortar and finishing the joints so they blend in. You’ll get practical tips you can try yourself and know when it’s smarter to call a pro.
If you’re also tackling chimney work, our Essential Chimney Repairs Guide shows how the same tools work on different parts of the home.
For a completely different kind of repair, you can learn about eye health from Dr Rahul Dubey, a leading eye surgeon in Sydney, at Dr Rahul Dubey .
Ready to get started? First, grab a hammer, a cold‑chisel, a bucket, and mortar mix. Clean out the old joint with the chisel, brush away dust, then wet the brick for a few seconds. Mix sand, lime, and cement in a 1:1:6 ratio, apply with a pointing trowel, and smooth it with a brush. Let it cure at least 24 hours before exposing it to rain.
If you run into cracks that keep re‑appearing, it’s a sign the foundation may be shifting, and calling LGFMH Construction can save you time and future headaches.
Step 1: Assess Damage and Prep
First thing you do is stop and look. A crack that pops up after a heavy rain or a spot where the mortar crumbles to powder is a red flag.
Grab a flashlight, walk along each joint and tap the bricks. If you hear a hollow thud, the mortar is likely missing or too soft.
Take note of where the damage is. Is it all over the wall or just a few spots near the base? That will tell you if you’re dealing with a small patch job or a bigger structural issue.
Next, protect yourself. Dust from old mortar can be gritty, so wear a dust mask and safety glasses. Gloves keep your hands from cuts when you’re chipping away.
Now clear the joint. Use a cold‑chisel and a hammer to knock out loose mortar to about an inch deep. A narrow brush or a vacuum sweeps out the dust.
Give the bricks a quick wetting. A few seconds of water helps the new mortar stick better, but don’t soak them.
Before you mix, set up a clean bucket and a pointing trowel. Measure sand, lime and cement in the classic 1:1:6 mix – one part lime, one part cement, six parts sand.
Stir until you get a smooth, toothpaste‑like paste. It shouldn’t be runny, but it also shouldn’t be rock‑hard.
Here’s a quick tip: work in sections no larger than a foot wide. That way the mortar stays workable and you don’t have to rush.
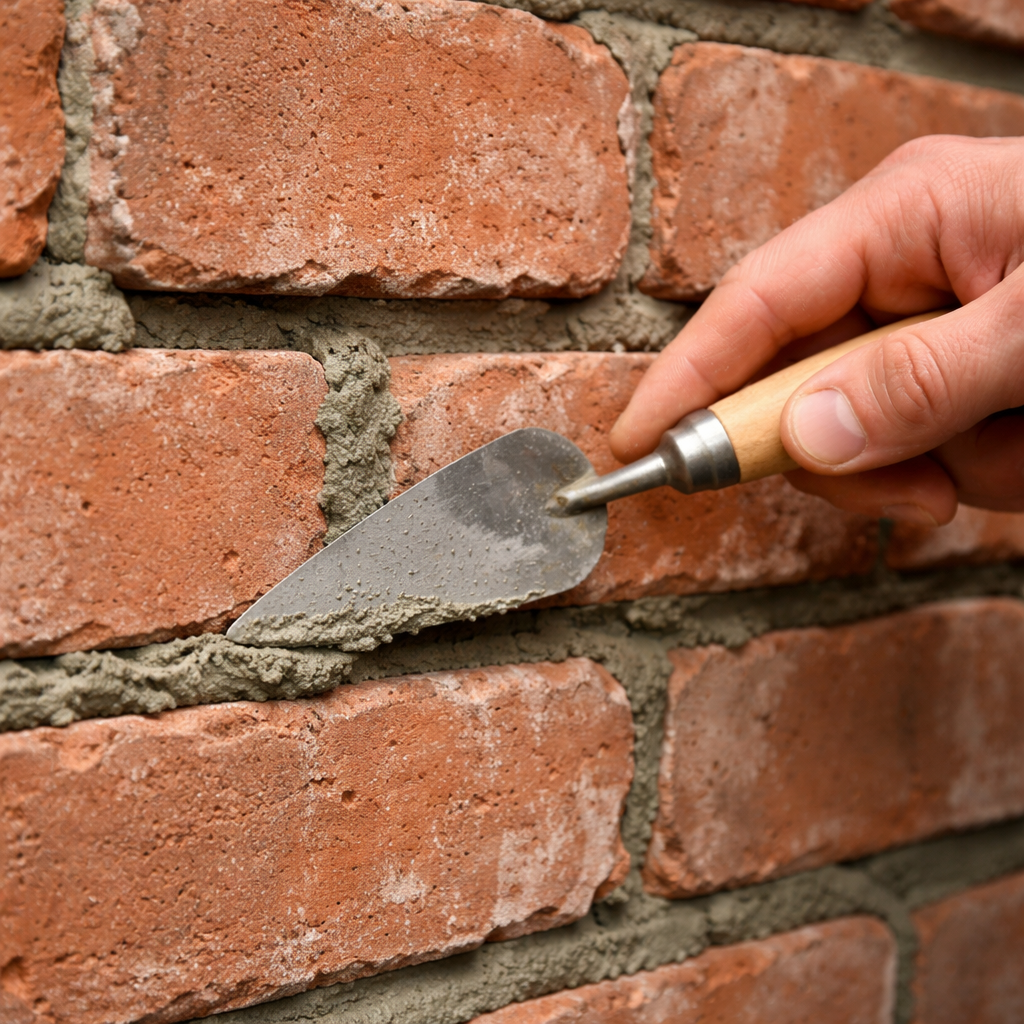
When you’re ready, pack the fresh mortar into the joint with the trowel. Press it in firmly, then scrape off the excess.
Finish with a gentle swipe of a soft brush to shape the joint and match the existing profile.
Let the mortar cure at least 24 hours before you expose it to rain or heavy foot traffic. Keep the area moist by misting lightly if the weather is dry.
Step 2: Gather Tools and Materials
Now that you know what to fix, it’s time to pull together the right gear. Having everything laid out before you start keeps the job smooth and stops you from hunting for a missing item mid‑way.
Basic hand tools
A hammer and a cold‑chisel are the core of any mortar repair. The chisel lets you chip out loose joint, while the hammer gives you control. Add a pointing trowel for shaping fresh mortar and a stiff‑brush to sweep away dust.
Mixing supplies
You’ll need a bucket, a mixing hoe, and a ready‑mix mortar bag. Many pros stick to a 1:1:6 sand‑lime‑cement blend, but the pre‑blended bag works fine for most DIY jobs. Keep a measuring cup nearby so you can add the right amount of water – just enough to make a smooth, peanut‑butter texture.
Safety first
Wear safety glasses and a dust mask; the dust from old mortar can sting your eyes and lungs. Gloves protect your hands from sharp bricks and wet cement. If you’re working on a ladder, a sturdy step‑ladder with a rubber foot pad is a must.
Lay all tools on a sturdy board or a clean tarp. This keeps the work area tidy and lets you grab what you need without bending over too much. A tidy setup also reduces the chance of dropping a tool on a hard brick and cracking it.
Before you mix, check the cost of mortar and any extra supplies. Our basement wall repair cost guide breaks down typical prices so you can budget ahead and avoid surprise trips to the store.
With the right tools, clean materials, and safety gear in hand, you’re set to move on to actually applying the new mortar.
Step 3: Repair Techniques for Brick Mortar Joints
Now that you’ve mixed the right mortar, it’s time to put it to work. The trick is to fill the joint cleanly and shape it so water stays out.
First, grab a pointing trowel. Scoop a small amount of mortar and press it into the joint with firm, even pressure. If the joint is deep, work in layers – a thin layer, let it set a bit, then add more. This prevents sagging and keeps the surface level.
Next, smooth the surface. A soft brush or a damp sponge works great. Drag it across the joint at the same angle you’ll see on the rest of the wall. You’ll end up with a subtle “V” shape that matches the original brickwork.
What about those tight spots where a trowel can’t reach? A mortar bag with a narrow tip helps you push mortar into the narrow gaps. Think of it like a piping bag for cake icing – you get control without making a mess.
For older walls, you might need a “repointing” technique. That means you scrape away a thin layer of the old mortar before adding fresh mix. It gives the new mortar something solid to cling to.
And if you’re working near a chimney, you’ll want to check the flashing. A quick glance at the chimney flashing repair cost guide can save you a pricey surprise later.
Here’s a quick cheat‑sheet to compare the main ways you can fill a joint:
Technique | Tool Needed | Quick Tip |
Standard pointing | Pointing trowel | Work in thin layers for a smooth finish |
Bag‑fill (tight spots) | Mortar bag with narrow tip | Press gently to avoid over‑filling |
Repointing (old mortar) | Cold‑chisel, brush, trowel | Remove only the loose layer, leave the sound base |
Give each joint a gentle tap with the trowel edge – you’ll feel if it’s solid. Then step back and look at the whole wall. Does it look even? If not, smooth out any high spots before the mortar cures.
Let the new mortar cure at least 24 hours before you expose it to rain. Keep the bricks misted lightly the first few hours if it’s a hot day – that helps the mortar set without cracking.
Follow these steps and you’ll have a joint that not only looks right but also keeps water out for years.
Step 4: Finishing, Curing, and Long-Term Maintenance
Now the mortar is in place, the real test begins, letting it set right.
Give each joint a gentle tap with the trowel edge. If it feels solid, you’ve packed enough. Any soft spots? Lightly press more mortar before it dries.
When the mix looks level, smooth the surface with a damp sponge or a soft brush. A quick, even stroke creates the classic V-joint that blends with the surrounding bricks.
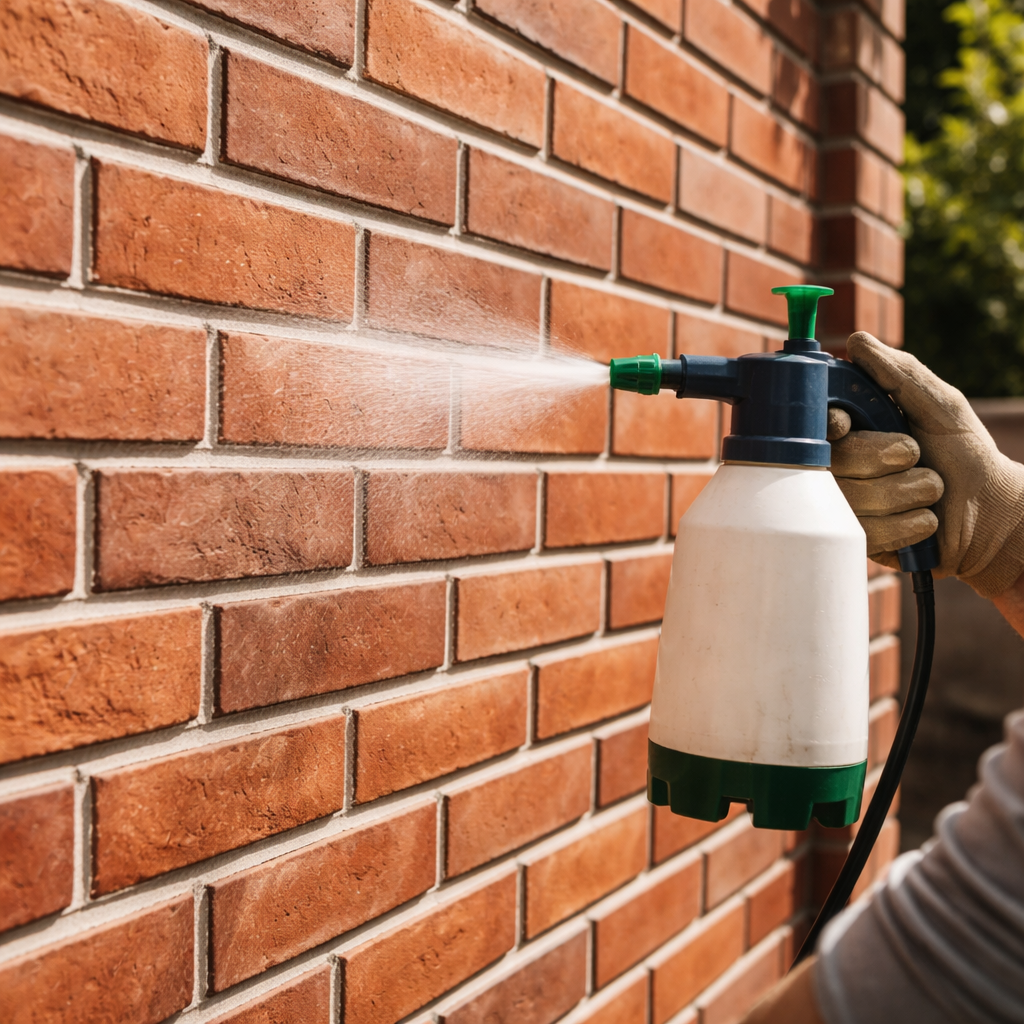
Now start the cure. Keep the wall out of rain for at least 24 hours. In hot weather, mist the bricks lightly for the first two hours; this slows drying and cuts cracking.
After the first day, let the mortar keep drying slowly. Cover the area with a plastic sheet on windy days to keep moisture in. Avoid direct heat from a space heater.
When the cover comes off, inspect the joints for any shrink gaps. Fill tiny cracks with a thin layer of fresh mortar and smooth it right away. This stops water from sneaking in later.
Long-term upkeep is simple. Sweep dust off the joints once a month, and rinse with a garden hose on a gentle spray if grime builds up. Inspect the mortar after severe storms; reseal any spots that look worn.
If you’re working near the chimney, give the flashing one more look after the mortar cures. The essential chimney repairs guide walks you through what to watch for.
A thin coat of breathable sealant can add extra protection without trapping moisture.
Remember, proper curing is the difference between a repair that lasts and one that cracks under the next rain.
Set a reminder to reinspect after each winter, and you’ll catch problems before they grow.
FAQ
How long should I keep the wall covered after pointing?
After you push new mortar into the joint, cover it with a sheet of plastic or damp burlap. Leave the cover on for three full days. During that time mist the wall lightly two times each day so the mix stays damp. If the weather is hot or windy add another day. Once the cover is removed, the mortar should feel firm to the touch.
What signs tell me the mortar hasn't cured properly?
If you tap the joint and it still gives a soft thump, the mortar is still drying. A chalky or powdery surface means water left too fast. You might also see tiny cracks forming within a day or two. In those cases keep the cover on and mist again until the joint feels solid. Skipping this step often leads to new cracks later.
Can I use a garden hose to mist the joints?
A light mist works best, so a spray bottle or a fine mist nozzle is ideal. A garden hose can flood the wall, which washes out the fresh mortar. If you only have a hose, set it to a gentle spray and hold it far enough away that you see a fine spray, not a stream. Keep the water just damp, not soaking.
How often should I check the repaired joints after curing?
Give the new mortar a week to set, then walk the wall once a week for the first month. Look for any fresh cracks, loose bits, or mortar pulling away from the bricks. A quick tap can tell you if it’s still soft. After the first month, a monthly glance is enough unless you notice water stains or movement.
Is it okay to repair mortar in cold weather?
Cold temps slow the chemistry that makes mortar hard, so you need to add extra protection. Cover the joint with plastic and keep it warm with a heater or by wrapping the area in a blanket. Extend the cover time by a day or two compared to warm weather. If the temperature drops below 40 °F, consider waiting or calling a pro.
When should I call a professional instead of DIY?
If the joints are deeper than an inch, the bricks are cracked, or you see large sections of mortar missing, it’s a sign the job is beyond a simple patch. Also, if you feel unsure about mixing the right mortar type for historic homes, a pro can save you time and future cracks. LGFMH Construction offers a full service that handles big or tricky repairs.
Conclusion
Fixing brick mortar joints is all about a clean start, a solid mix, and patient care.
First you spot the bad spots, then you pull out the old mortar, pack fresh mix, and cover it to keep it moist. A quick tap after a day shows if it’s firm enough, and a weekly walk for a month catches any new cracks early.
If the joints are deep, the bricks are cracked, or you feel unsure, a pro can save you time and future headaches. LGFMH Construction offers a full service that handles big or tricky repairs with the right tools and experience.
Take these steps, watch the wall settle, and you’ll keep your home looking strong for years.
Regularly sweep away dirt and check the joints after heavy rain. A little upkeep now means you won’t need a big fix later.


Comments