How to Replace a Damaged Deck Railing
- William McKracherne
- May 6
- 6 min read

Your deck railing is cracked or missing. It can feel unsafe and ruin the look of your outdoor space. In this guide we walk you through how to replace a damaged deck railing from start to finish. You’ll learn how to spot trouble, pick the right tools, take safe steps, and finish with a clean look.
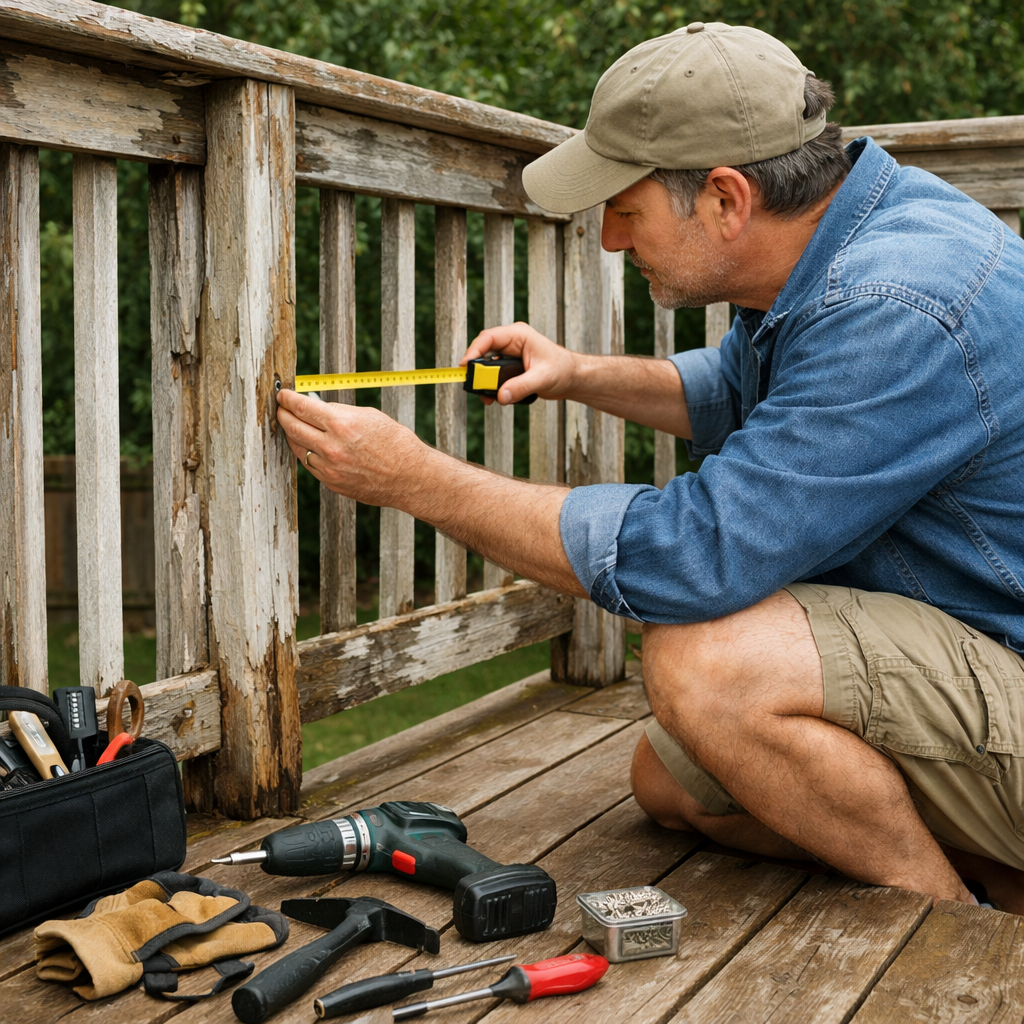
Step 1: Assess the Damage and Gather Tools
First, walk the rail. Look for rotted posts, bent balusters, or loose fasteners. A quick visual check helps you decide if a single section or the whole run needs new parts.
Next, note the material. Wood, metal, and composite all need different fasteners. Write down the size of each post and rail so you can buy exact replacements.
10%of DIY guides list needed tools
Now make a tool list. You’ll need a tape measure, level, hammer, pry bar, reciprocating saw, drill with bits, safety glasses, gloves, and a dust mask. If you plan to cut metal, add a metal‑cutting blade.
Safety comes first. OSHA recommends wearing eye protection and gloves when cutting or prying old wood and metal. A dust mask keeps you from breathing saw dust, especially with pressure‑treated lumber.
Pro Tip:Snap a chalk line along the top of the existing rail. It gives you a straight reference for the new rail and saves guesswork.
Check local code. Most codes require railings to be at least 36 inches high and able to withstand a 200‑lb force. Knowing the rule early avoids rework later.
When you have your list, head to the store. Buying everything at once cuts trips and keeps the project moving.
Bottom line:A clear damage assessment and a complete tool list set the stage for a smooth replacement.
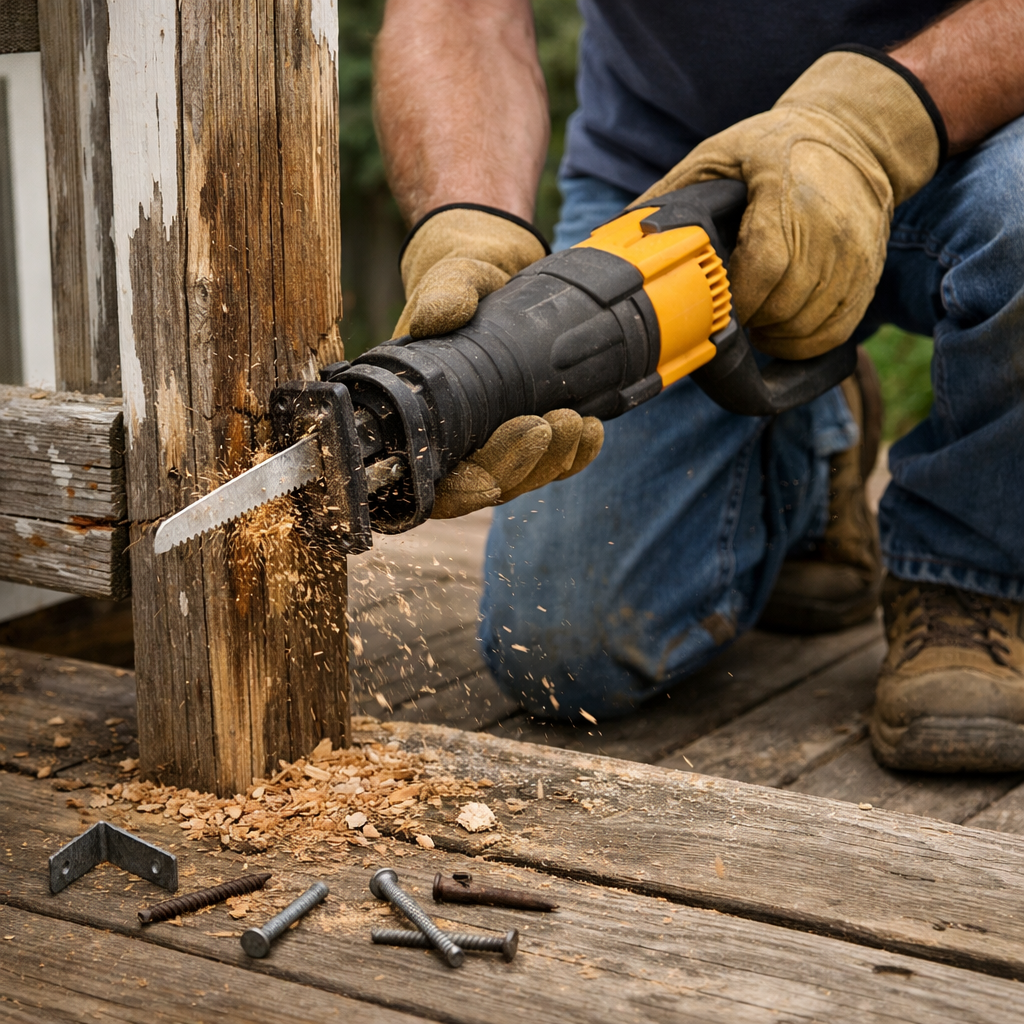
Step 2: Remove the Damaged Railing Section
Start by clearing out the balusters. Hit them from behind with a hammer and they pop off. Watch your knees; you’ll be bending a lot.
Gather the old pieces in a safe pile. Rusty nails can bite, so keep a metal bucket nearby for disposal.
Now cut the rails. A reciprocating saw with a carbide blade slices through wood and nails quickly. Follow the guide from Toolbox Divas for safe cuts.
After the rails are off, pry the 4×4 posts loose with a pry bar. Work slowly to avoid splintering the deck joists.
"A railing must hold a 200‑lb load in any direction," says the International Building Code.
Key Takeaway:Removing the old rail is quick if you work from the back and keep fasteners organized.
Dispose of the wood responsibly. Many cities offer bulk pickup or a local dump accepts construction waste.
Check the deck surface for damage once the rail is gone. Small cracks in the joists may need repair before you install new posts.
Bottom line:Careful demolition protects the deck and keeps the work area safe.
Step 3: Install the New Railing Posts
Measure the spacing. Most wood posts sit six feet apart; metal or composite can stretch to eight feet. Use the calculator from Wikipedia’s deck page to confirm.
Mark each post location on the deck surface. A level ensures the marks are even.
Drill pilot holes for the post brackets. This stops the wood from splitting when you bolt the post in place.
Set the post. Place it on the mark, level it, and secure it with lag bolts. Tighten until the post stands firm but don’t crush the wood.
Check for plumb. Use a level on both sides of the post. If it leans, add shims until it’s straight.
Pro Tip:Add a 1‑½‑inch gap between the house wall and the first post. It lets you fasten without hitting the ledger flashing.
Repeat for each post. Keep a spacing chart handy so you don’t end up with a short last span.
When all posts are up, give the whole line a quick shake. Any movement means a post isn’t tight enough.
Bottom line:Even post spacing and solid anchoring make the railing strong and code‑compliant.
Step 4: Attach Top and Bottom Rails
Lay the top rail on the posts. It should sit flush with the post caps.
Secure it with screws that match the post material. For wood, use corrosion‑resistant deck screws. For metal, use self‑drilling screws.
Repeat for the bottom rail. It helps keep the balusters aligned and adds rigidity.
Check the rail height. Most codes require the top rail at 36‑inches above the deck surface.
Key Takeaway:Proper rail height and tight screws keep the railing safe for kids and pets.
Run a level along the rail to catch any sag. If you see a dip, tighten the nearest screws and re‑check.
Now drill pilot holes for the balusters. This step keeps the balusters straight and spaced evenly.
Finish with a quick visual inspection. Look for any gaps between rail and post; fill them with exterior‑grade sealant.
Bottom line:Secure rails at the right height and level for a safe, stable railing.
Step 5: Install Balusters and Finishing Touches
Balusters come in wood, metal, vinyl, and glass. Pick the type that fits your style and budget.
Type | Pros | Cons |
Wood | Classic look, easy to paint | Needs regular maintenance, can rot |
Metal | Strong, low maintenance | Can get hot in sun, higher cost |
Vinyl | Cheap, resistant to rot | Fades over time, limited colors |
Glass | Max view, modern feel | Expensive, needs careful handling |
Measure the spacing. Most codes call for balusters no more than 4 inches apart to keep kids from slipping through.
Start at one end and work toward the other. Clamp each baluster in place, then screw through the rail into the post.When all balusters are set, give the whole railing a once‑over with a brush to remove dust.Seal any gaps with a clear exterior sealant. This keeps water from getting behind the wood or metal.Finally, step back and test the railing. Push on it hard; it should feel solid and not wobble.Bottom line:Proper baluster placement and a sealant finish protect the railing for years.ConclusionReplacing a damaged deck railing may look big, but breaking it into steps makes it doable. Start with a solid assessment, gather the right tools, and follow safe demolition practices. Install new posts at the proper spacing, attach top and bottom rails level, and finish with balusters that match your style. Throughout, keep safety gear on and check local building codes. If you run into trouble or lack time, LGFMH Construction offers an Exterior Repair and Deck Railing Replacement Service that handles every detail, from code compliance to final finish. Their team can save you from costly mistakes and get the job done right the first time. Ready to give your deck a fresh, safe look? Grab your tools, follow the steps, and enjoy a sturdy railing that lasts.Frequently Asked QuestionsDo I need a permit to how to replace a damaged deck railing?Most cities require a building permit for any railing that is over 30 inches high or supports a load. Check with your local building department. The permit process usually involves submitting a plan that shows post spacing and rail height. Getting approval before you start avoids fines and rework later.What kind of fasteners should I use for a wood deck railing?Use stainless‑steel or coated deck screws that are at least 2½ inches long. They resist rust and hold fast in pressure‑treated wood. Pre‑drill pilot holes to prevent splitting. Space screws about 8 inches apart along the rail for even holding power.Can I reuse the old balusters when I how to replace a damaged deck railing?Only if the balusters are still solid and free of rot or cracks. Test each piece by pressing on it; any give means it should be replaced. Reusing good balusters saves money, but installing new ones guarantees uniform strength.How do I make sure my new railing meets the 200‑lb load requirement?Follow the post spacing guidelines , six feet for wood, eight for stronger systems. Use a level to keep posts plumb and attach rails with at least three screws per post. A final shake test can reveal any loose points before the finish.What safety gear should I wear when how to replace a damaged deck railing?Wear safety glasses, work gloves, and a dust mask. If you’re cutting metal, add hearing protection. OSHA recommends these items to protect against flying debris, sharp edges, and saw dust.How long does a typical deck railing replacement take?For a single‑section repair, expect 4‑6 hours if you have all tools ready. A full‑run replacement can take a full day or a weekend, depending on post spacing and material choice. Planning ahead and ordering materials early cuts down on time.
Pro Tip:Apply a coat of exterior‑grade primer before painting wood balusters. It helps the paint stick and lasts longer.


Comments