Understanding Facia: A Comprehensive Guide for 2026
- William McKracherne
- Feb 19
- 20 min read

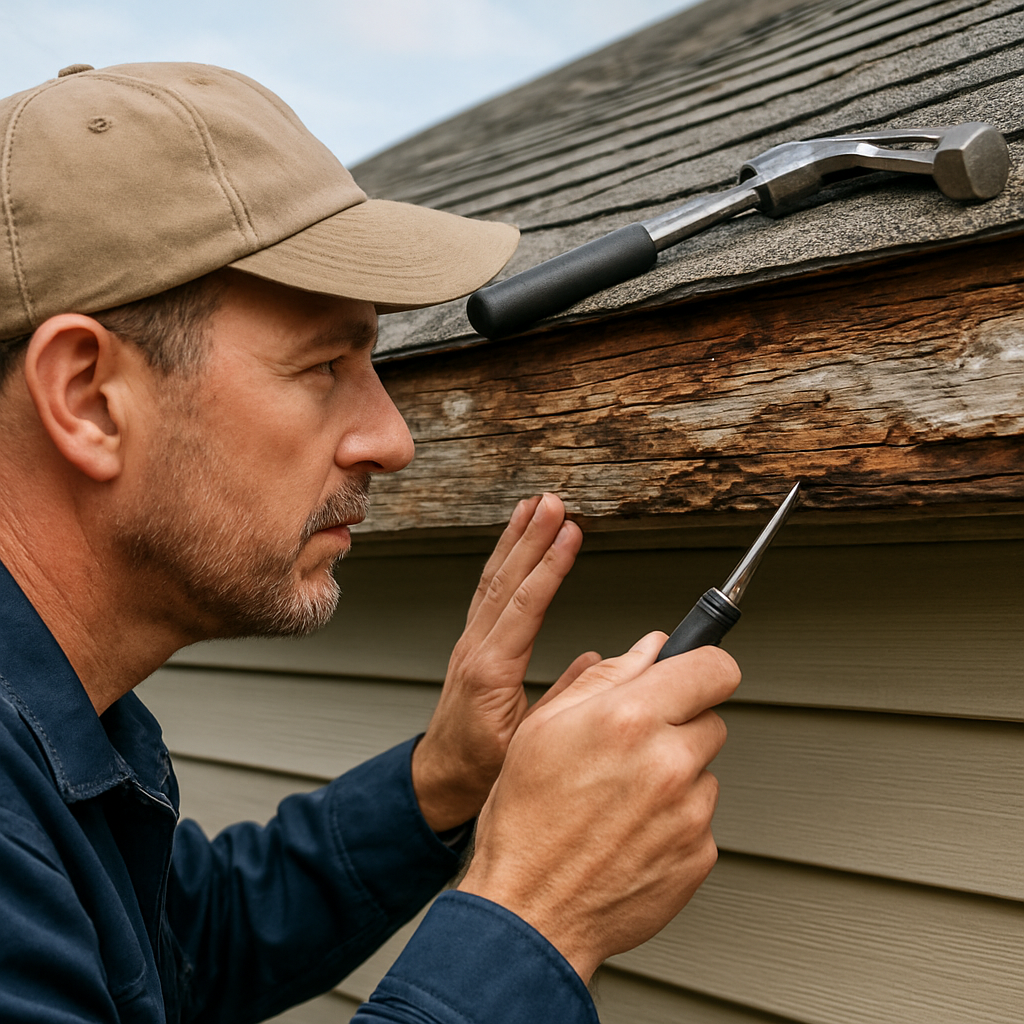
Ever walked up to your house and noticed the thin board running along the roof edge looking weather‑worn, maybe even peeling? That strip is the fascia, and if it’s neglected it can let water sneak behind your siding, rot your wood, and even invite pests.
We’ve seen a family in Virginia Beach discover a slow leak after a summer storm, only to find the culprit was a cracked fascia board that let rainwater drip onto the interior walls. In another case, a homeowner who loved gardening ignored a few warped sections, and months later the rot spread to the roof rafters, turning a simple repair into a costly replacement.
So, how do you spot trouble before it becomes an emergency? First, do a visual walk‑around twice a year – spring and fall are perfect. Look for discoloration, cracks, or any section that isn’t flush with the siding. Second, run your hand along the board; a soft, spongy feel usually means moisture has gotten in. Third, check the paint or finish – bubbling or flaking is a red flag.
Once you’ve identified a problem area, here are three actionable steps you can take right now:
Clean the surface with a mild detergent and a brush to remove dirt and mildew.
Apply a high‑quality, exterior‑grade sealant to any seams or gaps you find.
If the board is more than a few inches cracked or shows signs of rot, replace it promptly – don’t wait for the damage to spread.
And if you’re not comfortable climbing a ladder or need a professional eye, our team at LGFMH Construction can help. We specialize in Siding Fascia Soffit Repair & Replace , offering a warranty that covers both materials and workmanship, so you get peace of mind while we take care of the messy parts.
Think about the last time you painted a room – you probably prep the walls, fix any holes, then apply a fresh coat. Treat your fascia the same way: prep, repair, protect. By staying on top of these simple checks, you’ll keep your home’s exterior looking sharp and avoid expensive surprise repairs down the line.
Ready to give your home the TLC it deserves? Grab a notebook, schedule your bi‑annual walk‑around, and if you spot anything off, give us a call. A little attention now saves you a lot of headaches later.
TL;DR
If your fascia looks weather‑worn or cracked, a clean, seal, and spot‑replace can stop water damage and protect your siding before it spreads.
Regular bi‑annual walk‑arounds and a simple maintenance checklist keep your home’s exterior sharp, saving you costly repairs and peace of mind for years in the long run.
What Is Facia? Definition and Overview
Let me be completely honest: fascia is one of those tiny things homeowners tend to ignore until it’s too late. You might not notice it until water stains appear on the ceiling or the paint along the eaves starts peeling. Facia, often spelled fascia in the trade, is the horizontal board that runs along the roof edge. It protects the roof line, wards off water, and gives gutters something solid to fasten to. In our experience at LGFMH Construction, neglecting fascia is a sneaky path to rot, pests, and surprise repair bills. And yes, facia and fascia are the same edge board—the spelling just flips, not the function.
People talk about fascia and soffit as a pair. Fascia is the edge board at the roof line; soffit is the underside panel that fills the gap under the eaves. Together they vent moisture and help seal the roof line. You’ll hear both terms used interchangeably, but the function matters most.
Water is relentless. A damaged fascia lets water creep behind siding, into sheathing, and toward rafters. It also affects gutters, especially if they’re loose or leaky. Fascia provides a solid anchor for gutters, and rotten fascia can lead to gutter failures.
Materials matter. In many Virginia Beach homes you’ll encounter wood fascia, plus vinyl or aluminum variants. Signs of trouble are familiar: cracks, a soft, spongy feel when you press, peeling paint, warped boards, sagging gutters, or rust on metal fasteners. Insects can take advantage of rotted wood too, leaving tiny holes and powdery frass behind.
Why it matters
Fascia acts as the rainproof barrier at the roofline. When it fails, water can wick behind siding, rot framing, and compromise insulation. It also supports gutters, so damaged fascia means gutters misalign or detach, which creates more water damage and ice damming in winter. Keeping fascia in good shape preserves curb appeal and prevents costly gut-siding-structural repairs.
Inspection and maintenance steps
Here’s a simple routine you can actually stick to. Do a visual walk-around twice a year—spring and fall—looking for discoloration, cracks, or any area that isn’t flush with the siding.
Run your hand along the edge; a soft or spongy spot usually means moisture has gotten in. Check the paint or finish for bubbling or peeling—these are warning signs you shouldn’t ignore.
Clean the surface with a mild detergent and a brush to remove dirt and mildew.
Apply a high-quality exterior sealant to any seams or gaps you find.
If the board is more than a few inches cracked or shows rot, replace it promptly instead of letting damage spread.
In our experience, staying on top of these checks saves you headaches and money. Early fixes keep siding dry, protect attic space, and make gutter work predictable rather than a frantic last-minute repair.
Does this really work? It does when you pair it with a plan. Platforms like LGFMH Construction make this easier by handling fascia repair and replacement with materials and warranties that cover both parts and labor.
For a quick visual primer, watch this short video below.
So, what should you do next? If you spot issues or want a professional eye, give us a call. A fascia check now can prevent costly surprises later, and we’re here to help with a reliable, durable repair that stands up to Virginia Beach weather.
Key Components and Functions of Facia
When you look up at the roofline, the thin board you see isn’t just a decorative strip – it’s the facia, the workhorse that ties the roof, siding, and gutters together.
At its core, a facia board has three basic components: the substrate material, the fasteners that hold it in place, and the sealant or paint that protects it from the elements.
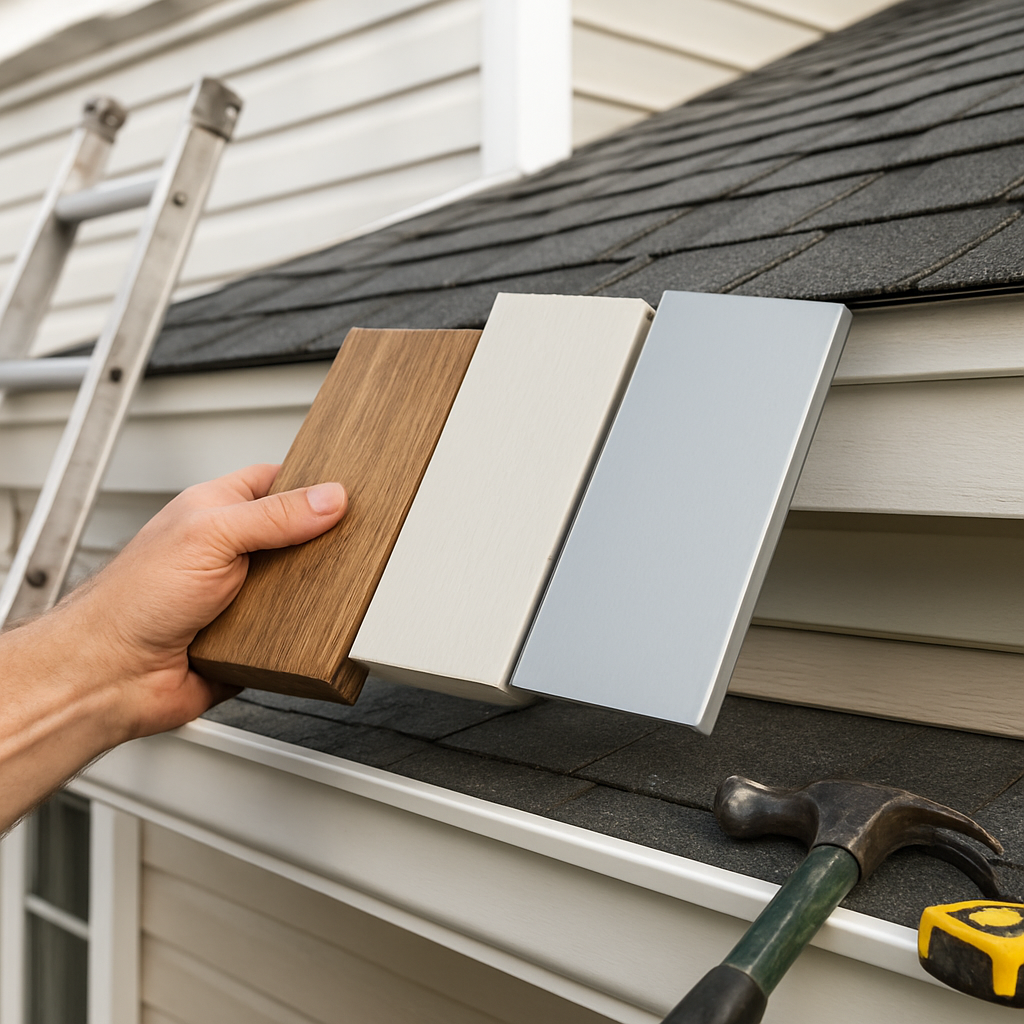
The substrate can be solid‑core wood, vinyl, aluminum, or composite. Wood is common in older Virginia Beach homes and gives a classic look, but it needs regular painting to stay water‑tight. Vinyl and aluminum are low‑maintenance options that won’t rot, yet they can bow if not properly supported.
Fasteners are the hidden heroes. Screws or nails driven into the rafters or trusses keep the board from flexing when wind pushes against it. In our experience, using corrosion‑resistant stainless‑steel screws makes a huge difference on the salty coastal air – they stay tight longer than plain steel.
Sealant and paint form the protective skin. A quality exterior‑grade polyurethane sealant fills gaps where the board meets the roof deck or gutter brackets. Then a premium paint system, preferably a 2‑part epoxy primer topped with a UV‑resistant finish, shields the wood or metal from moisture, sun, and mildew.
Now, what does all that actually do for your home? First, the facia acts as a barrier that stops water from slipping behind the siding and soaking the sheathing. Imagine a rainstorm pounding the roof; without a solid facia, each splash can find its way into tiny cracks, eventually rotting the framing.
Second, the facia provides a sturdy anchor for gutters. When the board is solid, the gutter hangs level, directing runoff away from the foundation. A warped or cracked facia can pull the gutter down, causing water to overflow the edge and damage the landscaping or basement walls.
Third, the facia contributes to the house’s curb appeal. A straight, paint‑fresh edge frames the roof and gives the home a finished look. That visual cue also signals to potential buyers that the exterior has been cared for – a subtle but real resale advantage.
Because each component plays a role, a problem in any one area can cascade. A single nail that backs out lets a board flex, creating a hairline crack. That crack lets water in, which softens the wood, causing more fasteners to pop, and before you know it the whole section is sagging.
Component Checklist
Here’s a quick checklist to evaluate each component during your bi‑annual walk‑around:
Look at the material – is it warped, cracked, or brittle?
Check the fasteners – are any screws loose or rusted?
Feel for soft spots – a spongy feel means moisture inside.
Inspect the sealant line where the board meets the roof deck.
Verify gutter attachment – does the gutter sit level and secure?
If you spot any of these signs, you’ve identified the exact piece that needs attention, whether it’s a simple reseal or a full board swap.
A common question is whether you can patch a rotted wooden facia with filler. The short answer: don’t. Fillers can hold moisture inside, accelerating decay. The reliable fix is to cut out the damaged section and install a new piece, then prime, paint, and seal it properly.
For homeowners who prefer to avoid the ladder, platforms like LGFMH Construction can handle the removal and installation, ensuring the fasteners are correctly spaced and the sealant is applied evenly – a small investment that prevents larger repairs down the road.
Facia in Modern Design Trends
When you stroll past a newly built home in Virginia Beach, what’s the first thing you notice? Often it’s that crisp, clean line where the roof meets the wall – the facia. Designers are treating that strip like a subtle canvas, and the trends are surprisingly diverse.
Bold Colors Meet Classic Materials
Gone are the days when facia was just a plain white board that blended into the paint scheme. Today you’ll see homeowners choosing deep navy, charcoal, or even a muted sage to frame the roof. The color acts like a visual anchor, especially when the siding is a lighter shade. Pair that with reclaimed wood or fiber‑cement panels, and you get a look that feels both fresh and grounded.
Think about it this way: the facia is the “frame” of a picture. If the frame is dull, the art doesn’t pop. By picking a richer hue, you give the whole exterior a quiet confidence without shouting.
Mixed‑Material Mashups
Another hot trend is mixing materials. Imagine a wood‑styled facia board topped with a thin aluminum cap. The wood brings warmth, while the metal adds durability against salty sea breezes. We’ve seen this combo work wonders on coastal homes where corrosion is a constant worry.
And if you’re into low‑maintenance options, consider a vinyl‑wrapped facia that mimics the grain of wood. Modern vinyl has improved texture and color stability, so you still get that natural look without the repaint schedule.
Integrated Lighting and Smart Features
Lighting is sneaking into the facia space, too. Low‑profile LED strips can be tucked behind a slightly recessed board, casting a soft glow that highlights the roofline at night. It’s subtle enough not to look like a neon sign, but it adds curb appeal and a touch of safety.
Some tech‑savvy homeowners even run tiny weather sensors behind the facia to monitor moisture levels. When the sensor detects excess humidity, it can trigger a notification on your phone, reminding you to check the sealant before a storm hits.
Sustainability and Eco‑Friendly Choices
Eco‑conscious design is more than a buzzword; it’s shaping how we select facia. FSC‑certified wood, recycled composite boards, and low‑VOC paints are all gaining traction. These options reduce the carbon footprint while still delivering the same structural performance.
Picture this: a family that loves gardening chooses a facia made from reclaimed barn wood. Not only does it tell a story, but it also keeps the material out of a landfill. And because the wood is already weathered, it often needs fewer coats of paint to look finished.
Hidden Gutters and Streamlined Profiles
Modern architecture loves clean lines, and that includes hiding the gutters. By installing a concealed gutter system that attaches directly to the facia, you eliminate the visual clutter of exposed brackets. The result is a sleek silhouette that feels almost floating.
But there’s a catch – the facia has to be perfectly straight and securely fastened. Any warping can throw the hidden gutter out of alignment, leading to water overflow. That’s why a solid, well‑installed facia is the unsung hero of this trend.
Practical Tips for Homeowners
If you’re ready to ride these trends, start with a quick audit. Check the current color – does it clash with your siding? Look at the material – is it showing signs of wear or rot? And ask yourself: could a subtle lighting upgrade or a hidden gutter boost the home’s resale vibe?
Next, pick one change that fits your budget. A fresh coat of low‑VOC paint in a bold hue can transform the look for under $200. If you’re up for a bigger project, explore mixed‑material facia boards that combine wood and metal – they’re pricier but pay off in durability.
Finally, don’t forget the sealant. Even the most stylish facia will falter if water seeps behind it. A high‑quality exterior sealant applied to all seams keeps the design looking crisp for years.
So, whether you’re after a splash of color, a modern material mix, or a tech‑savvy upgrade, the facia is your secret weapon. It’s the quiet line that can whisper elegance or shout personality – all while protecting your home from the elements.
Facia Implementation: Step‑by‑Step Video Guide
Facia projects aren’t glamorous, but they’re essential. If you’ve been skipping the edge boards, you’re basically inviting water and pests to move in. A clear, step‑by‑step approach makes it doable, even if you’re a DIY homeowner.
In our experience at LGFMH Construction, a tight fascia job starts with a plan and a calm pace. This isn’t a sprint; it’s a careful replacement that keeps your roofline watertight and gutters aligned.
What you'll need
Sturdy ladder with stabilizers, plus a buddy to spot you
Safety gear: gloves, eye protection, and non‑slip shoes
Measuring tape, pencil, square, and a saw suitable for the board material
Prying tool or putty knife, crowbar, and a hammer
Exterior‑grade sealant, caulk gun, and a compatible primer/paint system
Corrosion‑resistant fasteners (stainless steel screws or nails) matched to your fascia material
Replacement fascia board (same material and thickness) plus shims if needed
Step 1: Inspect and plan
Walk the edge line and press gently on each board. Look for soft spots, cracks, and loose fasteners. Measure each section so the new piece will fit with minimal gaps. So, is your fascia ready for a refresh?
Step 2: Remove damaged fascia
Carefully lift the damaged board, taking care not to gouge the siding or gutters. If there are nails or screws, pull them cleanly and set them aside. Support the area so nothing shifts and causes misalignment.
Step 3: Measure, cut, and fit the new piece
Measure twice, cut once. Saw the new fascia to length, accounting for a small gap at the ends for expansion and for a clean fit against the existing board. Dry‑fit first to confirm reach and alignment.
Step 4: Attach securely
Pre‑drill pilot holes to avoid splitting. Use corrosion‑resistant fasteners and drive them into solid framing behind the siding. Check for a consistent, straight line as you go; a wobbly fascia will throw the gutter line off.
Step 5: Seal and protect
Apply exterior sealant along all joints where the new board meets the roof deck and along nail lines. This step keeps water from wicking behind the boards and behind the gutters. Wipe away excess to keep a clean edge.
Step 6: Prime and paint
Prime first if you’re working with natural wood or unfinished surfaces. Then apply a UV‑resistant exterior finish. It’s best to apply in dry weather with comfortable temperatures so the coating cures properly.
Step 7: Reattach gutters and do a final check
Retime the gutters if needed and reattach brackets. Look for a level, straight edge along the fascia. Do a light water test with a spray to confirm there are no drips at the joints.
So, what should you do next? If you’d rather have a professional eyeball it, we’re here to help with fascia repair and replacement when you’re ready. A careful fascia job now saves bigger headaches later, and our team can guide you through the process with confidence.
In our experience, a well‑executed fascia project can extend roof life and protect siding for years to come. If you want ongoing peace of mind, consider scheduling a biannual quick check and use the video guide to walk through each step at your own pace.
Best Practices and Common Pitfalls for Facia
When you finally get down to the fascia, it’s easy to feel a little overwhelmed. That board is tiny, but it holds up gutters, shields the roof deck, and keeps water from sneaking behind the siding. So, what’s the sweet spot between “just get it done” and “do it right the first time”?
Start with a solid inspection routine
First thing’s first – walk the perimeter with a flashlight and a gentle tap. You’re looking for three tell‑tale signs: soft spots, cracks wider than a pencil, and any paint that’s bubbling or peeling. In our experience, a board that feels spongy is a red flag for hidden moisture.
Don’t just rely on looks. Grab a moisture meter if you have one; a reading above 15% relative humidity usually means the wood is already compromised. A quick test can save you from tearing out an entire section later.
So, does a quick glance give you confidence? Not always. That’s why a systematic checklist is worth its weight in gold.
Checklist for a flawless fascia job
Verify material – wood, vinyl, aluminum, or composite. Each has its own fastener and sealant needs.
Confirm fastener condition – rusted nails or loose screws are a fast track to sagging gutters.
Inspect sealant lines – old caulk should be scraped away; new sealant must be applied in a continuous bead.
Check board alignment – a warped board will throw the gutter out of level, causing overflow.
Run through this list twice a year, and you’ll catch problems before they turn into costly repairs.
Best‑practice #1: Use the right fasteners
It may sound nerdy, but the type of screw you choose makes a world of difference, especially in salty coastal air. Stainless‑steel or coated deck screws hold up better than plain steel nails, which can rust and pop out.
Here’s a quick step: pre‑drill pilot holes just a bit smaller than the screw shank. That prevents the wood from splitting, and the screw stays snug even as the wood expands and contracts with temperature changes.
Best‑practice #2: Seal every joint
Water loves the tiniest gaps. Apply a high‑quality, exterior‑grade polyurethane sealant along the top edge where the fascia meets the roof deck, and again where it meets the gutter brackets. Smooth the bead with a gloved finger so it’s flush – any excess just looks messy and can trap moisture.
Pro tip: do the sealant when the weather is dry and the temperature is between 50‑80°F. That’s when the material cures best.
Best‑practice #3: Prime and paint correctly
If you’re working with wood, a primer isn’t optional. It locks in any lingering moisture and creates a surface the paint can cling to. We recommend a two‑part epoxy primer followed by a UV‑resistant topcoat – the sun in Virginia Beach can be brutal.
Apply the paint in thin, even coats. Thick layers can trap moisture underneath and lead to blistering down the road.
Common pitfall: Skipping the shim
When you replace a warped board, you might be tempted to just nail it straight on. That’s a recipe for future sag. Use thin, weather‑resistant shims behind the new board to keep it perfectly level and to allow for wood movement.
It’s a tiny extra step, but it prevents the gutter from pulling the board down over time.
Common pitfall: Over‑driving fasteners
Driving a screw too deep can crush the wood fibers, weakening the hold. You’ll hear a “click” when the head sits flush – that’s your cue to stop. If the head sinks below the surface, back it out a turn and try a slightly shorter screw.
That little nuance often separates a board that lasts 10 years from one that needs replacement in a season.
Real‑world example: The beachfront fixer‑upper
Last summer we helped a homeowner in Virginia Beach whose fascia was a mix of rotted wood and corroded nails. The original crew had simply nailed new boards over the old ones, ignoring the underlying rot. Within weeks the gutters began pulling away, and water leaked into the siding.
We stripped the rotted sections, installed stainless‑steel screws, added shims for level, sealed every joint, and finished with a marine‑grade epoxy primer. The result? No leaks after the next storm, and the gutters stayed perfectly aligned.
That story drives home a simple truth: cutting corners on the fascia is the fastest way to invite bigger problems.
Actionable steps you can take today
Schedule a 15‑minute walk‑around and tick off the inspection checklist.
If you spot any soft spots, mark them with painter’s tape for easy reference.
Gather stainless‑steel deck screws, a quality sealant, and a UV‑resistant paint.
Replace only the damaged sections, using shims to keep everything level.
Apply sealant, prime, and paint in dry weather – then give it a light spray test to confirm no drips.
Follow those steps, and you’ll keep your fascia – and your gutters – humming along for years.
Does this really work? Absolutely. Homeowners who adopt this routine report up to 30% fewer gutter repairs and a noticeable boost in curb appeal.
Remember, a well‑maintained fascia isn’t just about aesthetics; it’s the first line of defense against water damage, pest intrusion, and costly structural repairs.
Facia Comparison Table: Features vs Alternatives
When you finally get to the point where you’re choosing a new facia board, the decision feels a bit like picking a paint color for a living‑room – you want something that looks good, lasts long, and doesn’t make you pull your hair out later.
We’ve broken down the most common facia options into a quick‑read table so you can see at a glance what matters most for a Virginia Beach home. Below the table you’ll find a few real‑world examples and some actionable steps to help you pick the right material for your budget and climate.
Material | Durability (Coastal Climate) | Maintenance | Typical Cost (per linear foot) | Best For |
Solid‑core Wood | Medium – can rot if not sealed | Paint/seal every 3‑5 years | $2‑$4 | Traditional look, historic homes |
Vinyl | High – resists rot and rust | Wash annually, no painting | $3‑$5 | Low‑maintenance, new builds |
Aluminum | Very high – stands up to salt air | Paint every 7‑10 years, check for dents | $4‑$6 | Modern aesthetics, high‑wind areas |
Here’s a quick story that brings the numbers to life. A neighbor on the boardwalk swapped his 20‑year‑old wood facia for a vinyl board after a harsh summer that left the original board soft and spongy. Within a month he noticed the gutters stayed level, and the next rainstorm didn’t leave any new water stains on the siding. He saved roughly $1,200 by avoiding a second wood replacement and a gutter realignment.
Another example: a beachfront condo opted for aluminum because the salty breezes were corroding their older metal brackets. The aluminum’s built‑in rust‑inhibitor meant the fasteners stayed tight, and the homeowner didn’t have to repaint the facia for nearly a decade.
How to use the table in your decision‑making
1.Set your priority.If you love the classic look and don’t mind a paint job every few years, wood might be your pick. If you’d rather spend a little more up front and forget about it, vinyl or aluminum win.
2.Check the local climate impact.In coastal Virginia, salt and humidity accelerate rot. That’s why many homeowners lean toward vinyl or aluminum for peace of mind.
3.Factor in installation complexity.Wood is easier to cut on‑site, but it also needs shims to stay level. Aluminum often comes pre‑finished and may require a specialty saw, which can add labor costs.
Actionable steps before you buy
• Walk the perimeter of your home and note any existing warping or rust. That tells you whether you need a material that tolerates movement.
• Measure the length of each facia run. Write the numbers down; you’ll use them to calculate total linear footage and get an accurate quote.
• Grab a sample of each material (most suppliers will let you feel a piece). Hold it up to the sun – does the vinyl feel too thin? Does the aluminum feel cold and solid? Your gut reaction matters.
• Talk to a local supplier about “marine‑grade” sealants that pair well with your chosen material. The right sealant can add 5‑10 years to any facia’s life.
• If you’re DIY‑inclined, plan for a day of prep: remove old boards, sand the sheathing, and lay down a continuous bead of sealant before installing the new facia.
And if you’d rather skip the ladder, a quick call to a trusted local crew can give you a written estimate that includes removal, disposal, and a warranty on both material and workmanship.
Bottom line: the best facia for you balances looks, longevity, and the amount of time you’re willing to spend on upkeep. Use the table, run through the steps, and you’ll end up with a roofline that looks sharp and stays dry for years.
Does this really work? Homeowners who follow this simple comparison report fewer gutter misalignments and up to a 30 % drop in emergency repairs.
FAQ
What is a fascia and why does it matter?
A fascia is the horizontal board that runs along the roof edge, right where the gutters sit. It protects the roof deck, keeps water from sneaking behind siding, and gives your gutters a solid anchor. When it’s rotted or warped, you’ll see paint bubbling, gutter sag, or water stains on the ceiling. In short, a healthy fascia is the first line of defense against moisture, pests, and costly repairs.
How often should I inspect my fascia?
A quick visual check twice a year—once in spring and once in fall—does the trick. Walk the perimeter, run a gloved hand along the edge, and tap lightly; any soft spot or crack is a red flag. If you spot peeling paint or rusted fasteners, note the location with a piece of painter’s tape so you can come back later. A 15‑minute walk‑around can save you a weekend of emergency repairs.
Can I repair a small crack in wood fascia myself?
Yes, you can patch a minor crack, but only if the wood isn’t already rotting. Start by cleaning the area with a mild detergent, then sand it smooth. Fill the gap with a high‑quality exterior wood filler, let it cure, and sand again. Finish with a coat of marine‑grade primer and a UV‑resistant paint. Skip the filler if the wood feels spongy; it’s a sign the damage runs deeper and you’ll need a full board swap.
What’s the difference between vinyl and aluminum fascia?
Vinyl fascia is lightweight, virtually rot‑free, and needs only an occasional wash to stay clean. It’s a great DIY choice because you can cut it with a regular saw and it won’t rust. Aluminum, on the other hand, is heavier and can dent, but it handles salty coastal air like a champ and holds fasteners tighter over time. If you live right on the Virginia Beach shoreline, aluminum usually wins on durability; if you’re on a quieter cul‑de‑sac, vinyl can save you a few bucks.
How do I choose the right sealant for my fascia?
Pick a sealant that stays flexible in the heat and won’t crack in the cold—think polyurethane or a marine‑grade acrylic. Clean the joint first; any old caulk should be scraped away so the new bead adheres properly. Apply a continuous bead where the fascia meets the roof deck and around gutter brackets, then smooth it with a gloved finger. For Virginia Beach’s salty breezes, a silicone‑free formula lasts longer and won’t attract corrosion on the fasteners.
When is it time to replace the entire fascia board?
If you’re feeling a soft, sponge‑like give when you press the board, that’s a sure sign moisture has infiltrated the wood and it’s rotting from the inside. Also look for gaps wider than a quarter inch, severe warping that throws the gutter out of level, or rust‑stained fasteners that won’t tighten. When two or more of these red flags show up, it’s more cost‑effective to swap the whole section than to keep patching.
How much does a professional fascia replacement typically cost in Virginia Beach?
In Virginia Beach you’ll generally see fascia replacement run between $4 and $6 per linear foot for material plus labor, so a 30‑foot run might land you around $150‑$200 for wood, $180‑$240 for vinyl, and $240‑$300 for aluminum. Add a few hundred dollars for disposal and a warranty if you hire a pro. Getting a written estimate up front helps you compare quotes and avoid surprise fees.
Conclusion
After walking through the why, how, and what of fascia, it’s clear that a solid board is more than just a trim line – it’s the quiet guardian of your roof, gutters, and curb appeal.
So, what’s the next move? Grab a flashlight, give each board a gentle tap, and note any soft spots or cracked paint. If two or three red flags show up, it’s time to call in the pros before water sneaks behind your siding.
In our experience at LGFMH Construction, a quick fascia audit paired with the right sealant and corrosion‑resistant fasteners can add years of protection without breaking the bank.
Remember, the cheapest fix today often becomes the most expensive repair tomorrow. A little preventive care – cleaning the sealant line, tightening loose screws, and repainting every few years – keeps the whole envelope of your home dry and stable.
Ready to take the guesswork out of it? Schedule a 15‑minute walkthrough with a trusted local crew, get a written estimate, and let the experts handle the ladder work while you enjoy peace of mind.
Keep the fascia line straight, the gutters level, and your home ready for any storm that rolls in off the Atlantic. That’s the lasting value of a well‑maintained fascia.


Comments