Best Insulation for Crawl Space Walls: A How-To Guide
- William McKracherne
- 3 days ago
- 10 min read

A cold, damp crawl space is one of the biggest energy drains in a home. The right wall insulation fixes that fast. This guide walks you through every step, from picking the right material to sealing the job properly, so you end up with a crawl space that actually does its job year-round.
Step 1: Start With a Professional Assessment From LGFMH Construction
Before you buy a single sheet of rigid foam or pick up a can of spray, get eyes on the space. That's what LGFMH Construction's repair and replacement services are built for. They handle interior and exterior work, which means they can assess the full picture, not just what's visible from the access hatch.
Here's why this matters as a first step. Crawl spaces fail for different reasons. Some have foundation walls that sweat with condensation. Others have standing water from poor grading outside. A few have insulation already installed in the wrong location, which traps moisture instead of blocking it. Without knowing what you're dealing with, you can spend real money on insulation that makes things worse.
LGFMH Construction identifies the moisture source, checks for structural issues, and confirms whether the crawl space is vented or unvented. That classification determines which insulation strategy actually works. For an unvented, conditioned crawl space, insulating the walls is the correct approach. For a vented space, the strategy shifts to the subfloor above. Getting this wrong means redoing the work.
Once you have a clear picture of the space, you're ready to choose your insulation type.
Key Takeaway:Knowing whether your crawl space is vented or unvented before buying any insulation saves you from a costly mistake.
Step 2: Choose the Best Insulation Type for Crawl Space Walls
Not every insulation works on crawl space walls. The wall application is different from the subfloor above, and the materials that perform well here share two qualities: they resist moisture and they maintain their R-value when temperatures swing.
These are the four types worth knowing.
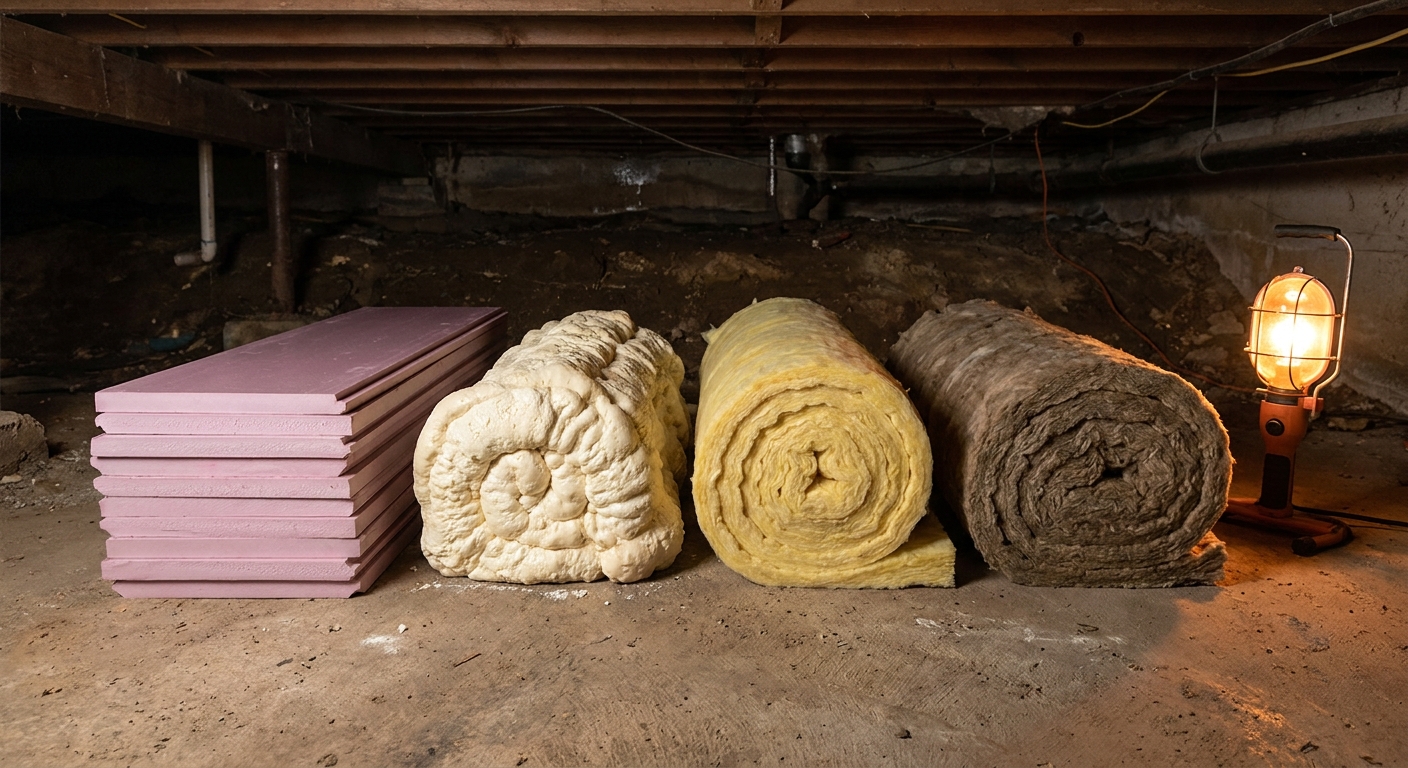
Rigid Foam Board (XPS or EPS)
This is the most common choice for crawl space walls, and for good reason. Rigid foam board doesn't absorb moisture. It holds its R-value in damp conditions. And it goes up fast with construction adhesive and mechanical fasteners.
Extruded polystyrene (XPS) typically delivers around R-5 per inch. Expanded polystyrene (EPS) runs a little lower, around R-3.8 to R-4 per inch, but costs less. For most crawl space wall applications, 2-inch XPS gets you to R-10, which meets or exceeds code requirements in many climates.
The one limitation: rigid foam must be covered with a thermal barrier, usually half-inch drywall, if the space will be accessed regularly. That's a code requirement in most jurisdictions.
Closed-Cell Spray Foam
Closed-cell spray foam is the highest-performance option. It air-seals and insulates at the same time, delivering around R-6 to R-7 per inch. It also adds structural rigidity to the foundation wall and acts as a vapor retarder.
The downside is cost. Spray foam costs significantly more than rigid board per square foot. It also requires professional equipment to apply correctly, so this is rarely a true DIY job.
Fiberglass Batts
Fiberglass batts are cheap and easy to find. But they're a poor fit for crawl space walls. They absorb moisture readily, which collapses the material and drops the R-value fast. In a damp environment, they can also become a surface for mold growth. Most building scientists agree: keep fiberglass out of crawl space walls.
Mineral Wool (Rigid Boards)
Mineral wool rigid boards resist moisture better than fiberglass and hold up well in crawl spaces. They're also fire-resistant, which matters if the space is near mechanical equipment. R-value runs around R-4 per inch. Mineral wool costs more than EPS but less than closed-cell spray foam.
Insulation Type | R-Value per Inch | Moisture Resistance | DIY-Friendly | Relative Cost |
Rigid Foam (XPS) | ~R-5 | Excellent | Yes | Moderate |
Rigid Foam (EPS) | ~R-3.8 to R-4 | Good | Yes | Low |
Closed-Cell Spray Foam | ~R-6 to R-7 | Excellent | No | High |
Mineral Wool (Rigid) | ~R-4 | Good | Yes | Moderate-High |
Fiberglass Batts | ~R-3.1 to R-4 | Poor | Yes | Low |
According to Wikipedia's overview of thermal insulation , R-value measures a material's resistance to conductive heat flow, and higher values indicate better insulating performance, though operational performance also depends on proper installation and moisture conditions.
If budget allows, closed-cell spray foam on the band joist area combined with rigid XPS on the walls is the strongest combination. If you're watching costs, 2-inch XPS board with careful seam sealing gets you most of the way there.
Step 3: Assess Your Crawl Space Before Installing Insulation
Walk the space before anything goes up. You need to know what you're working with so the insulation actually holds long-term.
Bring a bright flashlight and check the foundation walls first. Look for efflorescence, that white powdery residue that forms when water moves through concrete. It's a reliable sign of moisture intrusion. Also check for cracks in the block or poured wall, especially horizontal cracks, which can indicate pressure from soil outside.
Next, check the floor. Press a screwdriver into any wood members you can reach, including the sill plate sitting on top of the foundation wall. Soft or spongy wood means rot, and rot means a moisture problem that insulation alone won't fix. Address structural repairs before you insulate.
Look for standing water or wet soil. Even if there's no puddle, dark, glistening soil is a sign the water table or drainage is pushing moisture up. You'll need to deal with that before installing any wall insulation, or the moisture will find its way behind the boards and sit there.
Check existing penetrations too. Pipes, wires, and HVAC ducts that pass through the foundation wall create gaps that let in cold air and pests. These need to be sealed with canned foam or rigid blocking before insulation goes up.
By the time you finish the walkthrough, you should know the condition of the walls, whether there's an active moisture problem, and what repairs need to happen first. Only then is the space ready for insulation.
Pro Tip:Lay a small piece of plastic sheeting on the crawl space floor and tape the edges to the concrete. Check it after 24 hours. If moisture collects underneath, you have ground moisture infiltration that needs a vapor barrier before insulation work begins.
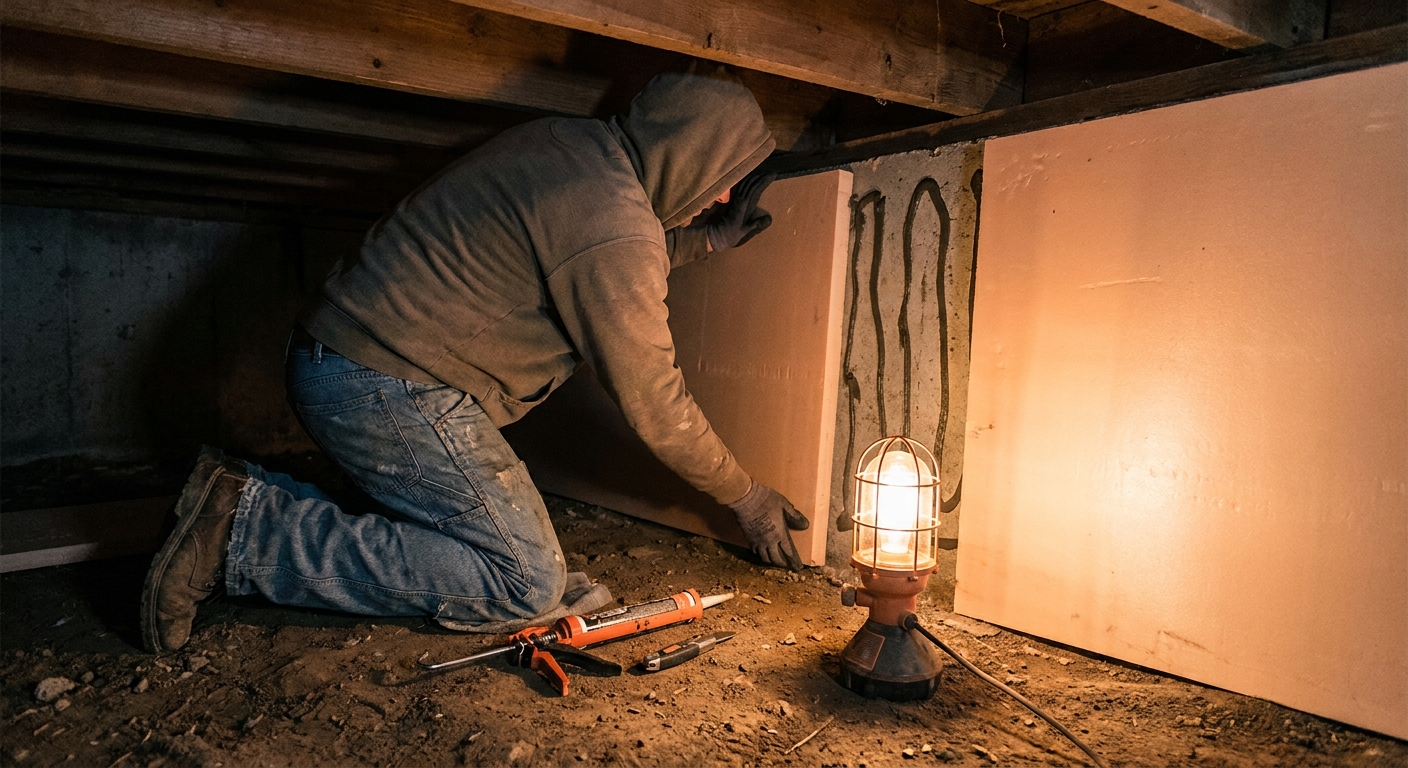
Step 4: Install Rigid Foam Board Insulation on Crawl Space Walls
Rigid foam board is the most usable choice for most homeowners tackling crawl space walls. Here's how to do it right.
What you'll need
2-inch XPS rigid foam boards (or EPS if budget is the priority)
Construction adhesive rated for foam board
Mechanical fasteners or tapcon screws for concrete
Utility knife and straightedge
Canned spray foam (for gaps and seams)
Tape measure and pencil
Safety glasses and knee pads
The installation process
Start at the top of the wall, just below the sill plate. Measure the wall height from the top of the footing to the top of the foundation wall. Cut your first board to that height using a utility knife and straightedge. Score deeply, then snap the board along the line. The cut doesn't need to be perfect, just close.
Apply construction adhesive in vertical beads on the back of the board. Press the board firmly against the wall, making sure the top edge butts up tight against the sill plate. Hold it in place for a minute, then secure with tapcon screws driven through the foam into the concrete. Space the screws about every 16 inches.
Work your way around the perimeter, fitting boards tightly together. Wherever two boards meet, seal the seam with canned spray foam or purpose-made foam tape. This step is often skipped and it shouldn't be. An unsealed seam is a thermal bridge and an air gap. Both undercut the insulation you just installed.
At inside corners, cut a narrow strip and press it into the corner first, then butt the field boards against it. At outside corners, wrap boards around the turn and tape the joint. Around pipes and penetrations, cut the board to fit as close as possible, then fill the remaining gap with canned foam.
If your local building code requires a thermal barrier over foam, install half-inch drywall over the boards before finishing. The U.S. Department of Energy's insulation guidance notes that crawl space wall insulation can significantly reduce heat loss from the conditioned space above, particularly in homes with ductwork or mechanical systems in the crawl space.
When the boards are up and seams are sealed, the wall installation is complete. The goal is a continuous layer with no gaps at the top, bottom, or sides.
Step 5: Apply Spray Foam Insulation in Hard-to-Reach Areas
Rigid boards cover flat wall sections well, but crawl spaces have spots where a flat board just won't fit. Band joists, pipe penetrations, odd-angle corners, and the transition between the foundation wall and the sill plate are the usual trouble spots. Spray foam handles all of them.
The band joist deserves special attention. This is the framing member that runs along the top of the foundation wall, connecting the floor joists. It's one of the biggest sources of cold air infiltration in an older home. You can buy two-component spray foam kits at any home improvement store. They're designed for exactly this application.
Before you spray, clean the surface. Dust and debris prevent adhesion. Then shake both canisters well, connect the mixing nozzle, and do a short test spray on a scrap piece to confirm the foam is mixing and curing correctly. It should expand and firm up within about 30 seconds.
Spray a consistent bead into the band joist cavity, filling it completely. Work in passes rather than one heavy application. Closed-cell foam expands less than open-cell, which makes it easier to control in tight spaces. Once cured, trim any excess with a serrated knife so the surface sits flush with the surrounding framing.
Around pipes and wires that pass through the foundation wall, a small bead of canned foam fills the gap completely. Don't skip these. A gap the size of a dime around a pipe can let in more air than you'd expect, and in winter it's a direct path for cold air into the floor system above.
If you're looking at a larger insulation project or suspect there are air sealing issues beyond what's visible, LGFMH Construction can assess and handle the work. Bigger projects, especially those involving spray foam equipment, are faster and more consistent with a professional crew.
If budget is a consideration for the broader home energy project, it's worth knowing that financing options for home improvement work, including HVAC upgrades that often accompany insulation work, vary by credit score. A resource on what credit score you need for HVAC financing can help you figure out which financing path fits your situation before committing to a larger project.
Step 6: Seal and Vapor-Barrier the Crawl Space After Insulating
Insulation on the walls is only part of the job. Without a vapor barrier and proper sealing, moisture from the ground soil will still enter the space and work its way into the structure over time.
The vapor barrier goes over the insulation, not behind it. This is important. Installing the barrier before the rigid foam, then securing the foam through the barrier, creates holes in the plastic every time you drive a fastener. Those holes defeat the purpose. Rigid foam doesn't absorb moisture on its own, so placing the barrier on the interior face of the foam keeps the barrier intact.
Use a minimum 6-mil polyethylene sheet, though 10-mil or 12-mil is more durable and easier to work with in a crawl space where you'll be moving around on it. Start by covering the ground floor completely, overlapping seams by at least 12 inches and taping all joints with seaming tape. Run the barrier up the foundation walls by at least 6 inches, and tape it to the wall surface or to the bottom edge of the foam insulation.
At the perimeter, secure the barrier to the wall with manufacturer-recommended adhesive or mechanical fasteners, then seal the edge with mastic tape. Any penetrations through the floor, like pipes or posts, need the barrier cut to fit around them and the edges taped tight.
Once the vapor barrier is down, check all wall insulation seams one more time. Spray foam or tape any gap you missed. The goal is a continuous air barrier from the ground up the walls to the sill plate, with no breaks in the envelope.
Note on spray foam and moisture: open-cell spray foam will absorb moisture over time, which lowers its R-value. If you used open-cell foam anywhere in the crawl space, the vapor barrier is especially important to protect it. Closed-cell spray foam doesn't have this problem, but the barrier is still good practice on the floor.
Key Takeaway:Always install the vapor barrier over rigid foam insulation, not behind it. Fastening foam through the barrier creates holes that let moisture in.
FAQ
What is the best insulation for crawl space walls?
Rigid foam board, specifically 2-inch XPS, is the most usable option for crawl space walls because it resists moisture, holds its R-value in damp conditions, and is manageable as a DIY project. Closed-cell spray foam performs better per inch but costs significantly more and usually requires a professional. Fiberglass batts are not recommended for wall applications in crawl spaces because they absorb moisture and lose effectiveness quickly.
Should I insulate crawl space walls or the floor above?
It depends on whether your crawl space is vented or unvented. An unvented, conditioned crawl space should be insulated at the walls. A vented crawl space is typically insulated at the subfloor above. Insulating both locations in a vented space can trap moisture in the floor cavity. If you're not sure which type you have, a contractor like LGFMH Construction can confirm the configuration before you buy materials.
Do I need a vapor barrier if I insulate crawl space walls?
Yes. Wall insulation and a vapor barrier solve different problems. The insulation controls heat loss through the foundation wall. The vapor barrier controls moisture that rises from the soil. Without the barrier on the ground and up the walls, that moisture can still reach the wood framing above and cause rot over time. Use a minimum 6-mil polyethylene sheet, installed over rigid foam insulation, not behind it.
How much R-value do I need for crawl space walls?
Most climate zones in the U.S. require between R-5 and R-15 for crawl space walls. A single layer of 2-inch XPS foam board hits approximately R-10, which meets code in most moderate climates. Colder climates may require two layers or thicker board. Check your local energy code or the U.S. Department of Energy's climate zone map to confirm the minimum for your area before purchasing materials.
Can I insulate a crawl space myself, or do I need a contractor?
Rigid foam board installation on crawl space walls is manageable as a DIY project for most homeowners. The tools are basic and the technique is forgiving. Spray foam, especially two-component closed-cell systems, is harder to do well without experience. If the space has moisture damage, structural issues, or unusual geometry, getting a contractor involved early saves time and prevents costly mistakes down the road.
Conclusion
The right approach for most homeowners is 2-inch XPS rigid foam board on the foundation walls, spray foam on the band joist and penetrations, and a proper vapor barrier over the finished installation. Start with an honest assessment of the space before any materials go up. If you want the job done correctly the first time without the trial-and-error, reach out to LGFMH Construction for a professional evaluation and installation.


Comments