Best Waterproofing Membrane for Foundation Walls: A 2026 Guide
- William McKracherne
- 4 days ago
- 9 min read

Finding the best waterproofing membrane for foundation walls can feel like hunting for a needle in a dark basement.
Most homeowners discover a leak too late, then scramble for a fix that barely holds up. The right membrane stops water before it sees the wall, keeping the foundation dry and the house safe.
One practical way to start is to look at what the membrane is made of. A sheet of rubberized asphalt or a liquid-applied polymer both form a barrier that flexes with the concrete. Rubberized sheets are tough, easy to patch, and love the movement that older foundations make. Liquid membranes flow into cracks, creating a seamless skin that resists ponding water.
Another factor is how the membrane meets the soil. A proper drainage plane behind the wall lets water flow away, while the membrane stays dry. Skipping this step is like putting a tarp over a leaky roof without fixing the gutters.
At LGFMH Construction we often recommend pairing a quality sheet membrane with a drainage board. That combo gives you both strength and a path for water to run off, so you avoid costly repairs down the line.
Stick with these basics, and you’ll stay on track for a dry foundation.
Understanding Waterproofing Membrane Types
When it comes to keeping a foundation dry, the first decision is what kind of membrane you’ll use. There are three main families: sheet membranes, liquid‑applied membranes, and hybrid systems that blend the two.
Sheet membranes
One big plus is repairability. A small tear can be patched with a piece of the same sheet and a heat‑weld or adhesive. You don’t need special tools, just a roller and a bit of pressure.
Liquid‑applied membranes
Because the film is continuous, ponding water can’t sit on a joint and work its way in. It also works well on oddly shaped sections where a sheet would be hard to fit.
So, how do you pick? If you expect a lot of wall movement, a sheet membrane gives you flexibility and easy patches. If your wall is more static or has many corners, a liquid coat may give you a smoother, leak‑free finish.
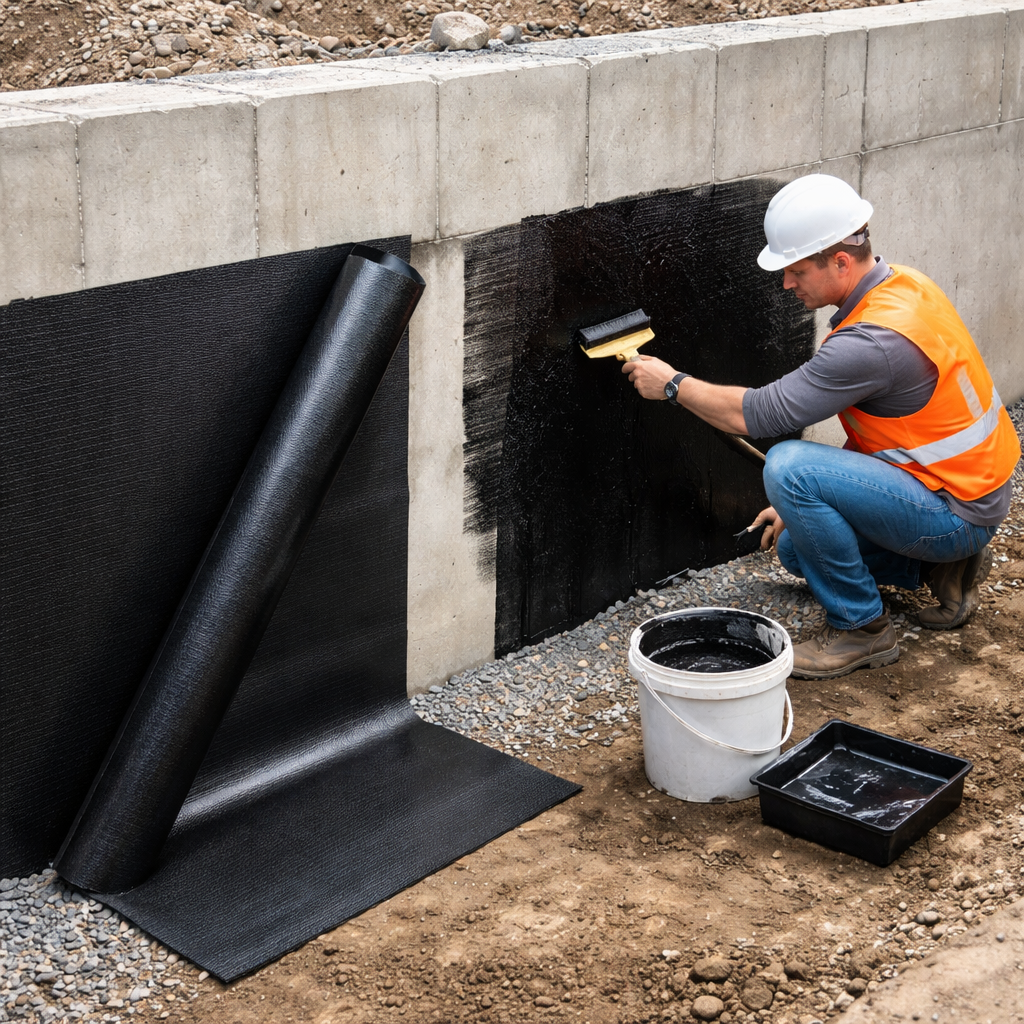
Many contractors, including LGFMH Construction, will suggest a hybrid approach: a sheet membrane for strength, topped with a thin liquid layer for seam‑less coverage. That combo lets you get the best of both worlds and keeps the foundation dry for years to come.
Step 1: Assess Your Foundation’s Moisture Risks
Before you pick a membrane, you have to know exactly how wet your foundation gets.
If water pools behind the wall or seeps through cracks, the best waterproofing membrane for foundation walls won’t help much unless you first spot the problem.
Start by walking the perimeter outside. Look for standing water, soggy soil, or a gutter that spills right onto the footings.
Inside, check the basement floor for damp spots, musty smells, or efflorescence on the walls – those are clear signs water is finding a way in.
Next, inspect the drainage plane. Is there a perforated pipe, a gravel layer, or a drainage board already in place? If not, you’ll need to add one before the membrane.
Grab a simple checklist: 1) exterior water pooling, 2) interior damp spots, 3) existing drainage, 4) wall movement. Tick each item as you go.
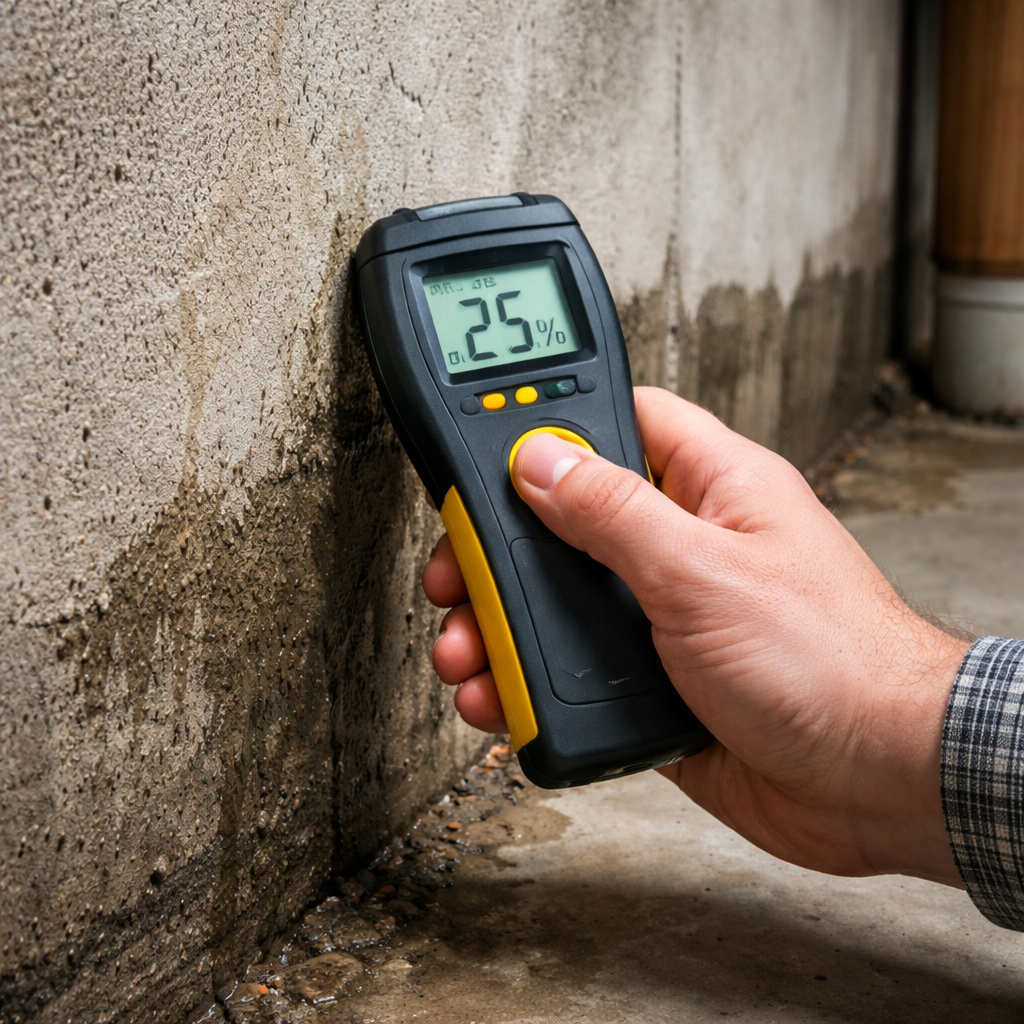
A cheap moisture meter can tell you how wet the concrete really is. Press the probes into the wall at a few spots; readings above 12 % mean the concrete is saturated.
Write down the results. Note where water collects, how deep the saturation goes, and whether the wall moves when the soil swells.
When you see a pattern, you can decide what type of membrane fits. Heavy movement and high moisture call for a flexible sheet plus a liquid top coat.
Need a full walkthrough? Our step‑by‑step guide to waterproof a basement wall walks you through each inspection step.
Tip: Do the check after a heavy rain. If water still pools, the problem is real and not just a dry‑season quirk.
Step 2: Choose the Right Membrane – Comparison Table
Now that you know how wet your wall is, it’s time to pick the membrane that fits.
When you compare membranes, keep three things in mind: how much the wall moves, whether water will sit on the surface, and how much you’re willing to spend on material and labor. A membrane that bends with the concrete will survive cracks, while a seamless liquid coat stops water from finding any gap.
Below is a quick table that lines up the three most common choices. Use it like a cheat sheet while you shop.
Membrane Type | Flexibility | Best For | Cost |
Sheet membrane | High – bends with movement | Foundations that shift | Medium |
Liquid membrane | Low – creates a seamless seal | Low movement, crack repair | Low‑to‑Medium |
Hybrid system | Medium – combines sheet & liquid | High movement + ponding water | High |
Notice how the flexible sheet handles a lot of movement, while the liquid coat seals tiny cracks. The hybrid gives you both strengths but costs a bit more.
If you want a deeper walk‑through of each step, check out How to Waterproof a Basement Wall: Step‑by‑Step Guide for a Dry Home. It shows where to install the membrane and how to finish the drainage board.
To decide, ask yourself: does my foundation shift a lot? If yes, the sheet or hybrid is safer. Is the wall mostly dry but has a few hairline cracks? Then a liquid coat may be enough. And if you have both big movement and ponding water, the hybrid gives the best of both worlds.
After the membrane cures, give it a quick visual check each spring. Look for lifted edges or tears. Small fixes now stop big leaks later.
LGFMH Construction can help you install the right system and set up the drainage board so the membrane stays dry.
Cost is a real factor. Sheet membranes usually run mid‑range in price and are easy to install for a DIYer. Liquid coats are often cheaper per gallon but may need a skilled applicator to get a smooth finish. Hybrid systems sit at the top end, but the extra protection can save money on future repairs.
Step 3: Proper Installation Techniques
Now that you know which membrane fits, it’s time to put it on right.
Clean and dry the wall
Start by sweeping away dust, loose mortar, and any old sealant. A wet wall will stop the membrane from sticking.
Use a shop‑vac or a stiff brush. Then wipe the surface with a mop dampened in mild soap. Let it dry fully, a sunny day helps.
Set up the drainage board
Lay the drainage board against the wall before the membrane. Overlap each board by at least 6 inches and secure it with corrosion‑resistant staples.
Make sure the board slopes slightly toward the exterior drain pipe. This tiny tilt lets water run away instead of pooling.
Apply the membrane
If you chose a sheet, roll it out from the bottom up. Press it flat with a roller, working out bubbles as you go.
For a liquid coat, stir the product well, then use a paint roller to spread an even layer. Two thin coats work better than one thick coat.
Watch the weather, aim for a dry day with low humidity. This helps the membrane cure fast and stick strong.
Secure edges and corners
Run a bead of sealant along the top edge, the floor joint, and any pipe penetrations. Insert flashing where the wall meets the floor to keep water out.
Check that the membrane wraps around the bottom of the wall by at least 4 inches. This "lap" stops water from slipping behind.
Final check
After the membrane has cured (usually 24 hours), walk the wall and look for lifted spots or gaps.
Mark any problem area and re‑seal it right away. A quick fix now saves a big repair later.
Need a full walkthrough? Our step-by-step waterproofing guide walks you through each move in detail.
Step 4: Maintenance and Long‑Term Care
Now the membrane is on the wall, the real test is what you do after the job ends.
Inspect it once a year
Pick a dry weekend in spring. Walk the wall, run your hand along every seam, and look for bubbles or lifted edges. If you spot a gap, a quick bead of sealant usually fixes it before water finds a way in.
Watch the drainage board
The board behind the membrane can clog with soil or debris. A garden hose aimed at the exterior drain pipe can flush out most buildup. Do this after a heavy rain when water is already moving through the system.
Mind the joints
Every pipe penetration, floor joint, or window flash is a potential leak point. Check the sealant around them every six months. A thin layer of fresh sealant can extend the life of the whole system by years.
Temperature changes
Cold snaps can shrink the membrane slightly, while hot sun can expand it. If you notice cracks after a big temperature swing, sand the area smooth and re‑apply a thin coat of the same product.
Keep records
Write down the date you finish, the type of membrane you used, and any maintenance you do. A simple notebook helps you spot patterns, like if a particular corner always needs attention.
Consider a professional inspection every few years, especially if you notice new cracks or the soil around your home shifts. LGFMH Construction can walk the site, spot trouble spots, and top up the sealant where needed.
Most homeowners find that a little yearly TLC saves a costly repair down the line. If you want step-by-step details on each of these tasks, check out our full waterproofing guide.
Sticking to this routine keeps your foundation dry and your peace of mind intact.
Conclusion
Choosing the best waterproofing membrane for foundation walls can mean the difference between a dry basement and costly repairs.
Remember the flow: spot moisture risks, match the membrane to your soil and movement, install it cleanly, then keep an eye on seams and the drainage board each year.
A quick tip is to jot down a simple checklist after the install – note the membrane type, tape locations, and any extra board you added. Pull it out when the seasons change and give the wall a brief visual scan.
If you’d rather have a pro handle the details, LGFMH Construction offers interior and exterior repair services that include membrane installation and ongoing maintenance.
Take the first step today: assess your foundation, pick a product that flexes with your house, and set a reminder for your yearly walk‑around. Your walls will thank you.
FAQ
What makes a membrane the best waterproofing membrane for foundation walls?
The best waterproofing membrane for foundation walls is one that stays flexible, seals every seam, and works with the soil pressure you have. Look for a sheet that can bend as the concrete moves, or a liquid coat that fills tiny cracks. It should also pair well with a drainage board so water has a path to run away. When you pick a product that meets these points, leaks are far less likely.
How often should I check the membrane after installation?
You should give the wall a quick look at least once a year, ideally after the first dry day of spring. Walk the outside, spot any new water pooling, and inside run a moisture meter on the finished surface. Check the seams and the drainage board for any lifted edges. If you catch a problem early, a simple tape fix or a small board adjustment can keep the system working.
Can I use a liquid applied membrane on a very old foundation?
Yes, a liquid applied membrane works well on old walls that have lots of cracks and uneven spots. The coating flows into each groove and then cures into a smooth skin that blocks water. Make sure the surface is clean and any big cracks are filled first, otherwise the liquid will just sit in the voids. Pair it with a drainage board for extra safety.
What is the role of a drainage board with the membrane?
The drainage board sits right behind the membrane and gives water a clear path to flow away from the wall. Without it, water can sit against the membrane and push it into cracks. A good board also spreads out the pressure from wet soil so the membrane doesn’t get overstressed. Think of it as a safety net that catches any water that slips past the skin.
How do I know if my membrane is failing?
Look for damp spots on the interior wall, salty stains, or a musty smell. A moisture meter reading above 15 % on the finished surface signals a problem. Outside, check for water pooling at the footings or cracks in the drainage board. If you see any lifted seams or water seeping through the tape, it’s time to reseal or replace that section.
Should I hire a professional for membrane installation?
Hiring a pro can save you time and avoid costly mistakes. A trained crew knows how to prep the wall, apply the primer, and seal every joint properly. They also have the tools to test the membrane after the job and set up a maintenance plan. If you’re comfortable with DIY, follow the steps carefully, but many homeowners find a professional install gives them peace of mind.


Comments