How to Repair a Leaking Attic Roof: A Step‑by‑Step Guide
- William McKracherne
- 5 days ago
- 9 min read

When water starts dripping down from the attic, it’s a clear sign that something’s wrong up on the roof. Ignoring it only makes the damage worse and can ruin insulation, wood, and even your ceiling.
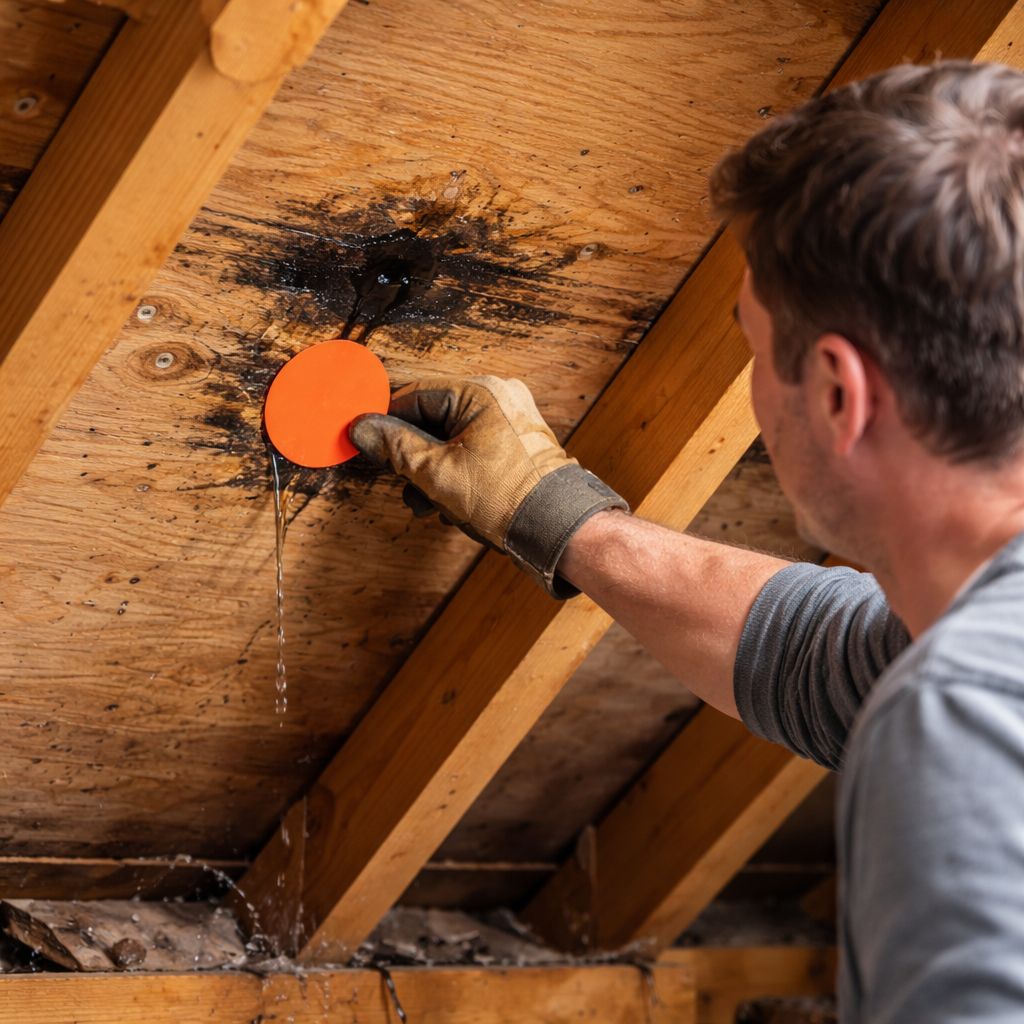
First, find the source . Look for wet spots on the attic floor, moldy smells, or rust on metal fasteners. If you can see a wet patch on the roof from the inside, trace it back to the nearest roof deck joint or flashing.
Next, clear the area. Remove any insulation or debris that’s covering the leak so you can see the roof deck. Use a flashlight and a sturdy ladder – safety first. If the leak is near a vent or chimney, check the seal around it; those are common weak spots.
Now it’s time to patch. A quick, temporary fix is to apply roofing cement over the damaged area and cover it with a piece of roofing tape. For a more permanent solution, replace the shingle or repair the flashing using a metal flashing patch and sealant. Tighten loose nails and seal any gaps with roofing sealant.
After the repair, run a water test. Use a garden hose to spray the repaired spot while someone watches the attic for any new drips. If the leak stops, you’ve bought yourself time before a professional inspection.
Remember, a small leak can become a big problem fast. If you’re unsure about any step, or the damage looks extensive, call a roof specialist. LGFMH Construction offers interior and exterior repair expertise to handle the tough jobs you can’t fix on your own.
For a deeper dive into the exact steps and tools you’ll need, check out our Essential Roofing Repairs Guide: Step‑by‑Step Solutions for Homeowners. It walks you through everything from safety prep to final inspection, so you can feel confident tackling that attic leak.
Step 1: Locate the Source of the Leak
First thing you do is find where the water is coming from. It might look like a dark line on the roof deck or a damp spot in the attic.
Grab a flashlight, a ladder, and a friend to hold the ladder steady. Safety first, never work alone on a steep roof.
Start at the highest point you can see from inside. Follow the wet streak down to the nearest joint, flashing, or vent pipe.
If the roof has shingles, look for any that are cracked, lifted, or missing. Those gaps let rain slip in.
Check around vents, chimneys, and skylights. The sealant can shrink over time, creating tiny openings that turn into big leaks.
Use a piece of chalk or a bright sticker to mark the exact spot on the deck. That mark will guide you when you get the tools later.
Watch the short video above for a visual walk-through of how to spot these problem spots. It shows the exact angles to check and what a hidden crack looks like.
When you’re ready to seal, pull out roofing sealant and a caulk gun. Apply a smooth bead over the crack, then press a piece of roofing tape over it.
Once you’ve marked the leak, you’ll know exactly where to apply sealant or replace a shingle.
If you’re not sure about any finding, call LGFMH Construction. Their crew knows how to repair both interior and exterior roof issues, so you can avoid costly water damage.
Step 2: Prepare the Attic and Safety Measures
Now that you know where the water comes from, clear the space around it. Pull back any insulation or debris so you can see the roof deck. A clean view helps you work faster and reduces the chance you miss a crack.
Before you climb, check your ladder. Make sure it’s on firm ground and the feet are level. If the ladder feels wobbly, use a piece of wood to steady it. Safety gear is a must, wear a sturdy pair of work gloves, safety glasses, and a dust mask.
Turn off any electricity that runs near the attic if you’ll be using metal tools. A quick test with a non‑contact voltage tester can save a shock. If you’re unsure, call an electrician.
Ventilation and Lighting
Good light makes tiny holes easier to spot. A bright LED flashlight with a swivel head works well. Open any attic vents briefly to let fresh air in, it clears dust and keeps you from breathing it.
Protect Your Home’s Insulation
Lay a tarp or a sheet of plastic over the insulation you pull back. This keeps dry insulation dry and stops dust from spreading. When you’re done, you can fold the tarp back and replace the insulation.
Finally, write down any measurements you take: length of a cracked shingle, distance from a vent, etc. Having numbers on hand makes the repair step smoother.
Need a full picture of what tools and steps you’ll need later? Check out the complete roof repair guide for Newport News homeowners.
Step 3: Apply Temporary Waterproofing
Now that the area is clear, you need to keep water out while you plan a permanent fix.
First, grab a roll of waterproofing tape or a sheet of roofing underlayment. Press it over the crack or hole, overlapping the surrounding shingles by at least an inch. Use a flat tool, like a putty knife, to smooth out bubbles and press the material into every crevice.
Next, seal the edges with a generous bead of roofing cement. Spread the cement with the same flat tool, making sure it runs a little onto the shingle surface. The cement should fill any gaps the tape can’t cover.
If the leak is near a vent or pipe, wrap a self‑adhesive flashing strip around the opening before you apply the cement. This extra layer helps stop water from slipping behind the tape.
Give the cement a few minutes to set, then run a quick water test. Use a garden hose on a low spray and watch the attic from inside. If no new drips appear, the temporary fix is holding.
Tip: Keep a small bucket handy to catch any stray water while you work. And remember, this is just a stop‑gap; a permanent repair should follow as soon as you can.
When the weather clears, give the tape one more look. If the edges seem lifted, dab another line of cement and press it down.
For a full walk‑through see the Virginia Beach step‑by‑step roof leak repair guide.
Step 4: Choose the Right Permanent Repair Material (Comparison Table)
Now that you have a temporary patch, it’s time to pick a material that will last.
Below is a quick table that lets you see the main options and what they are best for.
Material | Best For | Things to Watch |
Rubberized roofing cement | Flat spots and seams | Needs a clean, dry surface |
Self‑adhesive flashing tape | Small gaps around vents | Not strong in high heat |
Metal flash (aluminum or steel) | Large holes or pipe penetrations | May need a nail set and paint |
Pick rubberized cement if you want a smooth finish and you can wait for it to cure. It spreads easy with a putty knife and sticks well to shingles.
If the leak is near a vent pipe, the flashing tape gives you a quick seal that you can later cover with cement. Just press firmly and smooth out bubbles.
For a hole the size of a nail or a pipe opening, metal flash is the toughest choice. Cut a piece that overlaps the damaged area by at least an inch, then fasten with roofing screws and seal the seams.
What about cost? All three options are affordable, but the metal flash costs a bit more in material and tools. The tape and cement are budget‑friendly for most DIY jobs.
When you finish, run the water test again. If no drip shows, you’ve moved from a stop‑gap to a real repair, a key step in how to repair a leaking attic roof.
Need a closer look on picking the right material? See the Essential Roof Repair Hampton VA Guide for more details.
Step 5: Finish and Prevent Future Leaks
When the patch is set, you’re almost done. A clean finish makes the roof last longer and keeps water out.
First, remove any loose tape or excess cement. Use a putty knife to smooth the edges so they sit flush with the surrounding shingles. If you see a tiny gap, push a bead of roofing sealant into it and smooth it with your finger.
Next, check the roof edges where the deck meets the wall. A short strip of flashing or a bead of sealant can stop water from slipping under the shingles at the perimeter.
Now give the whole area a quick water test again. Run a garden hose over the repaired spot for a minute while someone watches inside the attic. No new drips means the fix holds.
To keep future leaks from happening, set a simple routine. After a heavy rain, peek inside the attic for fresh stains. Once a season, walk the roof and look for cracked shingles, rusted nails, or damaged flashing.
Cleaning the gutters also helps. When gutters overflow, water can run down the roof edge and find a weak spot. Scoop out leaves and make sure the downspouts direct water away from the house.
If you want a deeper look at how to keep the roof healthy, the roof repair guide for Newport News homeowners breaks down a yearly checklist you can follow.
Finally, note the repair date in a notebook or phone reminder. Mark the spot with a tiny piece of bright tape that’s easy to spot later. When the next season rolls around, you’ll know exactly where to check.

Conclusion
Fixing a leaky attic roof isn’t rocket science. You’ve learned to spot the source, clear the area, apply a temporary patch, choose the right permanent material, and give it a final test.
Now keep a quick habit: after each big rain, glance up and look for fresh stains or rust. A short walk on the roof to clear debris can stop a tiny crack from growing into a drip.
So, what’s the next step? If the repair feels out of reach, or you just want peace of mind, a pro can finish the job cleanly. LGFMH Construction offers interior and exterior repair expertise that many homeowners trust.
Remember, a small fix today saves you time, stress, and money tomorrow. Keep the routine, stay safe, and enjoy a dry attic.
A dry attic means a happier home and fewer surprises down the line.
You’ve got this.
FAQ
What are the first signs of an attic roof leak?
You’ll often see water stains on the attic floor, especially after a rain. Look for dark rings around joists, a musty smell, or rust on metal fasteners. Droplets may form on insulation or on the roof deck when you shine a flashlight up. Spotting these clues early lets you act before the wood rots or mold spreads. Checking the attic after each big storm can catch new spots before they grow.
How can I safely access the leak spot in the attic?
First, set up a sturdy board or plywood over the joists so you can walk without crushing them. Use a reliable ladder with rubber feet and make sure it’s locked in place before you climb. Wear a dust mask, goggles, and gloves to keep debris out of your lungs and eyes. A bright flashlight with a long arm lets you see the leak without bending too far.
What temporary fix works best until I can do a permanent repair?
A quick, effective method is to clean the spot, then apply roofing cement or a flexible sealant with a caulking gun. Smooth it with a gloved finger so it fills the crack fully. Cover the area with a piece of heavy‑duty tarp or polyethylene sheet and tape the edges down. This barrier holds back rain for a few days while you prep the permanent material.
When should I switch from a temporary patch to a permanent material?
Wait until the sealant has fully cured—usually 24‑48 hours in dry weather. Test the patch by gently spraying water with a hose; if no drops appear in the attic, the temporary seal is holding. At that point, you can remove the tarp and install the chosen permanent material, whether it’s silicone sealant, a polyurethane coating, or metal flashing. A solid permanent fix stops future leaks.
Do I need special tools to patch a roof leak?
You don’t need a full toolbox, just a few basics. A sturdy ladder, safety glasses, gloves, and a dust mask keep you safe. A caulking gun helps push sealant into cracks. A putty knife or flat scraper smooths the material, and a roll of tarp or polyethylene sheet provides a temporary cover. Most of these items are cheap and can be borrowed if needed.
Should I call a professional if I’m unsure about any step?
If a part of the job feels unsafe—like working on a steep roof or handling electricity—call a pro right away. Even a small mistake can cause bigger damage or injury. Many homeowners find that a quick inspection by LGFMH Construction saves time and gives peace of mind, especially when the leak is near vents or flashing. It’s better to pay a little now than to face costly repairs later.


Comments