Best Roof Snow Guard Installation Guide: Step‑by‑Step How‑to for 2026
- William McKracherne
- 6 days ago
- 8 min read

Winter can turn your roof into a slide for snow. If the snow breaks free, it can slam into walls, shatter windows, or even crush a deck. That's why a solid snow guard plan matters.
First, know why snow guards exist . They hold the snow sheet in place long enough to melt slowly. That cuts the force that hits the side of the house. Without them, a sudden release can cause costly damage.
Second, pick the right guard style. Flat metal roofs use clamp-on plates; sloped shingles work best with screw-in brackets. Quick check: if the roof has standing seams, use matching clamps; if it’s shingle, pick a bracket that sits under the ridge.
Third, plan the spacing. A common rule is one guard per 3-4 ft on a low-pitch roof and one per 6-8 ft on a steep pitch. Mark spots with a chalk line to keep guards evenly spread and avoid gaps where snow can still slide.
Fourth, install safely. Use a sturdy ladder, wear a harness, and never work alone on icy surfaces. Drill pilot holes, then secure the guard with the supplied screws or clamps. Tighten just enough to hold; too tight can crack the roofing material.
Finally, check your work each spring. Walk the roof after a thaw and look for loose guards or rust. A simple roof maintenance checklist can help you spot issues early and keep the system working year after year.
Follow these steps and you’ll turn a risky winter into a quiet, protected season.
Step 1: Assess Your Roof and Choose the Right Snow Guards
A roof without snow guards is a ticking time bomb when snow starts to melt. You feel the weight, the cold, and the fear that a sheet could break free and smash a wall. That’s why the first step in the best roof snow guard installation guide is a solid assessment.
First, look at what sits on top of your home. Is it metal panels, standing‑seam roofing, or classic shingles? Does the roof slope gently or steeply? Write down the material and the pitch; these two facts decide which guard will hold the snow best. A low‑pitch roof needs more guards placed close together, while a steep roof can get away with fewer, farther apart.
Before you buy any guard, give the roof a quick once‑over. Clear loose nails, sweep away leaves, and look for cracked flashing. A clean surface lets the clamps sit tight and stops future leaks.
Next, match the guard style to your roof type. Flat metal panels work well with clamp‑on plates that slip under the seams. Shingle roofs prefer screw‑in brackets that sit just under the ridge. Check the guard’s material – stainless steel or coated aluminum will resist rust in harsh winters. If you’re unsure, LGFMH Construction can walk you through the options and help you pick the right fit.
Finally, mark your guard locations with a chalk line. Space them about 3‑4 ft apart on low‑pitch roofs and 6‑8 ft on steep roofs. Double‑check the line before drilling any holes. A quick walk‑through after the first thaw will show if any guard feels loose – tighten it right away. Follow these steps and you’ll have a roof that lets snow melt safely, keeping your home and family safe all winter. If you’d rather have a pro do the job, reach out to LGFMH Construction for a free roof assessment and safe installation.
Step 2: Plan Layout and Placement for Maximum Protection
Now that you know which guard fits your roof, it’s time to map out where each piece will sit. A clear plan saves time, cuts mistakes, and keeps the snow from finding a weak spot.
Start with the roof’s run. Walk the ridge and note any dips, valleys, or changes in pitch. Those spots let snow collect and slide faster, so you’ll want a guard right before the change.
Next, decide on spacing. A low‑pitch roof usually needs a guard every 3 ft, while a steep pitch can stretch to 6 ft. Write the numbers on a piece of paper or a phone note so you can check each mark as you go.
Grab a chalk line or a thin string and snap it along the ridge. This line becomes your guide rail. As you move along, place a short mark where a guard will go. If the line veers off the roof’s edge, adjust it so the guard stays on solid decking.
Tip: Use a small level to make sure each mark is level left‑to‑right. Even small tilts can cause a guard to sit crooked, which reduces its grip on the snow sheet.
When you’re happy with the layout, take a photo. A quick picture helps you remember the pattern on a cold day when you’re wearing gloves.
Quick layout checklist
Guard Type | Spacing | Placement Note |
Clamp‑on metal | 3‑4 ft (low pitch) | Place just before any ridge dip. |
Screw‑in shingle | 6‑8 ft (steep pitch) | Align with roof studs when possible. |
Low‑profile tile clip | 4‑5 ft (moderate pitch) | Use a gentle chalk line to avoid cracking tiles. |
Finally, give yourself a safety check. Make sure the ladder is stable, wear glasses, and have a partner spot you if the roof is icy. A solid layout plan means fewer trips back up the ladder and a smoother install.
If you’d like a printable reference, check out our roof inspection checklist. It walks you through the same steps and adds a few extra safety tips.
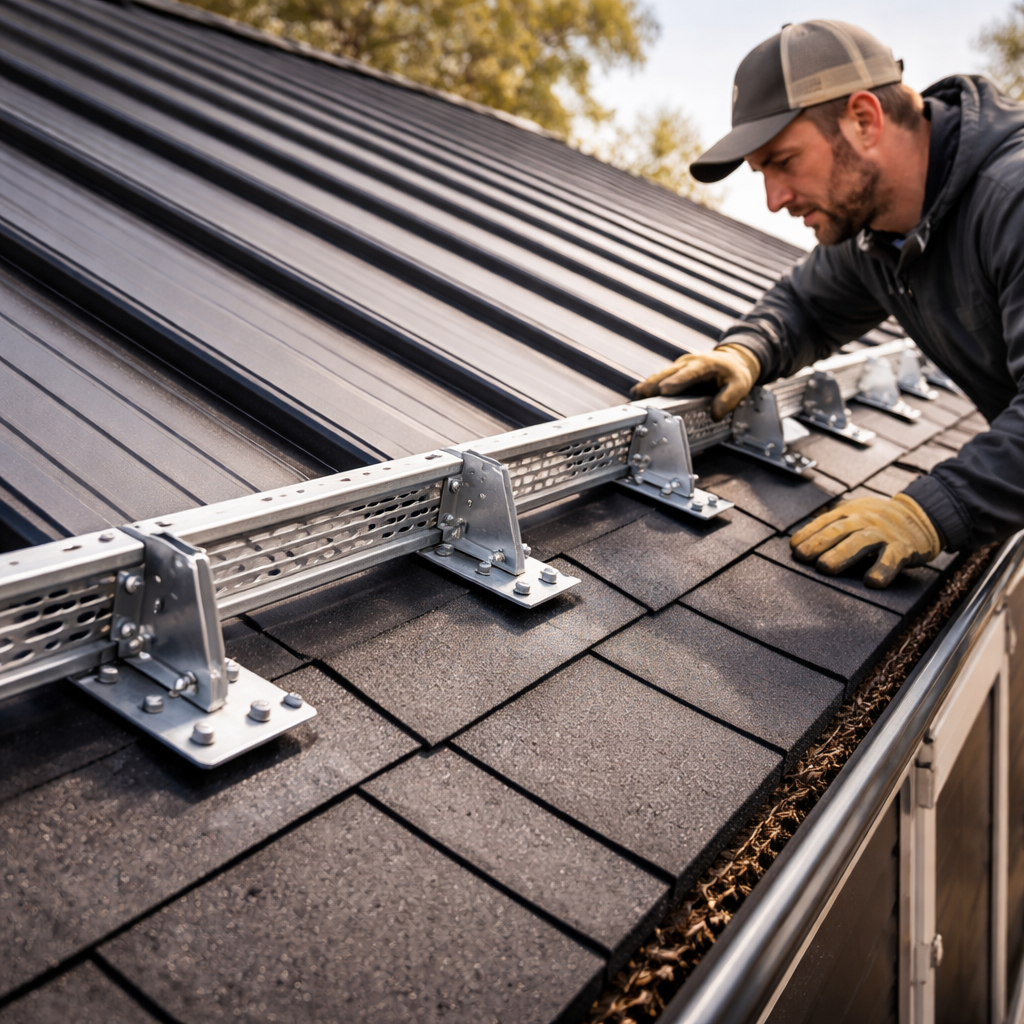
Step 3: Install Snow Guards Safely and Securely
Got your layout? Great. Now it’s time to actually put the guards on the roof. The trick isn’t how many you have – it’s how safely you get them up there.
Gear up first
Grab a sturdy ladder, a full‑body harness, and a buddy who can spot you. Wear a hard hat, safety glasses, and non‑slip boots. If the deck feels icy, lay down a piece of plywood for extra grip.
Drill pilot holes
Use a small drill bit that matches the screw size. A pilot hole stops the decking from cracking when you turn the screw. Go slow, especially on older wood or tile.
Tip: A quick squeeze of the drill’s clutch at the start helps keep the bit straight.
Secure the guard
Place the guard on the mark, line up the holes, and hand‑tighten the screw. Give it enough turn to hold, but don’t over‑tighten – you don’t want to crush the shingle or metal panel.
If you’re using a clamp‑on guard, make sure the clamp wraps snugly around the seam and that the rubber gasket sits flat.
Check alignment
After a few guards are in, step back and look across the roof. All the guards should sit level left‑to‑right. A quick level check with a small spirit level helps catch any tilt before you move on.
Final safety walk
When you’re done, walk the roof (with your harness) and give each guard a gentle wiggle. Anything that feels loose needs another turn. Clean off any debris, and seal the screw heads with a dab of roof‑safe sealant if you live in a salty air zone.
When spring thaws, run through a quick roof maintenance checklist to make sure nothing shifted over the winter.
Step 4: Inspect, Maintain, and Adjust Your Snow Guards
Winter's over, but the guards still have a job to do. A quick spring walk lets you catch any loose parts before they turn into a costly repair.
Do a safety walk
Grab your harness again, even if the roof is dry. Walk slowly along the ridge and give each guard a gentle wiggle. If it moves, tighten the screw a half‑turn. Look for rust spots or cracked seals – a little touch‑up now can stop a leak later.
And don’t forget the gutters. Snow melt can carry grit that scrapes the guard’s base. A quick brush clears the debris and helps the fasteners stay tight.
Seasonal check‑list
Mark your calendar for a mid‑summer review. Heat can expand metal brackets, and wood can shrink, both of which may loosen a screw. Use a small screwdriver and turn each fastener just enough to feel resistance.
When you spot a rusted screw, replace it with a stainless‑steel one. It’s a cheap swap that adds years of life.
Need a full guide on keeping your roof in top shape? Check out LGFMH’s roofing guide for a deeper dive.

Finally, keep a small notebook on the ladder. Jot down any guard that needed extra tightening, the date, and any parts you swapped. That log becomes a simple history you can hand to a contractor if you ever need professional help.
Stick to this routine each year, and your snow guard system will stay strong, keeping snow from turning your house into a winter hazard.
Conclusion
You've walked through the whole process: pick the right guard for your roof, map out spacing, bolt them in safely, and give them a yearly check‑up. Each step builds on the last, so a missed step can let snow slip where it shouldn't.
Make the habit stick. Put a note on your phone for the first warm day after winter, grab a ladder, and run the quick visual checklist. A few minutes now saves a noisy, leaky roof later.
When you'd rather skip the DIY grind, LGFMH Construction offers expert install and maintenance services that keep your home safe without the hassle. A short call can get you on a schedule before the next snow season hits.
Remember, the best roof snow guard installation guide is only as good as the care you give it. A clean guard, a tight screw, and a record of dates keep the system working year after year.
Frequently Asked Questions
How do I know the right spacing for snow guards?
Check the guide that comes with the guards. It tells you the exact distance to leave between each unit for your roof pitch. A low‑slope roof usually needs a guard every 3‑4 ft, while a steep roof works with 6‑8 ft spacing. Mark the spots with a chalk line before you drill so you keep the pattern even.
What tools do I need for a safe install?
You’ll need a sturdy ladder, a full‑body harness, a drill with a small drill bit for pilot holes, and the screws or clamps that match your guard set. A tape measure, a pencil, and a level help you keep everything straight. Have a partner on the ground to hand you tools and watch for slip hazards.
Can I use adhesive instead of screws on a metal roof?
Many high‑end guards are made of polycarbonate and come with a strong adhesive. The glue works if you clean the area well and let it cure for the time the maker says. Make sure the roof is dry and the temperature is above the minimum the glue needs. Skipping the cure step can let the guard slip when a big snow load hits, and a loose guard can cause ice to slide down.
How often should I inspect my snow guards?
Do a quick walk‑through each spring after the melt. Look for any guard that wiggles, any rust spot, and any missing screw. Tighten loose fasteners and clean debris. While you’re up there, check that the spacing still looks even and that the chalk line marks haven’t faded. A short check each year keeps the system strong and saves you a costly significant repair later.
What are the most common mistakes to avoid?
Homeowners often space guards too far apart, mis‑measure the roof, or forget to let adhesive set. These errors leave gaps where snow can slide, or cause guards to pop off in a storm. Following the manufacturer’s spacing chart and waiting for the glue to cure can stop those problems. Read more about common snow guard installation mistakes .
When should I call a professional like LGFMH Construction?
If the roof is very steep, icy, or you’re not comfortable working at height, it’s best to get help. A pro can set the guards to code, use the right fasteners, and check the roof structure. LGFMH Construction offers install and maintenance services, so you get a safe job and peace of mind.


Comments