Comprehensive Deck Repair Guide for Homeowners
- William McKracherne
- Feb 26
- 16 min read

Ever stepped onto a deck and felt that unsettling give, like the wood is whispering, “something’s not right”?
You’ve probably spent a weekend grilling, kids laughing, and then noticed a splinter or a loose board that makes you pause. That moment of doubt—“Did I just waste all that effort?”—is all too familiar for anyone who’s poured time into a backyard oasis.
Here’s the thing: deck repair isn’t just about patching a few nails; it’s about protecting the whole structure so your outdoor gatherings stay safe and enjoyable for years to come. Ignoring a small rot spot can turn into a costly overhaul, and nobody wants to be that homeowner scrambling for a contractor after the first rain of the season.
In our experience at LGFMH Construction, we’ve seen three common triggers that push homeowners toward repair: moisture seeping into the joists, wood that’s been sun‑bleached and cracked, and fasteners that simply gave out after years of traffic. Each of those tells a story about how the deck is aging, and each one has a straightforward fix if you catch it early.
So, what should you look for before the problem escalates? Start with a quick visual scan—walk the surface, tap the boards, and listen for any hollow sounds. Then, grab a screwdriver and check that the screws are still tight; loose hardware is a red flag. Finally, peek under the deck, if you can, to see if the joists are damp or warped.
Feeling a bit overwhelmed? Don’t worry. We’ll walk you through the basics of assessing damage, choosing the right materials, and deciding whether a simple repair will do or if a full replacement makes more sense. By the end of this guide, you’ll have a clear roadmap that turns “I don’t know what to do” into “I’ve got a plan.”
Let’s dive in and give your deck the care it deserves, so it stays the centerpiece of your outdoor life for seasons to come.
TL;DR
If your deck feels wobbly, cracked or soaked, a quick visual check and tightened screws can reveal whether simple deck repair will save you time and money.
We’ll walk you through identifying moisture, rot, and loose fasteners, then choosing the right materials so you can fix or replace your deck.
Step 1: Assess Deck Condition
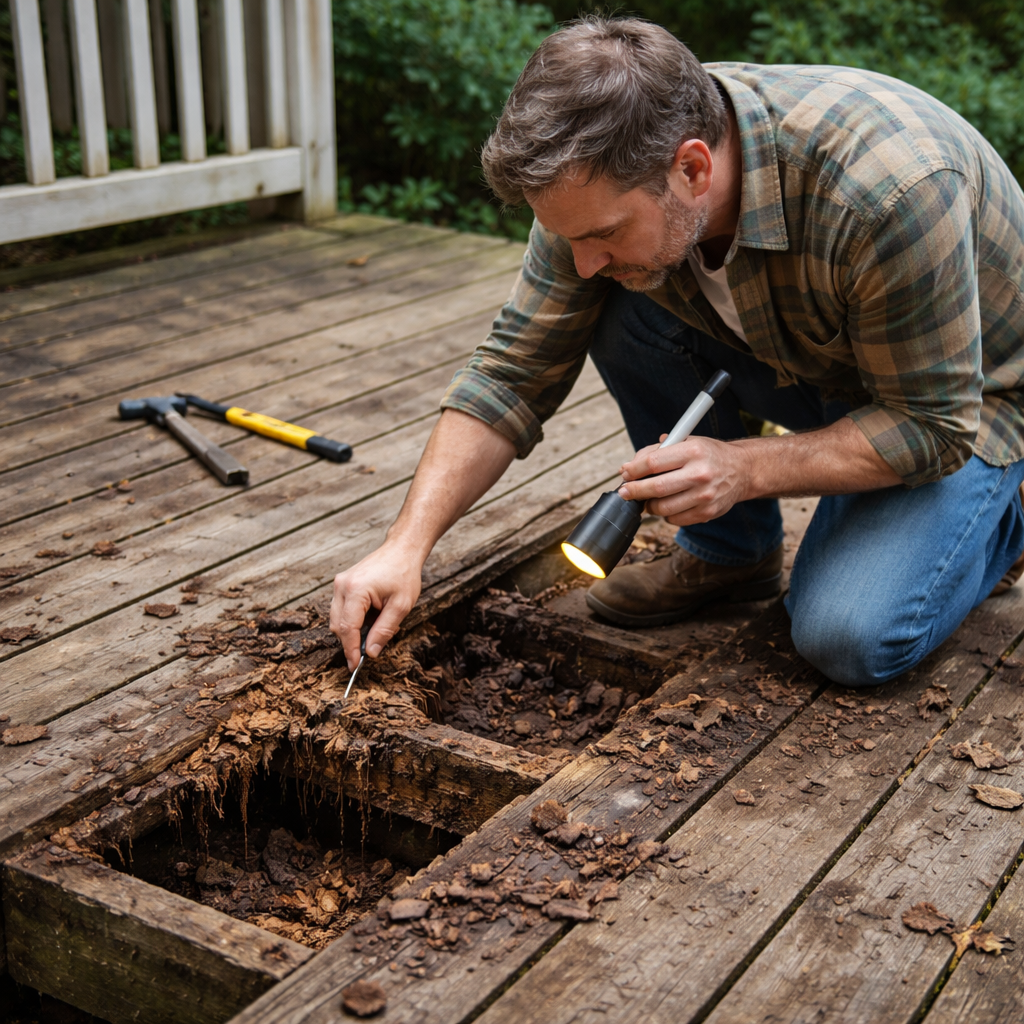
Let’s be honest: a deck that feels unsteady is stressful. It’s not just a nuisance; it’s a safety check that you can’t skip. Step 1 is all about diagnosing the deck’s condition with calm, methodical eyes instead of panic. By taking a measured approach, you’ll know whether a simple repair will save your weekend or if a bigger project is on the horizon.
Start with a visual sweep. Walk the surface slowly, looking for cracks, cupping, splinters, or water staining that wasn’t there last season. Note any boards that look warped or soft when you press with the flat of your hand. Those signs often point to moisture reaching the framing.
Next, test the fasteners. Grab a screwdriver and test screws and deck bolts. Are they tight, or do they spin? Listen for those hollow thunks when you tap boards—those are telltale signs of loose fasteners or decay beneath the surface. If several screws are loose, don’t just tighten them—consider replacing the hardware with corrosion‑resistant screws.
Under‑deck check
Peek underneath if you can. Look at the joists for dampness, rot, or swelling. A quick flashlight scan can reveal moldy patches or dark staining that shouldn’t be there. If you see repeated damp spots, you’re looking at ongoing moisture exposure that needs addressing beyond a quick fix.
Interpretation and next steps
Now think about severity. A few loose boards or shallow rot spots may be easily repaired with targeted replacements and proper sealing. Widespread staining, soft joists, or warped framing usually means a larger repair or even deck replacement. In our experience, catching these early saves money and headaches.
Tools and plan matter. Have a plan and the right tools: pry bar, drill, galvanized screws, a moisture meter if you have one. Keep notes—take photos, mark damaged boards, and log moisture readings. This prep makes it easier to decide whether you can DIY or need a pro.
For a deeper, step‑by‑step walkthrough, check our Deck Repair Guide: Step‑by‑Step Solutions for Common Problems.
Here’s a quick visual recap to reinforce the steps above:
After you watch, you’ll know where to start and whether LGFMH Construction can help with repairs or a full deck replacement.
For a quick touch of practical support while you plan, consider a reliable IT partner in your area. Business IT Support Bay Area: Reliable Solutions for SMBs can help you protect project data, budgeting spreadsheets, and timelines, so nothing slips during a remodel.
If you’re thinking about lighting and safety after the repair, you might want to explore outdoor lighting installation from a specialist. outdoor lighting installer can help you extend evenings on the deck with energy‑efficient solutions.
Finally, to give you a quick reference, here’s an image prompt you can use later as a reference point.
Step 2: Gather Tools & Materials
So you're staring at a pile of tools and wondering what you actually need for deck repair. The right toolkit isn't glamorous, but it saves you hours and a few headaches.
In our experience at LGFMH Construction, a well‑stocked kit is the difference between a clean patch and a weekend of fiddling with mismatched bits. You'll move faster, make cleaner cuts, and avoid redoing small fixes later.
We'll split this into two parts: the hand tools you'll grab first, and the power tools that do the heavy lifting. Then we'll cover materials, because a great repair starts with the right stuff on hand.
Hand tools you can count on
These are the basics you’ll reach for on almost every deck repair. They help you check fit, remove stuck boards, and keep the job moving.
First, a solid tape measure to confirm board lengths and joist spacing. A 25‑foot model with a clip for one‑handed measuring speeds things up. Next, a screwdriver set with both Phillips and flathead tips—magnetic tips make life easier when you’re working in tight corners. A pry bar becomes your best friend when a board sticks or you need to separate planks for rot inspection.
Power tools that actually save time
A cordless drill/driver is non‑negotiable. Look for at least 12V with a decent chuck and a solid bit kit. If you’re cutting boards or joists, a handsaw or circular saw with a fine blade makes cleaner cuts and reduces splintering. Don’t forget safety gear and a sturdy work surface; speed is great, but control is king.
What about fasteners and fastener selection? Stainless‑steel or coated screws resist rust in coastal climates, and proper flashing often goes hand‑in‑hand with repairs. You’ll want a few lengths of fasteners to match your decking boards and joists, plus corrosion‑resistant nails for any lightweight bracing.
Finally, stock up on safety basics: work gloves, safety glasses, and a durable dust mask when sanding or cutting. These aren’t optional; they protect you from splinters, dust, and flying debris.
Materials to have on hand
Besides tools, you’ll need the actual repair materials: exterior‑grade deck boards, replacement joists, stainless or coated fasteners, flashing, wood preservative, and a sealant or deck stain for protection after you repair. Consider calculating a little extra to cover mistakes or miscuts—it’s cheaper than running to the store mid‑project.
For a detailed, step‑by‑step deep dive into choosing the right materials and how to calculate how much you’ll need, check our Deck Repair Guide: Step‑by‑Step Solutions for Common Problems. Deck Repair Guide: Step‑by‑Step Solutions for Common Problems. That resource walks you through the planning and purchasing phase so you’re not guessing when you head to the lumber yard.
Okay, you’re armed. If you want a second pair of eyes on your plan, LGFMH Construction can help tailor the toolkit to your deck’s age and climate. You’ll also find a structured, field‑tested checklist in our guide.
Item | Purpose | Notes |
Tape measure (25 ft+) | Measure board lengths and joist spacing | Keep handy clip for one‑handed use |
Screwdriver set (Phillips & flathead) | Insert and tighten deck screws | Magnetic tips help in tight spaces |
Cordless drill/driver (12V+) | Drive screws quickly and consistently | Pair with corrosion‑resistant bits |
Pry bar | Lift or separate boards for inspection | Avoids damage to surrounding boards |
Handsaw or circular saw | Cut boards/joists as needed | Use fine teeth; wear PPE |
Safety gear (gloves, goggles) | Protect hands and eyes | ANSI‑rated gear recommended |
So, what’s next? Gather these basics, make a quick materials list, and you’ll be ready to start the first repair with confidence. If you’d like a tailored toolkit for your specific deck and climate, our team is a quick call away.
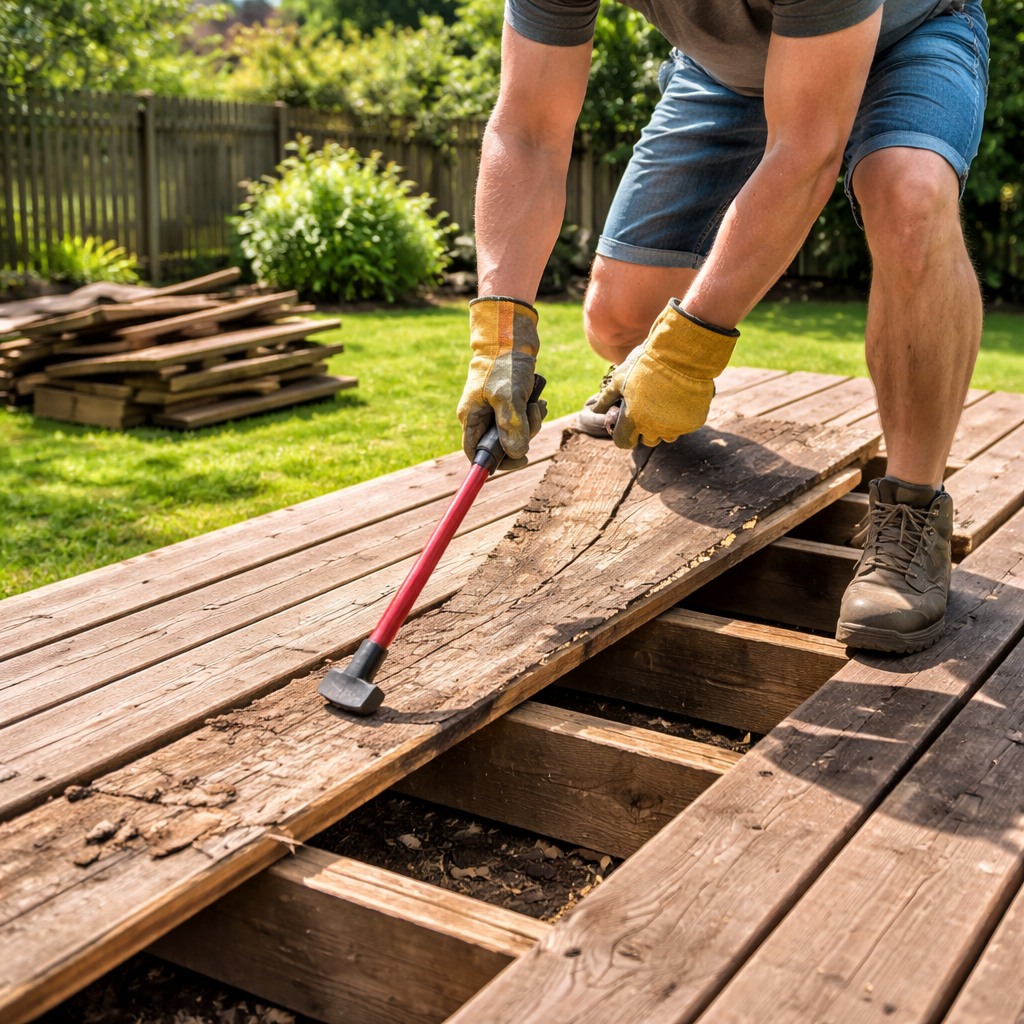
Step 3: Remove Damaged Boards
Alright, you’ve spotted the rot, the splinter‑filled plank, or the board that just won’t stay flat. The next move is to get that piece off the deck without turning the whole surface into a demolition site. It sounds messy, but with a little method you’ll be back to a smooth walking surface before the weekend grill gets busy.
Safety first, then the pry
Before you even lift a board, grab your gloves, safety glasses, and a dust mask. Even if the wood looks solid, you never know when a hidden nail or a splinter will bite. A quick safety check saves a trip to the ER and keeps the job moving.
Next, clear a workspace around the board. Remove any loose debris, leaves, or pet toys that might get in the way. A tidy area lets you see the screws or nails more clearly and reduces the chance of a slipped pry bar.
Locate the fasteners
Most deck boards are held with either stainless‑steel screws or coated nails. Use a screwdriver or a small pry bar to feel around the board’s edges. If you hit a screw head, unscrew it with your cordless drill; if it’s a nail, a nail puller or the claw of a hammer will do the trick.
Sometimes a board is fastened on both sides—top and bottom. If you can’t see the underside, gently tap the board with a hammer; a hollow sound often means there’s no hidden fastener. When in doubt, back‑track a few inches and look for a second row of screws.
Gentle leverage, not brute force
Insert a flat pry bar under the board, starting at one corner. Give it a little wiggle—just enough to create a gap, then lever the board up slowly. If the wood resists, double‑check for missed fasteners. For stubborn boards, a thin piece of scrap wood between the pry bar and the deck can protect surrounding planks from dents.Once the board lifts, pull it away from the joist. If the joist itself looks compromised—cracks, rot, or severe water staining—note it for replacement later. A damaged joist can’t hold a brand‑new board, and you’ll end up back at step three again.
What to do with the old board
Don’t just toss it in the trash. If the wood is only mildly weathered, you can repurpose it for a garden bench or a raised planter. For heavily rotted pieces, bundle them and take them to a recycling center that accepts construction waste. It’s better for the environment and often cheaper than a landfill fee.
While you’re clearing the space, give the joist a quick inspection. A screwdriver tip should bite into healthy wood with resistance; if it slides in like butter, you’ve got rot that needs a joist swap. Mark any problem spots with a piece of chalk so you don’t lose track.
Prep the opening for the new board
Before you set the replacement, sand the joist face lightly to remove any splinters, then wipe away dust with a dry cloth. If the old fasteners left holes, fill them with wood filler or a short piece of scrap lumber to give the new screws something solid to bite into.
Now you’re ready for the next step: installing the fresh board. The key is to keep the deck level, so measure twice, cut once, and line the new piece up with the adjacent boards before you drive the first screw.
Need a deeper dive on choosing the right replacement lumber and how to keep your deck level? Check out our comprehensive guide to building and maintaining decks for pro tips on material selection and long‑term care.
And remember, patience at this stage pays off later. Rushing the removal can bend surrounding boards or damage hidden joists, turning a simple fix into a costly redo.
Step 4: Repair or Replace Joists & Supports
So you’ve done the checks, and now you’re staring at the skeleton. Let’s be honest: this is the moment where a wobble becomes a plan you can actually execute. By 2026 we’ve refined this approach to save homeowners time, money, and a lot of headaches.
Assess which pieces are truly compromised
Look under the deck if you can. Dark staining, soft spots, or visible cracking in a joist aren’t cosmetic issues; they’re red flags. A screwdriver should meet resistance when you poke a healthy joist; if it sinks in easily, replace it. Mark those spots with chalk so you don’t lose track. In our experience, a handful of suspect joists is common, but broad rot across an entire run means you’re at a crossroads.
Repair vs replace: how to decide
Small patches or a single damaged joist can be repaired, especially if the rest of the frame is solid. When several joists are compromised or the span shows sag, replacing the affected run usually saves time and future headaches. Age, climate, and access all matter, so weigh cost, labor, and long-term stability before you swing the hammer. If the joist has soft spots near the ledger or near high-traffic areas, the safer choice is to replace that segment.
Materials and fasteners you’ll want
Grab exterior-grade joists that match the existing size, plus stainless or coated screws long enough to bite into solid wood. You’ll also want joist hangers, proper flashing, and a preservative or sealer for the new wood. Don’t skimp on corrosion-resistant fasteners in coastal climates. A little prep now goes a long way against moisture creeping back in. If you’re replacing multiple joists, consider replacing the affected decking boards to keep the surface flush and even.
Step-by-step approach
First, shore up the deck with temporary supports so you don’t put all the load on a single repaired area. Next, remove the damaged joists with clean cuts, keeping the ends square for solid connections. Install the new joists, fastening them into joist hangers, and confirm spacing matches the rest of the framing. Then reattach the decking using the same fastener pattern and check that the surface stays level. If you see a slight bow, add a blocking piece between joists for extra stiffness.
Moisture control and finishing touches
Moisture protection is non-negotiable. Add flashing where needed, ensure the ledger is properly sealed, and treat the new wood before sealing the entire deck. A fresh sealant or stain will help even out color and protect against UV and moisture for years to come. You’ll thank yourself after the first heavy rain, when the surface stays solid rather than wobbly.
For a deeper dive, check our Deck Repair Guide: Step-by-Step Solutions for Common Problems.
Deck Repair Guide: Step-by-Step Solutions for Common Problems
Step 5: Reinstall Boards & Finish
You're almost there. The framework is solid, and now it's all about surface, appearance, and long‑term durability. Does it feel satisfying to see those clean lines come back as you replace boards?
Let’s walk through the final moves so you don’t waste time or create new problems down the line.
Reattach the decking in the same pattern
Lay the replacement boards in the same sequence you removed them so the grain, drainage, and overall feel stay consistent. Pre‑drill where needed to prevent splitting, especially on hardwoods. Use corrosion‑resistant screws and drive them so the heads sit just below the surface to minimize trip hazards. If you had butt joints, stagger them where possible to avoid weak points along a single line. A quick test with your knee along each board helps confirm you’re seating them evenly.
Take time to align end gaps and ensure boards butt tightly against each other without binding. Measure twice, drill once, and double‑check that no board is sitting high in one spot and low in another. You’ll thank yourself later when the surface reads as one solid plane rather than a patchwork of high and low points.
Keep it level and even
As you go, check each board with a level and run a straight edge along the row. Small gaps matter—about 1/8 inch is ideal for normal expansion and contraction. If you notice a slight bow, add a thin spacer or a blocking piece between joists to keep the surface flat. Don’t rush; a few extra minutes now save call‑backs after the first heavy rain.
With coastal climates in mind, keep edges square to prevent water from wicking into the joist line. A chalk line along the deck edge can help you visualize any gradual drift as you move across the surface. If a board refuses to sit flush, remove it, re‑level the joist, and reseat before driving the screws home.
Finish the joints and flashing
Gaps at the ledger or where boards butt against the house are moisture gateways. Make sure flashing is intact and that any new ledger screws are sealed to prevent water intrusion. If you’re patching, consider a small flashing lip to help guide water away from the wood. Where boards meet the house, ensure a clean bead of sealant behind the flashing to close out capillary action that pulls moisture into the wood. A damp, not soaking, surface is ideal for finishing products to adhere properly.
Recheck vertical clearances around rail posts and stairs. Any wobble here isn’t cosmetic—it’s a safety issue. Tighten or replace fasteners as needed and wipe away excess sealant before it cures so you don’t trap dirt beneath the finish.
Treat, seal, and protect the new wood
Apply a preservative before sealing the entire deck, then finish with your chosen stain or sealant. In 2026 coastal climates, a UV‑protective sealant plus a water‑repellent product helps keep color true and boards dry. Follow the product directions for recoat intervals and coverage. If you’re unsure about drying times, plan the finish for a dry spell of at least 24–48 hours to avoid trapping moisture inside the wood.
Test a small area first to confirm color consistency with the existing boards. Remember: lighter coats dry faster and even out with a second coat after the recommended cure time. Keep tools off the wet surface to avoid fingerprints or lap marks in the stain.
Final safety checks
Walk the deck slowly, press each board to ensure no flex or pop, and listen for squeaks. Tighten any loose screws, countersink protruding heads, and fill holes so you don’t nick a leg or snag clothing. Inspect railing posts and step nosings for solid attachment and level alignment. If anything feels off, stop and correct it before you regain full use of the space.
Cleanup and maintenance plan
Clear debris, sweep the surface, and store tools. Leave a simple maintenance routine: recheck fasteners after heavy rains, inspect joists annually, and reseal every few years. A quick touch‑up now saves bigger repairs later.
For a deeper dive, check our Deck Repair Guide: Step-by-Step Solutions for Common Problems. Deck Repair Guide: Step-by-Step Solutions for Common Problems
FAQ
What are the most common signs that a deck needs repair?
Walk the surface and listen for hollow sounds. A board that sounds hollow often means rot underneath or a loose fastener. Look for squeaks, looseness, cracking, or cupping. Check for visible moisture staining, mold, or soft spots you can press with a screwdriver. If several boards show this, it’s not just a cosmetic issue—it's a structural red flag we don’t ignore.
Also inspect the ledger and railing connections. Rusty hangers, gaps at the house connection, or water pooling under the deck are signs water damage is creeping in. In our experience, catching these early lets you plan a repair instead of a bigger rebuild.
So, what should you do next? Start a notebook or quick photo log of suspect spots, then map out a repair plan with clear priorities.
Should I repair or replace decking after detecting rot?
That depends on how widespread the rot is and how many joists are affected. If it’s isolated to one or two boards, a targeted repair or sistering can save money and time. If several joists are compromised or the rot has penetrated the ledger, replacement usually makes more sense long term.
We assess the scope, then weigh protection, drainage, and future maintenance before deciding. In our experience, quick reinforcement can buy time, but widespread decay almost always calls for a smarter, longer‑lasting solution.
If you’re unsure, consider a professional evaluation to prevent a patchy fix from turning into a full rebuild later.
What materials work best for deck repair in rainy climates?
For structural framing, use rot‑resistant or treated lumber and corrosion‑resistant fasteners. Cedar and redwood are attractive but may require more ongoing maintenance. For the surface, premium composites resist moisture and fading, though they cost more. Pair with stainless‑steel or coated screws and hidden fasteners to minimize water traps.
Choose a solution that matches climate, foot traffic, and budget. If you’re aiming for longevity with lower maintenance, a high‑quality composite surface often pays off over time.
In our shop, LGFMH Construction leans toward fasteners and coatings designed for exterior use to keep decks dry and stable for years.
How do I safely remove damaged boards without harming the rest of the deck?
Mark the board, then back out visible screws with a drill. If screws are buried, use a reciprocating saw to cut along the length while supporting the board to avoid snapping adjacent boards. Pry gently, keep your body to the side, and wear eye protection. Collect debris and inspect the joist beneath for hidden rot before you replace the board.
Take your time and avoid rushing. A careful removal minimizes damage to nearby boards and makes re‑installation cleaner and faster.
What are the best practices to prevent future deck rot after repair?
Flashing at the ledger, proper drainage, and sealing the wood matter. Clear debris, keep weep holes open, and avoid soil contact with wood. Regular cleaning and resealing every couple of years extend life. If you’ve replaced joists, re‑check their tops for moisture and reapply protective coatings to slow moisture migration.
Think of maintenance as a quarterly check‑in—just a quick stroll through your deck to spot trouble signs before they grow.
How long does a typical deck repair take and what budget should I expect?
For a straightforward moisture or fastener fix, plan for a weekend and a modest budget. If you’re replacing joists or boards, it can stretch to a few days and a larger investment. Budget varies with material choice—pressure‑treated, cedar, or composite—and whether you hire help. A professional assessment provides a precise plan and a realistic estimate.
With careful planning, you can balance cost and longevity, avoiding costly surprises later.
When should you call a professional for deck repair?
Red flags include widespread rot, a soft ledger connection, or signs the deck is pulling away from the house. If you can’t access all areas safely, or if drainage and flashing look suspect, it’s time to bring in a pro. LGFMH Construction can perform a full assessment, reinforce or replace joists, and ensure flashing and footings meet code. We’re here to help when you need it.
Conclusion
After walking through inspection, tool gathering, board removal, joist work, and the final reinstall, you’ve seen that deck repair isn’t magic—it’s a series of small, doable steps.
So, what’s the biggest takeaway? Catch moisture early, tighten fasteners before they loosen, and don’t let a soft joist sit unnoticed. Those three habits keep a deck solid for years without breaking the bank.
We’ve also shown how a weekend‑long project can stay on budget when you plan your materials, protect the work area, and follow a clear checklist. If anything feels overwhelming, remember you can always call a pro—especially when the ledger or footings look suspect.
In our experience, homeowners who schedule a quick quarterly walk‑through avoid costly replacements down the line. A few minutes of tapping boards, checking for water stains, and wiping down joist tops can save thousands.
Ready to put the plan into action? Grab your tape measure, pull out that screwdriver, and give your deck the care it deserves. And if you hit a snag, LGFMH Construction is just a call away to help you finish the job right.
Enjoy the peace of mind that comes with a sturdy, beautiful deck—perfect for BBQs, family gatherings, or that quiet evening with a book.


Comments