Comprehensive Guide to Building and Maintaining Decks
- William McKracherne
- Jan 13
- 20 min read

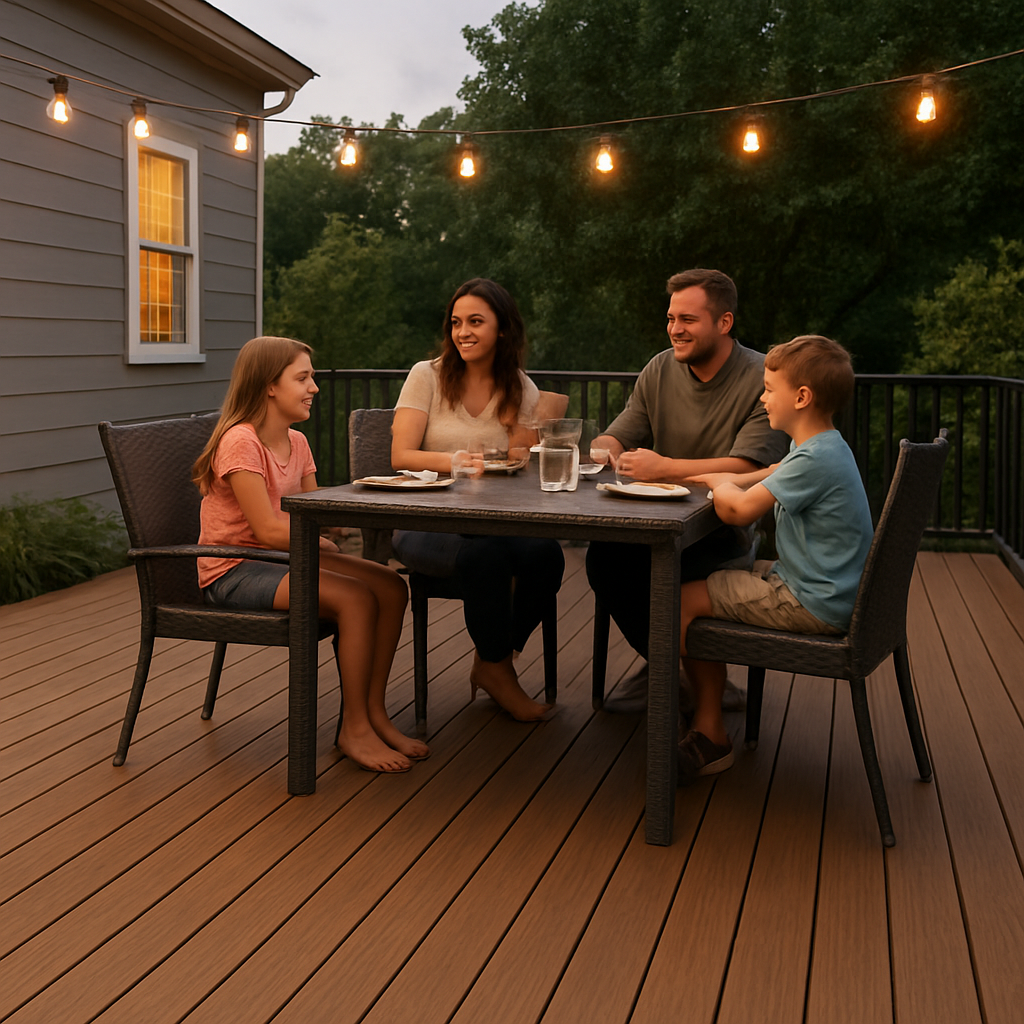
Picture this: you step out onto a fresh‑built deck on a sunny Saturday, the smell of pine in the air, and you realize this little platform could be the heart of your backyard.
Ever wondered why some decks stay beautiful for years while others start peeling after a single rainstorm?
We get it—your deck isn’t just wood and nails; it’s where you watch kids race down the stairs, where you sip coffee at sunrise, where your dog sprawls after a long walk.
In our experience at LGFMH Construction, the biggest mistake homeowners make is skipping the prep work. A solid foundation, proper flashing, and the right sealant can mean the difference between a deck that lasts a decade and one that needs replacement in half that time.
But don’t worry, you don’t need a construction degree to make smart choices. Think of it like building a sandwich: you start with good bread (the framing), add fresh ingredients (the decking boards), and finish with a tasty sauce (the finish coat) that keeps everything together.
So, what should you focus on first? Start with assessing the existing structure. Look for loose joists, water‑stained beams, or rusted fasteners—these are the red flags that signal trouble before you even pick up a brush.
Next, pick a material that matches your climate and lifestyle. Whether you lean toward pressure‑treated lumber, composite boards, or tropical hardwood, each option has its own maintenance rhythm.
And here’s a tip that saves you time and money: schedule a seasonal cleaning and a light sanding every spring. It removes grit, lets the sealant adhere better, and keeps the deck feeling smooth under bare feet.
By the end of this guide, you’ll know how to plan, build, and care for a deck that becomes the go‑to spot for family gatherings, weekend BBQs, and quiet evenings under the stars. Ready to get started?
TL;DR
We’ll walk you through inspecting your deck’s structure, picking the right materials for your climate, and applying sealant so it lasts season after season.
Follow our simple seasonal cleaning and sanding tips, avoid common pitfalls, and easily enjoy a sturdy, beautiful outdoor space that becomes the heart of your home.
Step 1: Selecting the Ideal Deck Material
So you've taken a good look at your existing frame and you're ready to pick the material that will actually stand up to your backyard life.
First, ask yourself what you want from the deck. Is it a weekend hangout spot that needs to survive salty sea breezes, or a cozy nook where your kids can swing without worrying about splinters?
That question narrows the field to three main families: pressure‑treated wood, natural hardwoods like Ipe, and low‑maintenance composites (including PVC). Each has its own price tag up front and a different long‑term story.
Here's a quick reality check on the numbers. A basic pressure‑treated board might run $2‑$4 per square foot, while a premium hardwood can climb to $8‑$12. Composite options sit somewhere between $5‑$9, but remember that the initial bump is offset by years of skipping stains and sealers.
We saw that on DecksDirect’s cost guide : over a 320‑sq‑ft deck, wood starts a few thousand dollars cheaper, yet by the fifth year the maintenance adds up and the total can overtake a composite build. In other words, the “cheaper” choice can end up costing more in the long run.
So how do you translate those numbers into a decision that feels right for you?
Step 1️⃣: Size up your climate. If you live in a humid, rainy zone, wood will swell, warp, and invite rot unless you’re diligent about sealing every 12‑18 months. Composite and PVC practically shrug off moisture, making them a safer bet for four‑season exposure.
Step 2️⃣: Think about upkeep. Do you enjoy pulling out a brush and roller every spring, or would you rather spend that time with a cold drink on the porch? Wood demands regular staining or sealing; composites never need paint, and they won’t splinter under barefoot feet.
Step 3️⃣: Factor in safety and kids. Splintered wood can turn a playful afternoon into a painful one. Composite boards stay smooth, so you get a surface that’s gentle on tiny toes and even on pet paws.
Step 4️⃣: Look at aesthetics. Modern composites now mimic the grain of real wood, and many brands offer hidden‑fastener systems that hide the screws for a clean look. If the authentic hardwood feel is non‑negotiable, Ipe and other dense woods give that rich, natural glow—just be ready for the extra maintenance.
Step 5️⃣: Budget for the whole package. Beyond the boards, railings, fasteners, and any custom edge work add dollars. A simple rectangle deck is cheapest; curves, herringbone patterns, or built‑in seating will push costs higher no matter the material.
Bottom line? If you plan to keep the deck for more than a few seasons, the extra upfront spend on composite or PVC usually pays for itself in saved time, money, and headaches.
Watching this short walkthrough can help you visualize how the hidden‑fastener system looks once installed, and why many homeowners choose composites for a “set‑and‑forget” experience.
When you’re ready to compare specific brands, check the product lines from big names like Trex or TimberTech—they each have budget, mid‑range, and premium tiers. Look for capped composite or PVC if you want extra resistance to stains and fading.
Finally, write down a quick checklist before you head to the supplier: deck size, desired lifespan, maintenance comfort level, and budget ceiling. Run those numbers through the cost guide we mentioned, and you’ll have a solid baseline to discuss with any contractor, including us at LGFMH Construction if you need a hand with framing or code‑compliant installation.
Step 2: Planning Your Deck Layout and Size
Alright, you’ve picked a material, so now it’s time to ask the big question: how big should this deck actually be? It’s easy to dream of a sprawling outdoor lounge, but the space you carve out has to fit your lifestyle, your yard, and—yes—your local code.
Know Your Use‑Case
First, picture a typical weekend. Are you firing up the grill for a crew of eight, or is this more of a quiet coffee‑on‑the‑porch spot? The activities you plan dictate the square footage. A 12×16‑foot rectangle comfortably seats a dining table, a few lounge chairs, and still leaves room to walk around. If you only need a spot for two chairs and a small table, a 10×10 layout might be enough.
Think about future needs, too. Kids grow, pets get older, and you might later want a built‑in bench or a fire pit. Adding 50–100 sq ft now can save a costly remodel later.
Sketch the Footprint
Grab a graph paper sheet or fire up a free online deck designer. Draw your house’s footprint first, then block out the deck. Keep the deck’s edge at least a foot away from the property line unless your HOA says otherwise. If you have a garden or a driveway, make sure there’s clearance for plants and cars.
Here’s a quick trick: measure the space you want for each function, then add a 2‑foot “wiggle room” buffer. For example, a 6‑foot dining table needs about 8‑foot clearance on all sides to move chairs comfortably.
Check Local Codes and Permits
Even if you’re a DIY enthusiast, you’ll likely need a building permit for any deck that’s supported by footings. In Montgomery County, a permit is required no matter how high the deck sits above grade, and you may also need an electrical permit if you plan on stair lighting or a hot tub. The county’s online portal walks you through the e‑plan submission, and the process can be as fast as a few hours if everything’s in order.
Read the full guidelines on Montgomery County building permit requirements to avoid surprise stop‑orders.
Fine‑Tune the Square Footage
Industry data suggests the sweet spot for most families lands between 300 and 400 sq ft. That translates to roughly a 19‑by‑19‑foot square, which can host a dining set, a couple of lounge chairs, and still feel spacious. Smaller decks around 100 sq ft work well for a DIY‑only project, while anything over 450 sq ft starts to feel more like an outdoor room than a deck.
If you’re still unsure, check out the average deck size guidelines . They break down common dimensions—10×20, 12×24, 16×20—and explain what each can comfortably hold.
Make a Simple Layout Checklist
Purpose: dining, lounging, cooking, kids’ play?
Desired square footage (based on use‑case).
Clearances: property lines, utilities, existing landscaping.
Code check: permit needs, height limits, setbacks.
Future upgrades: lighting, built‑in benches, fire pit.
Once you tick those boxes, you’ll have a solid footprint to bring to a contractor—or to your own toolbox if you’re going the DIY route.
In our experience at LGFMH Construction, clients who spend a little extra time on the layout phase end up with decks that feel “just right” for years, with fewer surprise changes during construction.
So, grab that sketch pad, run the numbers, and give yourself a clear, code‑compliant canvas. The rest of the build will flow much smoother when the size and layout are already settled in your mind.
Step 3: Building Your Deck – A Step‑by‑Step Video Guide
What the video will show you
Imagine a camera perched at shoulder height, walking you through every nail, every joist, every moment you might otherwise guess at. That’s the vibe we aim for – a clear visual that makes the whole build feel less like a mystery and more like a friendly walk across the yard.
We’ll start with the foundation, pause for a quick tool check, then move straight into framing, decking, and the final polish. No fluff, just the bits that matter when you’re actually holding a drill.
Gather Your Tools (and double‑check)
Before you even set foot on the concrete footings, line up a handful of essentials: a circular saw, a cordless drill/driver with a set of deck‑grade screws, a carpenter’s level, a speed square, and a sturdy tape measure.
Don’t forget safety gear – a pair of ear plugs, safety glasses, and work gloves. If you’re missing a tool, the video pauses at the exact moment you need it, so you can grab it without losing the flow.
Lay Out the Frame
First, the video shows how to snap a chalk line for the outer edge of your deck. This line becomes your visual boundary, the “you‑can’t‑go‑past‑this” guide for every board you later install.
Next, we fasten the ledger board to your house’s rim joist, making sure it’s perfectly level. The video zooms in on the shims and lag bolts, because a crooked ledger is the fastest way to end up with a wobbly deck.
Once the ledger is set, the guide walks you through placing the outer joists, spacing them 16 inches on center (or 24 inches if you’re using thicker boards). The camera shows a quick “check‑for‑square” trick: run a diagonal from corner to corner, then measure both diagonals – they should match.
Install Decking Boards
Now the fun part. The video demonstrates how to start the first board flush with the ledger, using a spacer to keep a consistent ¼‑inch gap for drainage. We’ll see the drill driver in action, driving screws at a 45‑degree angle for a hidden‑fastener look.
If you’re using composite, the guide points out the slight “pop‑out” technique to keep the board from warping as you fasten it. For wood, you’ll see the recommended pre‑drill depth to avoid splitting.
Every few boards, the video pauses for a quick level check – a habit that saves you from a lopsided surface later on.
Railings, Stairs, and the Finishing Touches
Once the surface is flat, the video moves on to railing posts, showing how to set them in concrete footings and attach top and bottom rails with a simple clamping jig.
Stairs get their own mini‑segment: you’ll see how to calculate rise and run, cut stringers, and attach tread boards so each step feels solid underfoot.
Finally, the guide wraps up with a quick walk‑through of cleaning any sawdust, applying a protective sealant (if you’re using wood), and giving the deck a once‑over with a shop vac.
Quick Checklist You Can Print
Tools: saw, drill, level, speed square, tape measure, safety gear.
Materials: ledger board, joists, decking boards, fasteners, railing components.
Pre‑build steps: chalk line, ledger attachment, square check.
Build steps: joist layout, board installation, hidden‑fastener technique, level checks.
Finish steps: railing, stairs, cleaning, sealant (if needed).
Print this list, keep it beside your laptop while the video plays, and you’ll have a tangible roadmap to follow.
Remember, the video isn’t a substitute for reading local building codes – it’s a visual companion to the planning you already did in Steps 1 and 2. If anything feels off, pause, rewind, and double‑check before you move on.
By the end of the walkthrough, you should feel confident enough to lay the last board without second‑guessing. And when the sun sets on your freshly built deck, you’ll know every nail is exactly where it should be.
Step 4: Comparing Deck Materials – Pros, Cons, and Costs
Now that you’ve sketched the footprint and know how big you want to go, the next big decision is the deck surface itself. It feels a lot like picking a floor for your living room – you want something that looks good, holds up to traffic, and fits the budget you’re comfortable with.
Why material matters more than you think
Think about the last time you walked on a hot concrete sidewalk in July. The heat radiated up through your shoes, and you wished for a cooler spot. Your choice will affect how often you need to clean, seal, or replace boards down the line.
Three front‑runners to compare
Most homeowners end up choosing between pressure‑treated lumber, a composite system, or a dense tropical hardwood like Ipe. Below is a quick snapshot of what each brings to the table.
Material | Pros | Cons | Typical Cost / sq ft |
Pressure‑treated wood | Affordable, easy to find, can be stained | Requires sealing every 12‑18 months, prone to warping & splinters | $2‑$4 |
Composite decking | Low‑maintenance, resistant to moisture & fading, uniform color | Higher upfront price, can feel “plastic” underfoot, may melt under extreme heat | $5‑$9 |
Tropical hardwood (Ipe) | Exceptional durability, natural grain, naturally resistant to rot & insects | Expensive, heavy (requires stronger joists), needs periodic oil to keep color | $8‑$12 |
Those numbers are based on industry surveys from 2023‑2024 and include material only – fasteners, labor, and finishing will add a few dollars per square foot on top.
Real‑world scenarios
Imagine you live in a coastal town where salty air loves to eat away at wood. One of our Virginia Beach clients tried pressure‑treated boards, but after two years the railings showed early signs of corrosion and the boards started cupping. Switching to a capped composite saved them about $1,200 in annual maintenance.
On the flip side, a family in the mountains chose Ipe for its natural resistance to the freeze‑thaw cycle. Their deck has been out there for eight years with no visible wear, and the only extra cost they’ve seen is a yearly oiling that takes 30 minutes.
So, which scenario feels closer to yours? Do you prefer the peace‑of‑mind of a “set‑and‑forget” composite, or are you willing to invest a bit more time for the authentic look of hardwood?
Actionable steps to lock in your choice
1.Set a realistic budget.Write down the total square footage you need, then multiply by the per‑sq‑ft cost from the table. Add a 10‑15 % buffer for fasteners and labor.
2.Check your local climate.If you’re in a high‑humidity zone, lean toward composite or Ipe. In dryer climates, pressure‑treated wood can be a safe, cheap option.
3.Ask for samples.Most suppliers will let you feel a board, see the grain, and even walk on a short slab. Bring the sample home and sit on it for a few minutes – does it feel comfortable?
4.Plan for fasteners.Hidden‑fastener systems work best with composites, while wood often uses concealed screws. Knowing this early avoids a costly redesign later.
5.Factor in long‑term upkeep.Write down the time you’re willing to spend each spring sealing or cleaning. If the answer is “none,” composite wins.
If you need a visual cue on how a finished surface should look, check out our Exterior Painting Virginia Beach guide – the same principles of surface preparation apply to decking too.
Bonus tip: think beyond the deck
Many homeowners later convert an existing garage into a “garage apartment” and extend the deck over the new roofline. That extra square footage can boost your home’s resale value while giving you a private patio. For ideas on how to pull that off without breaking the bank, see this creative garage apartment ideas article.
Bottom line: pick the material that matches your climate, your aesthetic, and the amount of time you want to spend on upkeep. Write down your decision, stick to the cost worksheet, and you’ll walk onto a deck that feels right from day one.
Step 5: Finishing and Maintaining Your Deck
Okay, you’ve built the frame, laid the boards, and stepped back to admire your new outdoor space. The next question is: how do you keep it looking fresh year after year without spending a fortune?
Pick the right finish for your material
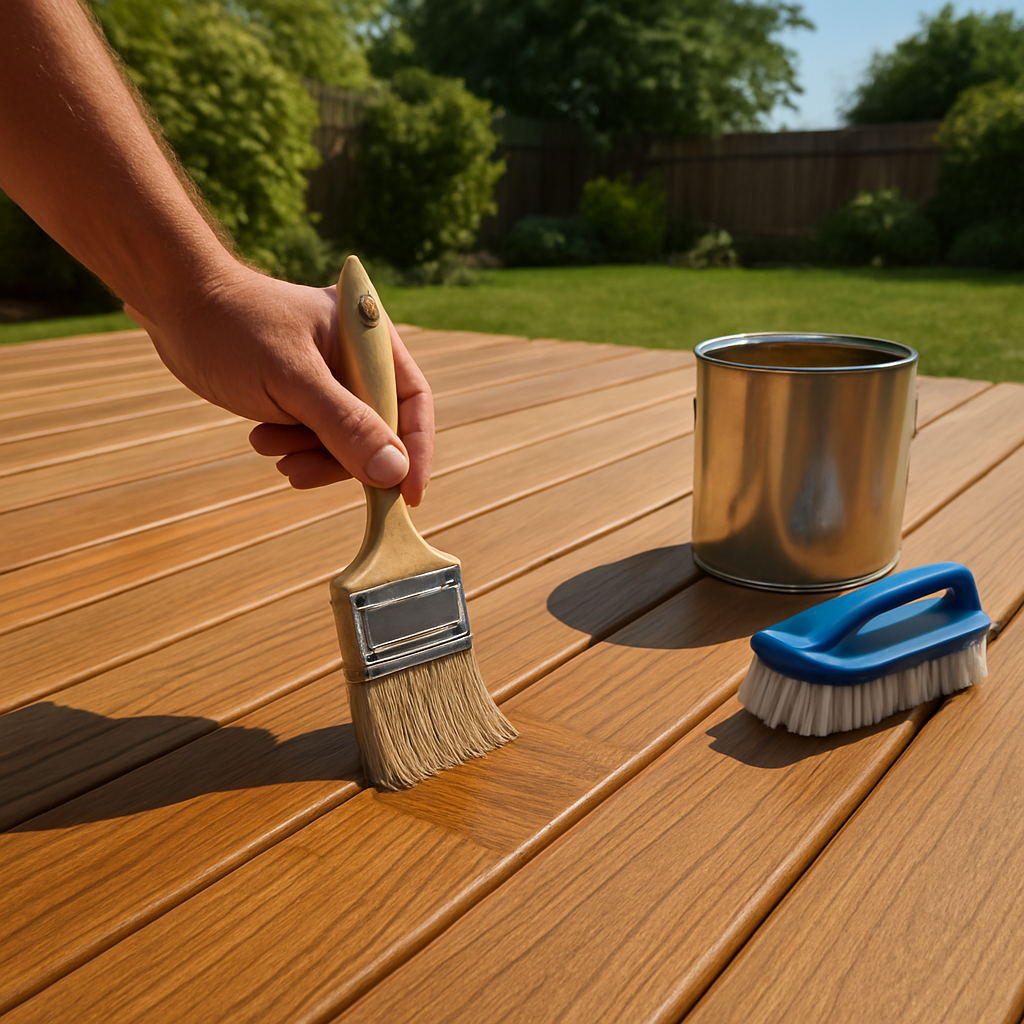
If you went with pressure‑treated wood, a clear or semi‑transparent sealant is your best friend. It penetrates the fibers, repels water, and lets the natural grain shine through. Composite boards usually don’t need a sealant, but a UV‑protective spray can help keep the color from fading in direct sun.
Hardwoods like Ipe love a thin coat of penetrating oil every 12‑18 months – it brings out that deep, chocolate‑brown glow and prevents the surface from drying out.
So, what’s the rule of thumb? If the product says “no finish required,” trust it. If it’s wood, plan on a finish.
Step‑by‑step: the finishing routine
1.Clean first.Sweep away leaves, dust, and any loose grit. Then give the deck a gentle wash with a garden hose or a low‑pressure washer. Avoid a power washer on composite; the high pressure can lift the surface.
2.Scrub stubborn spots.Mix a cup of trisodium phosphate (TSP) with a gallon of warm water, apply with a stiff brush, and rinse thoroughly. For mildew, a solution of one part vinegar to three parts water works wonders.
3.Let it dry.Wait at least 24‑48 hours before applying any finish. Moisture trapped under a sealant is a recipe for blistering and peeling.
4.Apply the finish.Use a high‑quality brush or a low‑nap roller, working with the grain. Two thin coats are better than one thick coat – it cures faster and looks smoother. Follow the manufacturer’s drying time between coats.
5.Buff the surface (optional).After the final coat cures, a light buff with a microfiber cloth can enhance sheen and remove any brush marks.
That’s it. A weekend’s effort, and you’ve set your deck up for years of low‑maintenance enjoyment.
Maintenance checklist – what to do each season
Spring: give the deck a once‑over with a mild soap solution, inspect for loose fasteners, and re‑apply sealant if the surface feels dry to the touch.
Summer: watch for water pooling in joints. If you see standing water after a rain, check that the board spacing is still ¼‑inch for drainage. A quick scrape of any debris will keep mold at bay.
Fall: sweep away fallen leaves before they decompose and attract moisture. This is also a good time to sand any rough spots on wood decks – a light 80‑grit sanding will smooth splinters without removing too much material.
Winter: if you live where snow and ice are common, avoid using metal shovels directly on the boards. A plastic shovel or a push broom works fine. If you must melt ice, opt for a calcium‑magnesium acetate (CMA) de‑icer instead of sodium chloride, which can corrode fasteners.
Quick tip: keep a small notebook in your garage and jot down the date you seal, the product you used, and any observations. A few notes will help you spot patterns – like “my deck always looks dull after the third summer” – and adjust your schedule.
Spot‑check: fasteners, railings, and hidden damage
Every six months, walk the deck and give the fasteners a gentle twist with a screwdriver. If any feel loose, tighten them before they loosen further and cause squeaks or board movement.
Railings deserve the same love. A loose railing post is a safety hazard, especially if you have kids or pets. Tighten bolts, and if you notice rust, sand it off and apply a rust‑inhibiting primer.
Look for hidden damage too – water stains on the underside of boards, rot at the joist connections, or signs of insect activity. Early detection means a small repair instead of a full board replacement.
When to call the pros
If you spot widespread rot, large sections of splintered wood, or a deck that feels soft underfoot, it’s time to bring in a professional. In our experience at LGFMH Construction, catching these issues early can save you hundreds of dollars compared to a full‑deck rebuild.
Sometimes a deck needs re‑leveling after years of settlement, or a hidden‑fastener system might need re‑aligning. Those are jobs where a trained crew can get it right the first time, keeping your warranty intact.
Remember, a well‑finished deck is like a good pair of shoes – a little care each season keeps it comfortable and stylish for the long haul.
Ready to protect your investment? Grab a brush, set a calendar reminder, and make finishing day a regular part of your home‑maintenance routine.
Step 6: Safety Standards and Building Codes for Decks
Before you swing a hammer, you’ve got to make sure the deck you’re dreaming about can actually stand up to the law and to everyday use. Skipping a code check is like walking a dog without a leash – you might get away with it for a while, but sooner or later something’s going to pull you back.
Why the code matters
Building codes exist to keep decks from turning into dangerous platforms. They tell you how much weight a deck must hold, how deep a footing should go, and how tall a railing needs to be. In plain terms, they protect your family, your neighbors, and your wallet.
Think about the last time a board gave way under a heavy grill. That’s the kind of scenario the code tries to prevent.
Know your permit requirements
Most municipalities require a permit if the deck is more than 30 inches above the ground or if it’s attached to the house. If you’re staying under that height, you might only need a zoning clearance. The safest move? Call your local building department and ask for the exact paperwork.
When you apply, have these items ready: a site plan that shows post locations, a cut‑list of lumber sizes, and a sketch of stairs, railings, and guardrails. Some towns also want proof of insurance from your contractor.
Does your city charge a fee? Yes – usually a few hundred dollars, but it’s a small price compared with a stop‑order that could shut down a half‑finished deck.
Footings, posts, and beams – the backbone
The code says footings must be at least 36 inches deep when the deck is attached to a structure. That depth puts the footings below the frost line, which stops the ground from heaving the deck up in winter.
If your soil is sandy, you may need a wider footing to spread the load. A quick rule of thumb is a 12‑inch diameter concrete pier for every 6‑by‑6 post.
Post size matters, too. Most codes allow 4‑by‑4 posts for decks under 10 feet high, but anything taller than that usually needs a 6‑by‑6. The maximum height for a 6‑by‑6 post is about 18 feet; beyond that you’re entering the realm of engineered columns.
Beams must be sized to carry a live load of at least 40 pounds per square foot. For a typical 12‑foot span, two 2×8 joist‑sized beams laid flat will do the trick. If you’re using composite decking, double‑up the beams to avoid bounce.
Stair and rail safety
Stairs are a common weak point. The code requires each tread to be at least 10 inches deep and each riser no taller than 7¾ inches if the stair rises more than 30 inches off the ground. Keep the stair width at 36 inches or wider – it feels safer and meets most local rules.
Handrails must be between 34 and 38 inches high, measured from the stair nosing. The grip size should be round or oval, not square, so hands don’t slip. Balusters need a maximum 4‑inch spacing; that stops a child from squeezing through.
If your deck is over 30 inches high, a guardrail is mandatory. It has to be at least 36 inches tall, with a 4‑inch gap between the deck surface and the bottom rail.
Hardware that lasts
All fasteners have to be corrosion‑resistant. Galvanized or stainless‑steel screws and nails are the only safe bets in a humid climate. Threaded decking screws are preferred because they stay tight even when the wood expands and contracts.
Never rely on plain nails for ledger attachment – the code explicitly calls for lag bolts or structural screws. A missed detail here can cause the whole deck to lift off the house during a storm.
Quick compliance checklist
Verify if a building or zoning permit is needed (usually >30 inches above grade).
Prepare stamped plans showing post locations, footing depth, beam size, stair dimensions, and rail heights.
Footings: minimum 36‑inch depth, sized for soil bearing capacity.
Posts: 4×4 for <10 ft, 6×6 for taller decks; max height 18 ft for 6×6.
Beams: sized for 40 psf live load, double‑up for composites.
Stairs: 10‑in tread, ≤7.75‑in riser, ≥36‑in width, handrail 34‑38 in.
Guardrails: ≥36 in high, baluster gap ≤4 in, bottom rail ≥4 in from deck.
Fasteners: galvanized or stainless, threaded screws for ledger and joist hangers.
Final inspection: schedule a city walk‑through before covering the deck.
When you tick each box, you’ll walk onto a deck that feels solid, looks great, and stays on the right side of the law. If any step feels fuzzy, give us a call – we’ve helped dozens of homeowners navigate permits and avoid costly re‑work.
Conclusion
We've walked through everything from picking the right material to nailing down code‑compliant footings, and now you’ve got a clear picture of what it takes to build decks that last.
So, what’s the next step? Grab your sketchpad, run the quick checklist we laid out, and give yourself a realistic budget before you order any boards.
If a detail feels fuzzy—maybe the right fastener for a hidden‑fastener system or how deep your footings should go—remember you don’t have to go it alone. A quick call to LGFMH Construction can save you hours of guesswork and keep your project on the right side of local codes.
Picture this: a summer evening, friends gathered around, kids’ laughter echoing off a smooth composite surface that’s never needed a sealant. That’s the payoff for spending a little extra time up front.
Before you start, double‑check two things: the permit requirements in your county and the spacing of your deck boards for proper drainage. A tiny oversight now can mean costly rework later.
In short, the secret to great decks is simple—plan, code‑check, choose the material that fits your climate, and stick to the checklist. Do that, and you’ll enjoy a sturdy, beautiful outdoor space for years to come.
FAQ
We’ve gotten a lot of questions after you’ve built your deck, so here’s a quick FAQ that covers the most common concerns.
How long does a deck typically last?
A well‑built deck can stick around 15‑20 years with regular upkeep, and many composite or PVC systems push that to 25‑30 years or more. Wood decks that are stained and resealed every 12‑18 months often hit the 10‑year mark before you start seeing splinters or rot. The key drivers are climate, material choice, and how diligently you follow the maintenance checklist we laid out earlier.
What are the most common mistakes homeowners make with deck maintenance?
One of the biggest slip‑ups is skipping the annual cleaning and letting leaves build up in the board gaps – that’s a recipe for mold and water‑damage. Another is using the wrong fastener material; galvanized or stainless steel is a must in humid zones, but cheap zinc screws will corrode and pull boards loose. Finally, many folks ignore the ¼‑inch spacing rule, which hurts drainage and shortens the deck’s life.
Do I need a permit for every deck I build?
In most jurisdictions a permit is required once the deck sits more than 30 inches above grade or is attached to the house, and many counties also ask for a separate electrical permit if you plan lighting. Some smaller, ground‑level decks can slip by with just a zoning clearance, but it’s always safer to check the local building department first. A quick phone call can save you a costly stop‑order later.
How often should I reseal a wood deck?
Most experts recommend resealing every 12‑18 months, but the exact timing depends on sun exposure, humidity, and how much foot traffic you get. If the water beads and rolls off the surface, you’re probably still protected. When water starts to soak in or the wood looks dull, it’s time for another coat. Spot‑checking a few boards after a rainstorm is an easy way to gauge whether the sealant is still doing its job.
What's the difference between hidden‑fastener and traditional screw decks?
Hidden‑fastener systems hide the screws behind a thin lip, giving the deck a sleek, gap‑free look and making cleaning easier because there’s no protruding head to catch dirt. Traditional screws sit on top of the board, which is faster to install and cheaper, but you’ll see the heads and may need to fill them for a smooth finish. Hidden‑fasteners also tend to stay tighter over time because the screw threads engage the board’s edge rather than the face.
Can I add lighting to an existing deck without rewiring the whole house?
Yes – you can bolt low‑voltage LED strip lights or plug‑in post caps directly to a nearby exterior outlet, using a weather‑proof timer or a smart plug for control. Just make sure any wiring is rated for outdoor use and that you seal all connections with waterproof connectors. If you want a more integrated look, a licensed electrician can run a dedicated 12‑volt circuit from your panel to a dimmer that feeds all the deck fixtures.
How do I know if my deck’s footings are deep enough?
Footings should extend below the frost line – in most of Virginia that’s about 36 inches – and be at least 12 inches wide for a 6‑by‑6 post. You can check by exposing a corner of the footing after the concrete has cured; the top of the rebar should sit just below the surface, and the bottom should be clearly deeper than the local frost depth. If you’re unsure, a quick site visit from a pro can confirm the depth and suggest any necessary reinforcement.


Comments