Step-by-Step Guide on How to Replace Exterior Door Threshold
- William McKracherne
- Feb 13
- 18 min read

Picture this: you’re standing on the porch, the wind whistles through the gap where the old door threshold used to be, and a cold draft sneaks straight onto the floorboards. That moment of frustration is the exact spot where a simple replacement can turn a house from “meh” to “wow” in an afternoon.
First, let’s admit the truth – most of us ignore that little strip of wood or metal because it’s out of sight until the weather decides to make it the star of the show. But a compromised threshold isn’t just an aesthetic eyesore; it’s a gateway for water, insects, and drafts that can raise your heating bill by up to 15 % during a harsh Virginia Beach winter.
So, how do we actually replace an exterior door threshold without calling in a pro? Here’s a quick roadmap that walks you through every step, from preparation to the final seal.
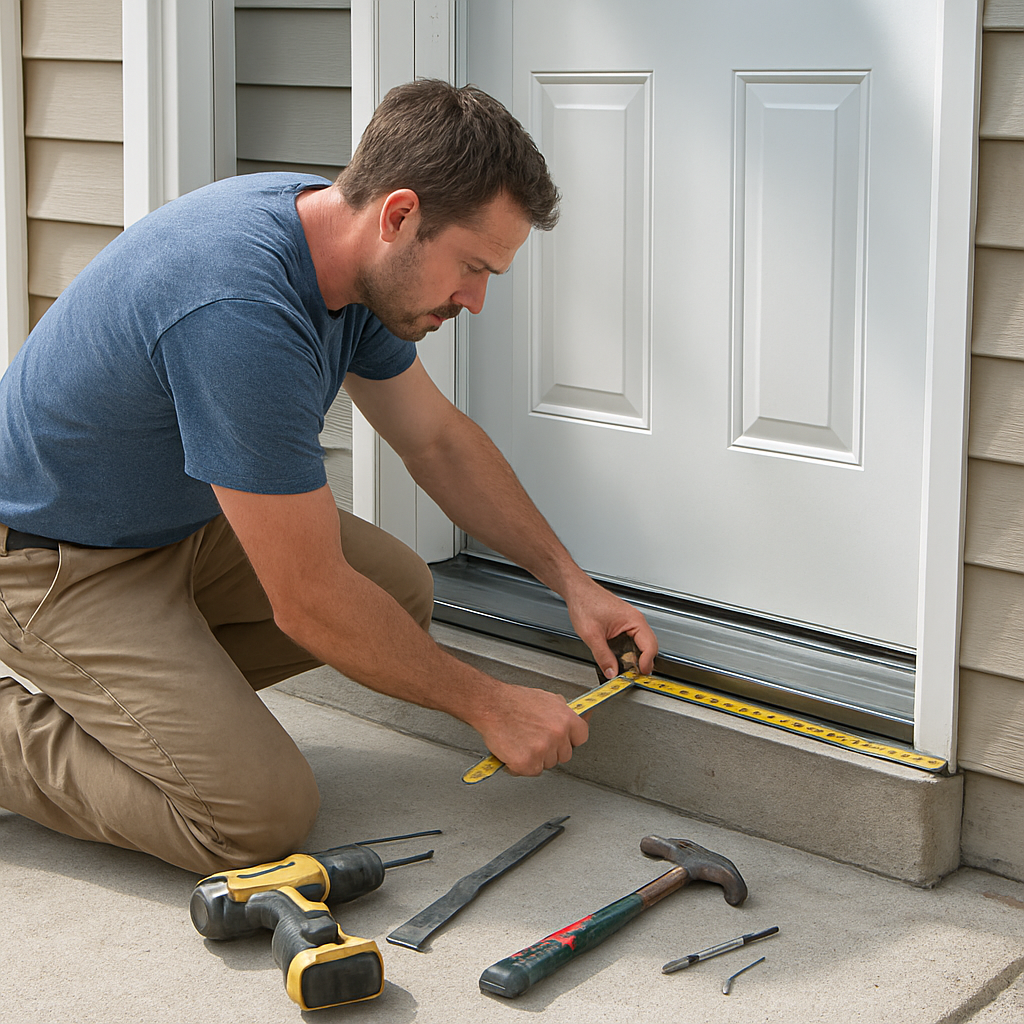
1. Assess the damage.Pull the door open wide and look for rot, cracks, or rust. If more than half the threshold is deteriorated, it’s time for a full swap. In our experience, homeowners who replace just the damaged section end up with a patchy look and recurring leaks.
2. Gather tools and materials.You’ll need a pry bar, hammer, circular saw, a level, construction adhesive, silicone caulk, and a new threshold that matches your door’s material – wood, aluminum, or PVC. A good rule of thumb is to buy a threshold 2‑3 inches longer than the door width to allow for a snug fit.
3. Remove the old threshold.Gently tap the old piece with a hammer and pry bar; it should lift away without damaging the surrounding framing. If screws are present, unscrew them first. Keep the debris out of the doorway – a clean workspace makes the next steps smoother.
4. Prep the opening.Sweep away old adhesive and debris, then sand the sub‑floor lightly to ensure the new threshold adheres properly. Apply a thin bead of construction adhesive along the bottom edge of the opening.
5. Install the new threshold.Slide it into place, checking that it sits level both side‑to‑side and front‑to‑back. Use shims if needed, then secure it with finishing nails or screws. Once it’s snug, run a bead of silicone caulk along the seam where the threshold meets the floor to keep water out.
6. Test the fit.Close the door several times; it should swing freely without catching on the new strip. If you notice any gaps, add a bit more caulk and smooth it with a wet finger.
Real‑world example: a family in Virginia Beach swapped a warped pine threshold for a PVC profile after a heavy rainstorm exposed water staining on their foyer floor. Within a day, the draft was gone, and their energy bill dropped noticeably the next month.
Need more guidance on choosing the right door material before you tackle the threshold? Check out our Door Guide: How to Choose the Best Doors for Style, Material, and Security for a deep dive on matching thresholds to door styles.
And while you’re upgrading the entrance, consider adding a splash of safety and curb appeal with professional lighting. Our trusted partners at outdoor lighting specialists can help you pick fixtures that highlight the new threshold and keep your porch well‑lit after dark.
Bottom line: replacing an exterior door threshold is a manageable DIY project that seals out drafts, protects your home’s structure, and boosts curb appeal. Grab your tools, follow these steps, and enjoy a snug, energy‑efficient entrance in just a few hours.
TL;DR
Replacing an exterior door threshold is a quick DIY fix that seals drafts, stops water leaks, and boosts curb appeal without hiring a pro.
Grab the right tools, follow our step‑by‑step guide, and in a few hours you’ll enjoy a snug, energy‑efficient entrance that protects your home all year round.
Step 1: Prepare the Doorway and Gather Tools
Before you even think about ripping out the old strip, take a moment to picture the doorway the way you want it to feel – solid, snug, and ready to keep the winter wind out.
The first thing we do is clear the space. Pull the front door wide, sweep away loose debris, and give the threshold a quick once‑over with a shop‑vac. A tidy work area saves you from tripping over scraps when the real work starts.
Next up, gather your toolkit. Here’s our go‑to list: a sturdy pry bar, a hammer, a 12‑inch circular saw (or a reciprocating saw if you’re dealing with metal), a level, a set of finish nails or #8‑10 mm screws, construction adhesive, silicone caulk, and a few shims for fine‑tuning. If you’re swapping a wooden piece for a PVC profile, add a utility knife for trimming the new material.
Don’t forget safety gear – goggles, gloves, and a dust mask. Even a quick cut can send splinters or metal shavings flying, and you’ll thank yourself when the job ends without a sore eye.
Now, before the threshold goes in, double‑check the opening dimensions. Measure the width from jamb to jamb and the depth from the sub‑floor up to the door sill. Write those numbers down; we’ll need them when we cut the new piece to length. A common mistake is ordering a threshold that’s a hair short, which forces you to jam it in and later discover gaps.
While you’re measuring, think about lighting. A well‑lit entry not only looks inviting but also highlights the clean line of a new threshold. Our partners at LED Artistry offer outdoor lighting kits that snap onto the door frame without any messy wiring. A subtle uplight can make the whole porch feel safer after dark.
If you’re choosing a flooring material that will meet the threshold, take a look at Millena Flooring. Their catalog showcases moisture‑resistant options that pair nicely with aluminum or PVC thresholds, especially in the salty air near the coast.
When you’re ready to promote your fresh‑look entry on social media or your own website, consider a quick ad boost. VexAds offers a simple platform for local homeowners to showcase before‑and‑after shots, driving neighborhood traffic without a big budget.
Alright, let’s get hands‑on. Start by loosening any screws or nails that hold the old threshold in place. If it’s glued, score the seam with a utility knife, then tap the pry bar gently to lift it out. Work from one end to the other, keeping the old piece as a reference for the new cut.
Watch the short walkthrough above for a visual of the pry‑out process – it’s faster than you think once the old strip gives way.
Now that the opening is clean, apply a thin bead of construction adhesive along the bottom edge of the joist area. Press the new threshold into place, using a level to confirm it sits perfectly flat front‑to‑back and side‑to‑side. If the fit is a tad tight, slip in a thin shim under the front edge; if it’s loose, add a little more adhesive.
Secure the threshold with two finish nails or screws at each end, then drive a bead of silicone caulk along the seam where the threshold meets the floor. Smooth the caulk with a wet fingertip – you’ll see a neat, water‑tight seal that will keep drafts out for years.
Give everything a final check. Close the door a few times; it should swing freely without catching. Look for any gaps and fill them with extra caulk. Finally, wipe away any excess adhesive, and step back to admire the seamless line you just created.
Step 2: Remove the Existing Threshold
Okay, you’ve cleared the doorway and measured everything – now it’s time to pull that old strip out. This is the part where most DIYers feel a little uneasy, but trust me, the process is pretty straightforward once you break it down.
First, take a moment to picture the old threshold. Is it a rotted pine piece, a rusted aluminum bar, or maybe a PVC profile that’s cracked at the ends? Knowing the material helps you decide whether you’ll need a pry bar, a screwdriver, or a combination of both.
Gather the right tools
You’ll want a flat‑head pry bar, a claw hammer, a set of screwdrivers (both flat‑ and Phillips‑head), a utility knife, and a shop‑vac or a sturdy bucket for debris. A pair of heavy‑duty work gloves protects your hands, and safety glasses keep dust out of your eyes.
Pro tip: If you’ve got a thin metal threshold, slip a thin piece of plywood under the pry bar to spread the force and avoid denting the surrounding framing.
Start the pry process
Slide the flat side of the pry bar under one edge of the threshold.
Tap the bar gently with the hammer until it wedges a bit.
Once you feel resistance give, apply steady pressure and watch the strip lift.
Don’t try to yank it out in one go.
Lift a few inches, then move to the opposite side and repeat.
This “see‑saw” method keeps the surrounding wood from cracking.
If the threshold is glued, you’ll feel a bit of resistance.
That’s normal – the adhesive will soften as you work, especially if you’ve already applied a thin bead of fresh construction adhesive in the previous step.
Dealing with screws or nails
Sometimes the old piece is fastened with screws rather than just glued.
Look for any visible heads; a Phillips screwdriver will usually do the trick.
If the heads are stripped, a flat‑head screwdriver and a hammer can pry them loose.
For stubborn nails, a nail puller or the claw end of your hammer works well.
Angle the claw under the nail shank and rock it out.
If the nail breaks, grab a pair of pliers and pull the remaining fragment.
Warm the area with a hair dryer for 30 seconds.
Heat softens many adhesives, making it easier to lift the threshold without damaging the sub‑floor.
Clean the opening
Once the old strip is free, pull it away and set it aside – you’ll probably want to recycle or dispose of it responsibly.
Sweep out any loose debris with a shop‑vac, then use a hand scraper to remove leftover adhesive.
Give the sub‑floor a light sand with 80‑grit sandpaper.
You’re not looking for a perfect finish here, just enough texture for the new adhesive to bite.
At this point, run a quick moisture check with a simple humidity meter or even a damp‑finger test.
If the wood feels damp, let it dry for a few hours before you move on – moisture trapped under the new threshold can lead to future rot.
We recently helped a family in Virginia Beach whose porch had a warped pine threshold that had split after a heavy rainstorm.
After gently prying the old piece out and cleaning the opening, the new PVC threshold sat flush on the first try – no extra shims were needed.
The homeowners reported an immediate drop in drafts and their energy bill showed a modest dip the following month.
Another case involved a metal threshold that had been screwed in place for years.
The homeowner was nervous about breaking the surrounding concrete slab.
By using a thin plywood shield under the pry bar, we avoided any concrete damage and removed the metal piece cleanly.
All screws and nails removed.
Debris swept away and vacuumed.
Adhesive scraped off and surface lightly sanded.
Sub‑floor dry and level.
Tools cleaned and ready for the next step.
If you’ve ticked each box, congratulations – you’ve successfully completed the most physically demanding part of learning how to replace exterior door threshold.
The doorway is now a clean canvas, ready for the new piece to sit snugly and keep the weather out.
Next up we’ll talk about positioning the new threshold, checking for level, and sealing the seams so you can finally close that door without a draft.
Step 3: Measure, Cut, and Fit the New Threshold
Now that the old strip is out of the way, it’s time to treat the opening like a fresh canvas – you want every inch to line up perfectly before the new threshold settles in.
Start by pulling out a sturdy tape measure and a small level. Measure the width of the opening at three spots: the top, the middle, and the bottom. Wood swells with humidity, so the longest of those three numbers is the one you’ll work from.
Write that length down, then add about 2‑3 inches on each side. Those extra inches give you wiggle room for shims and make sure the new piece won’t jam against the door jamb.
Why bother with three measurements? Because a door frame isn’t a perfectly straight ruler – it can bow or dip a little. Using the longest measurement guarantees a gap‑free fit, which means no drafts sneaking through later.
Grab a pencil and mark the exact length on the back of your new threshold. If you’re working with PVC or aluminum, a fine‑toothed blade on a circular saw (or a handsaw if space is tight) will give you a clean cut without splintering.
Safety first: wear safety glasses and a dust mask. Set the saw’s blade depth just a hair above the material – you don’t want to cut into the sub‑floor beneath.
Make the cut slowly, guiding the saw with the fence or a straight edge. A steady hand yields a straight edge, and that straight edge is what keeps water from slipping underneath once everything’s glued.
Once the piece is trimmed, bring it back to the doorway for a dry fit. Slide it in and see if it sits flush with the floor on both sides. If it’s a hair too tight, trim a millimeter at a time; if it’s loose, add a thin shim of wood or composite under the high spot.
Here’s a real‑world snapshot: a family in Virginia Beach recently swapped a warped pine threshold for a PVC profile. After measuring twice and cutting to a precise 42‑inch length, they found the new piece sat level without a single shim. Their door closed with a soft click and the draft vanished instantly.
Another example involved a metal threshold that had been screwed in for years. The homeowners measured the opening, cut a new aluminum profile, and discovered the old concrete slab was slightly higher on one side. A couple of 1/8‑inch composite shims under the new metal fixed the slope, and the door swung freely.
When you’ve got the right length and the piece feels snug, it’s time to level it. Place a long level across the front edge of the threshold; if the bubble leans toward one side, tap a shim under that end until the bubble centers.
Secure the threshold with the method that matches the material. For PVC or composite, a bead of high‑quality construction adhesive along the bottom edge does the trick. For wood or metal, pre‑drill pilot holes and drive finishing nails or corrosion‑resistant screws every 12‑18 inches.
Pro tip: pre‑drilling prevents the wood from splitting and makes the screws sit flush, so you don’t have to sand later.
After the fasteners are in, run a thin line of silicone caulk along the seam where the threshold meets the floor. Smooth it with a wet finger – this creates a water‑tight seal that stops future leaks.
Finally, wipe away any excess adhesive or caulk with a damp rag, and give the whole area a quick vacuum. A clean finish not only looks professional but also ensures the door won’t catch on stray debris.
In our experience, taking the extra minute to double‑check measurements and level the piece saves you a trip back to the hardware store. A well‑fitted threshold stays put for years, keeps drafts out, and helps your energy bill stay down.
So, with the new threshold measured, cut, and perfectly seated, you’re just one step away from sealing the doorway and enjoying a cozy, draft‑free home.
Step 4: Secure and Seal the New Threshold
Alright, you’ve got that fresh piece snug in the opening – now it’s time to lock it down so Mother Nature can’t sneak back in. Securing and sealing is the part that turns a “looks‑good” job into a “won’t‑leak‑for‑years” job.
1. Choose the right fastener strategy
If you’re working with PVC or a composite profile, a high‑quality construction adhesive does most of the heavy lifting. Squeeze a generous bead along the bottom edge of the threshold, then press it into place. The adhesive bonds instantly, but you’ll still want mechanical fasteners for extra peace of mind.
For wood or metal, grab a drill, pre‑drill pilot holes every 12‑18 inches, and drive corrosion‑resistant screws or finishing nails. Pre‑drilling stops the wood from splitting and keeps the screw heads flush, so you won’t have to sand later.
Pro tip: a #8 or #10 screw works well for most residential doors – it’s strong enough to hold but easy enough to remove if you ever need to adjust.
2. Double‑check level and alignment
Before the adhesive cures, run a long level across the front edge of the threshold. If the bubble leans toward one side, tap a thin shim (a scrap of plywood or composite) under the high spot until the bubble centers. A level threshold not only looks right; it prevents the door from catching and keeps drafts out.
Take a moment to walk the length of the strip with your hand – you should feel a solid, even surface. Any wiggle? Add a tiny shim and re‑check.
3. Apply a water‑tight silicone seal
Now for the seal that really matters. Cut the tip off a tube of 100% silicone caulk and run a thin, continuous line where the threshold meets the floor. Use a wet fingertip or a caulk‑smoothing tool to press the silicone into the joint and smooth it out. The result is a flexible, waterproof barrier that moves with the wood and never cracks.
Don’t rush this step. A smooth, even bead not only looks professional, it blocks water, insects, and drafts. If you see any gaps, add a bit more caulk and smooth again.
4. Clean up excess material
While the caulk is still tacky, grab a damp rag and wipe away any stray adhesive or silicone. A clean finish prevents debris from catching on the door and makes the whole entryway feel polished.
After the rag is dry, give the area a quick vacuum. A dust‑free floor means the door will glide without a hitch the next time you open it.
5. Test the door and fine‑tune
Close the door a few times. Does it swing freely? If you feel a faint drag, inspect the seam – a tiny spot of missing caulk could be the culprit. Add a dab, smooth it, and you’re set.
Take a step back and look at the whole picture. A securely fastened, perfectly sealed threshold is the unsung hero that keeps your home cozy and your energy bill in check.
Need a quick place to pick up a quality threshold or caulk? Home Depot’s online selection of weather‑stripping thresholds makes it easy to order the right size and material straight to your door (shop thresholds at Home Depot).
If you prefer a visual walkthrough, there’s a helpful step‑by‑step video that walks you through the sealing process ( threshold sealing video guide ).
And that’s it – a solid, sealed threshold ready to fend off drafts, water, and unwanted critters. In our experience, taking these extra few minutes now saves a trip back to the hardware store later, and you’ll hear that satisfying click of a door that finally stays closed against the wind.
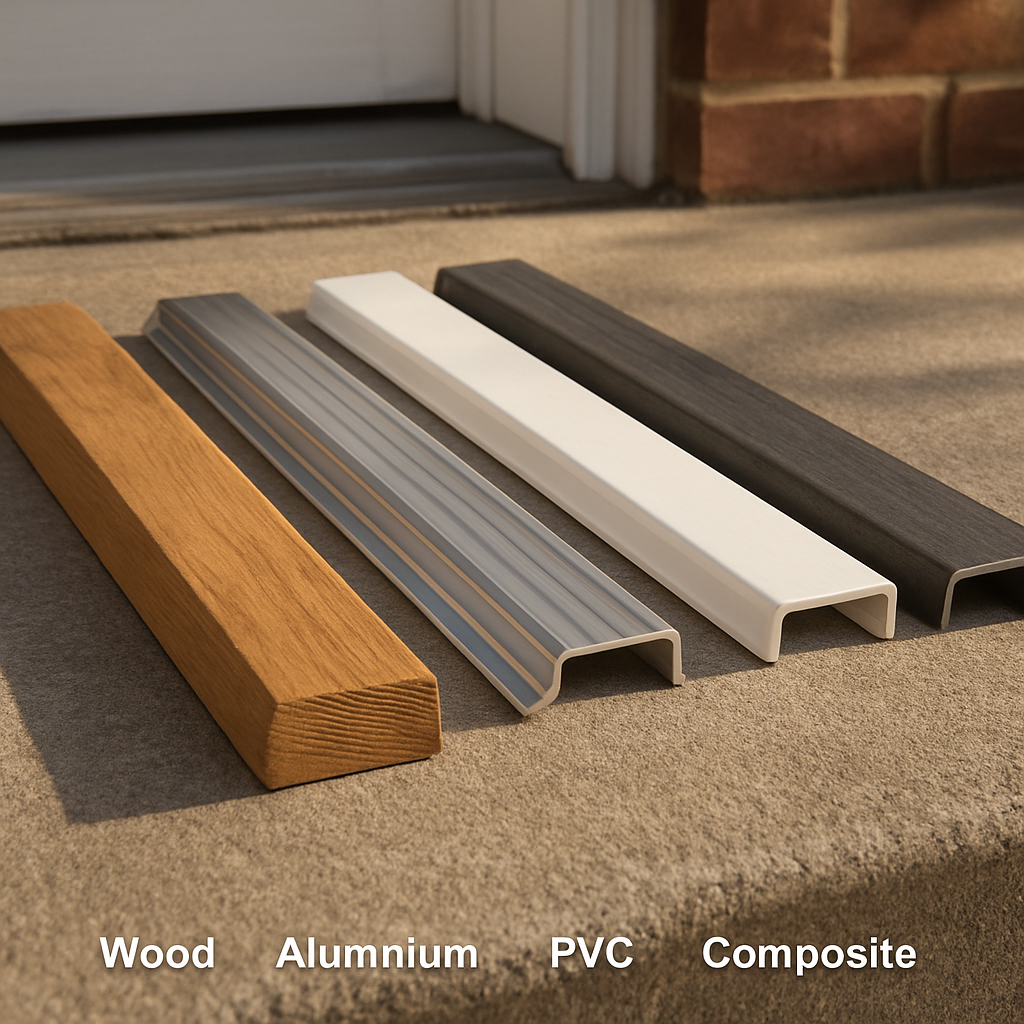
Step 5: Compare Threshold Materials and Choose the Best Option
Alright, you’ve got the opening prepped and the new piece measured. Before you snap that threshold into place, you’ve got to decide which material will actually stand up to Virginia Beach weather, foot traffic, and your budget.
Do you remember the moment you first noticed the draft? That chill was probably seeping right through a cheap wood strip that swelled after a rainstorm. Choosing the right material now can stop that from happening again.
Wood – Classic look, but watch the moisture
Wood thresholds look natural and can blend seamlessly with a traditional front door. They’re easy to sand, paint, or stain, so you can match any curb‑appeal vision.
However, wood loves water. In a humid climate, it can rot or warp if not sealed properly. If you go with wood, budget extra time for a high‑quality marine‑grade sealant and regular re‑coating.
Aluminum – Light, strong, and low‑maintenance
Aluminum is a favorite for modern homes because it won’t rust and it resists dents. It’s also lightweight, so installation is a breeze.
The downside? It can feel a bit cold underfoot and may dent under heavy foot traffic or a rolling lawn mower.
PVC (Vinyl) – Budget‑friendly and water‑tight
PVC thresholds are the go‑to for DIYers who want a water‑proof barrier without breaking the bank. They’re naturally resistant to rot, insects, and UV fading.
They’re not as sturdy as aluminum, so in high‑traffic zones you might notice wear after a few years.
Composite – The best of both worlds?
Composite thresholds combine wood fibers with plastic resins, giving you the look of wood with the durability of PVC. They’re often rated for heavy traffic and won’t swell in moisture.
They’re a bit pricier, but the long‑term savings on maintenance can make them worth it.
So, how do you pick? Think about three things: climate exposure, foot traffic, and how much upkeep you’re willing to do.
Here’s a quick cheat sheet that lays it all out:
Material | Pros | Cons |
Wood | Natural look, easy to finish | Prone to rot, needs regular sealing |
Aluminum | Lightweight, rust‑proof, durable | Can dent, feels cold |
PVC | Water‑proof, inexpensive, low maintenance | Less structural strength, may wear faster |
Composite | Wood aesthetic + moisture resistance, strong | Higher upfront cost |
When you’re standing in your doorway, ask yourself: “Will this material survive the next storm, the kids’ sneakers, and my occasional DIY projects?” If the answer is a confident “yes,” you’ve found your match.
Need a deeper dive on the different types? Quality Door’s guide breaks down the nine most common exterior threshold styles and their ideal applications ( learn about threshold options ).
If you prefer a visual walkthrough of how each material behaves under real‑world conditions, check out this short video that walks through material selection ( threshold material guide video ).
Once you’ve zeroed in on the material, order a piece that’s a couple of inches longer than your opening – that extra length gives you wiggle room for shims and ensures a flush finish.
And remember, a well‑chosen threshold isn’t just a strip of metal or wood; it’s the first line of defense that keeps drafts out, water out, and your energy bills down.
Ready to make the final call? Grab a few samples, line them up on the floor, and picture how each one feels underfoot. That tactile test often reveals the winner before you even start the glue.
Now you’ve got the knowledge to choose the best threshold material for your home, and you’re one step closer to a draft‑free, energy‑efficient entryway.
Conclusion
So you’ve walked through every step, from clearing the doorway to sealing the final joint. If you’re still wondering whether it’s worth the DIY effort, think about the draft‑free comfort you’ll feel every time you step inside.
What matters most is a snug, level fit and a watertight seal. A couple of extra inches on the threshold, a handful of shims, and a bead of silicone can make the difference between a leaky entry and a cozy foyer.
What to remember
Measure twice, cut once – that old adage saves you trips back to the hardware store. Use the right fastener for the material: adhesive for PVC, corrosion‑resistant screws for metal, and pre‑drilled nails for wood.
Check the level before the glue cures, then smooth the caulk with a wet finger. A quick test – open and close the door a few times – will tell you if any tweaks are still needed.
In our experience at LGFMH Construction, homeowners who follow these basics see a noticeable drop in drafts and energy bills within the first month.
Ready to give your entryway that fresh, sealed feel? Grab a few samples, line them up, and take that tactile test we mentioned earlier. When the right material feels right underfoot, you’ve found your winner.
Now you have the confidence to tackle how to replace exterior door threshold on your own, and a solid plan to keep your home comfortable year‑round.
FAQ
How long does it usually take to replace an exterior door threshold?
For most single‑door homes you’re looking at 2‑4 hours from start to finish. That includes removing the old strip, cleaning the opening, cutting the new piece, and sealing everything up. If you hit unexpected rust or hidden rot, add an extra hour for cleanup. In our experience the clock slows down only when you’re double‑checking level and making sure the silicone bead is smooth – a few extra minutes there pays off later.
What tools are absolutely essential and which ones can I skip?
You’ll need a pry bar, a claw hammer, a tape measure, a level, a circular saw (or a handsaw if space is tight), and a caulking gun with silicone. A utility knife helps trim excess adhesive, and a set of corrosion‑resistant screws or finishing nails rounds things out. If you don’t have a circular saw, a fine‑toothed handsaw will do the cut, but don’t skip the level – a sloping threshold invites drafts.
Can I replace the threshold during the colder months?
Yes, you can, but keep a few tricks in mind. Cold temperatures make silicone cure slower, so give it extra time – at least 24 hours before heavy foot traffic. Also, the sub‑floor can contract, so check level after the adhesive sets and be ready to add a thin shim if the wood has shrunk a touch. A quick warm‑up with a hair dryer on low can soften stubborn old adhesive before you pry.
How do I know when a threshold is beyond repair and needs a full replacement?
If you see more than half the strip rotted, cracked, or corroded, it’s time for a new piece. Small surface cracks can be patched with epoxy, but deep rot that you can see through the wood or metal that bends under pressure won’t hold. Also, if water consistently pools at the base despite a seal, the old profile is probably compromised and a fresh threshold will give you a reliable barrier.
Which material works best for the Virginia Beach climate?
For the salty air and occasional hurricanes, PVC (vinyl) and composite thresholds are the most forgiving. PVC won’t rust and resists moisture swelling, while composite gives you the wood look without the rot risk. Aluminum is another solid choice if you prefer a sleek, modern look, just remember it can dent under heavy foot traffic. We usually recommend PVC for most DIYers because it’s easy to cut and install.
What’s the secret to getting a truly watertight seal?
First, make sure the opening is clean and lightly sanded – the adhesive needs texture to bite. Apply a generous bead of high‑quality silicone along the back edge of the threshold, then press it firmly into place. After the threshold is fastened, run a second thin bead where the strip meets the floor and smooth it with a wet finger. Don’t rush; the silicone should be continuous, without gaps or air pockets.
Do I need a building permit to replace an exterior door threshold?
In most Virginia Beach neighborhoods a simple threshold swap is considered a minor repair and doesn’t require a permit. However, if you’re also altering the door jamb, moving the slab, or changing the exterior trim dimensions, check with your local code office just to be safe. A quick phone call can save you a surprise visit from an inspector later on.


Comments