Deck Repair Guide: Step‑by‑Step Solutions for Common Problems
- William McKracherne
- Jan 14
- 20 min read

You know that feeling when you step onto your deck and hear that dreaded creak, like the house is sighing under the weight of summer barbecues? It’s the little warning sign that something’s off, and suddenly you’re wondering if that deck will hold up for the next family gathering.
Maybe you’ve tried tightening a couple of bolts yourself, only to find the problem pops up again after a night of rain. Or perhaps the boards are starting to warp, and you’re not sure whether it’s a simple fix or a sign that a bigger repair is needed.
We’ve seen dozens of homeowners stand where you are right now, staring at a deck that once looked flawless but now shows the wear of time and weather. In our experience, the first step is to actually look, not just feel, because the visible signs—loose fasteners, cracked joists, water‑logged wood—tell a story about what’s really going on beneath the surface.
So, what does that mean for you? It means taking a quick inventory: Are any boards soft when you press them? Do any nails stick out like tiny flags? Is there any rot you can see, especially around the edges where water tends to collect?
Picture this: you’ve got a sunny Saturday, kids are buzzing about a backyard game, and you realize the deck can’t support the excitement. That’s the moment you decide to act before a small slip turns into a costly replacement.
Don’t worry—deck repair doesn’t have to be a nightmare. Whether you’re dealing with a few squeaky boards or a section that’s starting to sag, there are clear steps you can follow to bring safety and beauty back to your outdoor space.
Let’s dive in and figure out exactly how to spot the problem, choose the right materials, and get that deck back in shape without breaking the bank.
TL;DR
Deck repair may sound daunting, but you can quickly spot issues, choose the right materials, and fix squeaky boards or sagging sections without blowing your budget. Follow our step‑by‑step guide to restore safety and curb appeal, so your backyard stays ready for family fun and you can enjoy summer gatherings on a sturdy, beautiful deck.
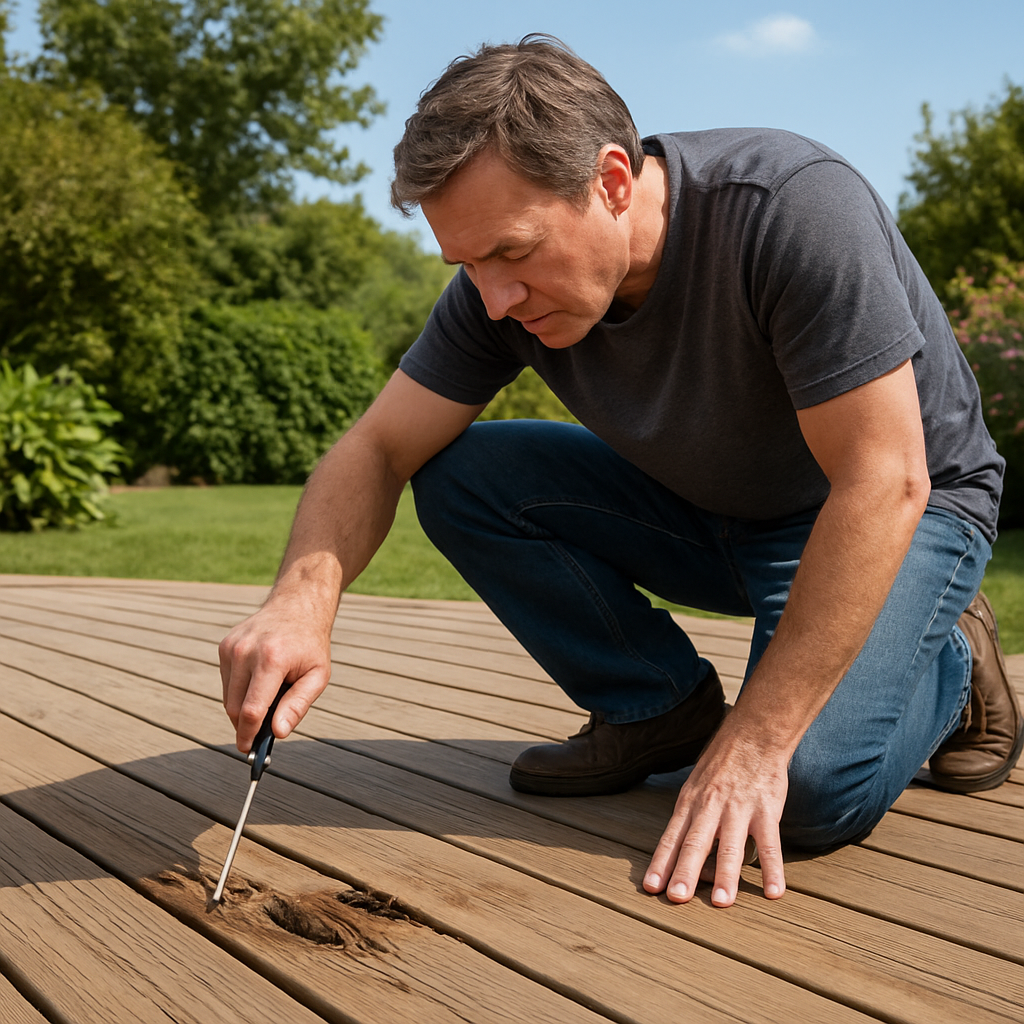
Step 1: Inspect Your Deck for Damage
You've just heard that unsettling creak again, and you pause, wondering if today's backyard barbecue will end with a slip. That's the exact moment we all wish we could catch the problem early, before a minor wobble turns into a costly repair.
So, what do you actually look for? Think of your deck like a living room that sits outside – you wouldn't ignore a sagging floorboard inside, right? The same principle applies up here, only the culprit is often water, wood decay, or loose hardware.
Grab a sturdy ladder, a flashlight, and maybe a friend to lend a hand. We'll walk through the inspection from the ground up, so you can spot trouble spots before they become emergencies.
Check the Substructure First
Start at the concrete footings. These little blocks spread the deck's weight, and if they're cracked or shifting, the whole thing can settle unevenly. Look for visible cracks, erosion, or any water pooling around them.
Next, move to the support posts and joists. Give each joist a gentle tap – a solid, dull sound means it's still sturdy; a hollow thud could signal rot. The TimberTech deck inspection checklist suggests pulling a screwdriver into the wood; if it splinters, the wood is healthy, but if it breaks in chunks, you may have rot.
And don't forget the flashing where the deck meets the house. Missing or warped flashing lets water sneak behind the ledger board, accelerating decay.
Spotting Wood Rot
Rotting wood feels soft, almost spongy, and often looks darker or cracked. Press a screwdriver into any suspect area – if it slides in without resistance, that's a red flag. The TimberTech guide on rotting decks warns that mold, mildew, and a fuzzy black surface are also tell‑tale signs.
Pay special attention to spots where water collects: the underside of the deck, near planters, or right above a gutter overflow. If you notice a sweet, earthy smell, that's often fungal growth getting a foothold.
Fasteners, Railings, and Stairs
Grab a wrench and give every bolt, screw, and nail a quick once‑over. Loose or corroded fasteners are the sneakiest cause of squeaks and wobble. Tighten anything that moves, but replace any that are rusted through.
Railings should feel solid when you push against them. A 180‑pound person shouldn't feel the rail give way. If it does, check the balusters and the joists they attach to – loose railings often point to deeper frame issues.
Stair treads are another high‑traffic area. Look for cracked or splintered steps, especially at the top where water drips from the deck surface. Replace any that feel soft underfoot.
Don’t Skip the Bottom
Flip the deck over if you can, or crawl beneath it with a flashlight. Inspect the joist connections, blocking, and any under‑deck water management system. Clogged drainage or blocked channels can trap moisture, feeding rot from below.
Take a moment to note everything – a quick checklist on your phone works wonders. Write down any issues, rank them by severity, and decide whether a simple tighten‑up will do or if you need to call a pro.
Now that you've got a clear picture of what's right and what's wrong, it's time to plan the repair steps. Remember, catching rot early saves you from tearing out an entire deck later.
When you finish the inspection, compare your notes with the checklist you created. If any structural component feels compromised, don't hesitate to reach out to a qualified contractor – a solid foundation is the cheapest part of deck repair in the long run.
Step 2: Choose the Right Repair Materials
Alright, you’ve figured out where the deck is crying out for help – now it’s time to pick the right stuff to fix it. The material you choose can mean the difference between a patch that lasts a season and a repair that survives the next summer storm.
Know Your Deck’s Personality
First thing’s first: what’s the deck made of right now? Pressure‑treated lumber, cedar, composite, or maybe a mix? Each has its own quirks. Pressure‑treated wood likes a good coat of sealant, cedar wants to breathe, and composite panels hate moisture seeping behind them.
Imagine you’re swapping out a worn‑out board. If you replace a pressure‑treated joist with cedar, the new piece will expand and contract at a different rate – and that can create squeaks later on. So, aim to match the existing material whenever you can.
When Wood Is Still the Best Bet
If your deck is all‑wood, you’ve got a few solid options. Pressure‑treated lumber is the workhorse – it’s cheap and resistant to rot when you keep it sealed. Cedar and redwood are pricier but naturally resistant to decay and they look great if you’re after that warm, rustic vibe.
Tip: look for a “#2 grade” board. It’s strong enough for structural work without the crazy knots that can split later. And always grab a board with a straight grain – a crooked grain is a warning sign that the wood will warp as it dries.
Going Composite?
Composite decking has become a favorite for folks who hate sanding and staining every year. The hidden polymer core resists rot, and the cap layer doesn’t splinter. But not all composites are created equal. Look for a product with a UV‑protected cap and a solid warranty (10‑year minimum is a good benchmark).
One thing to watch: composite can get hot in direct sun. If you live in a sunny climate, pick a lighter‑colored board or one with a “cool‑touch” technology. That way you won’t be cooking your feet when the kids run barefoot.
Fasteners Matter More Than You Think
Even the best board will fail if you’re using the wrong screws or nails. For wood, stainless‑steel or coated deck screws are a must – they won’t rust and they hold tight as the wood expands. For composite, use the manufacturer’s recommended hidden‑clip system or composite‑specific screws; regular wood screws can strip the cap.
We’ve seen homeowners try to save a buck with cheap galvanized nails, only to watch them corrode and cause new squeaks. In our experience, spending a little extra on the right fastener saves you time and money down the road.
Sealant, Stain, or Paint?
Once the structural pieces are in place, protect them. A water‑repellent sealant is the baseline for any wood deck. If you want color, a semi‑transparent stain lets the grain show while adding UV protection. Full‑cover paint is an option, but it can hide wood movement and may need more frequent touch‑ups.
Pro tip: apply the sealant in two coats – the first soaks in, the second builds a protective film. And always work on a dry day; rain will ruin the adhesion and you’ll be re‑doing the job.
Don’t Forget the Little Details
Things like flashing, joist hangers, and edge boards often get overlooked. Galvanized or stainless‑steel joist hangers are cheap insurance against sagging. Flashing around the ledger board should be a corrosion‑resistant metal like aluminum or stainless‑steel, especially if you live near the coast.
And if you have built‑in planters or a hot tub, make sure the decking underneath is rated for the extra load. A simple “look‑up‑load‑rating” chart from the manufacturer can save you a nasty surprise later.
What’s the Bottom Line?
Choosing the right repair materials is part science, part intuition. Match the existing deck material, pick a grade that can bear the load, use corrosion‑proof fasteners, and seal everything against the elements. When you’re unsure, a quick call to LGFMH Construction can give you a second opinion – we love helping homeowners avoid costly missteps.
Now that you’ve got the material list sorted, the next step is actually swapping out the damaged pieces. Grab your tools, double‑check your measurements, and let’s get that deck back to being the backyard stage for your next barbecue.
Step 3: Perform Basic Deck Repairs
Alright, you’ve got your material list, you’ve scoped the damage, and now it’s time to actually swap out the bad pieces. This part feels a lot like a DIY puzzle – you’re fitting new wood or composite where the old one gave out, and every screw you drive is a little victory.
Gather the right tools first
Before you even lift a board, pull together a short toolbox: a circular saw or handsaw for cutting, a drill/driver with the appropriate bit, a pry bar, a measuring tape, and a good pair of safety glasses. If you’re working with pressure‑treated lumber, a dust mask is a smart move – the chemicals can be a bit harsh on the lungs.
And don’t forget a set of deck screws that match your material . The right head style (flat/bugle for wood, cap/undercut for composite) and corrosion‑resistant coating will keep the repair from turning into a squeaky mess months down the road.
Step‑by‑step: Removing the damaged board
1.Mark your cut.Measure the length you need, then snap a chalk line on the joist to guide the saw. A little extra length is better than being short – you can always trim later.
2.Loosen the fasteners.If the old screws are rusted, a screwdriver or impact driver can help break them free. For stubborn nails, a nail puller or the claw of a hammer works wonders.
3.Prise the board out.Slip the pry bar under the board, gently lever it up, and watch for any hidden fasteners you missed. Take your time; you don’t want to damage the joist underneath.
Preparing the opening
Once the board is out, give the joist a quick visual check. Look for rot, cracks, or insect damage – those are signs you might need to replace more than just the surface board. A quick screwdriver probe (like we suggested in Step 1) tells you if the wood is still solid.
If the joist is sound, brush away any debris, sand rough edges, and, if you’re working with pressure‑treated lumber, apply a light coat of wood preservative. This extra step adds a layer of protection against future moisture.
Installing the new board
1.Dry‑fit first.Place the new board in the opening and check the fit. It should sit flush with the surrounding boards; if it’s tight, sand the edges or trim a little.
2.Pre‑drill pilot holes.Even the best deck screws can split wood if you drive them straight in. A 1/8‑inch drill bit for hardwood or a 3/32‑inch for softer wood does the trick. Space the holes about 12‑16 inches apart, and align them with the joist underneath.
3.Drive the screws.Use a drill/driver set to a low torque setting – you want the screw to bite, not strip. For composite, remember the reverse‑thread design on cap/undercut screws pulls the board down, preventing mushrooming.
4.Check for level.A quick straightedge or even a long level across the new board and its neighbors will tell you if you’ve introduced a dip. If it’s uneven, back‑off a screw a turn and tighten the opposite side.
Seal and finish
Now that the board is secure, give it a protective coat. Two coats of a water‑repellent sealant work best – the first soaks in, the second builds a film. If you’re using a stain, follow the manufacturer’s drying times before applying a clear topcoat.
And here’s a quick tip: a thin brush or foam applicator gets into the groove between boards without creating a mess on the walking surface.
Final walk‑through
Take a step back and give the deck a once‑over. Walk across the repaired section; you should feel solid, not springy. Listen for any new creaks – if you hear one, double‑check the fasteners. Finally, clean up any sawdust or debris – a tidy deck not only looks better, it lasts longer.
Does this feel doable? Most homeowners can finish a basic board swap in a Saturday afternoon, especially with the right screws and a bit of patience. If you hit a snag – like a rotten joist that needs replacing – that’s when you might call a pro like LGFMH Construction to handle the deeper structural work.
Want a visual walk‑through? Check out this short video that shows the whole process from removal to sealing: deck repair board replacement tutorial . It’s a handy reference if you get stuck on any step.
Step 4: Advanced Repairs & Structural Reinforcement
Now that the basic board swap is behind you, it’s time to tackle the stuff that keeps the whole deck from turning into a seesaw. We’re talking joist reinforcement, beam shoring, and those hidden weak spots that only show up when you load the deck with a grill and a bunch of friends.
Why reinforcement matters
Think about the last time you tried to move a heavy sofa onto a flimsy platform – the whole thing bends, creaks, and you end up with a dented floor. A deck works the same way. When joists or support beams start to sag, the live load (people, furniture, a hot tub) is redistributed unevenly, creating stress points that can crack or even collapse.
In our experience, decks that get a solid reinforcement early avoid costly rebuilds later. A study by the National Association of Home Builders shows that decks with properly sized footings and reinforced joists have a 30% lower failure rate over a 10‑year period.
Step‑by‑step: Assessing the structure
1.Check for deflection.Place a straight 2‑by‑4 across a span and push down in the middle. If you see more than a quarter‑inch give, the joist is undersized or damaged.
2.Look for cracks or rot.Use a screwdriver probe – if it sinks without resistance, you’ve got rot. Mark every compromised piece.
3.Measure spacing.Standard residential decks use 16‑inch on‑center joists. Anything wider can cause sagging, especially with heavier loads.
Reinforcing joists
When you find a weak joist, you have three go‑to options:
Sister a new joist.Cut a matching piece of lumber (same species and grade) and bolt it alongside the old one with two ½‑inch carriage bolts. This doubles the load capacity.
Install steel plates.Flat steel reinforcement plates (1/8‑inch thick) can be fastened to the side of a joist with structural screws. They’re especially handy when ceiling height limits how deep you can go.
Use engineered joist hangers.Replace simple nails with a certified joist hanger – they transfer weight directly to the beam, reducing shear on the wood.
Real‑world example: A homeowner in Toronto discovered a 12‑foot span that sagged under a new pergola. By sistering a #2‑grade pressure‑treated joist and adding steel plates, the deck held the pergola’s 1,200‑lb load without any further movement.
Strengthening support beams
Beams are the backbone. If a beam is undersized, you can:
Swap a 2×8 for a 2×10 or 2×12, depending on span and load.
Install a laminated veneer lumber (LVL) beam – these engineered pieces are stronger than solid wood of the same dimensions.
Add a “sister” beam beneath the existing one, bolted with lag screws and epoxy for a seamless load transfer.
One family in Virginia Beach added a 2×12 LVL beam under a sagging 10‑foot span that supports a built‑in fire pit. The upgrade let them keep the fire pit and add a bench without worrying about extra flex.
Foundation and footings
Even the strongest joist won’t survive if the footings shift. If your deck sits on concrete footings, check for cracks or settling. For soil that expands (clay) or drains poorly (sandy), consider helical piles – they’re quick to install and provide a stable anchor below the frost line.
Hard Decks notes that “proper footing depth” is critical in colder climates to prevent frost heave. A simple visual inspection each spring can catch early movement before it becomes a structural problem.
Practical checklist before you close up
Use this quick list to make sure you didn’t miss anything:
Item | What to Do | Tip |
Joist deflection | Measure sag with a 2‑by‑4 | More than ¼" = reinforce |
Rot detection | Probe with screwdriver | Replace any wood that gives |
Beam size | Check dimensions vs span tables | Upgrade to LVL if undersized |
Once everything is bolted, shimmed, and level, give the deck a firm step‑on test. It should feel rock‑solid, not springy.
When to call a pro
If you encounter any of these red flags, it’s time to let the experts step in: massive cracks in multiple joists, visible footings shifting, or a load requirement beyond standard residential specs (think hot tubs or large pergolas). LGFMH Construction can handle the heavy lifting and ensure code compliance.
And if you’re curious about material identification – say you’re looking at a decorative stone veneer and wonder if it’s real quartz or something else – here’s a handy guide on how to tell cubic zirconia from diamond . It’s a quick read that sharpens your eye for quality materials.
For a deeper dive into deck design, material choices, and long‑term maintenance, check out our Comprehensive Guide to Building and Maintaining Decks . It walks you through everything from footings to seasonal care, so your deck stays safe and beautiful year after year.
Step 5: Finish and Seal Your Deck
You've repaired the structure, swapped boards, and reinforced the frame. Now comes the final act: finish and seal. This step protects your work and keeps that deck looking good for seasons, not months.
Think of sealing as insurance against sun, rain, and the slow creep of rot. Do it right now, not when the boards start to gray.
When to do this
Only finish after the wood is fully dry and all repairs have cured—usually 48–72 hours after rain in warm weather. If you've used epoxy or wood preservative, follow the product cure times.
Does that timing feel picky? Good. Timing matters.
Choose the right product
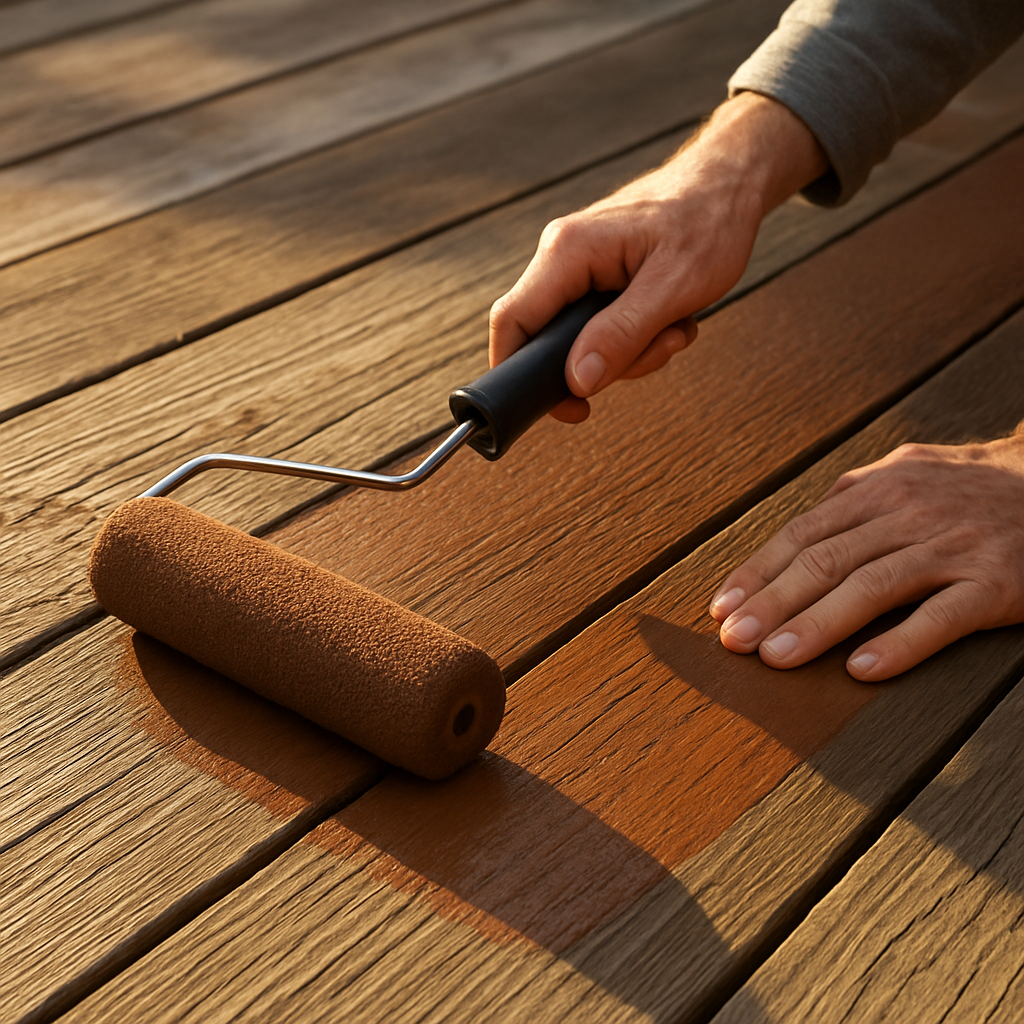
If your deck is older but structurally sound, a solid resurfacer is a great option — it levels worn grain and hides discoloration. For example, Cabot’s DeckCorrect is a solid resurfacer formulated for wooden decks; it rolls on like paint and comes in many colors. It's designed to protect against UV, temperature swings, and moisture, and it applies with a 3/8" roller for even coverage.
Prefer a stain? Use semi‑transparent stains to show the grain, or solid stains for maximum color and hide. Composites and capped boards need manufacturer‑approved products — don’t guess.
Step‑by‑step application
1) Clean first. Sweep, then pressure‑wash on low to remove dust, mildew, and old flaking finish. Let dry completely.
2) Repair tiny gaps and countersink any protruding fasteners. Replace any last‑minute soft boards.
3) Test a small area. Always do a 2×2 foot test patch to confirm adhesion and color.
4) Apply primer or bond coat if product calls for it. Some solid resurfacers need a bonding primer on very weathered wood.
5) Roll in thin, even coats with a 3/8" nap roller. Work with the grain and keep a wet edge to avoid lap marks.
6) Give adequate dry time between coats. Two thin coats are almost always better than one thick one.
Real‑world examples
We had a backyard deck where owners wanted to avoid replacing worn boards. A solid resurfacer applied in two coats hid age, reduced splintering, and made the deck usable for years. Another client preferred semi‑transparent stain to preserve cedar grain; we used two coats and touch‑up zones along planters to prevent trapped moisture.
Practical tips and pitfalls
Tip: pick a light color in hot climates — darker finishes absorb heat and make bare feet unhappy.
Tip: don’t seal when temperatures will drop below product recommendations overnight; moisture can condense and ruin the film.
Watch out for planters and furniture placement. Put pads under heavy pots and leave gaps for airflow; trapped moisture defeats the sealant.
Final checkpoint: after the topcoat cures, walk the deck, check for consistent sheen, and keep a simple maintenance schedule — clean each spring and recoat as product guidance suggests. When you do it with care, your deck repair becomes a long‑term win you actually enjoy.
Step 6: Maintenance Tips to Prevent Future Damage
After you’ve sanded, sealed and gotten those fresh boards in place, the real secret to a long‑lasting deck lives in the day‑to‑day habits you build.
You don’t need a fancy calendar, just a few minutes each month and a quick check each spring and fall.
Monthly Walk‑Through
Grab a broom and walk the surface like you’re scouting for lost toys. Look for loose screws, board movement, or water pooling in corners. If a board springs up or a fastener wiggles, tighten it now before the wood starts to flex and crack.
A quick 2‑by‑4 test helps you feel hidden sagging – lay it across a span and press down gently; more than a quarter‑inch gives a red flag.
Seasonal Deep Clean
Spring and fall are the perfect windows for a thorough scrub because the deck has had time to dry out after winter snow or summer rain.
Start with a stiff‑bristle broom to sweep away leaves, twigs and any soil that can hold moisture. For wood decks, a mild wood‑cleaner applied with a garden sprayer does the trick; composite decks need a cleaner formulated just for that material.
Rinse with a gentle fan‑spray nozzle – never a high‑pressure tip that could gouge the grain. Let the boards dry for at least 48 hours before you reach for a stain or sealant. The same guide from Chafin Communities recommends this routine to keep the wood breathing and to avoid trapping moisture.
Protecting High‑Traffic Zones
Areas under a grill, near a hot tub, or where furniture constantly slides are the fastest to wear. Place protective pads or a rubber mat underneath heavy planters and use felt pads under chair legs.
If you notice the finish thinning after a season, spot‑treat just that strip instead of re‑coating the whole deck – it saves time, product and money.
Landscaping & Drainage
Trim back any overhanging branches so leaves don’t collect and create a damp blanket on the board surface. A thin layer of mulch should stay at least six inches away from the deck edge – otherwise water will wick up into the wood.
Check that the deck’s perimeter slope directs water away from the house. If you spot a low spot, a quick fill of polymer‑based filler and a top‑off of sealant can prevent a future rot pocket.
Simple Re‑Seal Checklist
Once a year, run the water‑bead test: pour a cup of water on a hidden spot. If it beads and rolls off, the seal is still doing its job. If it soaks, it’s time for a fresh coat.
Before you apply, lightly sand with 120‑grit to give the new film something to grip. Apply two thin coats, letting the recommended drying time pass between them – most products need 4–6 hours.
Finally, mark the date on your calendar and set a reminder for the next spring. A habit of a quick visual check every few months plus this annual re‑seal can add a decade to your deck’s life.
So, what’s the takeaway? Treat your deck like a favorite pair of shoes – a little care each month, a deep clean twice a year, and a fresh coat when the leather starts to lose its shine, and you’ll keep walking on it for years to come.
FAQ
What are the first signs that my deck needs repair?
When you start hearing a hollow thud every time you step, or you see boards that feel spongy under a screwdriver, that's a red flag. Look for water stains, darkened wood, or a faint musty smell – those are the quiet clues that rot is setting in. If you notice nails popping up, loose railings, or cracks in the surface, it’s time to schedule a deck repair before the problem spreads to the joists.
How can I tell if a board is rotting versus just wet?
Dry wood will feel solid and a screwdriver will bite with resistance. If the tip slides in easily, or the wood feels soft and gives way, you’re likely dealing with rot rather than just moisture. Another quick test is the water‑bead check: pour a cup of water on the spot – if it beads and rolls off, the surface is still sealed; if it soaks, the underlying wood is probably compromised and should be replaced during deck repair.
What tools are essential for a DIY deck repair project?
The toolbox for a solid deck repair doesn’t have to be huge, but a few key items make the job painless. Grab a circular saw or handsaw for clean cuts, a cordless drill with the right bit size for pilot holes, and a set of corrosion‑resistant deck screws – stainless or coated are best. You’ll also want a pry bar, a tape measure, a level, safety glasses, and a dust mask if you’re working with pressure‑treated lumber. With these basics you can tackle most board swaps, fastener replacements, and surface prep without calling a pro.
How often should I re‑seal or repaint my deck?
Most experts recommend re‑sealing every 12‑18 months, but the exact schedule depends on climate, wood type, and how much sun or rain your deck sees. In a hot, humid region you might need a fresh coat every year, while a milder climate can stretch to two years. Before you apply, give the boards a thorough clean, sand lightly with 120‑grit, and make sure they’re completely dry. Apply two thin coats, letting the manufacturer’s drying time pass between them, and you’ll lock in protection for the next season.
Can I fix sagging joists myself, or do I need a pro?
Sagging joists are a tell‑tale sign that the deck’s skeleton is under stress. If the dip is less than a quarter‑inch you can often sister a new joist alongside the old one and bolt them together – a quick fix that adds strength. For larger deflection, or if the wood feels soft, it’s safer to replace the joist entirely and maybe add a steel plate for extra support. When in doubt, especially if you’re supporting heavy items like a hot tub, call a pro; a mis‑aligned repair can compromise the whole structure.
What’s the best way to protect my deck from water damage?
The biggest enemy of a deck is water that sits on the surface or seeps into the wood. Start by making sure the deck has a proper slope – at least a 1‑2% grade away from the house – so rain runs off instead of pooling. Keep gutters and downspouts clean, and install a drip edge or flashing where the deck meets the foundation. After each cleaning, apply a water‑repellent sealant; this creates a barrier that lets moisture escape but prevents it from penetrating the fibers.
How do I maintain my deck after a repair to avoid future issues?
After you finish a deck repair, think of it like a routine health check for your home. Walk the surface every month with a broom and note any loose screws or new cracks – a quick tighten‑up now saves a big job later. Schedule a deep clean in spring and fall: sweep away debris, scrub with a wood‑safe cleaner, then rinse gently and let dry. Finally, run the water‑bead test once a year; if the water soaks, it’s a cue to re‑seal. Consistent, low‑effort habits keep your deck looking good for years.
Conclusion
We’ve walked through everything from spotting rot to sealing the final coat, so you now have a clear roadmap for a lasting deck repair.
Remember, the biggest enemy is water – a proper slope, clean gutters, and a fresh sealant go a long way. If you catch a loose screw or a tiny crack early, a quick tighten‑up saves you a weekend of demolition later.
What to do next?
Grab a notebook, run the water‑bead test on a hidden spot, and schedule a 2‑by‑4 sag check this month. Those few minutes now pay off in years of sturdy board under your feet.
And if you ever hit a snag – a rotted joist, a sagging beam, or simply the doubt that “maybe I should call a pro” – we’re just a call away. LGFMH Construction has helped dozens of homeowners turn a shaky deck into a backyard stage for summer barbecues.
So, does your deck feel ready for the next family gathering? Give it the TLC it deserves, stick to the simple maintenance rhythm we outlined, and enjoy a safe, beautiful space for years to come.
Keep a calendar reminder for the annual water‑bead test – it’s a tiny habit that catches problems before they spread.
Happy building, and see you on the deck!


Comments