Essential Guide to Gutter Cleaning Chesapeake VA
- William McKracherne
- Dec 26, 2025
- 19 min read

Picture this: you step outside after a heavy September rain, and the gutters along your Chesapeake home are dripping, leaves piled high, water spilling onto the foundation.
That moment of "uh-oh" is all too familiar for many of us living near the water, and it's the exact reason gutter cleaning Chesapeake VA matters more than you might think.
Why does a clogged gutter feel like a ticking time bomb? Because every season, debris builds up, and when the next storm hits, water has nowhere to go but inside your walls, under your deck, or onto your beloved lawn.
We've seen rain gutters overflow on historic homes in downtown Chesapeake, causing wood rot and costly repairs that could've been avoided with a simple, regular cleaning routine.
So, what can you do before the next downpour catches you off guard? First, get a feel for how often your gutters need attention—think about the trees lining your street, the amount of pine needles, and how many leaves fall each autumn.
Next, grab a sturdy ladder, a pair of gloves, and a scoop; it's not rocket science, but safety matters, so always have someone hold the base or use a stabilizing stand.
And here's a tip that saves both time and money: schedule a quick check after each major storm. A visual inspection can reveal blockages before they become a full‑blown water invasion.
In our experience, homeowners who pair a bi‑annual clean‑up with a professional eye from LGFMH Construction never face surprise water damage.
Think about it this way: a few minutes of effort now prevents weeks of drywall replacement later, and you keep your home looking sharp for those summer barbecues on the porch.
Ready to take the guesswork out of gutter maintenance? Let’s dive in and walk through the simple steps that keep your Chesapeake house dry, safe, and worry‑free.
TL;DR
Regular gutter cleaning in Chesapeake, VA prevents water damage, saves costly repairs, and keeps historic homes looking their best.
Schedule a quick visual check after storms and a bi‑annual clean‑up—plus a professional inspection from LGFMH Construction—to protect your home year‑round. It only takes a few minutes each season and avoids weeks of drywall replacement, foundation erosion, and costly roof fixes.
Step 1: Assess Your Gutters and Safety Precautions
Before you even think about scooping leaves, take a moment to stand on the porch and really look at your gutters. That quick pause is where most homeowners miss the warning signs that later turn into water damage. In Chesapeake, the humid climate and towering oaks can turn a clean line into a clogged river in weeks.
First step? Do a visual inspection from ground level. Grab a sturdy step ladder, climb just enough to see the gutter profile, and note any sagging, rust, or debris piles. If the gutter hangs lower than the roof edge, that’s a red flag you can’t ignore.
Safety isn’t an afterthought – it’s the foundation of a good clean. Always place the ladder on level ground, and if possible, use a ladder stabilizer or have a friend hold the base. Wear gloves, safety glasses, and a non‑slip shoe; a simple slip can turn a routine task into a costly injury.
Now, walk the house perimeter and look for water stains on the siding, mortar joints, or foundation. Those dark lines are the silent scream of a blocked gutter. In our experience, a single spot where water runs down the wall often means the downspout is clogged or the gutter is overflowing.
If you’re wondering how much time or money this will actually save you, check out our Average Gutter Cleaning Cost: What Homeowners Really Pay guide. Knowing the average expense helps you decide whether a DIY clean‑up or a pro call makes sense for your budget.
Sometimes a quick visual reference helps you see the right angle and tool grip. Below is a short video that walks you through the proper ladder setup and how to safely reach the far side of a typical Chesapeake gutter.
Watch that video a couple of times before you start – the demonstration shows how to keep three points of contact on the ladder, which is the gold rule for any height work.
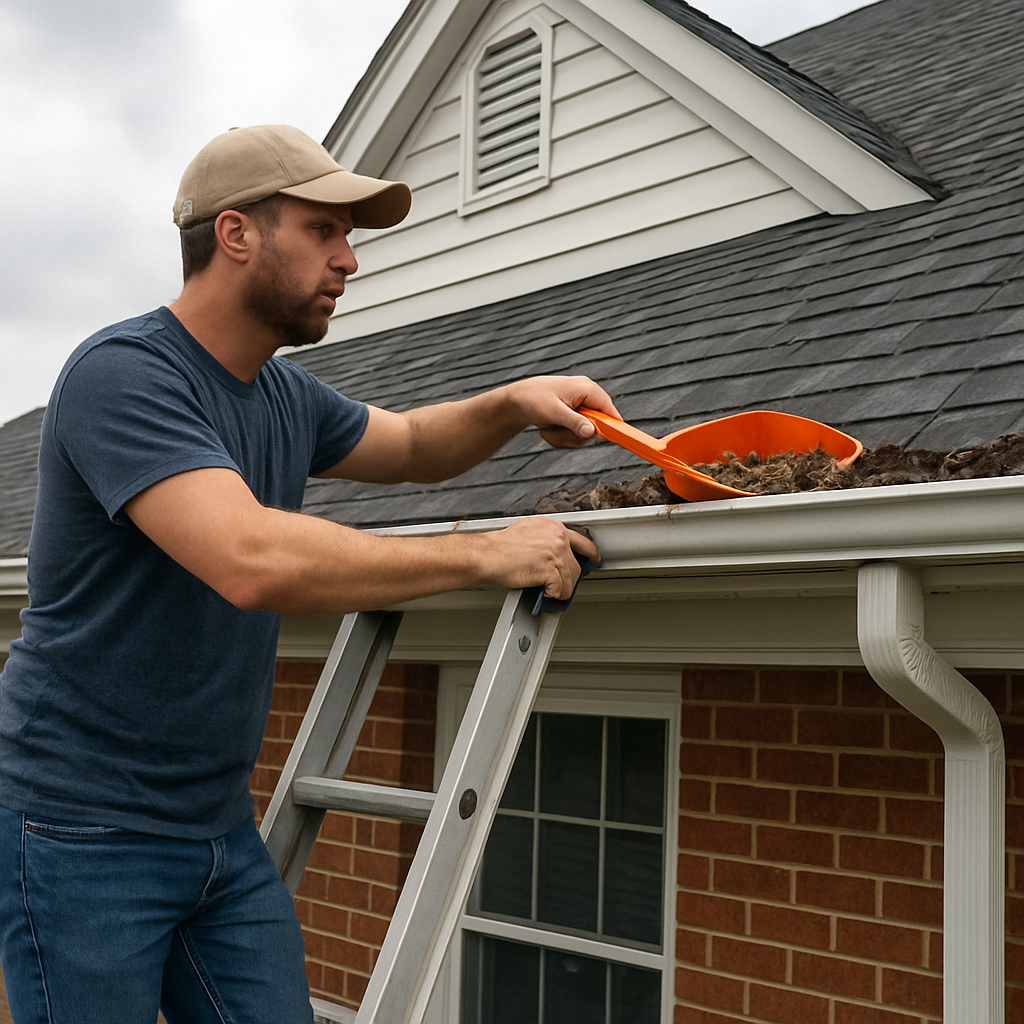
When you’re up there, a small plastic scoop or a garden trowel does the trick. Position it at the low point, pull the debris toward the downspout, and drop it into a bucket on the ground. This simple method saves you from climbing back and forth.
After you’ve cleared the bulk of the debris, run a garden hose from the downspout up toward the roofline. If water backs up, you’ve found a blockage you missed on the visual check. A quick flush also reveals any leaks at the seams – another safety concern.
While you’re flushing, take a moment to inspect the downspout extensions. Make sure they direct water at least three feet away from the foundation; otherwise, you risk basement seepage after the next rain.
For homeowners who want to take the guesswork out of future checks, consider installing a smart water‑level sensor from Plug & Carry . The device alerts you on your phone when water is pooling, so you can intervene before a minor clog becomes a major flood.
And don’t forget the interior side of the story – a clogged gutter can lead to moisture seeping into your attic, eventually affecting bedroom comfort. Pair your gutter maintenance with a breathable, cooling mattress protector from Sleep Sophie to keep nights dry and cool, even if a leak sneaks through.
Bottom line: a thorough assessment and safety checklist takes less than an hour, but it protects your Chesapeake home for years. Keep a notebook of what you see, schedule a repeat check after the next big storm, and you’ll never be surprised by water damage again.
Step 2: Gather Tools and Materials for Gutter Cleaning
Now that you've scoped the gutters, the next thing you need is a toolbox that actually works. Imagine standing on a ladder with a flimsy scoop that bends or gloves that tear the moment a pine needle slides under – it turns a quick clean‑up into a headache. Let’s walk through the gear you really want for gutter cleaning in Chesapeake, VA, so you can stay safe and finish the job without a second‑guess.
Core safety gear
A sturdy ladder is non‑negotiable. In our experience, a 6‑foot extension ladder with a slip‑resistant base works for most single‑story homes, while a 10‑foot ladder reaches two‑story roofs. If you have a steep roof pitch, a ladder stabilizer or a standing platform adds extra balance.
Never skip a harness or a ladder‑level safety line when you’re over four feet off the ground. A simple 1‑inch nylon safety strap that you clip to a sturdy anchor point on the house can prevent a nasty fall.
Gloves made of nitrile or heavy‑duty leather protect your hands from rusted seams and sharp debris. Pair them with a pair of safety glasses – those tiny splinters travel fast when you shake out a gutter.
Cleaning tools that actually move debris
The classic gutter scoop is still king, but not all scoops are created equal. Look for a wide‑mouth, stainless‑steel scoop with a sturdy handle; the stainless finish resists the salty Chesapeake air that can rust regular steel.
For hard‑to‑reach spots, a telescoping gutter brush slides right into the channel and scrapes out built‑up muck. A leaf blower with a low‑velocity setting works well for dry leaves, but keep the nozzle at least a foot away from the gutter edge to avoid denting.
If your gutters have screens or guards, a garden hose with a detachable spray nozzle helps flush out the finer grit. Run the water from the high point down to the downspout, watching for any lingering clogs.
Optional power‑assist tools
Many homeowners wonder whether a pressure washer is worth the rental. For a typical Chesapeake home with average leaf load, a pressure washer set to 1,500 psi can clear stubborn shingle grit in under five minutes per run. Just be sure to keep the nozzle moving; lingering too long can erode the gutter coating.
Another gadget some pros swear by is a handheld electric gutter vacuum. It sucks up wet debris without splashing, but the unit’s weight can make it hard to maneuver on a ladder. If you try it, test it on the ground first to gauge balance.
Materials for quick repairs
While you’re up there, keep a small repair kit handy. A roll of self‑adhesive aluminum tape can seal tiny holes in a pinch. For larger cracks, a two‑part epoxy designed for metal works even when the gutter is wet.
Replace any rusted brackets with stainless‑steel ones – they’re a few dollars more but last twice as long in the salty coastal air.
Checklist before you climb
Inspect ladder for missing rungs or bent legs.
Pack a harness, safety strap, gloves, and glasses.
Load a stainless‑steel scoop, telescoping brush, and hose nozzle.
Add optional items: pressure washer, gutter vacuum, repair kit.
Bring a helper to steady the ladder and hand you tools.
With this lineup, you’ll spend less time wrestling with equipment and more time watching water flow cleanly through the downspout. The next step is actually getting into the gutter and removing the debris – but that’s a story for the following section.
Step 3: Remove Debris and Clean Gutters Efficiently
Gather the right tools (and keep them within arm's reach)
Before you even step onto the ladder, lay out everything you’ll need: a stainless‑steel scoop, a telescoping brush, a garden hose with a detachable nozzle, and a sturdy pair of nitrile gloves. If you have a lightweight handheld vacuum, set it on the ground first so you know how it balances – you don’t want a wobbling device halfway up the roof.
Don’t forget a small bucket or a tarp to catch the bulk of the leaves. It saves you from dragging a soggy mess across the porch later.
Create a systematic cleaning routine
Start at the highest point of the gutter and work your way down. This way gravity does the heavy lifting and you avoid pushing debris back into sections you’ve already cleared.
Use the scoop to pull out the big chunks first – think pine needles, twigs, and any nesting material. When you reach a narrower section, slide the telescoping brush in and scrub the sidewalls. A quick back‑and‑forth motion loosens the fine grit that clings to the metal.
Once a section looks clear, give it a low‑pressure rinse from the hose. Aim the nozzle at a 45‑degree angle so the water flows toward the downspout without splashing onto your ladder.
Dealing with stubborn debris
Ever tried to wash out a clump of shingle dust that’s cemented itself to the gutter? It’s a pain, but a gentle pressure‑washer burst (around 1,500 psi) can break it up in seconds. Just keep the nozzle moving; lingering too long can wear away the protective coating.
If the debris is wet and clumped, the handheld vacuum works wonders – it sucks up the muck without creating a splash zone. Test it on the ground first, then carefully lift the unit while you’re on the ladder. A common mistake is to hold the vacuum too close to the edge, which can tip the unit and send water spraying everywhere.
Safety checks while you work
Do you remember to re‑secure your ladder after every few moves? A quick hand‑hold on the stabilizer or a second person steadying the base can prevent a wobble. Keep your harness clipped to a solid anchor point on the house; it’s a tiny step that saves a lot of heart‑ache.
Gloves on, glasses on – never skip them. Even a stray piece of bark can become a projectile when you shake the gutter.
Wrap‑up and inspection
When you’ve cleared the entire run, do a final flush from the highest outlet. Watch the water chase its way to the downspout; any lingering puddles mean you missed a spot.
Take a moment to run your fingers along the seams. If you feel any rough edges or see rust spots, dab a bit of self‑adhesive aluminum tape – it’s a quick fix until you can schedule a professional repair.
Finally, haul the debris bucket or tarp away, and give the surrounding landscaping a quick sweep. A clean yard means no hidden nests or leaves that could later find their way back into the gutter.By following this step‑by‑step routine, you’ll cut the cleaning time in half and keep your Chesapeake home’s gutters humming all year long.Step 4: Inspect and Repair Gutter DamageAlright, you’ve cleared the leaves, you’ve flushed the channel, and now it’s time to give those gutters a once‑over for damage. Think of it like a quick health check‑up after a marathon – you might feel fine, but a little inspection can spot a hidden sprain before it turns into a pulled muscle.Spotting the most common problemsGrab a flashlight and walk the length of the gutter while you’re still on the ladder. Here are the tell‑tale signs you’ll want to watch for:Rust patches or corrosion.A reddish‑brown streak isn’t just a cosmetic issue; it can eat through the metal in weeks.Sagging sections.If the gutter looks like it’s taking a nap, the brackets are probably giving up.Cracks or holes.Even a tiny split can let water slip behind the fascia and start rotting wood.Loose seams.You might hear a faint whine when rain hits – that’s a sign the joint isn’t sealed.Does any of that sound familiar? Good, because catching it now saves you from a wet basement later.Quick‑fix toolkitBefore you climb, stash a small repair kit at waist level. You’ll need:Self‑adhesive aluminum tape for pin‑hole leaks.A two‑part epoxy designed for metal (works even when the surface is a bit damp).Stainless‑steel brackets and screws for sagging spots.A putty knife and a wire brush to clean rust before you patch.These items are cheap, but they keep a gutter from turning into a water‑logged nightmare.Step‑by‑step repair routine1. Test the flow. Run a garden hose from the highest point and watch the water’s path. Any pooling means the water’s finding an escape route.2. Clean the trouble area. Use the wire brush to scrape rust away until you see bare metal. Wipe it clean with a rag.3. Apply a sealant. For small holes, press aluminum tape over the spot while the metal is still slightly warm. For larger cracks, mix the epoxy, spread it with the putty knife, and smooth it out. Let it cure according to the manufacturer’s instructions (usually 15‑30 minutes).4. Reinforce sagging sections. Loosen the existing screw, lift the gutter back into line, and replace the old bracket with a stainless‑steel one. Tighten firmly, but don’t over‑torque – you want a snug fit, not a stripped hole.5. Re‑check alignment. Drop a small marble or a handful of gravel into the gutter; it should roll straight to the downspout without getting stuck.When you’re done, give the whole run another quick flush. If water flows smoothly, you’ve earned a well‑deserved coffee break.When to call the prosSometimes the damage is beyond a weekend DIY – think extensive rust that’s eaten through the seam or a section that’s completely detached. That’s where LGFMH Construction can step in. We’ve helped dozens of Chesapeake homeowners replace whole gutter runs without tearing down the fascia, and the cost is often less than the water damage you’d avoid.For a broader view on how local public‑works handle routine maintenance, you can read the City of Chesapeake’s road‑shoulder maintenance guidelines, which underline the importance of regular inspections to prolong infrastructure life. City of Chesapeake maintenance standards Below is a quick reference table you can print out and keep in your garage.Damage TypeRecommended FixTools/MaterialsRust patchSand, then apply epoxy or aluminum tapeWire brush, epoxy kit, aluminum tapeSagging gutterReplace bracket with stainless‑steel bracketNew brackets, drill, screwdriverCrack or holeClean, then fill with epoxy; reinforce if largeEpoxy, putty knife, putty clothThat’s the whole inspection‑and‑repair loop. Simple, right? You’ve just turned a potential water‑damage disaster into a quick weekend win.Take a moment after the video to run through the checklist one more time. If anything feels off, pause, re‑inspect, and fix before you call it a day. Your gutters will thank you when the next storm rolls in.Step 5: Test Water Flow and Final Clean-UpAlright, you’ve cleared the muck, patched the little holes, and gave the brackets a little TLC. Now it’s time for the moment that tells you whether all that work actually mattered: testing the flow. If the water runs like a smooth river, you can breathe easy; if it backs up, you’ve got one more round of troubleshooting ahead.1. Do a quick visual check before you turn the hose onStand on a stable ladder (or ask a neighbor for a hand) and walk the length of the gutter. Look for any sections that still look saggy, any rust patches you missed, and make sure the seams are still snug. A quick glance can save you from splashing water all over the porch later.Does that sound familiar? We’ve seen a homeowner in Greenbrier spend an hour flushing a single spot only to discover a loose bracket that let the gutter dip just enough to trap water.2. Run water from the highest pointGrab your garden hose, attach a spray nozzle, and start at the roof’s highest gutter outlet. Turn the water on to a steady, moderate flow—nothing that looks like a fire‑hose, but enough to mimic a heavy rain. Let the water travel the full length of the system.Watch the water’s path. It should glide along the gutter, over any downspout inlets, and disappear down the spout without pooling. If you see water collecting in a low spot, that’s a sign the pitch is off or there’s a blockage you missed.3. Spot‑check problematic areasWhen the water slows or backs up, pause and investigate. Common culprits in Chesapeake homes include pine‑needle clogs in the downspout and small debris caught behind a corner joint. Use a screwdriver or a garden trowel to gently prod the water forward.In one real‑world case, a family in the North End thought their gutters were fine after cleaning. A quick hose test revealed a tiny piece of shingle lodged in the downspout that caused a two‑hour water backup every time it rained. Removing that fragment restored full flow instantly.4. Verify downspout discharge locationAfter the water clears the gutter, follow it to where the downspout meets the ground. It should discharge at least three feet away from the foundation—ideally into a drainage ditch or a splash‑guard. If water pools next to the house, add a downspout extension or a simple diverter.One homeowner discovered water pooling right at the foot of the porch after a storm. Adding a 2‑foot PVC extension redirected the flow away from the foundation and prevented future basement seepage.5. Final clean‑up and safety sweepNow that the system is proven, it’s time to tidy up. Pull the tarp or bucket down, shake out any remaining leaves, and sweep the work area. A quick brush of the ladder and the roof edge removes any stray debris that could become a slip hazard later.Don’t forget to wipe down your tools, especially the scoop and brush, and store them in a dry place. Moisture left on metal tools can cause rust, which you’ll regret the next time you climb up.6. Document the resultsTake a quick photo of the water streaming from the downspout. Snap a couple of pictures of the clean gutters, too. These visuals become handy proof if you ever need to file an insurance claim or show a future buyer that the home’s exterior is in good shape.Pro tip: Keep a small notebook in the garage and jot down the date you tested the flow, the hose pressure you used (low, medium, high), and any tweaks you made. When the next rainy season rolls around, you’ll know exactly where you left off.And finally, give yourself a pat on the back. You’ve turned a potentially messy, water‑damage nightmare into a smooth, dry finish—all in a Saturday afternoon.Step 6: Schedule Regular Maintenance and Professional ServicesNow that the gutters are clean and any small repairs are done, the real secret to staying dry is to treat maintenance like a recurring appointment rather than a one‑off chore.Ask yourself: how often do you actually walk around the house after a storm and give the gutters a quick glance? If the answer is “rarely,” you’re leaving a hidden leak to grow.Seasonal checkpointsSpring – pull the ladder out, clear any fresh pine needles, and run a low‑pressure hose test. Summer – inspect the downspout outlets for bird nests or debris that can clog during the heat. Fall – the biggest leaf‑drop window; do a thorough scoop, brush, and check that the slope is still directing water toward the downspout. Winter – if you get snow, clear any ice dams and verify that the extensions are still discharging at least three feet from the foundation.Homeowners who keep a regular schedule typically see far fewer foundation repairs, because water never gets the chance to sit long enough to seep into the footings.Set it up in a tool you already use. Most people have a phone calendar, a reminder app, or even a simple paper planner hanging in the garage. Mark the dates: March 15 for spring, June 15 for summer, September 15 for fall, and December 15 for winter. Add a note next to each date that says “gutter cleaning chesapeake va – quick visual check & flow test.” That tiny phrase triggers the right mental cue when the reminder pops up.If you prefer a hands‑off approach, schedule a professional service once a year. In Chesapeake, many homeowners opt for a mid‑fall visit from a gutter‑specialist, because that lines up with the heavy leaf season and gives the contractor time to fix any issues before the first freeze.What to look for when you call a pro? First, ask whether they perform a full visual inspection, a flow test, and a check of the downspout extensions. Second, verify that they use stainless‑steel brackets or rust‑resistant fasteners – Chesapeake’s salty air can chew through cheap steel in months. Third, request a written report with photos so you can compare next year’s condition.A real‑world example helps. The Thompsons on Greenbrier Road cleaned their gutters themselves in April, but skipped a professional check until the following September. When the rain came, a small crack they hadn’t noticed let water pool against the foundation, leading to a modest repair bill of $850. Had they booked a September service with a local contractor, the crack would’ve been spotted and sealed for under $150, saving both money and stress.If you decide to go pro, here’s a quick checklist to hand to the contractor:Confirm the scope: visual inspection, flow test, downspout extension check.Ask about the materials they’ll use for any bracket or sealant replacements.Get a timeline and written estimate before work begins.Request before‑and‑after photos for your own records.Finally, keep a simple log. Open a notebook or a spreadsheet titled “gutter cleaning chesapeake va log.” Record the date, season, what you did (DIY or pro), any issues found, and the next scheduled check. Over five years you’ll see patterns – maybe the east‑side downspout needs a longer extension, or the gutter guards are wearing thin. That insight lets you budget wisely and avoid surprise repairs.So, what’s the next move? Grab your calendar, block those four dates, and either set a reminder to do a quick visual check yourself or call a local gutter specialist for a professional visit. Stick to the plan, and you’ll spend a few minutes each season instead of hundreds of dollars fixing water damage later.FAQHow often should I schedule gutter cleaning in Chesapeake, VA?In most Chesapeake homes, a bi‑annual clean‑up does the trick—once in early spring after the snow melts and once in late fall after the leaf drop. If you have lots of pine trees or heavy storms, add a quick visual check after any big rain. Jot the dates in a calendar, and you’ll catch clogs before they turn into costly water damage. That simple habit can save you thousands.What are the signs that my gutters need cleaning right now?Look for standing water in the gutter after a rain, rust spots that spread, or water spilling over the edge onto the siding. Sagging sections, loose brackets, or a musty smell coming from the roofline are also red flags. When you see leaves piling up or the downspout drips constantly, it’s a clear cue to pull out the scoop. Water that pools can freeze and expand, cracking the gutter seams. If you notice rust creeping along the metal, it’s a sign the protective coating is failing and should be addressed soon.Can I safely clean my gutters myself, or should I hire a pro in Chesapeake?You can DIY if you have a sturdy ladder, a partner to steady it, and the right gear—gloves, goggles, and a scoop. The trick is to work on a dry day and never overreach; keep the ladder at a 75‑degree angle. For multi‑story homes, steep roofs, or if you spot rusted brackets, calling a local pro saves time and reduces the risk of a fall.What tools do I really need for gutter cleaning in Chesapeake, VA?A 6‑foot extension ladder with a stabilizer, a wide‑mouth stainless‑steel scoop, and a telescoping gutter brush cover the basics. A garden hose with a detachable nozzle helps flush out fine debris. If you prefer a power‑assist, a low‑pressure pressure washer works, but keep the nozzle moving to avoid scratching the metal. For safety, wear nitrile gloves and safety glasses; they protect your hands from rusted seams and keep splinters out of your eyes. Keep the tools dry after use to prevent rust, and store them at waist height so you can grab what you need without climbing back up.How does leaf buildup affect my home’s foundation?When leaves clog the gutter, water backs up and spills onto the fascia and then the foundation. Over time that extra moisture can erode the footing, lift basement walls, and even encourage mold growth inside. A few minutes of cleaning each season keeps the water flowing away from the slab, protecting both the structure and your indoor air quality. When the soil stays saturated, it expands and can shift the footings, leading to cracks in walls and costly repairs. By directing water into a downspout that ends at least three feet from the house, you also reduce the risk of basement seepage during heavy rains.What's the best time of year to do gutter cleaning in Chesapeake?Early October is a sweet spot—most leaves have fallen, but the first freezes haven’t set in yet. A quick clean‑up right after a heavy storm also helps you spot damage while the water is still fresh. Pair the October session with a spring check in March, and you’ll have a clear path for rain all year. During October, the humidity is lower, so any remaining debris dries quickly and you can see rust or cracks more clearly. If you notice any sagging brackets at this time, tighten or replace them before winter’s weight pushes the gutter down further. A short note in your calendar will remind you to do it.How do I choose a reliable gutter cleaning service in Chesapeake, VA?Start by asking for proof of insurance and a written estimate that breaks down labor, materials, and any extra work. Look for reviews that mention thorough inspections and clean‑up, not just “quick job.” A reputable crew will test the flow after they finish and give you photos of the before‑and‑after so you can see the difference. Ask whether they use stainless‑steel brackets and rust‑resistant sealants, which hold up better in Chesapeake’s salty air. Finally, request a simple maintenance guide; a quick checklist for the next season shows you’re getting value beyond the one‑time service.ConclusionWe've walked through every step of gutter cleaning chesapeake va, from scouting tools to sealing leaks, so you know exactly what to look for before the next storm hits.Do you ever feel that once‑a‑year clean‑up is a gamble? The truth is, a quick visual check and a simple flow test can save you weeks of water damage and a handful of repair bills.Key takeaways: grab a sturdy ladder, use a stainless‑steel scoop, inspect brackets for rust, patch tiny holes with aluminum tape or epoxy, and always give the system a low‑pressure hose run from the highest point.Keep a one‑page checklist in your garage and set calendar reminders for March, June, September and December – those four dates keep gutters clear without turning the job into a chore.If any part of the system feels beyond a weekend DIY, remember that LGFMH Construction can step in with a quick inspection and professional fix, letting you focus on the things that matter most.So, what’s the next move? Pull out that ladder, schedule your seasonal check, and enjoy peace of mind knowing that your home’s gutters are ready for whatever Chesapeake throws their way, and keep the house dry all year round.


Comments