Essential Gutter Repairs Checklist for Homeowners
- William McKracherne
- Jan 9
- 16 min read

Ever stared up at a sagging gutter and thought, “How did this even happen?” You’re not alone. A busted gutter can turn a simple rainstorm into a mini flood, soaking your basement and ruining those favorite floorboards you just refinished.
In our experience at LGFMH Construction, the most common culprit is a slow leak that starts at a tiny seam. One homeowner in Virginia Beach called us after noticing water stains on their kitchen ceiling. Turns out a single cracked joint let water slip behind the soffit, and by the time the damage showed up, the wood was soft and needed replacement.
So, what can you do before a small drip becomes a costly repair? First, give your gutters a quick visual check after a heavy rain. Look for sagging sections, rust spots, or gaps where the panels meet. If you spot anything, note the location and move on to the next step.
Second, clear out debris. Leaves, twigs, and even bird nests can weigh down the gutter and force it away from the roof edge. A garden trowel and a sturdy ladder are all you need. For safety, always have a friend hold the ladder steady—don’t try to balance on your own.
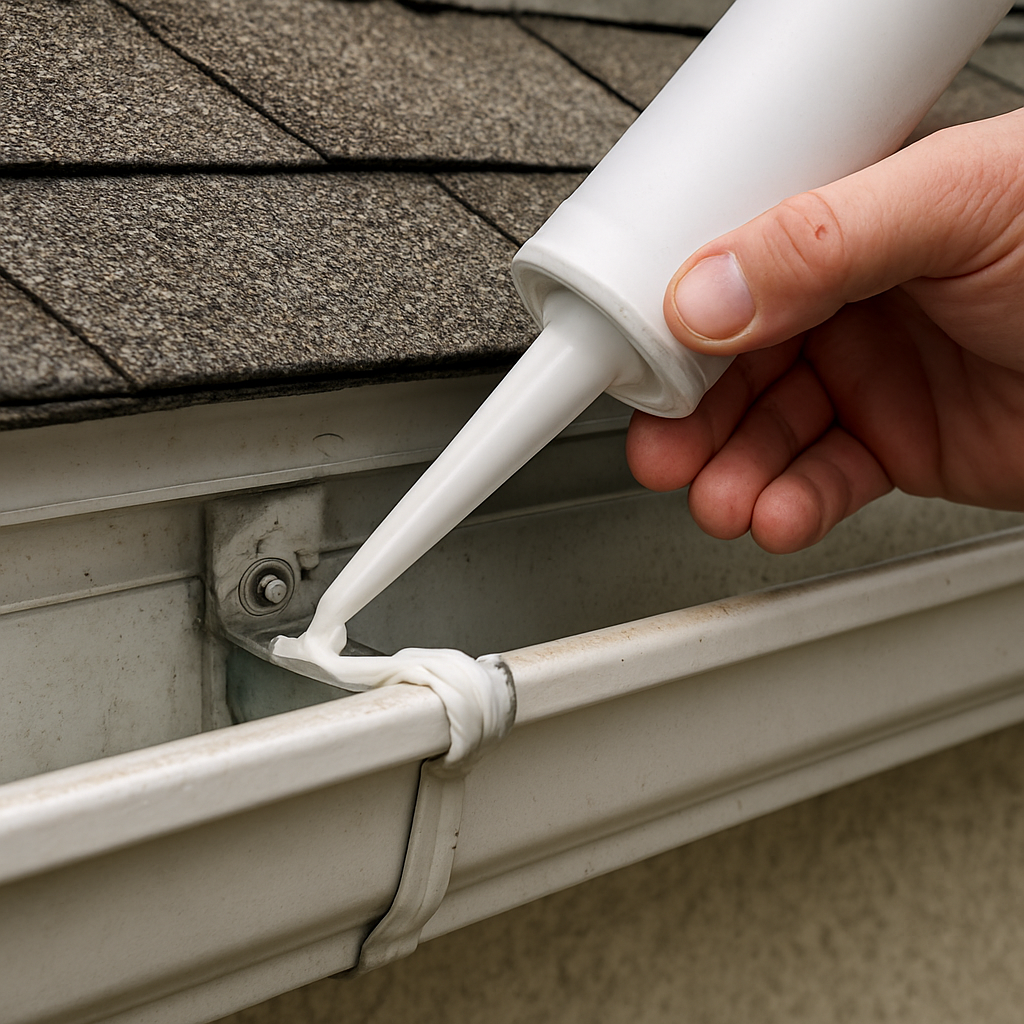
Third, seal any seams you find. A bead of quality silicone sealant works wonders on tiny cracks. If you’re uncomfortable with DIY, that’s where we step in. Our team can quickly assess the issue and apply a professional repair that lasts.
Want a deeper dive into the exact steps? Check out our detailed guide on Gutter Repair Virginia Beach: A Complete Homeowner’s Guide for everything from inspection tips to material recommendations.
And if you’re a pet lover, you might wonder why a cat grooming article is relevant. It isn’t, but our partners think it’s useful for homeowners who appreciate thorough, reliable reviews—just like we aim to be with gutter repairs. Take a look at the Best Cat Grooming Clippers Reviewed for an example of a well‑researched guide.
Bottom line: regular checks, prompt cleaning, and timely sealing keep your gutters—and your home—dry. If you’re ever unsure, give us a call. We’ll help you protect your biggest investment.
TL;DR
Regular gutter repairs prevent costly water damage, keeping your home dry and your peace of mind intact. Check for sagging sections, clear debris, seal seams, or call LGFMH Construction for fast, reliable service that protects your biggest investment; we’ll inspect, repair, and ensure your gutters flow smoothly year‑round without hassle.
Step 1: Inspect Your Gutters for Damage
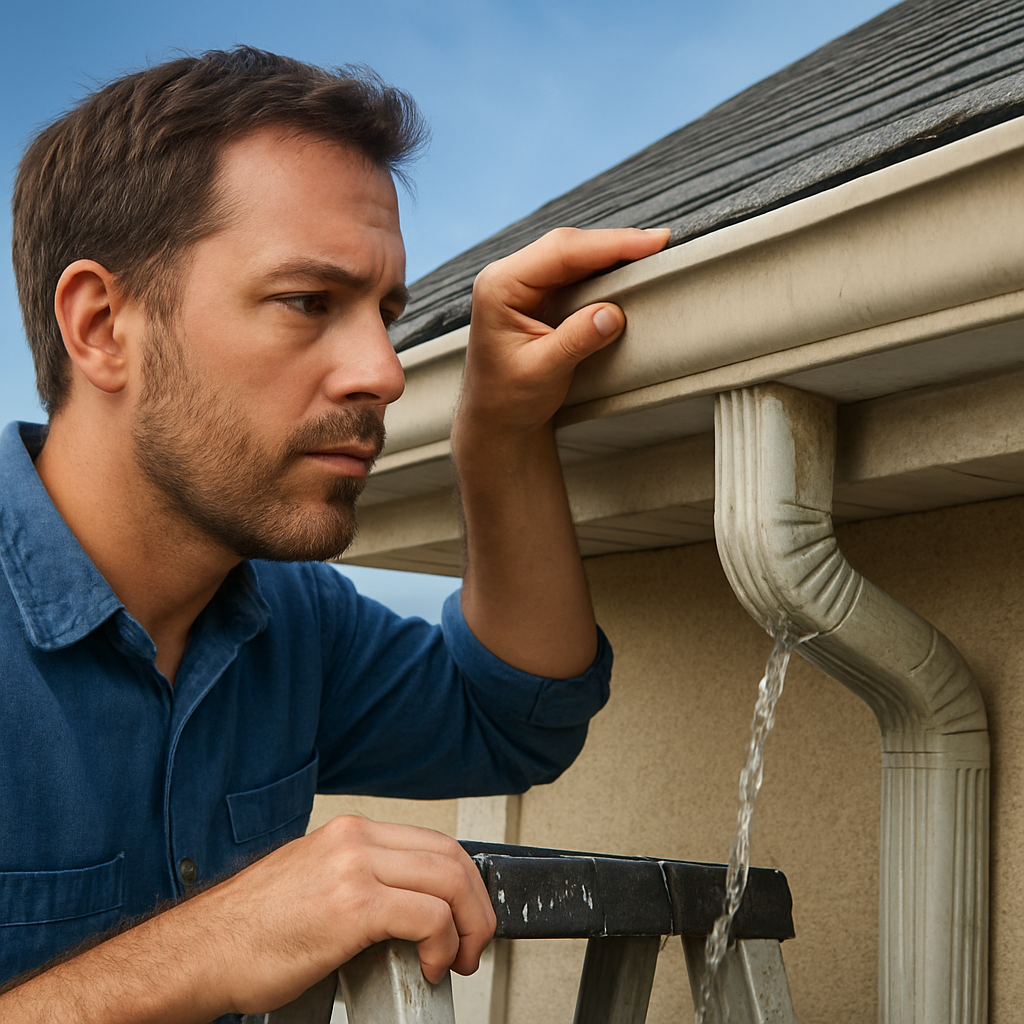
Picture this: you just walked out of a rainstorm, and the next morning you notice a faint line of water trickling down the side of your house. Your gut feeling says, "Something's off up there." That's the moment you know it's time for a close‑up look at your gutters.
First thing’s first—safety. Before you even think about climbing, make sure the ladder is on stable ground, the angle is about 75 degrees, and you’ve got a buddy to steady it. The American Ladder Institute reports that proper setup cuts ladder‑related injuries by more than a fifth in recent years, so a quick double‑check can save a lot of trouble.
Step‑by‑step visual sweep
1.Ground‑level scan.Walk the perimeter of your home and glance at the siding. Streaks of mildew, algae, or dark water marks are tell‑tale signs that water is spilling out before it even reaches the downspouts.
2.Downspout check.Stand near each downspout and watch where the water exits. If it’s pouring right at the foundation instead of a safe distance away, the spout may be loose, clogged, or mis‑aligned.
3.Debris watch.Even after you’ve cleared the leaves, look for bits that are still hanging over the gutter lip. Tiny pine needles or twigs can create a bottleneck that forces water to back up.
So, what does a healthy gutter look like? It should have a gentle slope of about ¼ inch per 10 feet toward the downspout. If you notice water pooling in the middle, the pitch is off and the gutters will eventually pull away from the roof.
Climbing up: what to examine up close
When you’re comfortable on the ladder, take a closer look at the seams, joints, and hangers. Run a gentle garden‑hose flow along the gutter line and watch for any drips. A single bead of water escaping from a seam is enough to start rot in the fascia board.
Check the hangers every three feet—any rusted or pulled‑out screws are a red flag. The fascia should be solid and painted; soft or spongy spots mean moisture has already infiltrated.
And here's a quick tip from the pros: a simple “paper towel test” works wonders. Place a dry paper towel at a joint, run water, and feel for dampness. If the towel gets wet, you’ve found a leak.
Does this feel overwhelming? Not really. It’s just a handful of visual cues that you can spot in under ten minutes.
Now that you’ve got the basics, let’s talk about when to call in a professional. If you see any of the following, it’s time to reach out: rusted gutters that won’t stop leaking, sagging sections that flex under a light touch, or a fascia board that’s already softened.
According to WIN, regular spring gutter maintenance—like the kind we just walked through—can slash the risk of costly water‑damage claims, which average over $15,000 nationwide. A little inspection now can save a small fortune later.
Still not sure if you’ve caught everything? Here’s a quick checklist you can print out and take with you the next time you head up the ladder:
Ground‑level streaks or stains?
Downspout water landing too close to foundation?
Visible debris over the gutter lip?
Gutter slope correct (¼" per 10 ft)?
Hangers secure, no rust?
Fascia solid, no soft spots?
Hose test shows no drips at seams?
If you tick all the boxes, you’ve likely averted a major repair. If not, consider a professional gutter repair to get the system back in shape before the next rain.
Want more seasonal tips? Check out this guide on spring gutter maintenance for a deeper dive into protecting your home year‑round.
Remember, a quick inspection after each heavy storm is the cheapest insurance policy you can buy for your home.
Step 2: Clean Out Debris and Blockages
Okay, you’ve scoped the damage, now it’s time to actually get those gutters breathing again. A clogged gutter is like a traffic jam on the roof—water backs up, seeps behind the fascia, and eventually you’re dealing with mold, rot, or an indoor ceiling stain. Let’s walk through a hands‑on, no‑fluff cleaning routine that keeps your gutter repairs from turning into a full‑blown emergency.
Gather the right tools (and stay safe)
First thing’s safety. Grab a sturdy ladder, a pair of work gloves, a small garden trowel or a plastic gutter scoop, and a bucket or tarp to catch the mess. A ladder with a 75‑degree angle and a buddy to hold the base is the gold standard—OSHA‑style advice that actually saves bruises.
Pro tip: If you’ve got a garden hose with a spray nozzle, you’ll use it later to flush out the hidden bits. And don’t forget eye protection; a stray pine needle can surprise you.
Start at the corners, work toward the downspout
Begin at the far‑left corner of the gutter run. Scoop out leaves, twigs, and any bird‑nest remnants. I like to work in 2‑foot sections, dumping the debris into a bucket so the ladder stays clean.
Imagine you’re clearing a driveway after a storm—those little pine needles act like sandpaper on the gutter surface. If you notice a stubborn clump, use the trowel to pry it loose rather than hammering it; you don’t want to bend the metal.
Flush with water and hunt for hidden blockages
Once the bulk of the debris is gone, attach the hose to the faucet, set the nozzle to a gentle stream, and run water from the opposite end of the gutter. Watch the water chase the debris toward the downspout. If you see water pooling or backing up, you’ve found a blockage.
Here’s a trick: place a small piece of cardboard at the gutter lip while you hose. If the water splashes over the cardboard, the flow is clear. If it dribbles off the side, you still have a snag—maybe a tiny twig lodged in a seam.
Seal the seams after you’re sure they’re clean
Cleaning isn’t the end of the job; a clean surface is the foundation for a solid repair. The Chase Corp guide explains that most leaks occur at the seams, and a high‑quality sealant tape—like 4EvaSeal Multipurpose Tape—will hold up under thermal cycling and rain load. Before you apply any tape, wipe the area with a rag so it’s dry and free of dust.
Apply the tape flat, pressing out any “fish‑mouth” bubbles. If the tape lifts, re‑clean that spot and try again. Once the tape adheres, run the hose one more time to confirm there’s no leakage.
When to call a pro
Even with a careful clean, some situations scream for a professional touch: heavily rusted sections, concrete or wooden gutters that need a urethane coating, or a downspout that won’t drain no matter how many times you pressure‑wash it.
In those cases, a crew that follows industry safety standards can use harnesses, rope‑systems, and specialty tools—something most DIYers don’t have on hand.
Quick checklist before you call it a day
All visible leaves, twigs, and nests removed?
Hose test shows water flowing freely to the downspout?
No standing water or slow‑drain spots?
Seams wiped clean and sealed where needed?
Downspout outlet at least 3‑4 feet from the foundation?
If you tick every box, you’ve given your gutters a solid reset and dramatically lowered the odds of future gutter repairs. If anything feels off, schedule a quick inspection with a trusted local crew.
Step 3: Repair Leaks and Cracks
Alright, you’ve cleared out the leaves and given the gutter a good hose‑down. Now it’s time to tackle the actual leaks and cracks that keep sneaking water into your home.
Why a proper repair matters
A tiny drip at a seam can turn into a soggy fascia board, mold growth, or even a basement flood. In our experience, homeowners who skip this step end up spending three‑times more on water damage than they would have on a quick seal.
Gather your toolkit
Safety gloves and goggles
Wire brush or sandpaper (80‑120 grit)
Rust remover – Topps® RustArrestor™ if you have rust
High‑quality sealant – silicone or a liquid rubber like Topps GutterGuard sealant
Caulking gun or brush
Clean rags and a bucket of water
Having everything at hand keeps you from hopping off the ladder mid‑job.
Step‑by‑step repair process
1. Dry and inspect.Wait until the gutter is completely dry. Run a garden hose from the opposite end and watch where water escapes. Mark the spot with a piece of painter’s tape.
2. Scrape away old material.Use the wire brush to strip paint, rust, and any loose sealant around the leak. If you hit rust, give it a quick dip in RustArrestor, then rinse and let dry.
3. Prep the surface.Wipe the area with a rag soaked in mineral spirits or soapy water. The goal is a dust‑free, oil‑free surface so the new sealant bonds.
4. Apply the sealant.For a standard silicone bead, cut the tip at a 45° angle and run a continuous line over the crack. For larger seams, we prefer a liquid rubber coat. Brush on a generous layer of GutterGuard, making sure it flows into the joint and over the rivet heads. The product stretches up to 550% and can handle the thermal movement of metal gutters.
5. Shape and smooth.Use a gloved fingertip or a putty knife to smooth the sealant, pushing it into any voids. A smooth finish also sheds water better.
6. Cure time.Most rubber sealants cure in 24 hours, but check the label. Avoid rain or heavy dew during this window.
7. Test again.After the cure, run water through the gutter once more. If no droplets appear, you’ve sealed the leak.
Real‑world examples
Jane from a historic home in Williamsburg discovered a hairline crack along a seam that let water drip onto her antique shutters. She followed the steps above, used GutterGuard, and the shutters stayed dry through a 2‑inch rainstorm the next week.
Another homeowner in Norfolk had a rusted joint on a 20‑year‑old aluminum gutter. After cleaning, treating the rust, and applying a rubber sealant, the gutter stopped leaking completely, saving them from a costly fascia replacement.
When to bring in the pros
If the gutter section is severely corroded, has large holes, or if you’re uncomfortable working at height, it’s smarter to call a crew. Professionals can replace the damaged segment, re‑align the pitch, and ensure the downspout discharges at least 3‑4 feet from the foundation.
Quick repair checklist
All rust removed or treated?
Surface cleaned and dry?
Sealant applied evenly, covering the entire crack?
Sealant cured for the recommended time?
Water test shows no leaks?
Follow these steps, and your gutter repairs will hold up season after season. Need a visual walk‑through? Check out this short GutterGuard application video for a quick demo.
And remember, a well‑sealed gutter is the unsung hero that keeps your home dry, your foundation solid, and your peace of mind intact.
Seasonal maintenance tip: after a hard freeze, inspect the joints for tiny hairline splits caused by ice expansion. A quick re‑application of a thin GutterGuard coat can seal those micro‑cracks before they widen with spring thaws. Doing this twice a year—once after winter, once after summer—keeps the metal flexing without losing its seal.
Step 4: Seal Joints and Re‑attach Loose Sections
Now that the gutter is clean and any cracks are patched, the next hurdle is making sure the joints stay put when the rain comes down. Loose sections are the silent culprits that let water sneak behind the fascia, and they’re easier to fix than you might think.
Find the weak spots
Start at the highest point of the run and work your way down. Look for sections that wobble when you press them lightly or seams that feel like they’re pulling apart. A quick “wiggle test” with your fingers will tell you if a bracket has slipped or a rivet is missing.
And if you notice any rust‑stained water trails on the fascia, that’s a clear sign a joint isn’t sealed tight enough.
Gather the right sealant and fasteners
For most metal gutters, a polyurethane‑based sealant such as Home Depot’s SeamerMate Gutter Sealant works like a charm. It bonds without primer, stays flexible when temperatures swing, and resists mildew.
If you’re dealing with aluminum, keep a few extra aluminum seamers and rivets on hand – they’re inexpensive and give you a solid mechanical hold.
Apply the sealant
First, clean the joint surface with a rag so it’s dry and free of dust. Then, cut the tip of the sealant tube at a 45° angle and run a continuous bead right into the seam, making sure it fills the gap fully.
Don’t over‑tool the bead; just smooth it with a gloved fingertip or a small putty knife so it adheres and looks neat. The sealant will cure to a rubber‑like film that moves with the metal, so you won’t see cracks reappear in the summer heat.
Re‑attach loose sections
Next, line up the loose gutter piece with the adjacent section. If the original brackets are bent or corroded, replace them with new ones – a simple how‑to video on securing gutter brackets shows the drill‑and‑screw method in under two minutes.
Secure the section with at least two screws per bracket, spacing them about 12 inches apart. For extra peace of mind, add a strip of the same sealant along the inside edge of the bracket before tightening the screw; this creates a double barrier against water infiltration.
Check your work
Give the repaired joint a gentle water test. Run a garden hose from the opposite end and watch the seam. If you see any drips, re‑apply a thin line of sealant and retest after it cures.
Once you’re satisfied, wipe away any excess sealant with a damp cloth – you don’t want a gloppy mess that could attract debris.
Maintenance tip
Every spring, after the ice melts, pop back up and give each joint a quick visual once‑over. A thin layer of fresh sealant can extend the life of the joint by another season, especially in coastal areas where salty air loves to corrode metal.
And remember, a well‑sealed joint is the unsung hero that keeps your home dry and your peace of mind intact.
Step 5: Set Up a Maintenance Schedule
Alright, you’ve sealed the seams, re‑attached the loose bits, and your gutters are finally looking like they belong on a showroom house. The next question most homeowners ask is, “How often should I actually check these things?” The answer is simple: turn gutter care into a habit, not an after‑thought.
Why a schedule matters
Think about your car. You wouldn’t wait until the engine roars before you change the oil, right? Gutters work the same way – they’re the first line of defense against rain, snow, and even pests. A regular rhythm catches debris, corrosion, or a loose bracket before they turn into a pricey water‑damage story.
In fact, a bi‑annual routine (spring and fall) can slash the chance of ice‑dam formation by up to 70 % according to industry studies. That’s the kind of number that makes you feel a little better about climbing a ladder twice a year.
Build your own calendar
Start with the two obvious checkpoints: early spring (after the last frost) and late fall (just before the first freeze). Mark those dates on your phone, your fridge, or that trusty wall planner you keep for birthdays.
Then add a “quick scan” reminder every 8‑12 weeks if you have heavy foliage, or after any major storm. The scan is a 5‑minute visual from the ground – you’re just looking for sagging sections, obvious blockages, or water stains on the fascia.
Here’s a step‑by‑step for each calendar entry:
Spring Reset (April‑May)– Clear leaves, run a hose to flush out the last winter’s debris, and inspect brackets for rust. If you spot a rusty screw, replace it with a stainless‑steel one.
Mid‑Season Scan (June‑July)– Walk the perimeter, look for bird nests or pine needles that have slipped through. A quick hose test from the top will tell you if water still flows freely.
Fall Prep (September‑October)– This is the heavy‑lifting day. Remove all remaining foliage, check the pitch (¼ inch drop per 10 ft), and apply a thin bead of sealant to any joint that feels dry.
Pre‑Winter Check (November)– Verify that downspout extensions still discharge at least six feet from the foundation. If water pools, add or adjust an extension.
Does that feel like a lot? Not really – each task takes less than 30 minutes, and you’ll avoid a $15,000 foundation repair down the line.
Seasonal cheat sheet
To make the schedule even easier, grab a printable cheat sheet (you can sketch one on a sticky note). Fill in the four rows below with your own dates, and you’ll have a visual cue every time you glance at your calendar.
Season | Key Tasks | Quick Tip |
Spring | Remove winter debris, check for rust, reseal joints | Use a garden trowel to pry stubborn pine needles – it saves a hose run. |
Summer | Mid‑season visual scan, hose test, clear bird nests | Carry a small flashlight; nests are easier to spot in the shade. |
Fall | Full clean‑out, verify pitch, apply fresh sealant | Work from the highest point down; gravity does the heavy lifting. |
Winter | Pre‑freeze check of downspout extensions, watch for ice dams | Place a heat tape on downspout outlets if you live in a freezing zone. |
Notice the pattern? Each season has a single focus, but the underlying goal is the same: keep water moving away from your roof, fascia, and foundation.
Quick checklist before you call it a day
All visible leaves and twigs cleared?
Gutter pitch correct (¼" per 10 ft)?
Brackets secure, no rusted screws?
Sealant fresh on any joint that looks dry?
Downspout outlet at least six feet from foundation?
If you can answer “yes” to every bullet, you’ve earned a weekend of peace of mind. If something feels off, grab a ladder and fix it, or give LGFMH Construction a quick call – we love stepping in when a DIY schedule hits a snag.
Bottom line: a maintenance schedule isn’t a chore, it’s a safety net. Set it, stick to it, and let your gutters do what they do best – keep your home dry, no drama required.
Conclusion
At the end of the day, gutter repairs aren’t a one‑off project; they’re part of keeping your home healthy.
If you’ve followed the seasonal checklist, cleared debris, sealed every joint, and tightened loose brackets, you’ve already built a safety net that will catch the next storm before it reaches your foundation.
So, what’s the next move? Grab a quick look at your quick‑check list—any sagging section, rusted screw, or dry sealant spot? Fix it today, or give LGFMH Construction a call and let a pro handle the heavy lifting while you enjoy a dry basement.
Remember, a small amount of time twice a year saves you thousands in water‑damage repairs, and it keeps the peace of mind that comes with knowing your home can weather any rain.
Take the habit, stick to the schedule, and let those gutters do their job—so you can focus on the things that really matter, like family gatherings, weekend projects, or just a quiet cup of coffee while the rain taps the roof.
Finally, keep this guide handy—print it, bookmark it, or save it on your phone. When the next season rolls around, you’ll know exactly where to start, and your gutters will thank you by staying clear, sturdy, and leak‑free.
FAQ
Got questions about gutter repairs? Below are the most common ones we hear from homeowners, plus practical answers you can use right away.
How often should I schedule gutter repairs?
We recommend a quick visual check twice a year – once in spring after the last frost and again in fall before the first freeze. During each check, look for sagging sections, rusted brackets, or any sealant that’s cracked. If you spot something, address it that same season. A bi‑annual routine keeps water flowing and saves you from costly emergency fixes later.
What are the signs that my gutters need repair?
Typical red flags include water streaks on the siding, rust spots on metal, loose or missing brackets, and a noticeable sag in the gutter line. You might also hear a dripping sound when rain hits the roof or notice water pooling around the foundation. If the downspout discharges water too close to the house, that’s a clear cue to re‑attach or re‑angle the pipe.
Can I fix a leaking gutter joint myself?
Absolutely, as long as the metal isn’t severely corroded. First, clean the joint with a wire brush and wipe it dry. Apply a high‑quality polyurethane sealant, smoothing it with a gloved fingertip. Let it cure for the manufacturer‑specified time (usually 24 hours) before testing with a garden hose. If the leak persists or the metal is crumbling, it’s time to call a pro.
What tools do I need for basic gutter repairs?
Grab a sturdy ladder set at a 75‑degree angle, a pair of work gloves, and a small garden trowel or gutter scoop for debris. You’ll also want a screwdriver or drill for tightening brackets, a wire brush for rust removal, and a sealant gun loaded with polyurethane or silicone sealant. A bucket or tarp helps keep the work area tidy, and a flashlight is handy for spotting hidden cracks.
How do I prevent rust on metal gutters?
Start by keeping the surface clean and dry; moisture is the enemy of metal. After each cleaning, wipe down any exposed fasteners and apply a thin coat of rust‑inhibiting paint or a clear protective sealant. Replace any rusted screws with stainless‑steel ones, and consider a quarterly spray of a water‑repellent product during humid months. These small steps dramatically extend the life of aluminum or steel gutters.
When is it better to call a professional for gutter repairs?
If you encounter large holes, sections that have completely pulled away from the fascia, or extensive rust that’s eaten through the metal, a professional crew is the safest route. Also, if you’re uncomfortable working at height, lack the right tools, or need a full gutter replacement, let a licensed contractor handle the job. They have the equipment, safety gear, and warranty backing to get it right the first time.
Does weather affect the timing of gutter repairs?
Yes – avoid repairing gutters in freezing temperatures because sealants won’t cure properly and metal can become brittle. Aim for mild, dry days, ideally above 40°F (4°C). If a storm just passed, give the gutters a chance to dry before you start working; a wet surface can trap moisture under sealant, leading to future leaks. Planning around the weather ensures a lasting repair.


Comments