Essential Pressure Washing Guide: Step‑by‑Step Techniques for Spotless Surfaces
- William McKracherne
- Jan 6
- 17 min read

Ever stood on your porch, stared at a grimy siding, and thought, “When did my house get this tired?”
You’re not alone. Those years of rain, pollen, and a bit of neglect can turn a proud curbside into a drab eyesore, and that’s where pressure washing swoops in like a fresh‑air breath.
In our experience at LGFMH Construction, we’ve seen a simple jet of water transform everything from brick walkways to vinyl siding in minutes, shaving off layers of dirt that years of scrubbing just can’t touch.
But before you grab a hose and hope for the best, there’s a bit more to the story. The right pressure, the proper nozzle, and a little know‑how can mean the difference between a sparkling finish and a damaged surface.
So, what should you keep in mind? First, think about the material you’re cleaning. Soft wood siding needs a gentler spray than a concrete driveway. Second, test a small hidden spot – that way you won’t be surprised by paint lifting later.
And here’s a tip most DIY guides skip: start from the top and work your way down. Gravity does half the work for you, letting the water carry the grime away instead of letting it run back onto a freshly cleaned area.
You might wonder if it’s worth the investment. The truth is, regular pressure washing not only boosts curb appeal – it actually extends the life of your exterior by preventing rot, mold, and corrosion.
Imagine pulling up to your home on a sunny Saturday, the sunlight reflecting off a spotless driveway, and the neighbors giving you a nod of approval. That feeling of pride? It’s affordable and achievable.
Ready to see what a little pressure can do? Let’s dive in and explore the basics, the tools, and the safety steps you need to get the best results without a slip‑up.
TL;DR
Pressure washing transforms grimy siding, driveways, and decks into spotless surfaces, boosting curb appeal while protecting your home from rot, mold, and corrosion.
Follow our simple tips—choose the right pressure, test a hidden spot, start at the top, and use proper safety gear—to achieve professional results without costly damage today.
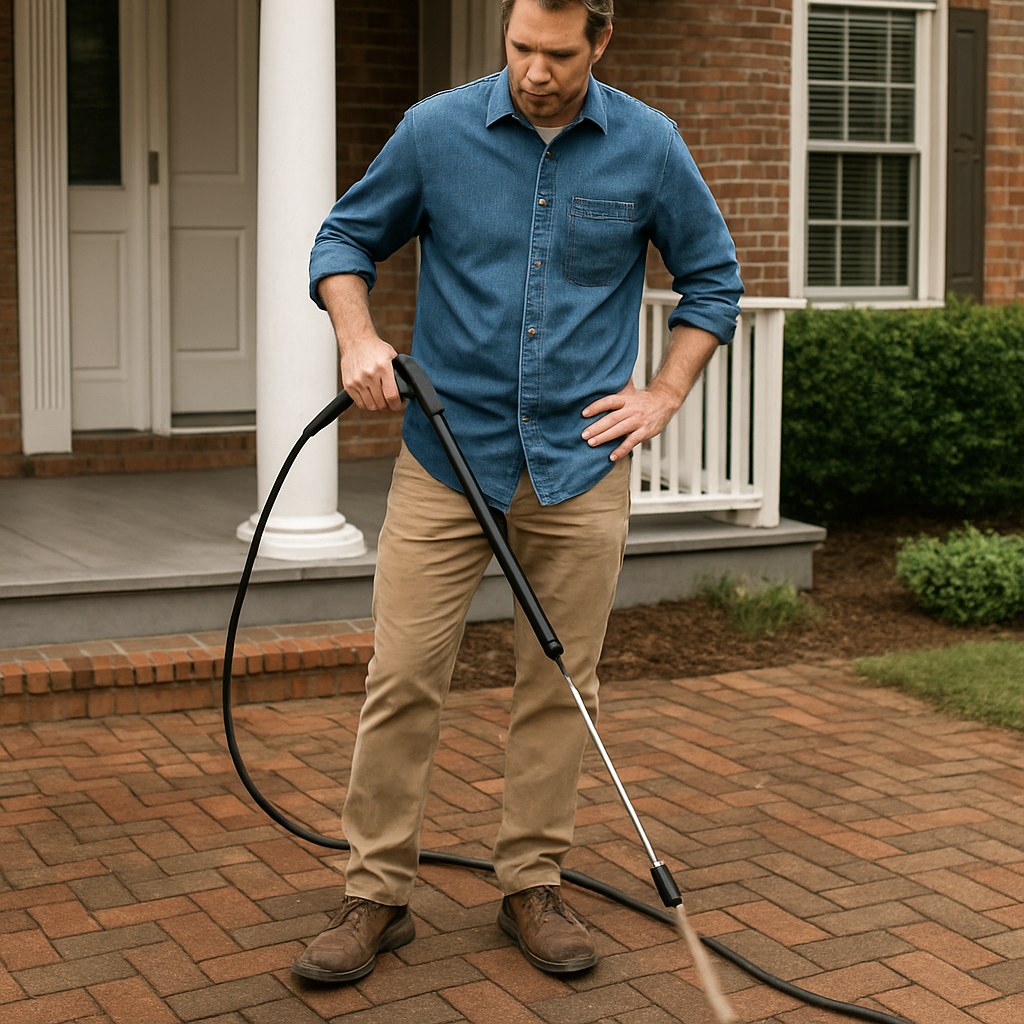
Step 1: Assess the Surface and Choose the Right Pressure Washer
First thing’s first – you’ve got to know what you’re cleaning. A brick driveway, a cedar deck, and vinyl siding each react differently when you crank up the pressure. That’s why the assessment step feels a bit like a quick medical check‑up for your home’s exterior.
Grab a flashlight and walk the perimeter. Look for obvious stains, mildew patches, and any cracked or flaking paint. Note where water tends to pool – that’s a red flag for mold growth. In my experience, a simple “spot test” with a garden hose can reveal hidden issues, like soft wood that’s started to absorb water.
Once you’ve mapped the terrain, it’s time to match the machine. Pressure washers come in two main flavors: electric (generally 1,300–2,000 PSI) and gas‑powered (2,500–4,000 PSI or more). Electric units are lightweight and perfect for delicate surfaces like vinyl siding or painted wood. Gas models deliver the muscle you need for concrete driveways, stubborn oil stains, or heavily soiled stone.
Here’s a quick decision tree:
Wood deck or painted trim:stay under 1,500 PSI, use a 25‑degree nozzle.
Brick, concrete, or pavers:2,500–3,000 PSI works well, 15‑degree nozzle for deep grime.
Roof shingles or stucco:opt for a soft‑wash system (low pressure, biodegradable detergent) – professional pressure washing services often use this approach.
Don’t forget the nozzle tip. A wider 40‑degree tip spreads the water, reducing impact – ideal for fragile surfaces. A tighter 0‑degree “pencil” tip concentrates force, great for spot‑cleaning oil spots on a garage floor. Swapping tips is cheap, but it makes a massive difference in results.
Now, let’s talk water temperature. Warm water helps dissolve grease and sap, but hot water can warp some plastics. Most homeowners are fine with cold water for routine cleaning; just pre‑soak stubborn stains with a biodegradable cleaner first.
Before you fire up the machine, protect the surrounding landscape. Cover nearby plants with a tarp, and shut off any exterior electrical outlets. This is the moment to pull out that LGFMH Construction Roofing checklist we keep on the truck – a quick reminder that safety always comes first.
Ready for the real test? Pick a hidden corner, set the pressure to the lowest recommended PSI, and spray a 12‑inch square. If the paint lifts, you’re too aggressive. If the grime stays, crank it up a notch. This trial run saves you from costly repairs later.
Pro tip: many pressure‑washer manufacturers publish a PSI‑to‑GPM chart. Aim for a balance of pressure (PSI) and flow (GPM) that matches the surface. A 2,800 PSI, 2.5 GPM unit is a sweet spot for most residential tasks.
Finally, remember that the right machine isn’t a one‑size‑fits‑all. If you’re juggling a deck, a driveway, and a siding job in one day, consider renting a dual‑pressure system that lets you dial the PSI up or down on the fly. Rental centers often have knowledgeable staff who can walk you through the settings.
Bottom line: assess, match, test, and protect. Follow those steps, and you’ll avoid the common mishap of stripping paint or gouging wood. When you get it right, the difference is night‑and‑day – a fresh‑look that makes the whole house feel new again.
Step 2: Prepare the Area and Safety Precautions
Before you even twist the trigger, think of the workspace as a stage where every prop needs to be in the right place – otherwise you’re setting yourself up for a slip, a spray where it shouldn’t go, or a busted window.
Clear the perimeter
Start by moving patio furniture, potted plants, and any loose décor at least three feet away from the wall you’ll be washing. In a recent job on a suburban deck, we tucked a set of garden chairs under a tarp and saved a brand‑new teak set from water spots and detergent stains.
Next, sweep away debris, leaves, and oil slicks from walkways. A clean floor not only looks professional, it prevents the high‑pressure stream from turning a simple slip into a painful tumble.
Protect what can’t move
Windows, doors, and any exterior electrical outlets need a good seal. We like to run a bead of silicone‑based caulk around window sills and tape over outlet covers – a cheap step that stops water from seeping inside where it can damage wiring or ruin drywall.
If you have delicate landscaping, drape plastic sheeting or drop cloths over shrubs and flower beds. Matt The Driveway Guy notes that covering plants “prevents chemicals from harming foliage” and makes cleanup a breeze commercial pressure washing checklist.
Gather the right safety gear
Pressure washers are basically a high‑velocity hose that can launch water and debris at 2,000 psi or more. That’s why you need personal protective equipment (PPE). A pair of slip‑resistant boots, safety glasses with side shields, hearing protection, and waterproof gloves are non‑negotiable.
According to Hotsy’s PPE guide, wearing a full‑face shield reduces the risk of eye injury by 70 % and a sturdy apron protects your skin from hot‑water burns and chemicals pressure washing personal protective equipment.
Don’t forget to test your power source. Plug the washer into a grounded outlet, flip the circuit breaker, and use a ground‑fault circuit interrupter (GFCI) to avoid electrical shocks.
Set up a safety perimeter
Mark the work zone with caution tape or cones. Let anyone walking nearby know that the area is active – a quick “Heads up, I’m pressure washing the side today” can keep kids and pets out of harm’s way.
If you’re on a multi‑unit property, post a short notice at the entrance with the start time and estimated finish. That little communication step cuts down on complaints and prevents accidental trespass.
Check the weather
Windy days turn a focused spray into an unpredictable mist that can land on freshly cleaned surfaces, re‑depositing dirt. Aim for calm, dry conditions; temperature between 50‑80 °F is ideal because the water won’t freeze on metal fixtures and you won’t have to battle condensation.
In the humid summer of Virginia Beach, we’ve seen a 15 % increase in runoff when we scheduled washes after a rainstorm. Waiting 24 hours for the surface to dry gives you a cleaner finish and fewer water‑damage concerns.
Final walkthrough before you start
Do a quick visual scan: Are all tarps secured? Is the power cord coiled away from the spray path? Is the nozzle tip the right degree for the material? If anything feels off, pause and fix it – the extra minute now saves hours of rework later.
When everything’s set, fire up the machine on low pressure, do a 12‑inch test spot, and then move on to the full job. With the area prepped and safety locked down, you’ll enjoy a smooth, damage‑free pressure washing experience that leaves your home looking brand new.
Step 3: Apply Detergent and Pre‑Wash Techniques
Now that you’ve cleared the area and double‑checked safety, it’s time to let the chemistry do the heavy lifting. Think of detergent as the quiet partner that breaks down grime while the pressure washer just rinses it away.
Why pre‑wash matters
If you’ve ever tried to scrub a stubborn oil stain with just water, you know the frustration. A good pre‑wash softens the bond between dirt and the surface, cutting the amount of pressure you need and protecting delicate materials.
In our experience in Virginia Beach, a 10‑minute dwell time with a biodegradable cleaner reduced the need for a second pass on a vinyl siding job by about 30 %.
Choosing the right detergent
Not all soaps are created equal. Look for a detergent that is specifically labeled “pressure‑washer safe” and biodegradable – it won’t harm your landscaping or the local waterway. A common mix is 1 cup of a concentrated surfactant per 5 gal of water. If you’re dealing with mildew, add a teaspoon of household bleach (but only on non‑porous surfaces).
For car enthusiasts, CleanTools recommends a foam‑cannon friendly soap that produces thick “snow‑foam” – it clings to the paint long enough to lift grime without scratching the clear coat. You can read more about that approach in their car‑wash guide .
How to get detergent into the washer
There are three ways most pros get soap onto the surface: downstream injection, X‑jetting, or direct application with a garden‑sprayer. Downstream injectors are the most popular for residential jobs because they keep the detergent separate from the pump until the water exits the wand, which protects the pump from corrosive chemicals.
The basic steps are:
Turn off the washer and relieve pressure.
Locate the small cap on the detergent tank (often near the pump).
Pour the pre‑measured soap into the tank, replace the cap, and secure it.
Re‑pressurize the machine, then switch the selector to “detergent” mode – most units have a green knob or a separate hose.
If your unit doesn’t have a built‑in tank, a handheld pump sprayer works fine for small jobs. Just spray the solution onto the surface, let it sit, then switch back to plain water.
One community member on Pressure Washing Resource broke down the process step‑by‑step and confirmed that a 2.3 GPM injector on a 4 GPM washer provides a nice balance of coverage and pressure in their forum thread .
Application technique
Start at the top of the wall or deck and work downward. Spray the detergent in a sweeping motion, overlapping each pass by about 25 %. This ensures no spot is missed and the foam stays wet longer.
Let the solution dwell for 5–10 minutes. During that time, you can gently mist the area with a low‑pressure setting to keep the foam from drying out – especially on hot, sunny days.
Here’s a quick checklist you can run through before rinsing:
Is the foam still glossy and covering the entire area?
Do any stubborn patches need a second light coat?
Are nearby plants still protected by your tarp?
Rinse and evaluate
Switch the washer back to plain water and increase the pressure just enough to lift the loosened dirt without blasting the surface. A 1,200 PSI setting works well on vinyl siding; for tougher concrete, you can go up to 2,500 PSI but keep the nozzle at 25 degrees to spread the force.
After the first pass, step back and look for any lingering streaks. If you see a faint residue, a second low‑pressure rinse will usually take care of it.
And that’s the sweet spot – you’ve let the detergent do the grunt work, then you’ve rinsed it away cleanly, leaving a surface that looks like it just got a fresh coat of paint.
Give it a try on your next driveway or deck, and you’ll notice how much less elbow grease is required. The key is patience during the dwell time and using the right amount of soap – too much can leave a film, too little won’t break down the grime.
Bottom line: a well‑executed pre‑wash with the right detergent cuts time, protects surfaces, and makes your pressure‑washing results look professional.
Step 4: Power Wash Techniques and Best Practices
Pick the right nozzle, then let the physics do the work
When you swap out the tip on your wand, you’re not just changing a plastic piece – you’re dialing the pressure, the flow, and the spray pattern all at once. A 25‑degree fan spreads the water, making it kinder on wood or vinyl, while a 0‑degree “pencil” concentrates the force for stubborn oil spots on a garage slab.
One of the most common questions I hear is how the weird numbers on a nozzle box translate to real‑world pressure. The community thread on Pressure Washing Resource breaks it down: the first two digits describe the spray angle (0540 = 5°), and the last two digits tell you the orifice size – a "40" means a 4.0 mm opening, which pairs nicely with a 4 GPM pump. Pressure washing nozzle guide Matching orifice size to your machine’s GPM prevents you from over‑loading the pump and keeps the PSI where you expect it.
Set the pressure for the material, not the mess
Here’s a quick mental cheat sheet: wood decks and painted trim stay under 1,500 PSI with a 25° tip; brick, concrete, and pavers handle 2,500–3,000 PSI with a 15° tip; delicate stucco or roof shingles get a soft‑wash system – low pressure, high‑foam detergent.
In practice, I like to start low, do a 12‑inch test patch, and watch the surface react. If the paint lifts, you’re too aggressive. If the grime stays put, crank the PSI up a notch. This “test‑first” habit saved a homeowner last summer from peeling the paint on his cedar fence.
Mind the dwell time and water flow
Even the best nozzle can’t compensate for a rushed job. After you’ve sprayed detergent, let it sit for 5–10 minutes – that’s the chemistry doing the heavy lifting. A gentle mist at low pressure keeps the foam from drying out on a hot day.
When you switch back to plain water, increase the pressure just enough to lift the soil without etching the surface. A good rule of thumb is to stay within the manufacturer’s recommended PSI‑to‑GPM ratio; you’ll see a cleaner finish and use less water.
Real‑world example: driveway vs. deck
On a 600‑sq‑ft concrete driveway, I used a 15° tip, 3,000 PSI, and 2.8 GPM. The first pass removed the oil stains, the second low‑pressure rinse wiped them clean. Total water use? About 120 gallons – roughly a third of what a garden hose would have soaked the same area.
Switch to a wooden deck, and the same machine with a 25° tip, 1,200 PSI, and 1.5 GPM did the trick. Because the flow is lower, the foam lingered longer, so I could let it dwell without worrying about runoff.Quick checklist before you fire up the wandChoose nozzle angle and orifice size that matches your PSI and GPM.Do a 12‑inch test patch at the lowest setting.Apply detergent, let it dwell 5–10 minutes, mist if needed.Rinse with a slightly higher pressure, keeping the nozzle at the same angle.Step back, inspect for streaks, and repeat a low‑pressure pass if necessary.Compare common nozzle setupsSurfaceNozzle tip (angle / orifice)Recommended PSITypical GPMVinyl siding25° / 401,200–1,5001.5–2.0Concrete driveway15° / 402,500–3,0002.5–3.0Wood deck (painted)25° / 401,000–1,2001.2–1.8Those numbers aren’t set in stone, but they give you a solid baseline. If you stray outside the range, you risk either under‑cleaning (leaving grime) or over‑pressuring (damaging the surface).Final tip: work in sections, keep it movingStart at the top of any wall or deck and sweep downward. Gravity does half the job, pulling the dirty water away from the area you just cleaned. Overlap each pass by about 25 % so you don’t miss a spot – it feels a little redundant, but the finish looks professional.And remember, the goal isn’t to blast everything into oblivion; it’s to lift the dirt enough that a gentle rinse wipes it away. Follow the checklist, respect the nozzle‑pressure combo, and you’ll get that showroom shine without a single surface scar.Step 5: Rinse, Inspect, and Post‑Cleaning CareOkay, the soap has sat, the grime has softened, and you’re ready for the part that makes everything look like you actually own a professional‑grade pressure washer. A good rinse isn’t just about blasting water off the surface – it’s about flushing out every last speck of detergent, lifting the loosened dirt, and leaving the material dry enough to inspect without a second‑guess.Rinse with the right pressureTurn the selector knob to plain water and dial the PSI up just a notch higher than the pre‑wash setting. For vinyl siding, 1,300–1,500 PSI works great; for a concrete driveway, 2,200–2,500 PSI is enough to clear the suds without gouging the concrete. Keep the same nozzle angle you used for washing – the pattern stays consistent, so you won’t create streaks.If you’re looking for a concrete example of an “effective rinse technique,” the car‑care folks at Turtle Wax explain why a low‑pressure pre‑rinse followed by a higher‑pressure final rinse prevents soap residue on a clear coat . The same principle applies to house siding: start gentle, finish strong.Remember to keep the wand moving. A stationary stream will etch the surface, especially on softer materials. Overlap each pass by about 25 % and work from the top down, letting gravity pull the runoff away from the area you just cleaned.And here’s a little habit that saves time later: as you finish each 10‑foot section, give it a quick visual once‑over before moving on. If you spot a dribble of foam or a lingering streak, a short low‑pressure blast will wipe it clean before it dries.Quick inspection checklistWhen the water runs clear, step back about three feet and scan the whole area. Look for three tell‑tale signs:Streaks or soap films – they’ll appear as rainbow‑like sheens in the light.Missed spots – any darker patches usually mean the detergent didn’t reach.Water‑marks on adjacent trim or windows – a sign you’re spraying too close.If any of those pop up, swing the wand back over the spot with a 25‑degree tip at a lower PSI. It’s easier to fix now than to sand or repaint later.Pro tip: grab a white sheet of cardboard and hold it up against the wall. The way the light reflects will instantly reveal hidden streaks you might miss with the naked eye.Drying and protecting the surfaceOnce you’re satisfied with the rinse, let the surface air‑dry for 10–15 minutes. In humid climates, a leaf blower or a garden‑sized air mover can speed up the process and prevent water spots on glass or metal.After it’s dry, consider a light protective coating. For decks and painted wood, a quick wipe‑on sealant adds a moisture barrier. For concrete, a breathable sealant helps repel future oil stains without trapping water.And if you’re in a region that sees a lot of rain, a post‑wash sealant is the secret sauce that keeps the freshly cleaned look lasting longer.After‑wash maintenance tipsEven the best rinse can be undone by neglect. Schedule a light sweep or leaf‑blower pass every week to keep debris from settling. If you notice a fresh oil spot on a driveway, a quick spot‑clean with a low‑pressure spray and a biodegradable degreaser will prevent it from soaking in.For sidewalks, the folks at Cutting Edge Window Cleaning Services suggest a periodic sealant application to lock in the clean and protect against grime buildup. The same idea works for any exterior surface you’ve just pressure‑washed – a little maintenance now saves a full‑blown wash later.Finally, keep a log. Jot down the date, PSI, nozzle tip, and any observations (like “stubborn algae on north‑facing wall”). Over time you’ll spot patterns, adjust your settings, and become the pressure‑washing pro your neighborhood envies.Bottom line: a thorough rinse, a meticulous inspection, and a bit of post‑care are the three pillars that turn a decent wash into a showroom‑ready shine. Follow these steps, and you’ll walk away with a surface that looks like it just stepped off a home‑improvement magazine – without a single scratch.ConclusionSo you’ve walked through every step—from sizing the right washer to sealing the surface after the rinse. If any part felt fuzzy, just remember the three pillars: assess, apply, protect.Think about the last time you stared at a grimy deck and imagined it sparkling. That feeling of pride is exactly what a proper pressure washing job delivers, and you don’t need a pro crew to get there.Here’s a quick cheat sheet you can pin to the garage: test a hidden spot, use the lowest effective PSI, let detergent dwell, rinse with a slightly higher pressure, then seal. A one‑minute glance at your log will remind you what worked and what to tweak next season.And if you ever catch a stubborn oil stain or algae patch, go back to the basics—lower the pressure, switch to a 0‑degree tip for spot‑cleaning, and rinse fast. You’ll avoid the “oops‑I‑scratched” regret.Ready to make your home look showroom‑ready? Grab your washer, follow the routine, and enjoy that fresh‑clean glow every time you pull into the driveway.If you ever hit a wall—like persistent mildew on a north‑facing wall—or just want a second opinion, our team at LGFMH Construction can walk the job with you, suggest tweaks, and even handle the sealant step so you keep that fresh look year after year.FAQHow often should I pressure wash my home’s siding?In most climates a good wipe‑down every 12‑18 months keeps mold, pollen, and grime from building up. If you live near the coast or have lots of trees, you might bump it up to once a year. The key is to watch for streaks or a “musty” look – that’s your cue that the surface is begging for a rinse.What PSI is safe for wood decks without damaging them?Stick under 1,500 PSI and pair it with a 25‑degree tip. Start on the lowest setting, spray a 12‑inch test patch, and watch the wood grain. If the paint lifts or the wood fibers look rough, drop the pressure a notch. A gentle approach protects the finish and lets the deck shine for years.Can I use regular dish soap as a detergent for pressure washing?Most dish soaps are too harsh for the pump and can leave a film on the surface. If you’re in a pinch, a tiny splash of mild car‑wash soap mixed with water works, but rinse thoroughly to avoid streaks.How do I prevent water from getting into my windows and doors while washing?Mask the openings with painter’s tape and a bead of silicone caulk, then cover the frames with plastic sheeting. A quick “wiggle” test with a hose will tell you if any water is seeping in. After the job, pull the tape off while the surface is still wet so you don’t trap moisture.What’s the best way to tackle oil stains on a concrete driveway?First, sprinkle a generous layer of cat litter or sawdust to absorb fresh oil. Then apply a biodegradable degreaser, let it sit 5‑10 minutes, and pressure wash at 2,500‑3,000 PSI with a 15‑degree tip. A second low‑pressure rinse often lifts the remaining ghost of the stain.Should I pressure wash before or after applying a sealant?Always wash first. The sealant needs a clean, dry surface to bond properly. After you’ve rinsed and let the area air‑dry for about 15‑20 minutes (or use a leaf blower in humid weather), apply the sealant according to the manufacturer’s directions. Skipping the wash will trap dirt under the coating and ruin the finish.How can I safely pressure wash when I have pets or kids nearby?Set up a clear perimeter with caution tape or cones and keep the water stream pointed away from play zones. Let the little ones know it’s “work time” and give them a fun side‑task like handing you the tarp. A quick walk‑around before you start makes sure no curious paws wander into the spray zone.Additional ResourcesLooking for a next step after you’ve rinsed and inspected? A quick checklist can keep your driveway or deck shining for months.First, jot down the PSI, nozzle tip, and any stubborn spots you noticed. That simple log helps you tweak settings next time and avoids over‑pressurizing delicate wood.Second, consider a breathable sealant – it repels oil, prevents algae, and lets water drain without trapping moisture. A light coat after the surface dries is all you need.Third, schedule a seasonal walk‑through. Spot a fresh oil drop or a patch of mildew early, and you can spot‑clean with a low‑pressure spray instead of a full wash.And if you ever feel stuck, the LGFMH Construction team is just a call away to walk you through the right settings or recommend a pro‑grade sealant.So, what’s the easiest habit you can add today? Grab a notebook, note your pressure‑washing specs, and you’ll see the difference next time you fire up the washer.


Comments