Essential Siding Guide: Choose, Install, and Maintain the Best Exterior for Your Home
- William McKracherne
- Jan 4
- 17 min read

Picture this: you pull up to your house after a long day, and the first thing that catches your eye is the siding—weather‑worn, peeling, maybe a few cracks where the wind has taken its toll. It’s the skin of your home, and when it looks tired, the whole place feels off.
Does that feeling ever make you wonder if you could have done something sooner? Maybe you’ve shrugged it off, thinking a fresh coat of paint will solve everything, but deep down you know the damage might be more than surface‑level.
We get it. Homeowners often stand at the crossroads of “just paint it” and “call a pro,” and the uncertainty can be paralyzing. That’s why we’re starting this guide with a simple promise: by the end, you’ll know exactly how to read the signs your siding is sending you, and which steps will actually protect your home for years to come.
First, let’s talk about the emotions that come with siding problems. It’s not just about curb appeal; it’s the anxiety of water seeping into walls, the dread of costly repairs, and the frustration of watching your investment fade.
Imagine you’re sipping coffee on the porch, and a sudden drip from a cracked panel interrupts your peace. You’d rather enjoy the view than chase leaks, right? That tiny crack is often a symptom of larger issues like moisture buildup or improper installation.
In our experience at LGFMH Construction, the most common mistake we see is waiting until the damage is obvious—rot, mold, or warped panels before taking action. A quick visual inspection each season can catch trouble early and save you a bundle.
So, what’s the game plan? We’ll walk you through how to assess siding condition, choose the right materials for Virginia Beach’s salty air, and tackle maintenance without breaking the bank.
Ready to stop guessing and start fixing? Let’s dive in and give your home the protection it deserves.
TL;DR
This guide shows you how to spot early siding warnings, decode cracks, moisture stains, and warping before they become costly repairs. Follow our step‑by‑step inspection checklist, material recommendations for Virginia Beach’s salty air, and maintenance tips so your home stays protected for years and avoid unexpected headaches and peace of mind.
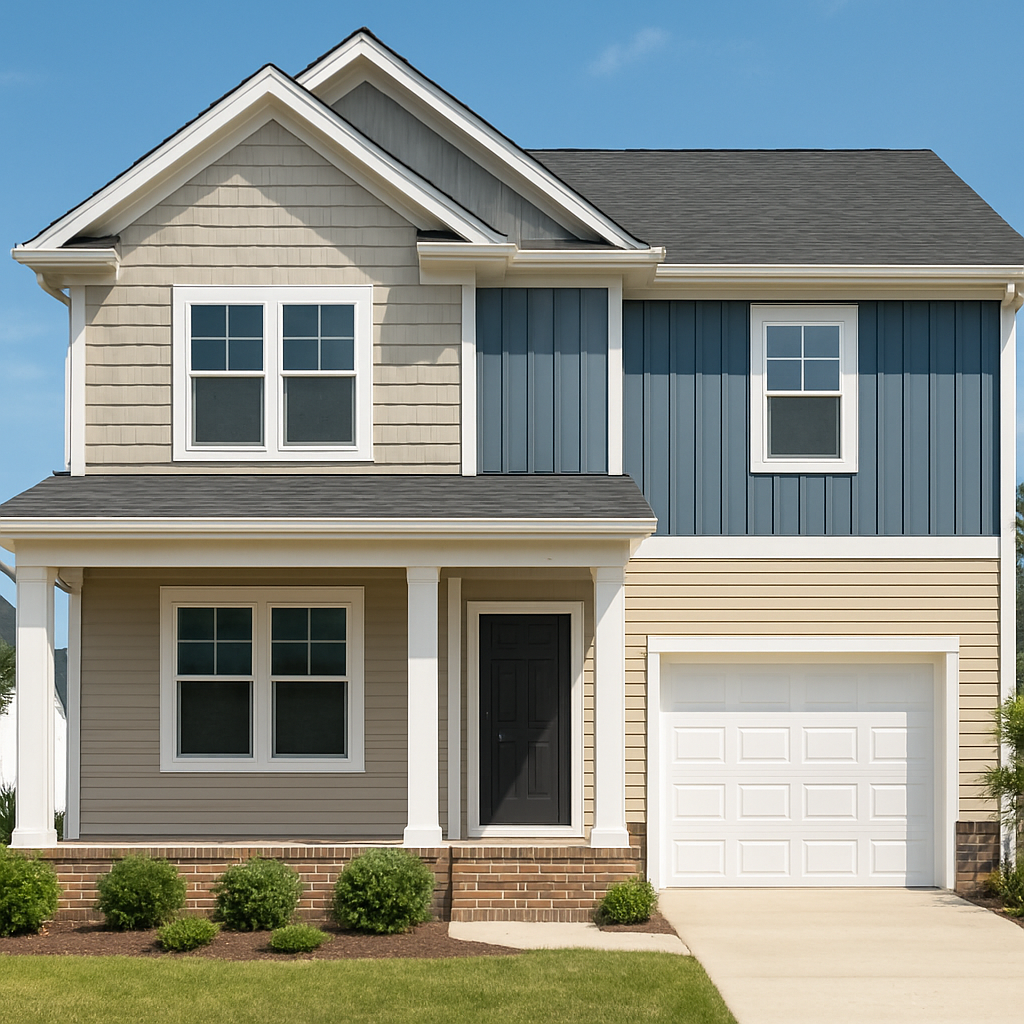
Understanding Different Types of Siding Materials
When you start looking at siding options, it can feel like standing in front of a candy store with too many flavors. The good news? Each material has a personality, a set of strengths, and a few quirks. Knowing those can save you from a future headache – and maybe a few extra bucks.
Vinyl – the budget‑friendly workhorse
Vinyl siding is the go‑to for homeowners who want a decent look without breaking the bank. It’s lightweight, comes in a rainbow of colors, and resists rot out of the box. The downside? It’s not the toughest kid on the block – hail, baseballs, or even a stray branch can dent it.
Action step:Walk around the property and note any high‑impact zones (near trees, garages, or play areas). If you see a lot of potential impact, consider a higher‑grade vinyl or an alternative material for those sections.
Insulated Vinyl – a tiny upgrade with big payoff
Think of insulated vinyl as vinyl with a built‑in sweater. The foam backing adds R‑2 to R‑5 of insulation, which can shave a few dollars off your heating bill each year. It also makes the panels a bit more rigid, so they’re less likely to warp in hot Virginia Beach summers.
Action step:Use a simple energy calculator (you can find free ones online) to estimate how much you’d save with an extra R‑value. If the projected savings cover the modest price bump, insulated vinyl is a win.
LP SmartSide (engineered wood) – the paint‑able performer
Engineered wood, like LP SmartSide, gives you the warmth of real wood without the constant sanding and staining. It’s treated to resist moisture and insects, and manufacturers back it with a 50‑year warranty. The big perk? You can repaint it whenever you crave a fresh look.
Action step:If you love changing your curb appeal with seasonal colors, schedule a paint‑touch‑up every 5‑7 years and note the cost. Compare that to the long‑term warranty to see if the upfront price makes sense.
Fiber Cement – the tough‑as‑nails hybrid
Fiber cement blends cement, sand, and cellulose fibers into a panel that mimics wood, stucco, or brick. It stands up to wind, rain, and even fire better than most other options. It’s a bit heavier, so professional installation is recommended.
Action step:Ask your contractor to check the framing – fiber cement adds about 5‑10 pounds per square foot. Make sure the wall studs can handle the extra weight without reinforcement.
Hardie Board – the premium fiber cement
Hardie Board is essentially the upscale cousin of generic fiber cement. It’s painted in‑house for color consistency and comes with a 30‑year warranty. Homeowners love it because it looks like real wood but lasts longer.
Action step:Pick a color you truly love. Since repainting is a bigger job than with vinyl, you’ll want a shade you can live with for a decade or more.
Composite Everlast – the “set‑and‑forget” option
Everlast composite siding is made from crushed rock, polymers, and resins. It’s incredibly dense, so dents are rare, and the manufacturer offers a lifetime guarantee for as long as you own the home. The trade‑off? Color choices are more limited.
Action step:If you’re set on a specific hue, ask the supplier for a custom sample before committing. That way you avoid surprise mismatches later.
Natural Wood – classic charm, high maintenance
Nothing beats the grain of real wood for curb appeal. Cedar, pine, and cypress can look stunning, especially when stained or painted. But wood drinks moisture, so you’ll need to seal it every few years and watch for rot or insects.
Action step:Create a maintenance calendar: seal in spring, inspect for pests in fall, and plan a full repaint or restain every 5‑7 years.
Metal – the industrial heavyweight
Metal siding (steel or aluminum) is the ultimate durability champion. It’s fire‑resistant, won’t rot, and can be recycled at the end of its life. The main concerns are rust (for steel) and dents (for aluminum).
Action step:Choose a pre‑finished, zinc‑coated steel if you’re near the salty air of Virginia Beach. The coating adds a protective barrier against corrosion.
Brick & Stone Veneer – the timeless look without the weight
Real brick is heavy and expensive, but brick veneer gives you the same aesthetic with lighter panels. Stone veneer does the same for stone. Both are low‑maintenance once installed, though the mortar joints may need occasional repointing.
Action step:Walk the neighborhood and note any visible mortar cracks. If you see a pattern, ask your installer how often they recommend repointing for the chosen veneer.
Choosing the right siding isn’t just about price tags; it’s about matching the material to your lifestyle, climate, and how much upkeep you’re willing to do. Take a notebook, list your top three priorities (cost, durability, style), and use the steps above to rank each material. That simple matrix can turn an overwhelming decision into a clear path forward.
Bottom line: there’s a siding type for every homeowner. Whether you gravitate toward the low‑maintenance charm of fiber cement or the paint‑able flexibility of engineered wood, understanding the pros, cons, and real‑world steps will keep your home protected and looking great for years.
How to Choose the Right Siding for Your Home
Choosing siding feels a lot like picking a new coat for your favorite jacket – you want something that looks good, feels right, and can survive the weather you throw at it. The first thing to ask yourself is: what’s the biggest headache you’re trying to avoid? Leaky walls, endless repainting, or maybe the fear of a hurricane ripping panels off?
In our experience at LGFMH Construction, the most common mistake is focusing only on price and forgetting how the material behaves in Virginia Beach’s salty air. A cheap vinyl panel might look great today, but a few months later you could be chasing water stains behind it.
1. Map Your Priorities with a Simple Matrix
Grab a piece of paper and draw a three‑by‑three grid. Across the top, writeCost, Durability, Style. Down the side, list the siding types you’re eyeing – vinyl, insulated vinyl, engineered wood, fiber cement, metal, etc. Rate each material 1‑5 for every criterion. The highest total wins, but also pay attention to any low scores that could bite you later.
Tip: If you’re budgeting tight but still need durability, give fiber cement a boost in the durability column – it often outperforms cheaper options in the long run.
2. Test the Climate Fit
Virginia Beach sits on the Atlantic, so think salt spray, humidity, and occasional hurricanes. Materials that resist moisture and corrosion will save you headaches. For example, James Hardie fiber cement durability is engineered to withstand rain, wind, and even fire, making it a solid choice for coastal homes.
Ask yourself: does the siding need a protective coating? Steel‑based metal siding should be zinc‑coated to fend off rust. Engineered wood benefits from a water‑resistant barrier.
3. Check Installation Weight and Structural Capacity
Heavier panels like fiber cement add 5‑10 lb per square foot. That sounds small until you realize it can stress older framing. Have a contractor inspect the studs; sometimes a simple reinforcement solves the problem.
Real‑world example: A family in Chesapeake swapped vinyl for Hardie board. After checking the wall framing, the builder added extra blocking – a small step that prevented future sagging.
4. Factor in Maintenance Commitment
How much time do you want to spend on upkeep? Natural wood looks amazing but demands resealing every few years. Vinyl is virtually maintenance‑free but may need replacement sooner. Metal lasts decades but can dent.
Action step: Write a 12‑month calendar. Mark when each material would need inspection – e.g., “spring: check for rust on metal panels.” If the calendar feels overwhelming, you probably chose a high‑maintenance option.
5. Visualize the End Result
Take a smartphone, walk around your neighborhood, and photograph homes you admire. Note the siding material, color, and any visible wear. Then, use an online visualizer (many manufacturers offer one) to see that same hue on your own house.
One homeowner I helped loved the warm tone of cedar but worried about rot. We swapped to a wood‑grain fiber cement that gave the same vibe without the upkeep. He now enjoys the look and peace of mind.
Watching a quick video on siding options can clarify the subtle differences between textures – a good visual aid before you commit.
6. Leverage Professional Insight
Even with a solid matrix, a seasoned installer can spot red flags you miss. At LGFMH Construction we often run a free on‑site assessment. During that visit we’ll point out hidden moisture pockets, suggest the best flashing details, and even give you a cost‑breakdown for the top three choices.
If you’re ready to dive deeper, check out our Siding Repair Virginia Beach: A Practical Guide… for step‑by‑step inspection tips and maintenance tricks.
So, what’s the next move? Grab that matrix, walk the block, and schedule a quick consult. Within a weekend you’ll have a clear picture of the siding that matches your budget, style, and the salty breezes of the coast. The right choice today means fewer repairs tomorrow.
Step-by-Step Installation Process for Vinyl Siding
Imagine you’re standing on your porch, tape measure in hand, and the old siding is ready to come off. It feels a little intimidating, but the good news is vinyl siding is designed to be DIY‑friendly when you follow a solid plan.
So, what does a smooth install look like? Below is a walk‑through that breaks the job into bite‑size actions you can tackle on a weekend, plus a few insider tips we’ve picked up at LGFMH Construction.
1. Prep the Existing Wall
First, clear the area. Remove any loose panels, trim, and old caulk. A quick sweep with a shop‑vac gets rid of dust that could interfere with the new barrier. If you spot rot or water damage, patch it now – skipping this step is the fastest way to end up with new leaks later.
Real‑world example: A family in Norfolk found a small water stain behind their vinyl after a summer storm. By sealing the underlying sheathing before reinstalling, they avoided a repeat repair that would have cost twice as much.
2. Gather Tools & Materials
Here’s a checklist you can print out:
Vinyl siding panels (order 5‑10% extra for waste)
Weather‑resistant house wrap (Tyvek or equivalent)
Nails with a large head (12‑gauge, 1‑1/4" to 1")
J‑channel, starter strip, and corner trim
Level, chalk line, circular saw with a fine‑tooth blade
Measuring tape, utility knife, safety glasses
Tip: Use a cordless drill with a nail gun attachment if you have one – it cuts install time in half.
3. Install the Weather‑Resistant Barrier
Roll out the house wrap from the bottom up, overlapping each row by about 6 inches. Secure it with staples, then seal the seams with waterproof tape. This barrier is the unsung hero that keeps moisture out while allowing the wall to breathe.
In our experience, homes that skip the wrap see premature panel warping within a year, especially in Virginia Beach’s salty air.
4. Set Up the Starter Strip
Attach the starter strip along the bottom edge of the wall, using a level to ensure it’s perfectly straight. This strip sets the slope for water runoff; a slight 1/4" drop away from the house is ideal.
Imagine you’re lining up a row of books – if the first one is crooked, the whole shelf looks off. The same principle applies to siding.
5. Cut and Fit Panels
Measure the height of each wall, then cut panels with a circular saw, leaving a 1/8" gap at the top for expansion. When you reach windows or doors, use a jamb extension piece to keep the panel flush.
Real‑world scenario: One client had a bay window with an odd angle. By snapping a piece of the panel over the jamb and trimming it on the field, we saved a full panel and kept the look seamless.
6. Nail and Level the Panels
Start at the left corner and work your way right. Nail each panel about 12" apart, driving the nail just enough to indent the lip without piercing the siding’s hollow core. Check each panel with a level before moving on; a few minutes of double‑checking prevents a wavy façade.
Pro tip: If you hear a “ping” when you tap the panel, it’s probably too loose – add another nail.
7. Install J‑Channels and Trim
Once the main field is up, snap on J‑channels around windows, doors, and the roofline. Cut the trim pieces to fit, then nail them in place, sealing the seams with a silicone caulk that’s UV‑stable.
A homeowner in Virginia Beach asked why we bother with the extra trim. The answer? It protects the edges from wind‑driven rain, which is the #1 cause of water infiltration on vinyl homes.
8. Final Inspection & Clean‑Up
Walk the perimeter with a flashlight. Look for any gaps, uneven panels, or loose nails. Give the whole house a gentle rinse with a garden hose to wash away sawdust – this also shows you if any water is pooling behind the wrap.
If everything looks straight and dry, you’re done. Celebrate with a cold drink on the porch – you’ve just given your home a fresh skin that will last 30‑plus years with minimal upkeep.
Need a visual recap? Check out this detailed vinyl siding installation video for a quick walkthrough of each step.
Cost Comparison Table: Vinyl vs Fiber Cement vs Wood Siding
Alright, you’ve nailed the J‑channels and you’re staring at a fresh‑looking wall. The fun part now? Figuring out whether you’ve paid a fair price for that new skin.
Do you ever wonder why two neighbors with the same‑size home can end up with wildly different bills? It usually boils down to three things: material cost, labor intensity, and how often you’ll need to tend to it.
Breaking Down the Numbers
Here’s a quick snapshot from the data we trust – the Angi cost guide for vinyl vs. fiber cement and Hover’s broader siding cost breakdown for wood. Those sources give us a realistic range, not some glossy showroom figure.
Material | Avg. Installed Cost(per sq ft) | Typical Lifespan | Key Pros / Cons |
Vinyl | $2.5 – $10.75 | 20‑40 years | Lightweight, DIY‑friendly, many styles; can fade, less fire‑resistant. |
Fiber Cement | $4.5 – $11.25 | 30‑50 years | Durable, fire‑rated, mimics wood/stone; heavier, needs painting. |
Wood (natural) | $2.25 – $15 | 15‑30 years (with upkeep) | Authentic grain, high curb appeal; requires regular sealing, prone to rot. |
Notice how the price bands overlap a bit? That’s because location, labor rates, and the exact product line can swing the numbers.
What the Costs Mean for You
If you’re on a tight budget, vinyl’s lower material price and ease of installation usually keep labor under $5 per sq ft, according to Hover’s siding cost breakdown . That’s why many Virginia Beach DIY‑ers start there.
But if you’re wrestling with salty air, hurricanes, or a homeowner association that demands fire‑rated cladding, fiber cement starts to look less like a premium add‑on and more like a safeguard. The Angi guide notes an average home total of $14,870 for fiber cement versus $12,205 for vinyl, reflecting both material and the extra hands needed ( Angi’s siding cost guide ).
Wood lovers, take note: you can get a gorgeous timber look for as low as $2.25 per sq ft, but that number assumes you’ll be painting or staining every few years. Skipping the upkeep can turn a $5,000 project into a $15,000 repair down the line.
So, how do you decide?
Budget today vs. budget tomorrow:Add up material + labor + expected maintenance over 10‑15 years.
Weight & structure:Fiber cement adds 5‑10 lb per sq ft; older framing may need reinforcement.
Climate fit:In coastal zones, the extra durability of fiber cement or a properly coated metal may offset the higher upfront cost.
One practical trick: grab a spreadsheet, plug the low‑end and high‑end numbers for each material, then factor in a rough annual maintenance estimate (e.g., $0 for vinyl, $150‑$300 for wood, $100 for fiber cement repaint).
When the numbers line up, you’ll see whether a $2,000 premium now saves you $5,000‑$7,000 in future repairs. That’s the sweet spot most homeowners miss when they only look at the sticker price.
Bottom line: don’t let the headline cost dictate your choice. Look at the whole picture – material, labor, lifespan, and the little things like how often you’ll be pulling out the brush. The right siding will feel like an investment, not a gamble.
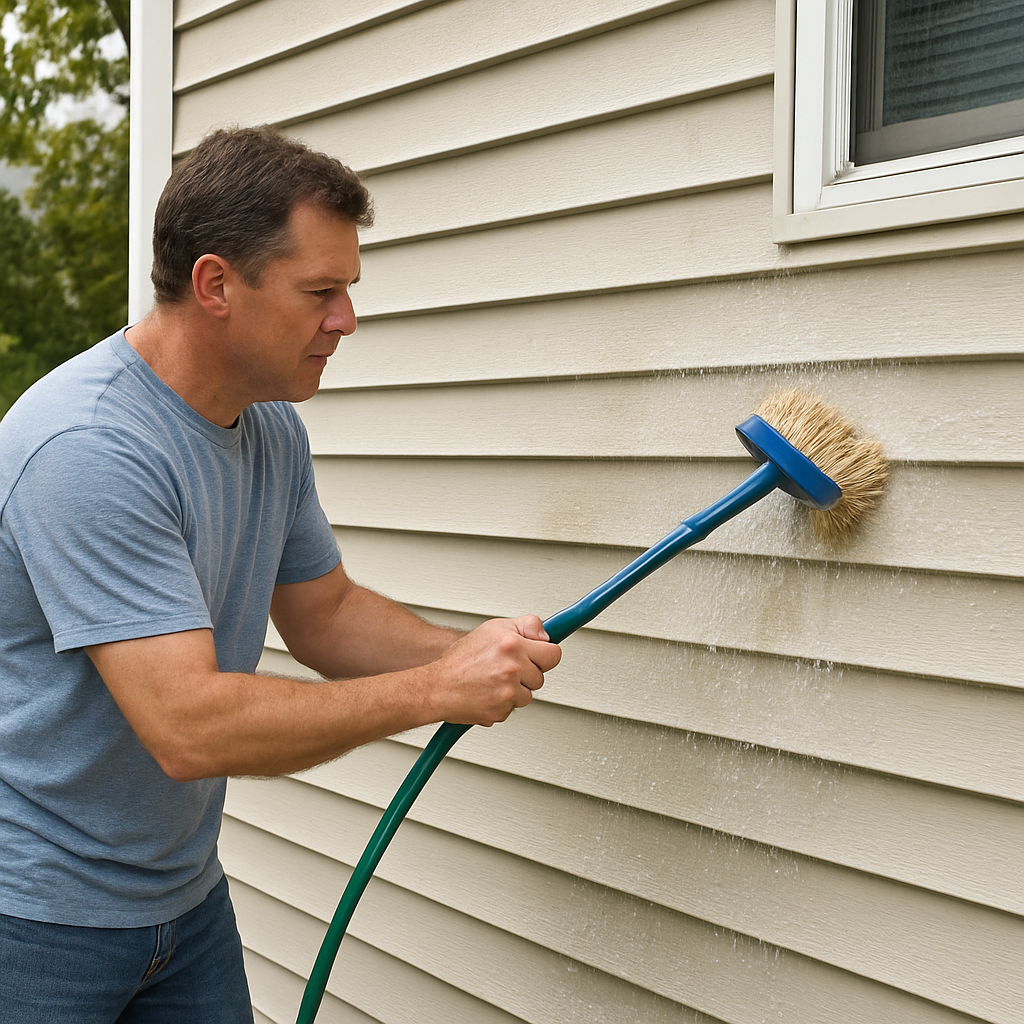
Maintenance Tips to Extend the Life of Your Siding
Ever glance at your siding after a rainstorm and wonder why a few dark streaks have appeared? You’re not alone—most homeowners notice something’s off the moment a gust of wind brings dust, pollen, or a splash of salty sea air onto the exterior.
Here’s the good news: a little routine care can keep that siding looking fresh for decades, and you don’t need a fancy contractor every season. In fact, a simple wash and a few spot‑checks are often enough to dodge costly repairs later.
Regular rinse & gentle scrub
Start with a garden hose and a low‑pressure flow. James Hardie recommends pulling the hose down the side of the house once every 6‑12 months and using a soft‑bristle (non‑metal) brush to lift grime. James Hardie cleaning recommendations stress that a gentle brush—think an All‑Paint poly brush or a horsehair bench brush—does the trick without scratching the finish.
Pro tip: work from the top down. Clean a small section, rinse, then move lower. This prevents dirty water from dripping onto areas you’ve already cleaned and leaves a streak‑free shine.
Mind the mildew and stains
If you spot green‑ish spots, that’s mildew trying to make a home. Grab a soft cloth, dip it in mild dish soap and water, and gently scrub. Don’t let the soap dry—keep the surface wet and rinse thoroughly.
For tougher mold, a mildew‑specific cleaner works, but always follow the label and wear gloves. Avoid bleach or acidic cleaners; they can eat into the coating on fiber cement or painted wood.
Seasonal checks and sealant touch‑ups
Spring is the perfect time for a quick inspection. Walk the perimeter, look for cracked caulk around windows, doors, and roof edges. If you see gaps, pull out a tube of exterior‑grade silicone and seal them before the summer humidity sets in.
Wood and engineered wood lovers, note this: a fresh coat of sealant every 3‑5 years protects against the salty Virginia Beach air. Even fiber cement benefits from a light touch‑up of the paint every decade to keep the ColorPlus technology performing at its best.
Protecting high‑impact areas
Tree branches, patio awnings, and garage doors are the usual suspects for dents or chips. Trim low branches to give panels a clear breathing space, and consider a sacrificial trim piece where a fence meets the siding. It’s a tiny extra cost that saves you from a noticeable blemish later.
And don’t forget the gutters. A clogged gutter can spill water onto the siding, leading to rot or warping. A quick scoop after each big rain keeps the water where it belongs—down the downspout.
So, what should you do next? Grab a bucket, a soft brush, and set a calendar reminder for early spring. A 15‑minute wash, a quick caulk check, and a glance at the paint’s condition will keep your home’s skin looking vibrant and, more importantly, protected.
Remember, siding isn’t a set‑and‑forget component; it’s the first line of defense against the elements. Treat it like you would a favorite pair of shoes—clean them regularly, patch up scuffs, and they’ll keep you looking sharp for years.
Conclusion
So, you've walked through every material, every cost, and every maintenance tip—how does it all fit together?
At the end of the day, siding is more than just cladding; it's the first line of defense that keeps your home dry, comfortable, and curb‑appealing.
If you’ve been wondering whether to splurge on fiber cement or stick with vinyl, remember the simple rule we’ve used with countless Virginia Beach homeowners: match the material to the climate, your budget, and the amount of time you want to spend on upkeep.
A quick checklist can seal the decision: 1️⃣ Does the material resist salty air and humidity? 2️⃣ Can your framing handle the weight? 3️⃣ Will the look stay fresh for the years you plan to stay in the house?
When those three boxes are checked, you’ve basically guaranteed a siding system that will protect you for a decade or more without surprise repairs.
And if something does slip through—like a cracked caulk or a stray branch dent—catch it early with the seasonal walk‑through we described earlier, and the fix is usually a weekend DIY or a brief call to a pro.
Think about it this way: spending a little time now is like buying insurance for your home’s skin; the payoff shows up as lower energy bills, fewer water stains, and a resale value that stands out on the block.
So, what’s the next move? Grab that matrix, set a reminder for a spring inspection, and give your siding the love it deserves.
FAQ
What signs tell me my siding needs repair?
When you’re sipping coffee on the porch and you see a dark streak or a small crack, that’s often the first whisper. Look for peeling paint, warped panels, water stains around windows, or any loose pieces that rattle in the wind. Even a faint musty smell inside the house can mean moisture has slipped behind the skin. Spotting these early lets you fix a patch instead of a whole wall later.
How often should I inspect my siding in Virginia Beach?
We recommend a quick walk‑through twice a year – once in spring after the salty breezes settle, and once in fall before the winter rains arrive. During each visit, check the caulk around openings, brush away debris, and give the surface a gentle rinse to see if any new stains appear. If you live near tall trees, add a mid‑summer glance to catch any stray branches that might have nicked the panels.
Is vinyl siding really low‑maintenance, or am I missing something?
Vinyl does a great job of resisting rot and requires only occasional cleaning, but it isn’t invincible. The material can fade under UV exposure, and sharp objects can dent it. A yearly wash with a soft brush, re‑caulking any gaps, and touching up paint‑faded areas every 5‑7 years will keep it looking fresh. Think of it like a pair of shoes – you still need to wipe them down and replace the laces now and then.
Can I switch from vinyl to fiber cement without major remodeling?
Because fiber cement is heavier – roughly 5‑10 lb per square foot – the existing framing must be able to support the extra load. In most newer homes the studs are up to the task, but older houses might need a few blocking pieces added. It’s a job best handled by a pro who can inspect the wall cavity, but the upgrade itself isn’t a full gut‑rehab, just a reinforcement step before the new panels go up.
What’s the best way to protect my siding from salt‑air corrosion?
Start with a quality house‑wrap under the siding; it acts like a breathable raincoat. For metal siding, choose a zinc‑coated steel or aluminum with a factory‑applied finish. On wood‑based products, keep the paint or sealant fresh – a fresh coat every decade does wonders. And don’t forget the gutters; a clogged gutter sends salty water right onto the panels, accelerating wear.
How much does a typical siding repair cost in our area?
Small fixes – like resealing a few inches of caulk or swapping out a cracked trim piece – usually run between $150 and $300. More involved jobs, such as replacing a whole section of panels, can climb to $1,000‑$2,500 depending on material and labor. The key is to catch issues early; a $200 caulk job today often prevents a $1,500 panel replacement down the road.
Should I DIY my siding maintenance or call a professional?
If you’re comfortable climbing a ladder, have a garden hose, and can handle a nail gun, the routine cleaning and caulk touch‑ups are perfectly DIY‑friendly. When the problem involves structural concerns – like checking stud integrity for fiber cement, or fixing large cracks that expose the sheathing – it’s safer to bring in a crew. In our experience, a quick professional assessment can save you hours of guesswork and costly re‑work later.


Comments