Exterior Painting Virginia Beach: A Practical Guide for Homeowners
- William McKracherne
- Dec 19, 2025
- 17 min read

Ever stood on your porch, feeling the salty breeze off the Atlantic, and wondered why the paint on your home looks like it's been through a hurricane?
You're not alone. Most homeowners in Virginia Beach discover that the combination of sun, sand and occasional storms can turn a fresh coat into a faded, peeling mess faster than they'd expect.
So, what does that mean for you? It means the right exterior painting Virginia Beach strategy can protect your curb appeal, keep water out, and even boost your property value before you think about selling.
In our experience, the biggest mistake is treating exterior painting like a one‑time cosmetic fix. We see houses where the paint was applied without proper surface prep, and within months the colors start to blister or crack.
Think about it this way: a well‑prepped wall is like a clean canvas for an artist. Scrubbing away old, loose paint, fixing any wood rot, and sealing seams gives the new paint something solid to cling to, and the results last years longer.
But here's the good news – you don't have to become a paint‑expert overnight. A few simple steps can set you up for success: walk the perimeter, note any cracks or water stains, test a small patch for adhesion, and choose a high‑quality, UV‑resistant coating that’s designed for coastal climates.
Does this feel overwhelming? Honestly, it can be a bit messy, especially when you spot hidden damage behind faded layers. That's why many of our customers let us handle the heavy lifting while they watch the transformation from their favorite spot on the deck.
Imagine stepping outside after a fresh rain, watching the newly painted siding glisten without any streaks, and feeling confident that the paint will stand up to the next summer heat wave.
Ready to take the first step? Start by giving your home a quick visual audit – look for peeling edges, chalky spots, or uneven sheen. Jot down what you see, and when you’re ready, reach out for a free on‑site assessment so we can turn that list into a plan.
TL;DR
Exterior painting in Virginia Beach demands thorough prep, UV‑resistant coatings, and attention to coastal wear, so your home stays bright and protected through salt, sun, and storms.
Follow our quick visual audit, patch any rot, choose a marine‑grade paint, and let LGFMH Construction handle the rest for a flawless finish that lasts years.
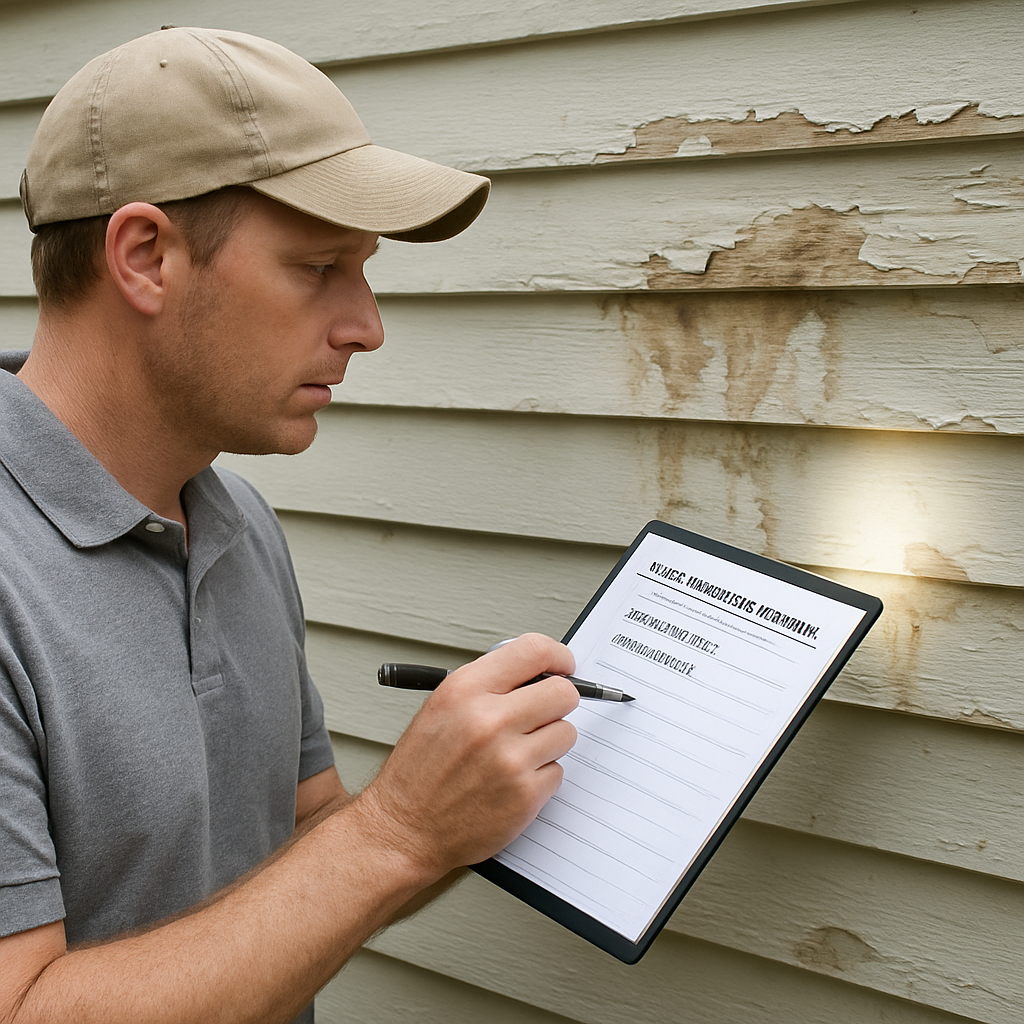
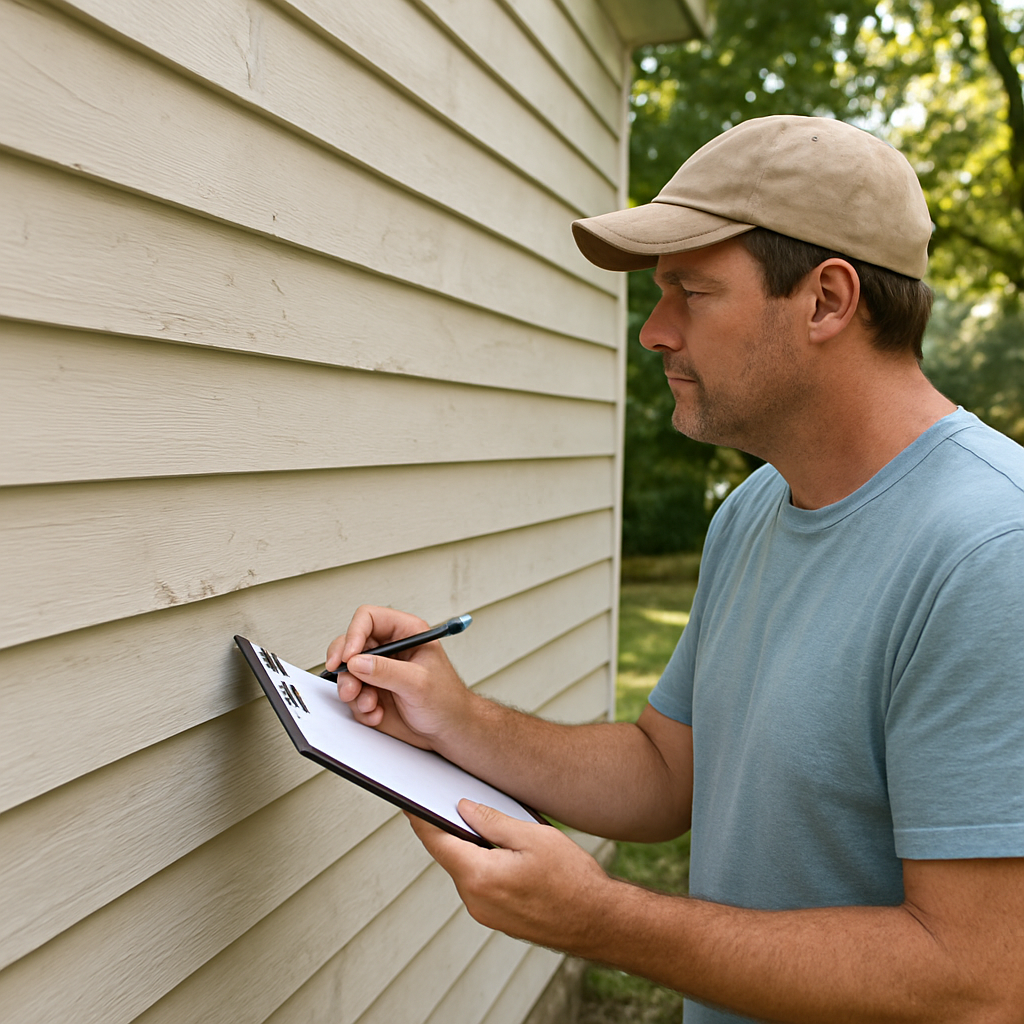
Step 1: Assess Your Home’s Exterior Surfaces
Before you even think about picking a color, you need to know exactly what you're working with. In Virginia Beach, the salty air can sneak into tiny cracks, turning a fresh coat into a peeling mess in months if you miss a spot.
Grab a notebook, walk the whole perimeter, and start a quick visual audit. Look for peeling paint, chalky residue, water stains, or any wood that feels soft to the touch. Those are the red flags that tell you where prep work is non‑negotiable.
Check for Moisture Intrusion
One trick we swear by is the “plastic sheet test.” Tape a 2‑ft square of clear plastic to the siding and leave it for 24 hours. If condensation forms on the inside of the plastic, you’ve got moisture trapped behind the surface – a sign you’ll need to address rot before any paint goes on.
And don’t forget the soffit and fascia. Those narrow strips often collect debris and retain water, creating hidden rot that will eventually bleed through the new paint.
Identify Surface Types
Virginia Beach homes mix wood, vinyl, brick, and stucco. Each material demands a different prep routine. Wood needs sanding and a mildew‑resistant primer; vinyl can often be painted with a special adhesion primer; brick and stucco usually require a pressure‑wash and a bonding agent.
When you’re unsure, a quick scrape with a utility knife can tell you how tightly the old coating is holding. If it lifts easily, you’re looking at a full strip‑and‑sand job.
So, what should you do next?
Document Everything
Take photos of every problem area and jot down notes – “north side siding, 2‑inches of rot near window,” or “back porch soffit, water streaks.” This inventory becomes the roadmap for anyone you hire, and it saves you from costly surprise add‑ons later.
We often see homeowners skip this step and end up paying extra when the contractor discovers hidden damage mid‑project. A solid checklist keeps the budget honest.
Here’s a handy checklist you can print:
Peeling or flaking paint
Cracks wider than ¼ inch
Soft, spongy wood
Staining or mildew
Loose trim or siding
Once you’ve got your list, it’s time to decide whether you’ll tackle minor repairs yourself or call in pros. Small nail pops and nail‑hole fillers are DIY‑friendly, but extensive rot or structural issues are best left to specialists.
Speaking of specialists, we often reference industry insights from seasoned contractors. For example, J. Racenstein’s painting expertise emphasizes the importance of a moisture‑free substrate before any marine‑grade paint is applied.
If your home also has flooring that will be exposed during prep, consider the long‑term durability of the surface beneath. A quick read on Millena Flooring’s durability tips can help you choose the right underlayment that won’t warp when the exterior gets wet.
And for those of you tackling a larger renovation that includes a farmhouse‑style porch or barn‑door addition, the practical farm house renovation guide offers great ideas on blending historic charm with modern coastal paints.
Now that you’ve mapped out the problem areas, you’re ready to move on to the next phase: repairing rot, sanding rough spots, and applying a primer that can stand up to salty breezes.
Watch the short video above for a step‑by‑step walk‑through of surface preparation, from pressure‑washing to priming.
With a clear picture of what needs fixing, you’re ready to move on to the next phase: repairing rot, sanding rough spots, and applying a primer that can stand up to salty breezes.
Step 2: Choose the Right Paint and Materials
Now that your walls are clean and any rot is patched, the fun part really begins – picking the paint that will survive Virginia Beach’s salty breezes, scorching sun, and occasional rainstorms. It feels a bit like shopping for a new coat before a big date, right? You want something that looks great the first night and stays gorgeous for years.
Understand the climate challenge
Coastal homes face three big enemies: UV rays, salt spray, and humidity. A study from the American Coatings Association shows that UV‑induced fading can reduce a paint’s gloss by up to 30 % after just three years in a sunny, salty environment. That’s why a standard interior‑only latex won’t cut it out here.
What we’ve learned on dozens of Virginia Beach jobs is that a marine‑grade acrylic latex, formulated with UV inhibitors and a flexible binder, is the sweet spot. These paints stretch a little when wood expands, then snap back without cracking.
Pick the right paint system
Step‑one: Choose a high‑quality exterior acrylic paint with a 100‑year warranty – that’s a good signal the manufacturer expects the coating to survive harsh weather. Look for labels that mention “mildew resistant” and “salt‑mist protection.”
Step‑two: Match the sheen to the architectural style. Flat or matte hides minor imperfections on older clapboard, while a satin or low‑gloss finish works well on newer fiber‑cement siding and gives a subtle sheen that repels water.
For a real‑world example, a client on the oceanfront swapped a cheap 5‑year paint for a 10‑year marine acrylic. Within six months the new coat retained its deep sea‑blue hue, while the old paint had already started to chalk.
Select primers and sealers
Even the best paint can’t adhere to a surface that’s still porous. If you’ve uncovered raw wood or repaired a rot spot, a bonding primer is non‑negotiable. An oil‑based or high‑build acrylic primer seals the pores, blocks tannin bleed, and gives the topcoat a solid foundation.
One tip from our crew: apply a thin coat of a rust‑inhibiting primer on metal trim before the final color. It adds a few dollars but saves you from unsightly rust streaks later.
Choose the right application tools
Rollers, brushes, or a sprayer? Each has a place. For smooth vinyl siding, a high‑density roller (⅜‑in nap) gets you even coverage fast. For intricate trim, a synthetic‑bristle brush offers control without shedding fibers.
If you’re tackling a large, flat surface and want a flawless finish, a low‑pressure airless sprayer can be a game‑changer. You don’t have to own one – check out professional‑grade equipment from J Racenstein to rent or buy a reliable sprayer that won’t over‑atomize and waste paint.
Create a materials checklist
Before you head to the supply store, write down everything you’ll need. A typical checklist for a 2,000‑sq‑ft home looks like this:
Marine‑grade acrylic paint – 8–10 gallons (depending on color and number of coats)
Bonding primer – 2–3 gallons for repaired areas
Rust‑inhibiting metal primer – 1 gallon for trims
High‑density roller and ⅜‑in nap cover
Synthetic‑bristle brush set (2‑in, 3‑in)
Drop cloths, painter’s tape, and masking film
Caulk and backer rod for any gaps discovered during prep
When you cross‑reference that list with the Siding Repair Virginia Beach guide , you’ll spot any missing steps – like a missing sealant on the soffit – before you spend a dime on paint.
And if you’re thinking about a full home refresh, remember the interior can benefit too. After the exterior is done, many homeowners pair it with fresh flooring. A quick look at Millena Flooring shows how a new hardwood floor can complement the bright, clean look of a newly painted façade, tying the whole house together in one cohesive style.
Bottom line: pick a paint built for the coast, prep with the right primer, and arm yourself with the proper tools. Follow the checklist, double‑check the product specs, and you’ll end up with a finish that laughs at the next salty wind.
Step 3: Prepare and Protect Areas (Video Walkthrough)
Alright, you’ve already cleared the debris and patched the rot – now it’s time to treat your home like a delicate artwork that needs a protective frame before the brush even touches the canvas.
Think about the last time you moved a piece of furniture without covering the floor. You probably left a scratch or two, right? The same principle applies to exterior painting: every surface that isn’t meant to get paint needs a barrier.
Mask, cover, and protect
Start with the big, obvious things: doors, windows, and any hardware you don’t want to see a speck of pigment on. Painter’s tape works wonders on trim, but it’s the drop cloths that really save you from a soggy mess.
Lay a 9‑by‑12‑foot canvas‑grade drop cloth on the ground before you even pull the hose. If you’re working on a narrow porch, fold the cloth into a makeshift “paint apron” and secure it with masking tape so wind‑blown gusts don’t lift it.
Next, wrap any built‑in lighting fixtures or vent covers with plastic sheeting. A quick zip‑tie and you’ve prevented drips from turning a sleek vent into a dripping sculpture.
Do you have a porch swing or a set of garden chairs that you love? Move them temporarily or cover them with old sheets. Trust me, you’ll thank yourself when you’re not scraping dried paint off a favorite recliner.
Safeguarding trim, windows, and fixtures
Trim is the crown jewel of your home’s façade, so give it a little extra love. Apply a thin coat of painter’s tape along the edge, then press a foam brush‑backed “edge guard” (you can make one from a folded piece of cardboard) to catch any stray brush strokes.
For windows, use a specialized window‑masking film. It adheres gently and peels off cleanly, leaving no residue that could cloud the glass. If you don’t have the film on hand, a few layers of newspaper pressed tightly will do the trick.
Don’t forget the gutters. A quick zip‑tie and a piece of tarp will keep water from turning your gutters into a paint‑soaked runway. This is especially important in Virginia Beach, where a sudden rainstorm can ruin hours of work in minutes.
Checklist before the first coat
Lay drop cloths on all ground surfaces.
Cover doors, windows, and hardware with painter’s tape.
Wrap vent covers, light fixtures, and electrical boxes in plastic.
Mask trim with edge guards or cardboard.
Secure gutters with tarp and zip‑ties.
Double‑check local zoning setbacks – some neighborhoods restrict how close you can place temporary structures like scaffolding or large cloths near property lines. See Virginia Beach zoning guidelines for details.
Now that everything’s tucked away, you’re ready for the video walkthrough. Imagine a 5‑minute clip that shows you stepping through each protected zone, confirming that no surface is left exposed. While we won’t embed the video here, picture yourself pausing at each step, checking that the tape is still sealed and the cloth hasn’t shifted.
One last tip: after you finish the first coat, peel back the tape while the paint is still tacky. This prevents the paint from tearing off with the tape and gives you crisp, clean lines.
Feeling more confident? Good. The prep stage might feel like a lot of extra work, but it’s the difference between a paint job that lasts for a decade and one that starts flaking after the first salty breeze.
When you’re ready to move from protection to application, our crew at LGFMH Construction can step in and handle the heavy lifting, letting you enjoy a flawless finish without the mess.
Step 4: Painting Techniques and Application Methods
Alright, you’ve wrapped everything up and the surface is ready – now the real fun begins. How you actually put paint on the wall makes the difference between a showroom finish and a job that flakes after the first sea breeze.
Cutting in: the first line of defense
We always start with a clean cut. Grab a good‑quality angled brush, dip it just enough to coat the bristles, and pull a steady line where the wall meets trim, windows, or any edge. It feels a bit like drawing a border before you fill in a coloring book.
Why bother? A crisp edge stops paint from bleeding later, and it gives you a “wet edge” you can blend into with a roller or sprayer. If the edge dries before you get to it, you’ll see those unsightly streaks that make you wonder if you missed a spot.
Roller vs. sprayer: choosing your weapon
Rollers are the workhorse for most Virginia Beach homes. A ⅜‑inch nap high‑density roller pushes paint deep into wood grain and smooths over any minor imperfections. The trick? Roll in a "W" pattern, then fill in without lifting the roller – that keeps the paint wet and even.
Sprayers sound fancy, and they can be a game‑changer on large, flat siding. A low‑pressure airless sprayer atomizes the paint just enough to coat without over‑spraying. If you rent one, practice on a scrap board first; you’ll quickly learn the sweet spot between a mist and a torrent.
Honestly, most DIYers stick with rollers and a brush for trim. You get control, less overspray, and cleanup is a breeze.
Back‑rolling for a uniform coat
Once the paint is on, go back over it with a clean roller – we call this “back‑rolling.” It flattens the texture, forces excess paint into the pores, and helps the coat dry evenly. In salty coastal air, that extra step can add a year or two to the life of the finish.
Just remember: don’t over‑work the paint. A few gentle passes are enough; you don’t want to lift the pigment off the surface.
Mind the weather
Virginia Beach weather can be a fickle partner. Ideal conditions are 50‑85°F, low humidity, and no direct sun beating down on the wall. Paint that dries too fast in hot sun can shrink and crack; too much humidity and it won’t cure properly.
If you’re stuck with a hot afternoon, try a paint formulated with slower drying time, or work in the shade with a portable canopy.
Layering and drying times
Most marine‑grade exterior paints call for 2‑3 coats. The first coat acts like a primer, sealing the surface. Let it dry to the touch – usually 2‑4 hours in moderate weather – before you start the second coat.
Don’t be tempted to rush. A premature second coat can trap moisture and lead to blistering later on.
Clean‑up and safety
When you’re done, clean brushes and rollers with warm, soapy water if you used a water‑based paint. For oil‑based products, a mineral‑spirit wash is required. Keep a mask handy, especially if you’re spraying – the fine mist can irritate lungs.
And always protect the surrounding plants with a drop cloth; a stray drip can harm your garden and ruin that fresh look you’re aiming for.
Quick‑reference table
Technique | Tool | Key Tip |
Cutting in | Angled brush (2‑in) | Maintain a wet edge; work from top down |
Rolling | ⅜‑in nap high‑density roller | Use a "W" pattern and back‑roll for evenness |
Spraying | Low‑pressure airless sprayer | Practice on scrap board; keep spray distance 12‑18" |
So, what’s the bottom line? Choose the technique that matches the surface, respect the weather, and give each coat the time it deserves. Follow those steps, and your exterior painting Virginia Beach project will look like it was done by a pro – even if you’re the one holding the brush.
Step 5: Maintenance Tips and Weather Considerations
Now that the fresh coat is drying, you might be wondering how to keep it looking like a brand‑new day at the beach for years. The truth is, a little routine care goes a long way, especially when the Atlantic wind is constantly testing your paint.
First off, think of your paint like a sunscreen. It protects the wood, but you still need to reapply or touch it up when the sun beats down hard. A quick visual check every 3‑4 months is all it takes to spot fading, chalky patches, or tiny cracks before they turn into major problems.
Seasonal inspection checklist
Walk the perimeter after a rainstorm – look for water pooling on the sill or behind trim.
Run your hand over the surface; any roughness or flaking means the seal has been breached.
Check the caulk around windows and doors – salty air can shrink it, leaving gaps.
Inspect gutters and downspouts; clogged water can back up and soak the paint.
Does that sound like a lot? Not really. It’s the same stroll you’d take to pick up the mail, just with a keen eye for the paint.
When you do find a problem, the fix is usually straightforward. Small nail holes? Fill with a marine‑grade wood filler, sand smooth, and dab a touch of the same paint. For larger areas where the coating has peeled, lightly sand the edge, clean the dust, then apply a thin “touch‑up” coat. Because you’ve already primed the surface in earlier steps, the new paint will bond just as well as the original.
Weather‑smart maintenance
Virginia Beach weather can swing from balmy summer breezes to sudden thunderstorms. Here’s a rule of thumb: avoid any exterior painting work when humidity is above 70 % or when the temperature is below 50 °F. Those conditions trap moisture under the film and cause blisters.
But what about after you’ve finished the job? Keep the siding out of direct, scorching sun for at least 24 hours. If a heat wave hits, a portable shade cloth can protect the fresh coat and prevent premature drying.
And don’t forget the wind. A strong gust can blow debris onto wet paint, leaving specks that look like dust. If the forecast calls for wind speeds over 15 mph, wait until it eases up or set up a temporary windbreak with a tarp.
So, how do you stay ahead of the weather? A quick glance at the National Weather Service’s 7‑day outlook will tell you if you’re in a safe window. If you’re unsure, a simple “no‑paint‑on‑rain‑day” rule works wonders.
Routine care tips that actually matter
1.Wash gently once a year.A low‑pressure rinse (around 1,500 psi) removes salt deposits without etching the wood. Use a mild detergent and rinse thoroughly.
2.Re‑caulk annually.Even the best sealants shrink under UV exposure. Pull back the old line, clean the joint, and apply a fresh bead of UV‑resistant caulk.
3.Touch up high‑traffic zones.Trim around doors, decks, and porches gets the most sunlight and wear. Keep a small can of the original paint handy for quick spot repairs.
4.Inspect after storms.A sudden downpour can force water behind the paint, especially if there are unnoticed cracks. Spot‑check within 24 hours and dry any wet spots with a soft cloth.
5.Schedule a professional check‑up every 3‑5 years.Even if you’re a DIY enthusiast, a fresh set of eyes can catch hidden issues before they spread.
Does all that feel like a lot to remember? Here’s a quick cheat sheet you can print and tape to your garage door:
- Visual check each season
- Wash once a year
- Re‑caulk annually
- Spot‑touch after storms
- Professional review every few years
Stick that on the wall, and you’ll never forget.
And remember, the best maintenance plan is the one you actually follow. A few minutes each season beats a full‑blown repaint every two years, both in cost and hassle.
Bottom line: keep an eye on the paint, respect the weather, and give it a little love when nature tries to wear it down. Follow these steps and your exterior painting Virginia Beach project will stay vibrant, protected, and ready for the next summer breeze.
FAQ
How often should I repaint the exterior of my Virginia Beach home?
Because the salty air and strong sun wear down paint faster than inland homes, most homeowners find a 5‑7 year repaint cycle works well. If you do the seasonal visual check we mentioned earlier and spot‑touch any chalky spots, you can stretch it a bit longer. In practice, we’ve seen a well‑prepped, marine‑grade coat hold up for up to eight years, but plan on a fresh topcoat before the next big summer heat wave.
What’s the best type of paint for coastal weather?
Look for a marine‑grade acrylic latex that lists UV inhibitors and salt‑mist protection. Those formulas stay flexible when the wood expands and won’t crack under the constant breeze. A low‑sheen (satin or flat) finish also helps hide minor imperfections while still repelling water. In our experience, the extra few dollars for that specialized product pay off in years of fewer touch‑ups.
Do I need a primer even if the surface is already painted?
Yes, especially if you’ve uncovered raw wood, repaired rot, or are switching from a glossy to a matte finish. A bonding primer seals the pores and gives the new paint something solid to cling to. Skipping it can lead to premature peeling, which is exactly what we try to avoid when we say “prep is everything.” A thin coat costs almost nothing but saves a lot of headaches later.
Can I handle the prep work myself, or should I hire a pro?
You can definitely tackle the basic steps: wash the siding, sand flaky spots, and apply caulk where needed. The tricky part is spotting hidden rot or moisture behind the paint, which often requires a flashlight and a bit of experience. If you’re comfortable with a pressure washer and a sanding block, you’ll save money. But for anything beyond surface cleaning, a quick professional inspection can catch problems that would otherwise turn into costly repairs.
How do I protect my paint job from the next storm?
First, make sure all gaps around windows, doors, and trim are sealed with a UV‑resistant caulk. After the coat dries, avoid heavy rain for at least 24 hours—rain can trap moisture under the film and cause bubbling. If a storm is forecasted soon after you finish, cover the freshly painted areas with a breathable tarp or a temporary shade cloth to keep the sun and rain from interfering with the cure.
What’s the safest weather window for painting?
Aim for temperatures between 50 °F and 85 °F, low humidity (under 70 %), and no direct sun beating on the surface. Those conditions let the paint cure evenly without cracking. If you’re forced to work on a hotter day, choose a slower‑drying formulation or work in the shade with a portable canopy. A quick glance at the National Weather Service forecast can save you a wasted day.
How can I keep my exterior paint looking fresh between major repaints?
Stick to a simple maintenance rhythm: a gentle low‑pressure wash once a year, re‑caulk any joints that look shrunk, and keep a small can of the original paint on hand for touch‑ups. After a big storm, walk the perimeter and dry any wet spots within 24 hours. Those small habits add up, and you’ll notice the color staying vibrant without needing a full repaint every two years.
Conclusion
If you've made it this far, you already know that exterior painting Virginia Beach isn't just a weekend hobby—it's a strategic move to protect your home against salt, sun, and storms.
Think back to the checklist we walked through: assess every surface, choose a marine‑grade acrylic, prep with primer, mask wisely, and respect the weather window. Each step is a small investment that pays off in years of curb‑appeal and fewer touch‑ups.
So, what’s the next move? Grab a notebook, take a quick walk around your house, and mark any spots that need repair. Then, schedule a free on‑site assessment with LGFMH Construction. Our crew can confirm the prep work, recommend the right paint system, and handle the heavy lifting.
Remember, a fresh coat is only as good as the preparation behind it. A little extra care now means you won’t be scrambling after the next rainstorm.
Ready to lock in that vibrant, weather‑ready finish? Let’s turn your visual audit into a plan you can trust. Give us a call, or book online, and watch your Virginia Beach home shine for years to come.
One final tip: keep a small can of the exact paint color you used for the main coat. A quick touch‑up after a summer hail or a stray splash of sand will keep the surface uniform without a full re‑paint. And don’t forget to inspect your gutters annually—clean gutters mean less moisture seepage, which preserves the integrity of that fresh finish.


Comments