Gutter Cleaning Norfolk VA: A Complete Homeowner’s Guide
- William McKracherne
- Dec 22, 2025
- 18 min read

Picture this: a rainy June afternoon in Norfolk, and you hear that familiar drip‑drip‑drip from the kitchen ceiling.
That's the moment you realize your gutters are clogged, and suddenly a simple task feels like a major headache.
Does it seem like gutter cleaning is always a chore you push to the back burner? You're not alone—many homeowners in Norfolk VA treat it like a distant to‑do list, until water starts seeping in.
In our experience at LGFMH Construction, we see the same pattern: a few weeks of neglect, then a costly repair bill.
But here's the good news: a little bit of routine maintenance can keep your roof, siding, and foundation dry, and it doesn't have to break the bank.
Think about it this way: clean gutters act like a highway for rainwater, guiding it safely away from your home. When that highway gets blocked by leaves, pine needles, or even a stubborn squirrel nest, water backs up and finds the easiest path—often straight into your walls.
So, what should you do the next time the sky opens up? First, take a quick look from the ground. Can you see standing water or debris spilling over the edge? If the answer is yes, it's time to act.
We recommend a simple three‑step check every 3–4 months—especially after the big leaf‑fall in fall and the spring bloom in Norfolk. Step one: clear visible debris with a sturdy scoop. Step two: flush the gutters with a garden hose to spot hidden clogs. Step three: inspect the downspouts for blockages and ensure they discharge at least three feet away from the foundation.
Even if you prefer a professional touch, knowing this process helps you ask the right questions when you call a service for gutter cleaning norfolk va.
Ready to take the first step? Grab a ladder, a pair of gloves, and a cup of coffee, and give those gutters the attention they deserve. You'll sleep better knowing your home is protected, and you’ll avoid the surprise of water damage later in the season.
TL;DR
Quickly spot clogged gutters in Norfolk, VA, using our simple three‑step check and prevent costly water damage before the next storm hits. Follow our easy routine, grab a ladder and gloves, and keep your home dry all year with minimal effort and enjoy peace of mind knowing your gutters work.
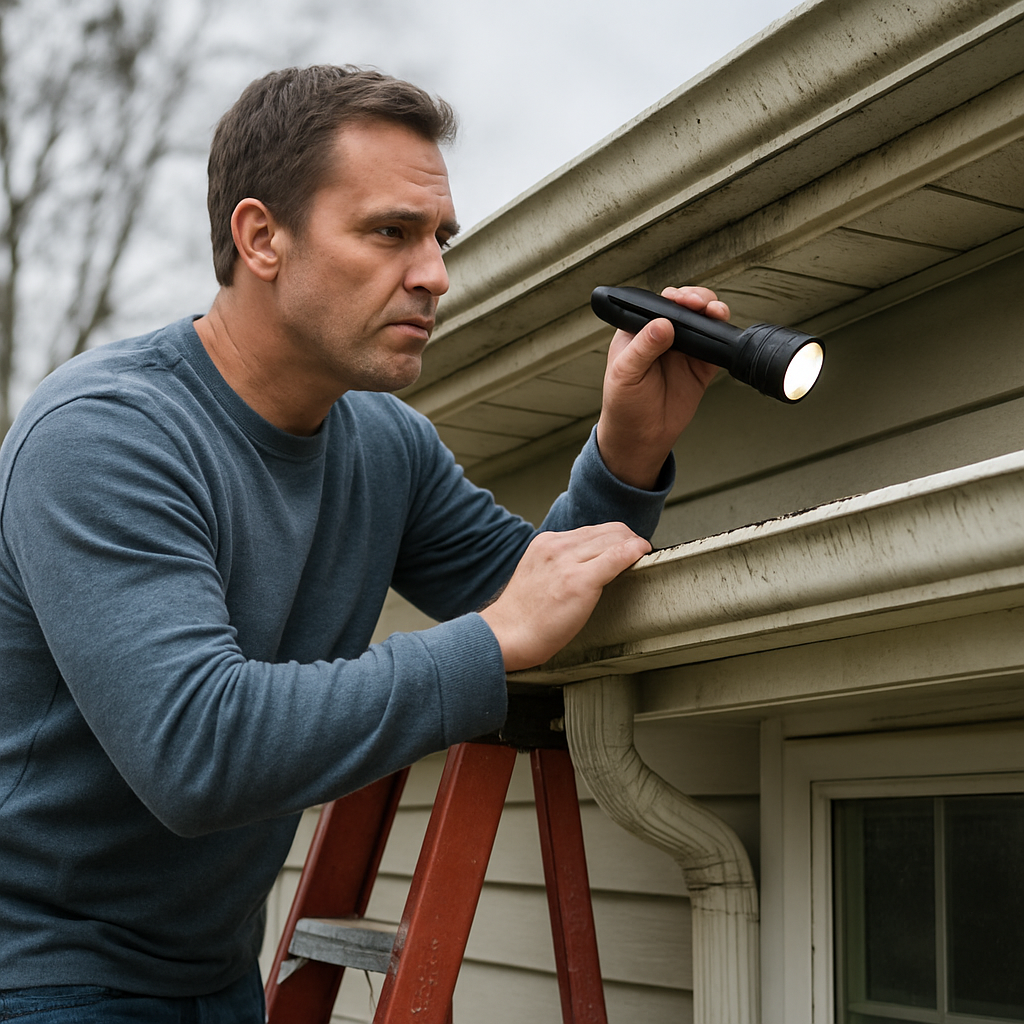
Step 1: Inspect Your Gutters for Clogs and Damage
Okay, you’ve got the ladder, the gloves, and that fresh pot of coffee. Before you start scooping out leaves, take a moment to actually look at the gutter system like you’re checking a friend’s car before a road trip. Does anything look out of place?
What to look for from the ground
First, step back and scan the roofline. Can you see water pooling at the edge, or maybe a dark line where debris is spilling over? Those visual clues are the quickest way to spot a problem without climbing up.
Next, give the gutters a gentle tap with a broom handle. A solid, even sound means the metal is still sturdy; a hollow thud could signal a loose or sagging section that needs reinforcement.
And if you notice any rust patches, cracks, or sections that have pulled away from the fascia, make a note. Those are the spots that will let water sneak behind the wall sheathing.
Getting up close and personal
Now, climb the ladder—safety first, always. Position yourself so you’re stable, then open the gutter with a scoop or your hands. Look for three things:
Visible debris (leaves, pine needles, even bird nests).
Blockages near the downspout outlet.
Signs of water damage on the underside, like corrosion or frayed seams.
When you spot a clog, don’t just pull it out with a gloved hand; use a small garden trowel or a gutter scoop to avoid bending the metal. If you’re dealing with a stubborn buildup, a garden hose on low pressure can flush out finer material.
Here’s a pro tip we’ve learned at LGFMH Construction: after clearing the visible junk, run the hose from the opposite end of the gutter. The water pressure will push any hidden clogs toward you, making them easier to spot.
Once the water flows freely, check the downspout. Remove the cap, then pour a bucket of water in. If it drains quickly, you’re good. If it backs up, you probably have a blockage farther down the line or a clogged underground pipe.
And remember, even a small dent can become a big leak when water freezes in the winter. Mark any dents with a piece of chalk so you can come back and repair them later.
Wondering how often you should repeat this inspection? Our practical guide on how often to clean gutters breaks it down by season and local foliage patterns, so you never miss a beat.
So, why does this matter beyond a rainy day? A clean, undamaged gutter system is your first line of defense against water backup. If water can’t exit the roof the way it’s supposed to, it will find its way into your foundation, basement, or even your favorite carpet.
That’s where water backup coverage on homeowners insurance comes into play. Knowing what’s covered can save you thousands if a hidden leak does cause damage.
And if you’re thinking about upgrading the look of your home while you’re at it, check out Millena Flooring for quality flooring options that pair nicely with a dry, well‑maintained interior.
After watching the video, you’ll see exactly how a quick visual check can reveal hidden problems before they become expensive repairs.
Now that you’ve inspected every inch, you’re ready for the next step: actually cleaning out the gutters. But first, take a breather, snap a quick photo of any damage, and jot down what needs fixing. That way, when you call a pro—or tackle the job yourself—you’ll have a clear to‑do list.
Step 2: Gather the Right Tools and Safety Equipment
What you actually need in your toolbox
Before you even think about climbing that ladder, take a minute to lay out the tools you’ll use. A sturdygutter scoop or trowelis the workhorse for pulling out leaves, pine needles, and that stubborn shingle‑grit that builds up over summer. Awide‑mouth garden bucketlets you toss debris down without spilling it all over the porch.
Many Norfolk homeowners swear by aleaf blower with a low‑speed nozzle. It’s perfect for blowing dry debris out of the gutter’s far end without having to reach in with your hands. If you have a longer run, aextendable gutter cleaning wandsaves you from constantly repositioning the ladder.
Safety gear – treat it like your life jacket
Climbing ladders is the #1 cause of home‑maintenance injuries, so treat safety like it’s non‑negotiable. First, aladder with a weight rating that exceeds your combined weight plus tools. A 6‑foot step ladder works for most single‑story homes; a 10‑foot extension ladder is safer for two‑story roofs.
Next, slip‑resistantwork gloves. They protect your hands from sharp metal edges and keep the grime from getting under your nails. Pair them withprotective eyewear– even a tiny piece of twigs can bounce back when you shake the gutter.
Don’t forget ahard hatif you’re working under overhanging trees. And adust mask or respiratoris a lifesaver when you’re dealing with moldy debris or old pine‑needle buildup that can irritate your lungs.
Optional power‑boost tools
If you have a pressure washer on hand, a low‑pressure setting (around 1,500 PSI) can rinse out lingering slime without gouging the metal. It’s especially handy after a heavy fall‑leaf season when the gutters are a soggy mess.
For those who prefer a hands‑free approach, agutter vacuumattaches to a shop vac and sucks out debris while you stay on the ground. It’s not a must‑have, but it cuts down the time you spend perched on the ladder.
Step‑by‑step checklist
1.Lay out every tool on the ground.Seeing everything in one place helps you spot anything you’ve forgotten before you climb.
2.Do a quick ladder inspection.Check the feet for wear, make sure the rungs are tight, and place the ladder on a level surface. A ladder stabilizer can keep it from wobbling on uneven grass.
3.Suit up.Slip on gloves, goggles, and your mask. Clip your hard hat on and secure the ladder with a safety strap if you have one.
4.Test your tools.Give the scoop a quick shake, make sure the bucket’s handle is sturdy, and run the blower for a few seconds to confirm it’s working.
5.Take a safety pause.Before you step onto the ladder, ask yourself: “Do I feel steady? Is the ladder secure? Do I have everything I need within arm’s reach?” If anything feels off, fix it now.
Real‑world example from Norfolk
One of our neighbors on Granby Street told us they started a “tool‑ready Sunday” ritual every fall. They’d pull the ladder and tools out of the garage, lay them on the driveway, and spend ten minutes double‑checking the safety gear. That extra half‑hour saved them a nasty slip when a sudden gust knocked the ladder a few inches off‑center.
Another homeowner in the South Norfolk area tried using just a garden hose to flush the gutters, only to discover a stubborn pine‑needle mat that the water couldn’t move. After adding a leaf‑blower and a gutter scoop to their kit, the same hose flush cleared everything in minutes. The lesson? A few extra tools can turn a frustrating half‑day job into a quick, painless finish.
Pro tip from our crew
Keep a small “maintenance kit” in your garage: ladder stabilizer, spare ladder levelers, extra gloves, and a zip‑locked bag of zip ties. When you need to tighten a loose bracket or secure a sagging section, you won’t have to run to the hardware store mid‑job.
And remember, if the thought of handling all this gear feels overwhelming, a quick call to LGFMH Construction can get you the right equipment and a professional’s eye on the job – but most homeowners find that a well‑prepared toolkit makes the whole process feel like a weekend project rather than a chore.
Step 3: Remove Debris and Clean the Gutter System
You've got the ladder steady, the gloves on, and a bucket ready. The moment you lean over the edge and see that soggy mat of pine needles and leaves, you know the real work is about to start. That's the point where many homeowners either quit or push through—let's make sure you push through with confidence.
So, how do you actually get that mess out without turning your backyard into a leaf‑filled swamp?
Gather your removal tools
First, grab a sturdy gutter scoop or a wide‑mouth trowel. A leaf blower with a low‑speed nozzle works wonders for dry debris at the far end of the run. If you have a garden hose handy, a low‑pressure spray (around 1,500 PSI) can loosen compacted muck without gouging the metal. For Norfolk homes that see heavy fall leaf fall, a combination of blower + scoop usually cuts the job in half.
Pro tip: The window cleaning supply guide recommends a telescoping wand for hard‑to‑reach spots. It lets you stay on the ground while the wand does the heavy lifting.
Step‑by‑step: Clear the gutter
1. Start at the downspout.Work your way toward the opposite end, scooping out the biggest clumps first. This prevents the debris from sliding back down as you move.
2. Use the blower.Once the bulk is removed, point the blower at the remaining thin layer. A quick burst clears the corners where the scoop can't reach.
3. Flush with water.Run the garden hose from the highest point of the gutter down toward the downspout. Watch for water that rushes through cleanly—if it pools, you’ve missed a spot.
4. Check the downspout.After flushing, feel around the interior of the downspout with a plumber’s snake or a flexible rod. A small blockage can turn a perfectly clean gutter into a backup nightmare.
When the water flows freely, give the whole system a final visual scan. Any lingering leaves? Toss them into the bucket and dump them away from the house to keep critters from moving back in.
Safety checkpoint
Before you step down, pause and ask yourself: Is the ladder still level? Are your gloves dry? A quick safety pause can save a trip to the ER later. If the weather turns windy, it’s better to pause than to risk a slip.
And remember, Norfolk’s rain can be relentless. The City of Norfolk public works drainage guidelines note that proper runoff helps protect roadways—and your foundation—by keeping water moving quickly away from structures.
Now that the gutter is clear, you’ll notice a lighter feel on the ladder and a quieter “whoosh” as water slides down. That’s the sound of a job well done.
Need a visual refresher? Check out this quick walkthrough video that shows the exact motions we just described.
Take a moment after the video to wipe down your tools, store the ladder safely, and give yourself a pat on the back. A clean gutter system not only prevents water damage but also extends the life of the gutters themselves—saving you time and money before the next Norfolk storm rolls in.
And if you ever feel the job is getting too big, a quick call to LGFMH Construction can get you the right equipment or a professional hand without the hassle. Most homeowners we’ve helped say that a few extra minutes of prep make the whole process feel like a weekend chore rather than a full‑blown project.
Step 4: Flush and Test the Drainage
Alright, you’ve cleared out the muck, you’ve given the gutters a good once‑over, and now it’s time for the part that really tells you whether you’ve done the job right: flushing and testing the drainage. Think of it as a quick health check for your gutter system before the next Norfolk storm rolls through.
Why a flush matters
Even after you’ve scooped out the visible debris, tiny bits of pine‑needle mush, moss, or a stray twig can cling to the bottom of the gutter or hide inside the downspout. If those little clogs stay hidden, they’ll turn a clean run into a slow‑draining nightmare the next time rain hits.
According to the City of Norfolk street‑sweeping program , the city pulls roughly 6,682 tons of debris from streets each year to keep stormwater moving. Your gutters play the same role for your home – they need an unobstructed path for water to escape.
Step‑by‑step flush
1. Gather a garden hose with a spray nozzle.Set the nozzle to a steady, moderate flow—about 1.5 gallons per minute works well. Too much pressure can damage the metal, and too little won’t move the sludge.
2. Start at the far end of the gutter.Position the hose a few feet away from the downspout and aim upstream. Let the water cascade down the gutter, pushing debris toward the opening.
3. Watch the flow.As water reaches the downspout, you should see a clear, continuous stream. If the water pools or drips slowly, pause and use a plumber’s snake or a flexible rod to poke through the interior of the downspout.
4. Repeat from the opposite end.Move the hose to the other side and repeat the process. This two‑sided approach helps dislodge anything that might have settled in a low spot.
Testing the drainage
Once the water runs freely, it’s time to verify that the downspout is delivering water far enough away from your foundation. The rule of thumb is at least three feet, but three to six feet is ideal in Norfolk’s heavy rains.
Stand at the base of the downspout and watch where the water lands. If it’s splashing right against the house, you’ll want to add a splash block, extend the pipe, or install a simple underground drain.
Real‑world example: a homeowner on Granby Street noticed a steady trickle pooling right by the footings after his flush. He added a corrugated‑plastic extension and the water now lands on his lawn, keeping the foundation dry.
Quick sanity checklist
Is the water flowing continuously from the downspout?
Does the stream land at least three feet from the house?
Are there any visible drips along the gutter seam after flushing?
Did you hear any unusual gurgling sounds that might indicate a hidden blockage?
If you answered “yes” to all of those, you’ve nailed the flush and test.
What to do if the flow stalls
Sometimes a stubborn clog hides deep inside the downspout. Grab a garden hose, insert the nozzle into the downspout from the top, and turn the water on full blast. The pressure often pushes the blockage out the bottom.
If that still doesn’t work, a hand‑held plumber’s snake (about 25 feet long) is your next best tool. Gently rotate it while pushing forward—most debris will break apart or be pulled up where you can grab it.
One of our South Norfolk neighbors tried just the hose and ended up with a half‑inch blockage of old moss. After a few twists with the snake, the water surged, and the gutter was back to full speed.
Expert tip from the pros
In our experience, running a quick “rain‑simulation” after the flush helps catch hidden slow spots. Grab a bucket, fill it with about 10 gallons of water, and pour it into the gutter at the highest point. Watch the water race down. If it slows, you’ve found a low‑lying snag that needs another quick clean‑out.
Another tip from the spring cleaning guide on preventing water damage is to repeat the flush after the first heavy rain of the season. That way you catch any new debris that may have settled during the storm.
Final wrap‑up
Flushing and testing isn’t just a “nice‑to‑have” step—it’s the safety net that ensures your gutters actually do what they’re supposed to: move water away from your home’s foundation. A quick 10‑minute hose run, a visual check of the discharge point, and a simple bucket test give you confidence that the next downpour won’t turn into a water‑damage nightmare.
Take a moment now to jot down the date you finished the flush and the distance the water traveled. When you revisit the checklist in six months, you’ll see at a glance whether anything’s changed and what needs tweaking. And if you ever feel stuck, a quick call to LGFMH Construction can bring the right tools and a seasoned eye to the job—no pressure, just peace of mind.
Step 5: Maintenance Checklist & Local Service Options
Now that you’ve flushed and tested, the real secret to staying ahead of clogs is a simple, repeatable checklist. Think of it as your gutter’s yearly health record – a few minutes on paper (or your phone) can save you hours on a ladder later.
Why a checklist matters
Because Norfolk’s climate loves to surprise you. One night a nor’easter can dump 3‑4 inches of rain, and the next weekend a pile of oak leaves can sit in your gutters unnoticed. A checklist forces you to look for the same trouble spots every season, so nothing slips through the cracks.
Monthly quick‑scan (5‑minute habit)
1.Visual glance from the ground.Spot any water spilling over the edge or sagging sections. No ladder? No problem – the eye test catches the obvious.
2.Downspout discharge check.Walk to the base, see where the water lands. If it’s within two feet of the foundation, note it for a deeper look.
3.Debris peek.Use a telescoping inspection mirror (or a selfie stick) to glance at the far end of each run. If you see a dark line, that’s a potential clog.
Seasonal deep‑dive (30‑minute routine)
When spring rains roll in (late March) and again after the fall leaf‑drop (late October), give your gutters a full audit.
1.Gather your tools.Ladder, gloves, scoop, garden hose, and a bucket. If you have a leaf‑blower, bring it along – it speeds up the dry‑debris stage.
2.Inspect the gutter profile.Run a gloved hand along the metal. Feel for rust, cracks, or loose seams. In Norfolk’s salty air, corrosion can start early, so any sign of flaking needs a quick seal.
3.Clear the bulk.Scoop out the biggest clumps first, starting at the downspout and working toward the opposite end. This prevents debris from sliding back as you move.
4.Blow out the corners.A low‑speed leaf‑blower pushes remaining needles out of the corners where a scoop can’t reach.
5.Flush with a hose.Begin at the highest point, aim downstream, and watch the water race. If it pools, pause and use a plumber’s snake to dislodge the hidden blockage.
6.Measure the discharge distance.Place a tape measure at the downspout exit and note the splash distance. Aim for at least three feet; six feet is ideal for Norfolk’s heavy downpours.
7.Document.Write the date, any repairs made, and the discharge distance in a notebook or a phone note. A quick glance at next year’s entry tells you if things are getting worse.
Real‑world example
We helped a family on Larchmont Street who skipped the October deep‑dive. Their gutters overflowed during a September nor’easter, soaking the basement and costing $4,200 in repairs. After we introduced the checklist, they now set a calendar reminder for the March and October audits. Six months later, the same heavy storm left their foundation dry – no water, no stress.
When to call a pro
Not every homeowner wants to climb a two‑story ladder, especially if you have limited mobility or a roof with steep pitches. If any of these red flags pop up, it’s time to reach out:
Persistent rust or cracks that you can’t seal yourself.
Downspout water consistently landing within two feet of the foundation.
Visible sagging that doesn’t bounce back when you push.
A local pro can safely repair seams, replace damaged sections, and install splash blocks or underground drains – all while keeping the job under budget.
Choosing the right local service
Look for a company that offers a written warranty on workmanship, provides a detailed estimate before starting, and has clear insurance coverage. In Norfolk, many crews also bundle gutter guard installation with their cleaning service, which can cut future labor.
Ask yourself: Do they inspect the roof flashings while they’re up? Do they clean the downspout interiors with a high‑pressure nozzle? Those extra steps make the difference between “good enough” and “future‑proof.”
Quick reference table
Task | Tool/Method | Tip for Norfolk |
Ground visual check | Binoculars or smartphone camera | Do it after a rainstorm when water is visible. |
Deep‑seasonal clean | Ladder, scoop, leaf‑blower, hose | Start at the downspout; work upstream to push debris out. |
Downspout discharge test | Garden hose + measuring tape | Target 3–6 ft away from foundation to handle heavy coastal rain. |
Keep this table on your fridge or in a digital note – it’s a cheat sheet you’ll reach for every season.
And remember, a well‑maintained gutter system isn’t just about avoiding leaks; it protects your home’s resale value, keeps pests out, and gives you peace of mind when the next hurricane season rolls in.
So, grab a notebook, set those calendar reminders, and let the checklist do the heavy lifting. When you’re ready to skip the ladder entirely, a qualified Norfolk gutter specialist can handle the tough spots while you enjoy a dry, worry‑free home.
Conclusion
We've walked through everything you need to keep your gutters in top shape, from the quick visual scan to the seasonal deep‑clean.
So, what’s the biggest takeaway? A few minutes of attention now saves you a flood of headaches later, especially here in Norfolk where rain can hit hard and fast.
Remember to schedule a visual check after every big storm, do a full clean every 3–4 months, and always test that the downspout discharges at least three feet from your foundation.
And if you ever feel the ladder wobble, the debris is too much, or a rusted seam shows up, don't hesitate to call a pro—LGFMH Construction can step in, repair the problem, and get you back to peace of mind.
Before you close this guide, grab a notebook or set a phone reminder for your next gutter audit. Write down the date, the discharge distance, and any repairs you made. A simple log turns a chaotic job into a repeatable routine.
Ready to protect your home this season? A quick check today means you’ll sleep soundly when the next Norfolk storm rolls in.
Keep the habit, and your gutters will thank you year after year, sparing you costly repairs.
FAQ
How often should I schedule gutter cleaning in Norfolk, VA?
Because Norfolk gets heavy rain and a lot of fall foliage, most homeowners find a 3‑month cadence works best. Aim for a deep clean after the peak leaf‑drop in October and another one in early spring before the rains start. If you have trees right next to the house, add a quick visual check after any big storm. Consistency keeps water moving and prevents costly repairs.
What signs tell me my gutters need cleaning right now?
Look for water spilling over the gutter lip, standing pools along the roofline, or sagging sections that bounce when you push them. Dark streaks on the fascia, rust spots, or moss growing inside the channel are also red flags. If you hear a drip inside the attic after a rain, that’s a clear cue that debris is backing up the system.
Can I safely clean my gutters myself, or should I hire a pro?
You can handle most routine clean‑ups if you have a sturdy ladder, gloves, and a scoop. The key is safety: always work on a level surface, use a ladder stabilizer, and never lean too far over the edge. For multi‑story homes, steep roofs, or extensive rust damage, it’s smarter to call a pro like LGFMH Construction. They have the equipment and insurance to get the job done without risking injury.
What tools make gutter cleaning easier for Norfolk homeowners?
A gutter scoop or wide‑mouth trowel is essential for pulling out the bulk of leaves and twigs. Pair it with a low‑speed leaf blower to clear dry debris from the far end. A garden hose with a spray nozzle helps flush out fine muck, and a plumber’s snake works wonders for stubborn downspout clogs. Don’t forget a sturdy ladder with a stabilizer and slip‑resistant gloves.
How do I prevent gutter clogs from leaves and pine needles?
Installing a mesh guard or a surface screen can catch most large debris before it even gets into the channel. Trim overhanging branches so fewer needles fall into the gutters during the fall. After each heavy rain, do a quick visual scan from the ground – a few seconds can catch a new buildup before it becomes a problem.
What is the typical cost of professional gutter cleaning in Norfolk, VA?
Most homeowners pay between $120 and $250 for a standard two‑story home, depending on the length of the gutter run and the amount of debris. Prices can rise if you need extra services like downspout repairs or rust treatment. Getting a written estimate before work starts helps you compare quotes and avoid surprise fees.
How can I test my downspout drainage after cleaning?
Run a garden hose from the highest point of the gutter toward the downspout and watch the water flow. It should exit the downspout in a steady stream and land at least three feet away from the foundation. If the water pools or drips slowly, try a plumber’s snake inside the downspout, then re‑flush. A quick “rain‑simulation” with a bucket of water can also reveal hidden slow spots.


Comments