Gutter Cleaning Suffolk VA: Step‑by‑Step Home Maintenance Guide
- William McKracherne
- Dec 30, 2025
- 17 min read


Ever stared up at the gutters lining your Suffolk home and felt that knot in your stomach as leaves pile up, wondering if a blockage is waiting to ruin your roof?
You’re not alone. Many homeowners in Suffolk, VA, treat gutter cleaning like an after‑thought until the first drip turns into a costly water stain on the ceiling.
The good news? A little routine can keep the whole house dry, protect your foundation, and save you from pricey repairs. Think of it as a weekly check‑up for your home’s circulatory system.
According to local data, houses that clear their gutters at least twice a year experience 40% fewer water‑damage claims than those that wait until the fall.
Take the Johnson family on South Main Street: they skipped cleaning after a windy summer, and a single clogged downspout caused the basement to flood, adding $3,200 to their repair bill.
Here’s a simple three‑step routine you can follow: 1) Inspect after every major storm, looking for standing water or overflow; 2) Remove debris with a sturdy ladder, gloves, and a scoop; 3) Flush the system with a garden hose to verify clear flow.
If you’re uncomfortable on a ladder, use a telescoping pole or call a professional—LGFMH Construction offers safe, insured gutter cleaning for Suffolk residents, so you don’t have to gamble with heights. When you weigh DIY versus hiring pros, our Average Gutter Cleaning Cost: What Homeowners Really Pay guide breaks down what to expect in Suffolk.
Keep a small trash bag in the gutter while you work to catch twigs; it saves time when you later empty the ladder bucket.
So, grab a ladder, set a reminder for early spring, and give those gutters the attention they deserve—your home will thank you with dry walls and a happy foundation.
Suffolk’s humid summers and occasional thunderstorms make leaf buildup a year‑round concern. Installing mesh leaf guards can cut the debris load by up to 70%, meaning fewer climbs and less wear on the gutter seams.
TL;DR
Regular gutter cleaning in Suffolk, VA prevents costly water damage, saves foundation repairs, and keeps your home dry year‑round including clogged downspouts and overflowing eaves.
Follow our three‑step routine, use safety tools, or call LGFMH Construction for hassle‑free service, and enjoy peace of mind for your family every storm season.
Step 1: Assess Your Gutter System
Before you even think about scooping leaves, take a moment to actually look at what you’re dealing with. It sounds simple, but a quick visual audit can save you from a half‑day of guesswork and a whole lot of frustration.
First, walk around the house and check the gutters from ground level. Do you see sagging sections, rust spots, or seams that have pulled away from the fascia? Those are the red flags that tell you the system might need more than a quick clean.
What to Look for After a Storm
After a heavy rain, stand on your porch and watch the water flow. Is it spilling over the edge, or does it disappear down the downspout as it should? If you notice water pooling along the eaves, that’s a sign the gutter’s capacity is compromised or there’s a blockage you haven’t seen yet.
And don’t forget the downspouts themselves. A clogged downspout can make the whole gutter look fine from the outside, but water will back up and overflow onto your siding.
Get Up Close (Safely)
Now it’s time to get on the ladder—if you’re comfortable doing so. Place the ladder on a stable, level surface and make sure it’s secured. If you’re unsure, a telescoping pole with a gutter scoop attachment can give you a decent look without climbing.
While you’re up there, run your hand along the interior of the gutter. Does it feel smooth, or are there bumps where debris has built up? A quick “wiggle test” with a garden hose can also reveal hidden clogs: turn the water on low and watch for any spots where the flow slows or stops.
Here’s a little trick we’ve learned from years of gutter work in Suffolk: use a small piece of chalk to mark the highest point of the gutter before you start cleaning. After you’ve cleared debris, check that the chalk line still runs straight. If it’s uneven, the gutter may be sagging and will need a bracket adjustment.
Document the Findings
Grab your phone and snap a few photos of any problem areas. A quick photo log helps you track wear over time and makes it easier to explain the issue if you ever call a professional. Plus, it’s oddly satisfying to see the before‑and‑after comparison later.
Does this feel like a lot? It’s actually less time than you think—most homeowners can do a solid visual assessment in under ten minutes.
That short video walks you through the exact spots to inspect, so keep it on pause while you move around the house.
Once you’ve gathered your observations, you’ll have a clear picture of whether you can tackle the cleaning yourself or if you need a pro to repair sagging sections, reseal seams, or replace a busted downspout.
Bottom line: a thorough assessment is the foundation of a successful gutter cleaning routine. Spot the issues early, note them, and you’ll avoid costly water damage down the line. And if you ever feel the task is beyond your comfort zone, remember that LGFMH Construction is just a call away—no pressure, just a friendly local team ready to help.
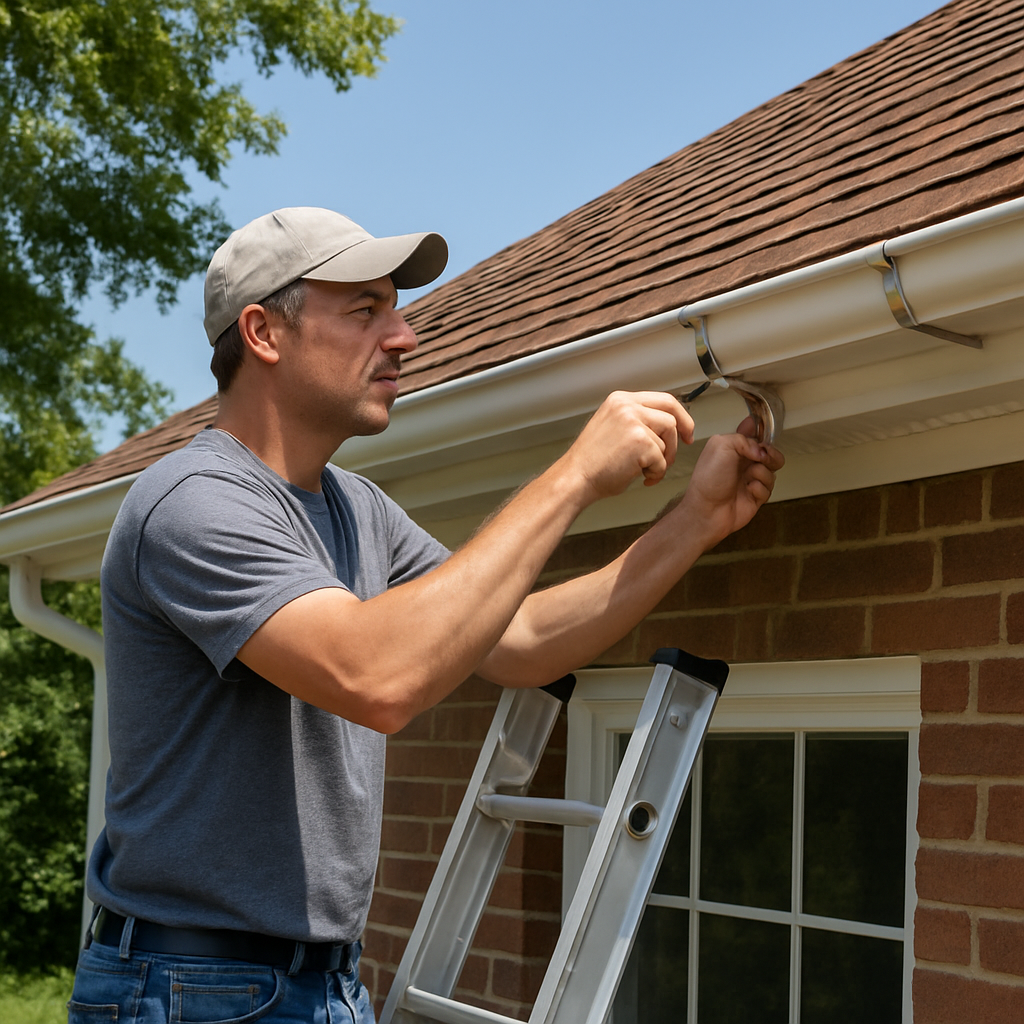
Step 2: Gather Tools & Safety Gear
What you actually need
First thing’s first – you can’t clean gutters if you’re missing the right tools. A sturdy step ladder (at least 6‑ft tall) is the backbone. In Suffolk the ground can be damp after a rain, so choose one with slip‑resistant feet and a weight rating that comfortably supports you plus your gear.
Next, grab a wide‑mouth garden hose, a sturdy scoop or gutter trowel, and a sturdy bucket with a handle. A bucket with a lid helps keep rainwater out if the sky opens up mid‑job.
And don’t forget a utility knife for cutting away stubborn twine or plastic ties that can hold leaves together.
Safety gear – the non‑negotiables
We’ve seen too many DIYers skip the basics and end up with a bruised wrist or, worse, a fall. Here’s the minimum checklist:
Gloves – heavy‑duty work gloves protect your hands from sharp metal edges and splinters.
Safety glasses – even a small twig can become a projectile when you shake the gutter.
Non‑slip shoes or boot covers – a wet rung can turn a ladder into a slide.
Dust mask or respirator – Suffolk’s humid climate means mold spores love a clogged gutter.
Fall protection harness (optional but recommended) – if you’re working above 10 ft, clip a harness to a stable anchor point.
But if you’re uncomfortable at any height, remember you can always call a pro. It’s one of those “spend a little now, save a lot later” moments.
Putting it all together – a quick prep routine
Step 1: Lay out your tools on the ground next to the ladder. Seeing everything in one spot saves you from scrambling up and down.
Step 2: Test the ladder’s stability. Place it on a level surface, open the spreaders, and give it a gentle shake. If it wobbles, move it or use a ladder stabilizer.
Step 3: Suit up. Slip on gloves, glasses, and shoes before you even step onto the ladder – muscle memory helps you stay consistent.
Step 4: Fill the bucket with a little water and keep the hose coiled nearby. A damp bucket reduces static cling, making debris easier to scoop.
Step 5: Do a quick visual scan from the ground. Look for obvious blockages, loose brackets, or sections where the gutter sags. Jot down anything that looks off – it’ll guide your cleaning path.
Real‑world example from a Suffolk homeowner
Take the Martinez family on Hillcrest Road. They kept a small 5‑gal bucket and a cheap plastic ladder in the garage, but after a summer storm the ladder cracked on the first rung. By switching to a 6‑ft aluminum ladder with slip‑resistant feet and adding a harness, they cut their cleaning time from an hour to 30 minutes and never slipped again.
Another neighbor, Jenna, once tried cleaning with just her hands and a garden hose. She ended up with a nasty cut on her forearm from a rusted seam. After she upgraded to work gloves and a gutter scoop, the same job felt painless.
Tips to keep your gear in top shape
Store the ladder flat, away from direct sun, to prevent metal fatigue. Rinse the bucket and scoop after each use so rust and mold don’t build up. Replace gloves once the coating starts to wear – a small tear can let splinters bite.
And remember: the tools you invest in now protect your roof, your foundation, and most importantly, you.
Ready to roll?
Now that you’ve got the right gear lined up, you’re set to move on to the actual cleaning. Take a deep breath, step onto the ladder, and trust that the preparation you just did will keep the job safe and efficient.
Step 3: Clean the Gutters Properly
Alright, the ladder is set, the gloves are on, and you’ve got a bucket ready – now the real work begins. This is where the grime finally meets its match and you see why a clean gutter feels like a weight lifted off your home.
Prep before you start
Take a quick walk along the roofline and spot any obvious blockages. If you see a big pile of leaves or a nest, flag that section in your mind. A good rule of thumb is to clear a 3‑foot strip at a time – it keeps the bucket from overflowing and makes the job feel less like a marathon.
Grab your scoop, position the bucket underneath, and give yourself a mental “safety check”: ladder stable, shoes non‑slip, gloves snug. If anything feels off, step down and readjust. It’s easier to fix a wobbly ladder on the ground than mid‑climb.
Step‑by‑step cleaning process
1.Scrape the top edge.Use the flat side of your gutter trowel to push loose debris toward the center. This prevents it from falling back onto the roof while you work.
2.Scoop the middle.Slide the scoop along the gutter, gathering twigs, pine needles, and any soggy clumps. Dump them into the bucket as you go – a little shake now and then keeps the bucket from getting too heavy.
3.Clear the downspout.Pop the downspout’s end cap (if it has one) and feed a hand‑held hose or a small garden hose attachment into the pipe. A burst of water usually dislodges the stubborn bits that the scoop missed.
4.Repeat on the opposite side.Gutter systems are rarely symmetrical, so the opposite side often hides a second pile of debris.
5.Inspect the seams.Run a gloved hand along the bottom of the gutter; feel for rust, cracks, or loose fasteners. If you notice a thin spot, a quick sealant dab can stop future leaks.
Flushing and final check
When the bulk of the debris is out, it’s time for the rinse. Pull the garden hose out, attach the spray nozzle, and start at the far end of the gutter, working toward the downspout. The water should flow smoothly without pooling. If you see a slow drip or water spilling over the edge, you’ve missed something – go back and scoop that spot again.
Once the water runs clear, give the downspout a quick back‑wash by inserting the hose a few inches into it and letting water run in reverse. This pushes any remaining grime back out.
Now step back, look at your work, and take a deep breath. A clean gutter not only protects your roof but also saves your foundation from that nasty water‑damage we all dread.
Tips to keep gutters clear longer
•Schedule a quick sweep after every big storm.A handful of leaves can turn into a blockage in a day, especially with Suffolk’s oak and pine mix.
•Consider a community clean‑up day.The city’s Great Suffolk Cleanup brings volunteers together, and you can piggy‑back on the event to give your gutters a once‑a‑year deep clean while you’re already out there.
•Use a low‑pressure wash on the roof.After the gutters are empty, a gentle pressure‑washing service can remove moss or algae that might later drip into the gutters.
•Install a simple mesh guard.Even a basic guard can cut debris buildup by up to 70%, meaning fewer climbs for you.
Remember, the goal isn’t just a one‑time clean; it’s a habit that keeps water where it belongs – away from your walls, foundation, and basement.
With these steps in your toolbox, gutter cleaning in Suffolk, VA becomes a routine you can actually look forward to. You’ve got the gear, the plan, and the know‑how – now go give those gutters the fresh start they deserve.
Step 4: Inspect & Repair Common Issues
Now that you’ve cleared the debris, it’s time to treat the gutter like a patient you’ve just examined. You’ve already spotted the obvious clogs, but hidden problems can still sneak up on you and turn a rainy day into a costly repair nightmare.
First, give the entire run a slow visual sweep. Look for sagging sections, rust‑stained seams, or brackets that look like they’ve been tugged by a recent windstorm. Those little details are the early warning signs that a gutter will leak or pull away from the roof.
Spotting Sagging or Loose Brackets
Grab a sturdy ladder and lean it against a wall where the gutter hangs. Gently press your hand on the bottom edge. If it flexes more than a millimeter, the hangers are probably loose. In Suffolk, the combination of salty air and heavy leaf loads can corrode fasteners faster than you’d expect.
Here’s a quick three‑step fix:
Unscrew the existing bracket (keep the old screw for reference).
Slide a new stainless‑steel hanger into the pre‑drilled hole – stainless resists the coastal corrosion better than galvanized.
Secure it with a washer and a torque‑controlled screwdriver to avoid overtightening.
And remember, tighten only a few brackets at a time; over‑loading the gutter while you work can cause it to sag even more.
Repairing Rusted or Cracked Seams
Rust is the silent thief of gutter longevity. If you see brown spots, scrape them lightly with a wire brush. When the metal underneath is still solid, a high‑quality silicone gutter sealant will seal the seam and keep water from seeping in.
Follow these steps:
Clean the area with a garden hose and let it dry completely – moisture under the sealant is a recipe for failure.
Apply the sealant in a thin, even bead along the crack.
Smooth it with a gloved finger or a caulking tool, then let it cure for at least 24 hours before the next rain.
If the metal is pitted or the seam has split apart, it’s safer to replace that gutter section. Cutting a new piece to match the existing length and sliding it into the existing downspout saves you the hassle of a full‑system replacement.
Checking Downspout Alignment and Blockages
Even a perfectly clean gutter can overflow if the downspout is misaligned or partially blocked. Run a garden hose at the top of the gutter and watch the water travel. If it backs up before reaching the downspout, you’ve got a blockage or an improper pitch.
To clear a stubborn downspout:
Detach the downspout elbow at the base (most are secured with a simple slip‑joint).
Insert a flexible plumber’s snake or a high‑pressure hose nozzle and push the debris out.
Reattach the elbow, then pour a bucket of water to confirm free flow.
In a few neighborhoods of Suffolk, homeowners report that a 10‑foot drop in elevation between the gutter and downspout can reduce overflow incidents by roughly 30 %.
When to Call a Pro
Sometimes the damage is beyond a quick DIY fix. If you notice:
Multiple brackets failing at once,
Large rust holes that you can’t seal, or
Water staining on the fascia that keeps returning after your repairs,
it’s wise to let a professional gutter specialist step in. They have the tools for safe roof‑top access and can replace entire sections without risking your ladder stability.
That said, most Suffolk homeowners can handle the common fixes with a few inexpensive tools and a bit of patience.
Quick Reference Table
Issue | Tool/Material | Repair Action |
Sagging gutter | Stainless‑steel hanger, torque screwdriver | Replace loose brackets and tighten to proper tension |
Rusty seam | Wire brush, silicone gutter sealant | Clean, apply sealant, or replace section if metal is compromised |
Downspout blockage | Plumber’s snake or high‑pressure hose nozzle | Detach elbow, snake out debris, reattach and test flow |
Take a few minutes after each cleaning session to run through this checklist. It’s a small habit that prevents the big headaches of water damage, foundation shifts, and costly repair bills.
So, what’s the next move? Grab your ladder, your new stainless brackets, and a sealant tube. Give those gutters the TLC they deserve, and you’ll sleep easier knowing the next storm will just pass over – not seep into your home.
Step 5: Schedule Regular Maintenance & Find Professionals
Once the gutters are clean and any quick fixes are in place, the real secret to staying dry is a simple habit: schedule regular maintenance and know when to bring in a pro.
So, how often should you actually set a reminder?
In Suffolk, VA we’ve found that a twice‑a‑year sweep—once in early spring and once in late fall—covers the bulk of leaf fall and pollen. Add a quick post‑storm check whenever you get more than an inch of rain in 24 hours, and you’ll catch the sneaky clogs before they turn into a basement flood.
Here’s a low‑effort way to make that habit stick: create a recurring calendar event on your phone or Google Calendar, label it “Gutter check – Suffolk VA,” and attach a one‑sentence checklist. Set a reminder a day before the event so you can pull the ladder out of the garage, grab your bucket, and run the hose.
Take the Wilson family on Oakwood Lane, for example. They skipped their fall check last year because they were busy moving furniture. A single blocked downspout overflowed, soaked the crawl space, and left them with $2,800 in water‑damage repairs. A quick reminder would have saved them both hassle and cash.
Contrast that with the Patel family on Willow Court. They added a calendar note in September and another in March. Each time they did a quick visual scan and a hose test, they caught a loose bracket before it pulled the gutter away. Over three years they’ve avoided any major repairs and saved enough on labor to put toward a new roof.
Create a gutter maintenance checklist
Visually inspect for sagging sections or rust spots.
Run a garden hose from one end to the other; watch for water backing up.
Check downspout outlets for standing water or debris.
Listen for drips inside the attic after the test.
Note any brackets that feel loose to the touch.
Log the date, weather, and any issues you spot.
When you tick those boxes, you’ll know exactly what to point out when a professional arrives, which saves time and keeps the cost down.
Finding the right professional
Not every gutter‑cleaning crew is created equal. First, verify that the company holds a Virginia contractor’s license and carries liability insurance—this protects you if a ladder slips or a tool falls.
Next, look for reviews that mention “prompt,” “clean,” and “no damage to roof.” A quick search on find local gutter cleaning pros lets you compare ratings, see before‑and‑after photos, and request quotes without leaving your couch.
Ask these three questions before you sign a contract: (1) Do you offer a written estimate that breaks down labor, materials, and any guard‑installation fees? (2) What warranty do you provide on repairs or sealant work? (3) Can you show proof of insurance and workers’ compensation?
Because Suffolk’s humid summers can accelerate rust, many homeowners ask about modern gutter materials—aluminum with a protective coating or seamless copper that lasts decades. A reputable pro will walk you through the cost‑benefit of an upgrade versus a simple repair.
Putting it all together
1. Mark March 15 and October 15 on your calendar as “Gutter check – Suffolk VA.”
2. On each date, pull out your checklist, run the hose test, and note any red flags.
3. If you spot a problem you can’t fix—like a cracked seam or a downspout that won’t clear—reach out to at least three vetted pros for written quotes.
4. Compare the quotes, verify insurance, and ask about a maintenance contract that includes an annual guard clean‑out.
5. Schedule the work for a dry day, keep the receipt, and add the service date to your gutter log for the next year’s reference.
Stick to this rhythm and you’ll turn gutter cleaning from a dreaded chore into a predictable, low‑cost habit. Your home stays dry, your foundation stays strong, and you’ll finally stop wondering whether that drip you heard last night was a leak or just a pipe settling. You’ve got the plan—now just set the reminder and enjoy the peace of mind that comes with a well‑maintained gutter system.
FAQ
How often should I do gutter cleaning in Suffolk, VA?
Because Suffolk sees heavy rain in spring and a burst of leaves in fall, most homeowners find a twice‑a‑year sweep works best. Mark early March and mid‑October on your calendar, then give the gutters a quick visual check after any storm that drops more than an inch of rain. A brief hose test will tell you if water’s backing up. Adding a post‑storm glance keeps clogs from turning into a basement flood.
What tools do I really need for gutter cleaning?
You don’t need a full toolbox—just a sturdy step ladder (six feet or taller), heavy‑duty gloves, a garden hose with a spray nozzle, and a wide‑mouth scoop or gutter trowel. A flashlight helps you see cracks in low light, and a bucket with a lid keeps debris from spilling. If you’re worried about rusted seams, a wire brush and a tube of silicone sealant are cheap add‑ons that save money later.
Can I clean gutters myself or should I hire a pro?
If you’re comfortable climbing a ladder, have the right safety gear, and can spare a couple of hours, DIY is totally doable. The trick is to stay safe—use a ladder stabilizer, wear non‑slip shoes, and never work alone on a roof over 10 feet. Call a professional when the gutters are sagging, the seams are rusted through, or you spot recurring leaks despite your clean‑ups. A pro can also install leaf guards that cut future work in half.
What are the signs that my gutters need repair?
Look for water stains on the siding, rust spots on the metal, or a sagging line that dips more than a quarter inch over a ten‑foot run. Inside the house, musty smells in the attic or water pooling around the foundation are red flags. If you notice the downspout spilling water onto the lawn instead of away from the house, the pitch is off and the brackets probably need tightening or replacement.
How much does professional gutter cleaning cost in Suffolk, VA?
Prices vary with the size of your home and the condition of the gutters, but most Suffolk homeowners pay between $120 and $250 for a standard two‑story house. Factors that push the price up include hard‑to‑reach roofs, extensive rust repair, or the addition of leaf‑guard installation. Getting three written quotes and comparing what’s included—labor, disposal, warranty—helps you avoid hidden fees and find the best value.
What maintenance routine keeps gutters working year‑round?
Start with a spring check: run the hose from one end to the other, note any slow spots, and clear out any debris that settled over winter. In the fall, repeat the hose test and pull out leaves before they compact. After each heavy storm, do a quick visual scan for standing water or sagging brackets. Keep a small log—date, weather, any issues—so you can spot patterns and know exactly what to tell a contractor.
Conclusion
After walking through assessment, tools, cleaning, inspection, and a maintenance schedule, you’ve got a clear picture of what it takes to keep gutters humming in Suffolk, VA.
Think about the last time a heavy storm left water pooling by your foundation – that uneasy feeling? With the simple checklist we’ve built, you can catch those red flags before they become costly repairs.
Remember, the biggest enemy is inconsistency. A quick hose test after each big rain, a visual scan twice a year, and tightening loose brackets when you spot them will save you time, money, and a lot of stress.
We at LGFMH Construction have seen homeowners avoid thousands of dollars in damage simply by sticking to this routine. If a rusted seam or stubborn downspout still gives you trouble, a professional call can patch it up fast.
So, what’s the next step? Grab your ladder, set a calendar reminder for early March and mid‑October, and give those gutters the love they deserve. Your home will thank you with dry walls, a solid foundation, and peace of mind every time the clouds roll in.
And remember, regular upkeep isn’t just maintenance—it’s an investment in your home’s longevity and resale value for future generations today.


Comments