How to Check a Roof Flashing Sealant Warranty
- William McKracherne
- Aug 22
- 8 min read

A roof flashing sealant warranty can look useful until you try to find its length, limits, or claim rules. Many product pages leave those details out. Use the steps below to find the right documents, inspect the repair, record the defect, and decide who should fix it.
Table of Contents
Step 1: Gather the Roof Flashing and Sealant Warranty Documents
Step 2: Inspect the Flashing, Sealant, and Surrounding Roof Area
Step 3: Check What the Roof Flashing Sealant Warranty Actually Covers
Step 4: Document the Problem Before Contacting the Installer or Manufacturer
Step 5: Decide Whether to File a Warranty Claim or Arrange Repairs
Step 1: Gather the Roof Flashing and Sealant Warranty Documents
Start by collecting every document tied to the roof flashing sealant warranty. Do this before you scrape away old sealant or approve a repair.
Look in your closing papers, repair invoice, email history, and maintenance folder. Search for the product name, the contractor’s name, the date of installation, and words such as “limited warranty,” “workmanship,” or “flashing system.” A photo of the sealant tube can help identify the maker when the invoice only says “roof repair.”
Ask for four records if you don’t have them:
The sealant product name and technical data sheet.
The manufacturer’s written warranty.
The installer’s workmanship warranty .
The invoice or work order showing where the product was used.
Keep material coverage separate from labor coverage. A manufacturer may cover a defective sealant. The installer may cover poor surface prep or an incorrectly sealed joint. Those are different promises, with different claim paths.
Some flashing systems have a full written warranty rather than a short product note. Read the actual flashing system warranty instead of relying on a product name alone. Check who issued it, what installation method it requires, and whether the warranty applies to a system or one tube of sealant.
LGFMH Construction can help when the paperwork is missing and the roof detail needs a closer look. Keep the original files, but make one working copy for your inspection notes. Never write on the only signed document.
Key Takeaway:You need the product warranty and the installer’s workmanship warranty before you can tell who is responsible.
Step 2: Inspect the Flashing, Sealant, and Surrounding Roof Area
A roof flashing sealant warranty claim depends on the cause of the failure, so inspect more than the crack you can see.
Only inspect the roof when conditions are dry and access is safe. If the roof is steep, wet, icy, fragile, or hard to reach, stop and arrange a professional inspection. A leak near a chimney or vent may begin several feet uphill from the ceiling stain.
From the ground or a safe access point, note the roof section first. Then check the flashing around vents, chimneys, skylights, wall edges, and roof-to-roof joints. Look for:
Sealant that has split, peeled, shrunk, or pulled away from metal.
Open corners or gaps at the ends of a flashing lap.
Loose metal, exposed fasteners, rust, or lifted edges.
Water marks below the joint or inside the attic.
Ponding, debris, or a blocked drainage path beside the flashing.
Do not assume the sealant caused the leak. Water can move beneath roofing layers before it reaches the ceiling. The source may be a loose flashing piece, failed membrane, damaged roof covering, or a nearby penetration.
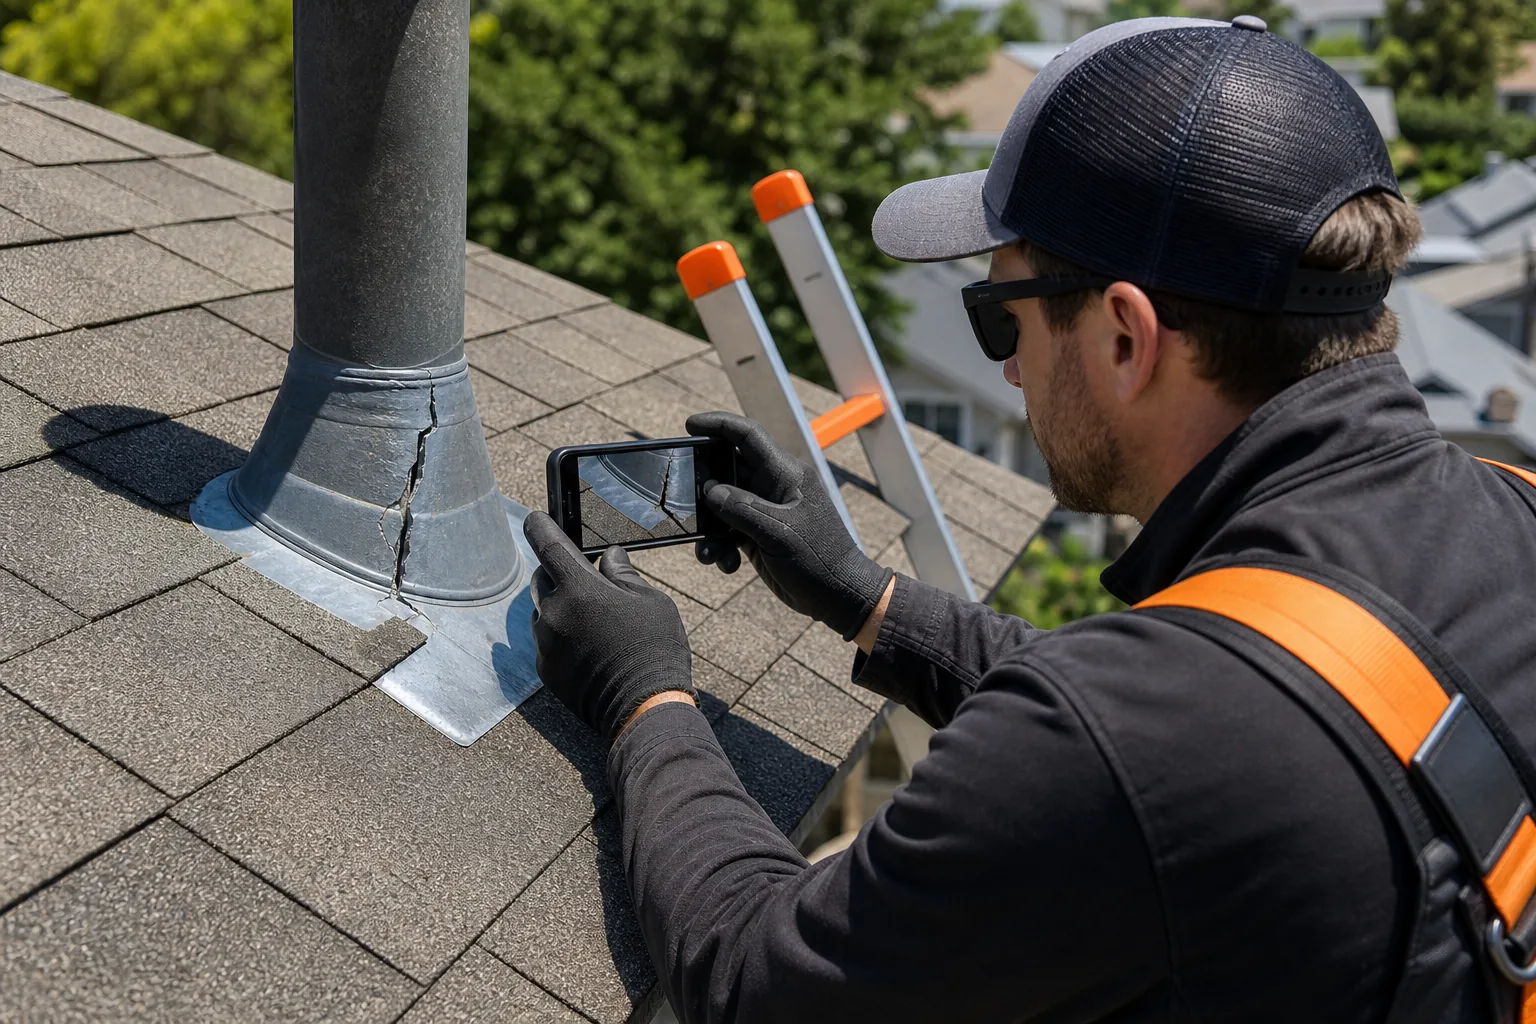
Take wide photos first. Then take closer photos that show the defect beside a fixed feature, such as a vent, chimney, wall, or roof seam. Add a ruler only if you can place it safely. Note the weather, roof section, and direction of the photo.
Warranty guidance often separates normal aging from a covered defect. Sun, rain, temperature shifts, poor drainage, and foot traffic can affect the seal. A warranty may also exclude work altered by another contractor. The inspection should record these facts without declaring coverage.
For a better product check, compare the sealant label with the roof surface. The material may need to bond to metal, masonry, membrane, or another substrate. If the product was used outside its instructions, that detail may affect the claim.
By now you should have a location map, a safe photo set, and a list of visible conditions. You should not have cut into the sealant yet.
Step 3: Check What the Roof Flashing Sealant Warranty Actually Covers
Read the roof flashing sealant warranty line by line. Look for the promise, the time limit, the required conditions, and the exclusions.
Make four headings on a sheet of paper:
Coverage:What failure does the warranty address?
Term:When does coverage start, and when does it end?
Conditions:What proof, installation method, or maintenance does it require?
Exclusions:What damage does it leave out?
A material warranty usually concerns a defect in the product. A workmanship warranty concerns the way the contractor installed it. If a sealant failed because it was defective, the manufacturer may be the right contact. If the joint was dirty, damp, too wide, or poorly shaped at installation, the contractor may need to review the work.
This split matters when a leak appears. A workmanship warranty may address a flashing joint that was sealed incorrectly. It may not cover a storm-damaged roof, normal aging, later alterations, or damage caused by someone walking on the roof.
The key distinction is that workmanship coverage concerns installation labor, while a material warranty concerns the roofing product itself. Use that distinction when you write your claim. State what failed and why you think it falls under that party’s responsibility.
Also check whether the warranty covers only replacement material or includes labor. Some documents limit the remedy to the product. Others may require the manufacturer to inspect the site before approving anything. A warranty can exist without paying for every related cost.
Request written terms before work begins.
Do not fill in missing terms from a sales page, a video review, or a verbal promise. Ask the provider to state the warranty length, covered failure, remedy, exclusions, claim deadline, and registration rule in writing.
If the document is vague, mark the item as “unconfirmed.” That is more accurate than calling the repair covered.
Step 4: Document the Problem Before Contacting the Installer or Manufacturer
Good documentation gives a warranty reviewer a clear boundary. It shows what you saw before anyone changed the roof.
Make one claim folder with the invoice, warranty, product details, inspection notes, and photos. Name each photo with the date, roof area, and feature shown. For example, “North roof, vent 2, cracked sealant, exterior view” is more useful than “IMG_1043.”
Write a short defect record. Include:
Property address and the date you noticed the problem.
Installer or supplier name.
Approximate installation date.
Exact roof location and room below.
Visible defect and signs of interior moisture.
Recent storms, roof work, or changes near the area.
Steps taken to limit damage.
Photograph the ceiling stain, attic area, roof feature, flashing, sealant bead, fasteners, and nearby drainage path. Keep both the wide view and the close view. If the sealant has already been repaired, keep the before photos and the repair invoice.
A claim should describe observations, not guesses. Write “sealant has separated along the lower flashing edge.” Don’t write “the sealant caused the leak” unless a qualified inspection established that link.
For a detailed record, strong inspection documentation identifies the area, boundary, condition, photos, repair basis, and follow-up method. The same habit works for a home roof, even when the form is much shorter.
Send copies, not originals. Ask the installer or manufacturer to confirm receipt and provide a claim number. Keep a log of each email, visit, inspection, and requested document.
If water is entering the home, take reasonable steps to protect ceilings and belongings. Do not apply a new bead over the old sealant before the responsible party has had a fair chance to inspect it, unless immediate safety or property protection requires action.
Pro Tip:Put one photo of the roof location beside each close-up defect photo. Reviewers can then match the defect to the claim without guessing.
Step 5: Decide Whether to File a Warranty Claim or Arrange Repairs
Choose the claim path after you know what failed, who supplied it, and whether delay could cause more damage.
File with the installer when the evidence points to labor. Examples include a flashing piece that was fitted poorly, a joint that was left open, or sealant that was applied over a dirty or wet surface. Contact the manufacturer when the product itself appears defective and the installation followed the written directions.
Contact both parties when the cause is unclear. Give each one the same facts. This prevents two separate versions of the event from entering the file.
Before you submit anything, check the warranty for:
Notice deadlines.
Required photos or proof of purchase.
Inspection and access rules.
Approved repair methods.
Labor limits and replacement limits.
Exclusions for maintenance, storms, alterations, or ponding water.
Roof warranties commonly depend on the source of the leak. Material defects and installation errors usually follow different warranty paths. A warranty is not general insurance for every roof problem.
Arrange an urgent repair when water is actively entering the home, the flashing is loose, or more damage may occur while you wait. Tell the contractor that a warranty review is pending. Ask for photos before work starts and an itemized invoice after the repair.
LGFMH Construction can review flashing and sealant problems when you need a repair assessment rather than a document search. Ask for the proposed repair scope in writing. It should say whether the work is a reseal, refastening, flashing replacement, or a wider roof repair.

Do not sign a release until you understand what the payment covers. A small reseal may address one joint while leaving corroded metal or a nearby roof defect untouched. The repair record should state what was fixed and what remains outside the scope.
After the work, photograph the finished area. Record the product used, the date, the cure instructions, and any follow-up inspection. Set a reminder to check the detail after the next period of heavy rain.
Decision rule:Claim first when the roof is stable and the paperwork is clear. Protect the home first when delay could worsen the damage, then preserve evidence before the repair starts.
FAQ
What does a roof flashing sealant warranty cover?
A roof flashing sealant warranty may cover a defective product, faulty installation, or both, depending on the document. Material coverage usually addresses the sealant itself. Workmanship coverage usually addresses how the flashing or sealant was installed. Check the stated remedy, time limit, exclusions, and labor terms before assuming a leak qualifies.
How long does roof flashing sealant warranty coverage last?
The coverage period depends on the specific product, service agreement, and installer warranty. Some providers publish a term, while others leave the length unstated. If your paperwork has no clear start date or end date, ask for written confirmation. Don’t rely on the expected life of the sealant as proof of warranty coverage.
Does a roof warranty cover a flashing leak?
A roof warranty can cover a flashing leak when the leak comes from a covered installation error or defective material. It may exclude storm damage, normal aging, poor maintenance, later alterations, or damage near an unrelated roof defect. Document the flashing and nearby roof area before making repairs.
Do I need to register roof flashing sealant for a warranty?
Registration depends on the written warranty. Keep your invoice, product details, installation date, and photos. Ask the provider whether a claim needs registration or another proof of purchase.
Who should fix failed roof flashing sealant?
The installer should review a failure caused by poor workmanship, while the manufacturer should review a defective sealant. When the cause is unclear, send the same inspection record to both. LGFMH Construction may be able to assess the roof detail and explain whether the problem appears limited to sealant or involves the flashing itself.
Conclusion
Don’t approve a roof flashing sealant repair on a verbal warranty promise. Gather the documents, photograph the full roof detail, and ask the responsible party to confirm coverage in writing. If water is entering or the flashing is unsafe, contact LGFMH Construction for a written repair assessment while preserving the evidence needed for any claim.


Comments