How to Fix a Leaking Outdoor Faucet Near Garage
- William McKracherne
- Jun 15
- 4 min read

A dripping outdoor faucet near your garage isn't just annoying , it wastes water and can damage your foundation. Most homeowners think tightening the handle will stop the drip, but that often makes things worse. Here's how to fix it yourself in about 20 minutes with basic tools.
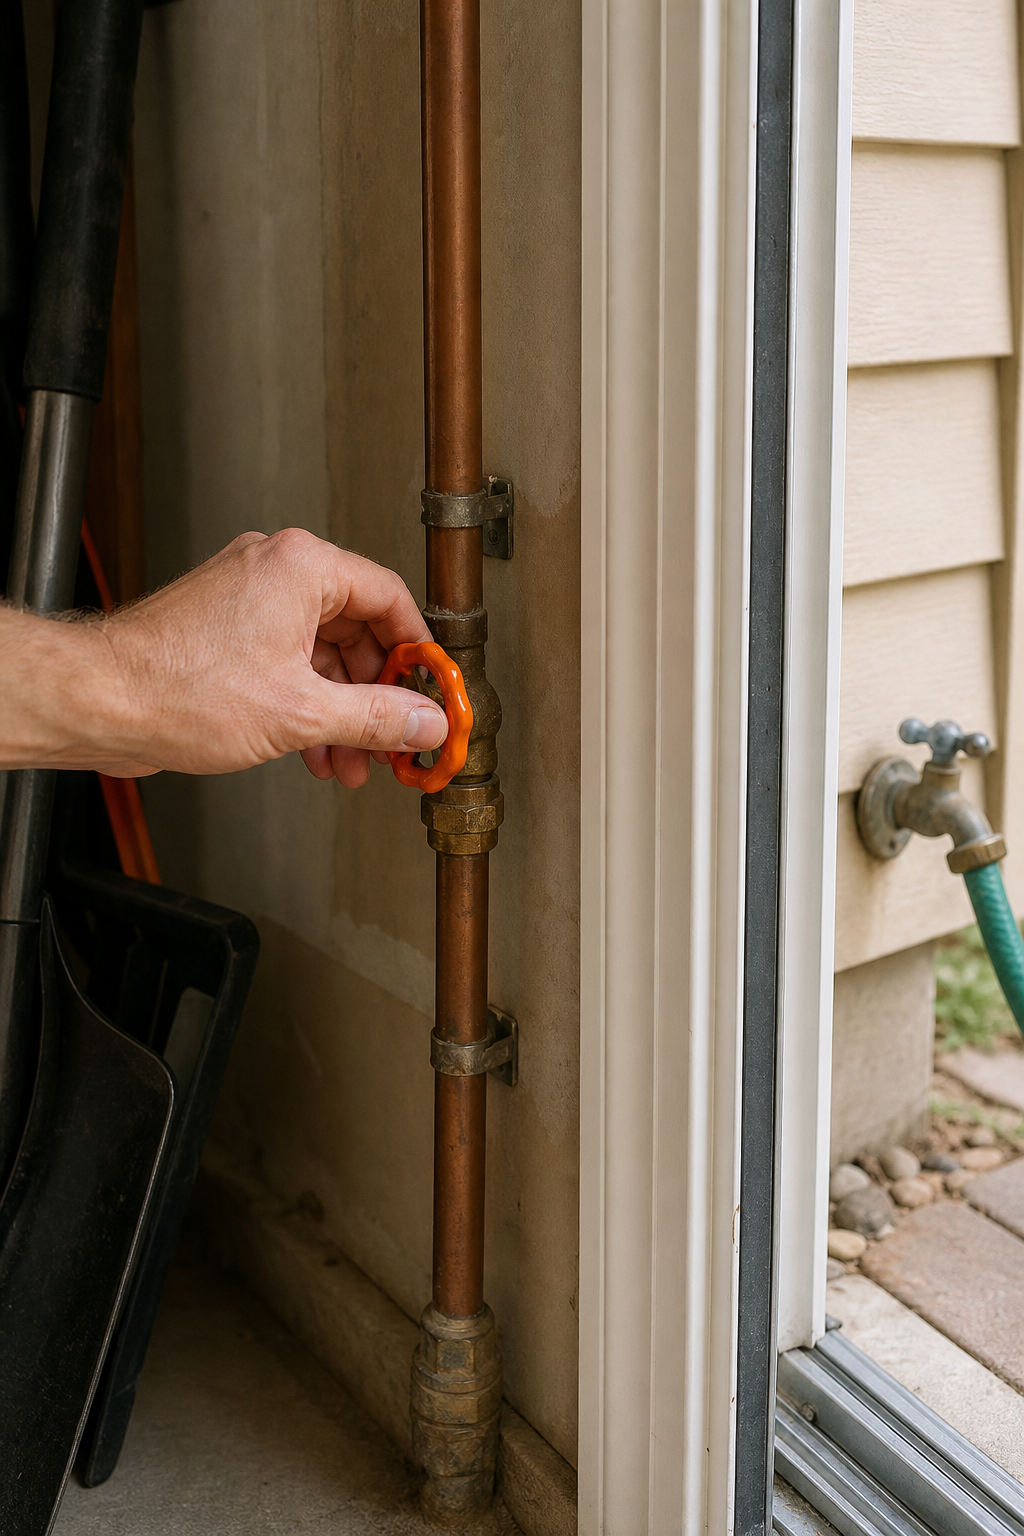
Step 1: Turn Off Water Supply and Drain the Faucet
Before you touch anything, shut off the water to the outdoor faucet. Look for a shut-off valve inside your garage or basement on the pipe leading to the faucet. Turn it clockwise until it stops. If there's no dedicated valve, shut off the main water supply for your house.
Next, open the outdoor faucet all the way to drain any water left in the pipe. Leave it open for a minute until the flow stops completely. This step prevents water from spraying everywhere when you take the faucet apart. Draining outdoor faucets is also key to preventing frozen pipes in winter.
Step 2: Disassemble the Outdoor Faucet
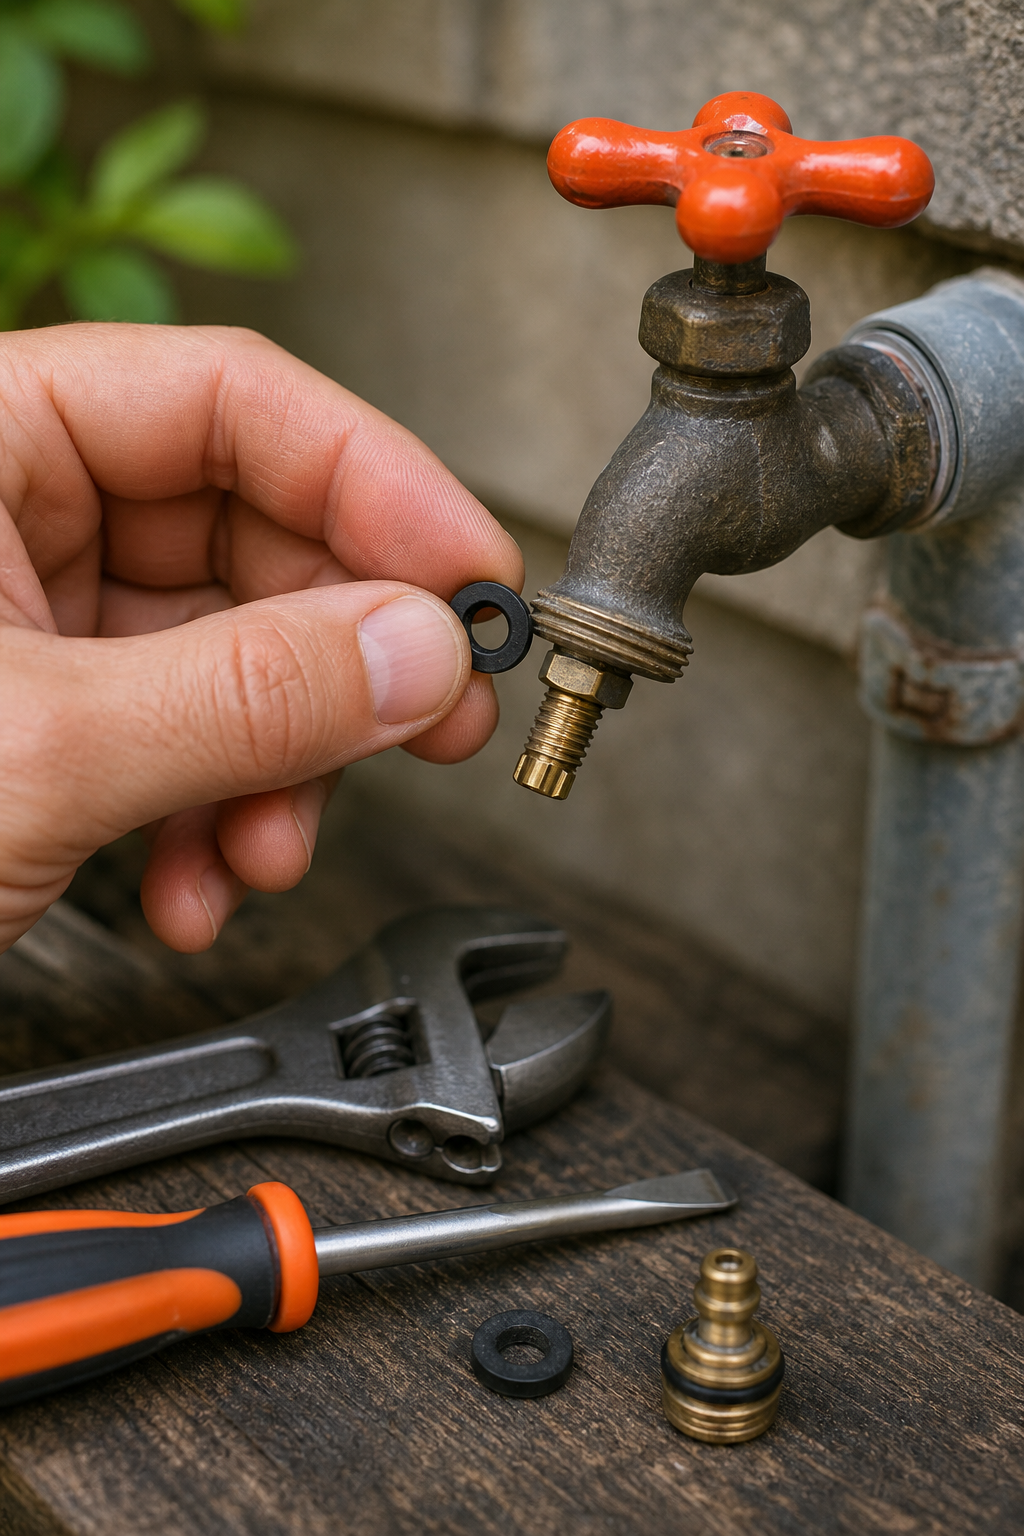
Once water is off, remove the handle. Most handles are held by a small screw under a decorative cap , pop the cap off with a flathead screwdriver, then unscrew the handle. Pull the handle straight off.
Now you'll see the packing nut (the hex-shaped nut behind the handle). Use a wrench to loosen it. If it's stuck, spray some penetrating oil and let it sit for five minutes. Be careful not to overtighten when loosening , you just want to break the seal. A community discussion on Home Improvement Stack Exchange warns that using pliers can damage the nut; a snug-fitting wrench or socket works best.
After the packing nut is loose, unscrew the entire valve stem assembly from the faucet body. You may need to pull it straight out with some force. The rubber washer at the bottom of the stem is usually the culprit.
Step 3: Identify the Leak Type
Now that the faucet is open, look closely at the rubber washer and the stem seat. There are two common leak locations:
Leak Location | Signs | Likely Cause |
Around the handle / packing nut | Water seeps out when faucet is on or off | Worn packing washer or loose nut |
From the spout when faucet is off | Drips continue after closing | Worn stem seat washer |
If water leaks around the handle, the packing nut just needs tightening or a new packing washer. If it drips from the spout when off, you need a new stem washer. Both fixes are basic DIY repairs and take about 15 minutes.
Watch this short video for a visual walkthrough of identifying the leak type:
Step 4: Replace Damaged Parts
If the stem washer is worn, take it to your local hardware store to match the size , they're standard but sizes vary. Pick up a new packing washer too if the old one looks cracked.
Remove the old washer from the stem (it's usually held by a small brass screw). Put the new washer in place and tighten the screw. For the packing nut, wrap a few layers of Teflon tape around the stem threads below the nut, then screw the nut back on hand-tight.
LGFMH Construction recommends replacing both washers at the same time, even if only one looks bad , they're cheap and you don't want to disassemble the faucet again soon. If the valve seat inside the faucet body is pitted or corroded, you may need a seat-dressing tool or a complete faucet replacement. For tough jobs, consider calling in a professional. LGFMH Construction offers Interior and Exterior Repairs and Replacements that cover outdoor fixtures just like this.
Step 5: Reassemble and Test for Leaks
Put the valve stem assembly back into the faucet body. Tighten the packing nut with a wrench until snug , don't overtighten. Apro tip from research: overtightening can damage the new parts and cause leaks. Hand-tight plus a quarter turn is usually enough.
Reattach the handle and turn the water supply back on. Open the faucet fully and check for drips from the spout and around the handle. If it still leaks, you may have the wrong washer size or a damaged valve seat.
If the test shows no leaks, congratulate yourself on a successful repair. But if the leak persists or you notice water behind the wall, it's time to call a pro. Persistent leaks can lead to structural damage and should not be ignored.
Frequently Asked Questions
Why is my outdoor faucet leaking only when I attach a garden hose?
This usually means there's a crack in the pipe or the faucet body itself. The backpressure from the hose widens the crack, causing a leak. Check for water inside the wall near the faucet. If you find moisture, call a professional like LGFMH Construction to replace the faucet.
Can I use plumber's tape on the packing nut?
Yes, Teflon tape works on the stem threads below the packing nut to help seal it. But don't put tape on the washer surfaces , the seal needs rubber-to-metal contact. Use tape only on threads that screw together.
How long does it take to fix a leaking outdoor faucet?
Most DIY repairs take 15 to 30 minutes, including shutting off water and testing. If you need to run to the hardware store for washers, add travel time. Professional replacement takes about an hour.
What if the faucet still leaks after replacing the washer?
You may have a damaged valve seat inside the faucet body. You can try a seat-dressing tool to smooth it, or replace the entire faucet. If the faucet is more than 10-15 years old, a full replacement is often better.
Is it safe to leave a leaking outdoor faucet over winter?
No. A leak can freeze and burst the pipe behind the faucet, causing major water damage inside your wall. Fix it before freezing weather arrives, or at least shut off and drain the water supply to that faucet.
Conclusion
Fixing a leaking outdoor faucet near your garage is a straightforward DIY job if you have a wrench and a few minutes. Follow the steps above , turn off water, disassemble, replace the washer, and reassemble carefully to avoid overtightening. If the leak comes back or you find hidden wall damage, trust LGFMH Construction to handle the repair fast and right. Next, you might want to explore HVAC financing plans if you're planning other home system upgrades.


Comments