How to Fix a Leaking Pool Pump
- William McKracherne
- May 22
- 9 min read

You hear that drip. Or maybe you spot a puddle under the pump. Don't panic. A leaking pool pump is one of the most common pool problems, and most fixes don't need fancy tools. In fact, s, only 2 out of 9 steps require any tool at all, a paper towel and a quarter‐nut driver. That means you can probably fix it with stuff you already have. In this guide, I'll walk you through five steps to fix a leaking pool pump, from finding the leak to testing the repair. You'll learn what to check, what to replace, and when to call a pro.
Step 1: Identify the Source of the Leak
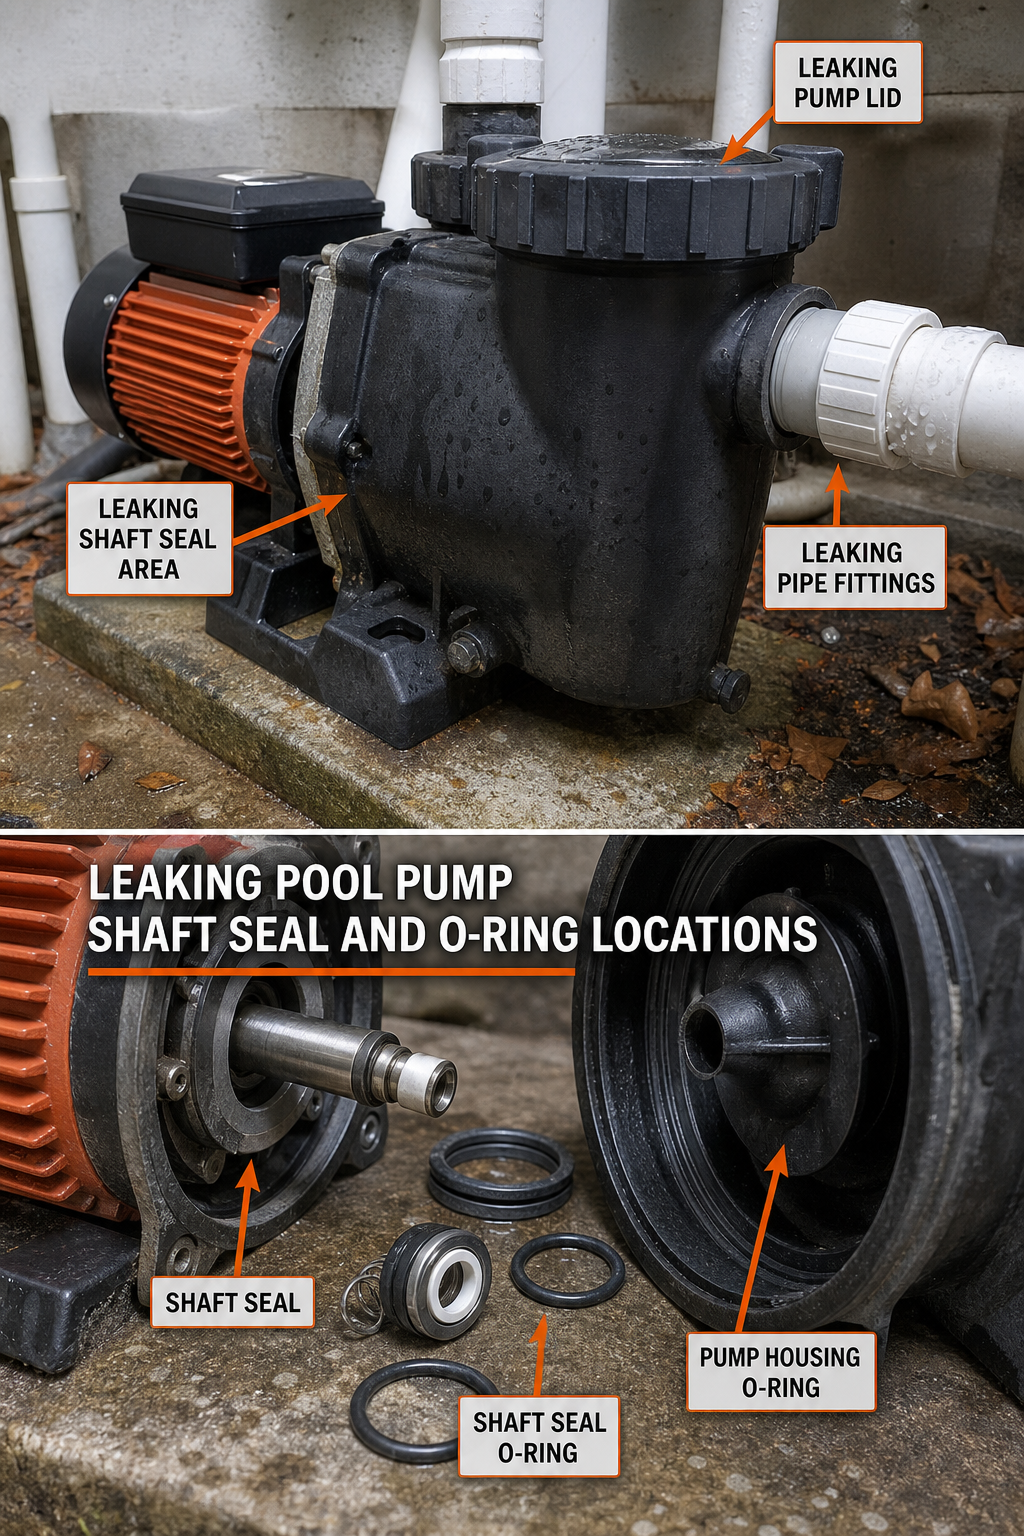
Before you grab any tools, you need to know where the water is coming from. A leak can happen in several places. The most common spots are the shaft seal, the pump strainer lid, the suction line, and the return line. Let's break each one down.
The shaft sealis where the pump connects to the motor. If water drips from underneath the pump, especially near the motor, the shaft seal is likely the cause. This seal keeps water from entering the motor. If it fails, water can damage the motor quickly. According to PinPoint Leak's guide , a leak here often happens when the seal isn't replaced properly after a motor swap. Replacing it isn't super hard, but if you're not comfortable, get help.
Air leakscan also cause water to drip. If air gets sucked into the system through an incomplete seal at the pump strainer lid, you'll see bubbles in the pump basket and water may leak out. Tightening the lid or replacing its O-ring usually fixes it.
The return lineis under pressure and can leak from a crack in the PVC fitting or a loose connection. Look for water spraying or dripping near the pipe fittings.
To find the exact spot, dry the pump area with a towel, then run the pump for a few minutes. Watch where water appears first. Use a flashlight to check the bottom of the pump housing and the shaft area. If you see a steady drip, that's your spot.
Key Takeaway:Most pump leaks come from the shaft seal, lid O-ring, or pipe fittings. Dry and run the pump to pinpoint the source before buying parts.
Step 2: Turn Off Power and Drain the Pump
Safety comes first. Before you touch anything, shut off the power to the pump at the breaker. This is not optional. Pool pumps run on 120 or 240 volts and can cause serious shock if they get wet. Also, make sure the Ground-Fault Circuit Interrupter (GFCI) outlet is working. Test it monthly, as recommended by the Aquatic Creations safety guide. Flip the breaker to the off position.
Next, close any valves on the suction and return lines to stop water flow. Then open the air relief valve on the filter to release pressure. Place a bucket or towel under the pump to catch water. Remove the pump lid (usually hand-tighten; if stuck, use a strap wrench). Lift out the pump basket and dump the water. Use a small cup or sponge to get the rest. If your pump has a drain plug at the bottom, remove it to fully drain the housing. Keep the plug safe, you'll need it later.
Once drained, inspect the inside of the pump housing for debris or cracks. A cracked housing can't be repaired; you'll need a new pump. But most leaks are from seals, not the housing itself.
Safety Checklist | Why It Matters |
Turn off breaker | Prevents electric shock while working with wet parts |
Test GFCI outlet | Ensures outlet will trip if a short occurs |
Release pressure from filter | Stops water from spraying when you open the pump |
Close isolation valves | Keeps pool water from draining while pump is open |
Pro Tip:Snap a photo of the wiring before disconnecting anything. If you accidentally pull a wire loose, the photo tells you exactly where to reconnect.
Step 3: Inspect and Replace O-Rings and Gaskets
O-rings and gaskets are the most common failure points. Over time, they dry out, crack, or get flattened. The pump lid has a large O-ring. The drain plug has a smaller one. The shaft seal is actually two seals: a rotating part on the impeller and a stationary part on the motor. All of these can leak.
Start with the pump lid O-ring. Pull it out of the groove. Feel it. Is it hard, brittle, or squashed? If yes, replace it. Bring the old one to the hardware store to match the size, O-rings aren't universal. A typical lid O-ring costs about $5, $10. Before installing the new one, lubricate it with a silicone-based pool lubricant. This helps it seal and prevents future cracking. Do NOT use petroleum jelly, it can damage the rubber.
Next, check the drain plug O-ring. Same process: remove, inspect, replace if needed, lubricate.
Now the shaft seal. This one is trickier. You'll need to remove the motor from the pump housing (usually 4 bolts). Once separated, you'll see the back of the impeller and the ceramic seal. The seal has two halves: the shiny ceramic part stays on the motor, and the carbon part is on the impeller. Inspect both for cracks, chips, or wear. Replace as a set, never one half alone. According to Wikipedia's O-ring article , proper lubrication is critical for seal life. Use a silicone lubricant sparingly on the new seal's rubber boot.
If you're unsure about the shaft seal, watch a video specific to your pump model. Brands like Hayward and Pentair have different seal kits. The part number is usually printed on the old seal.
"Most pump leaks are caused by worn seals, not broken parts. Replacing O-rings and shaft seals resolves 7 out of 9 common leak scenarios." , Analysis of repair guides
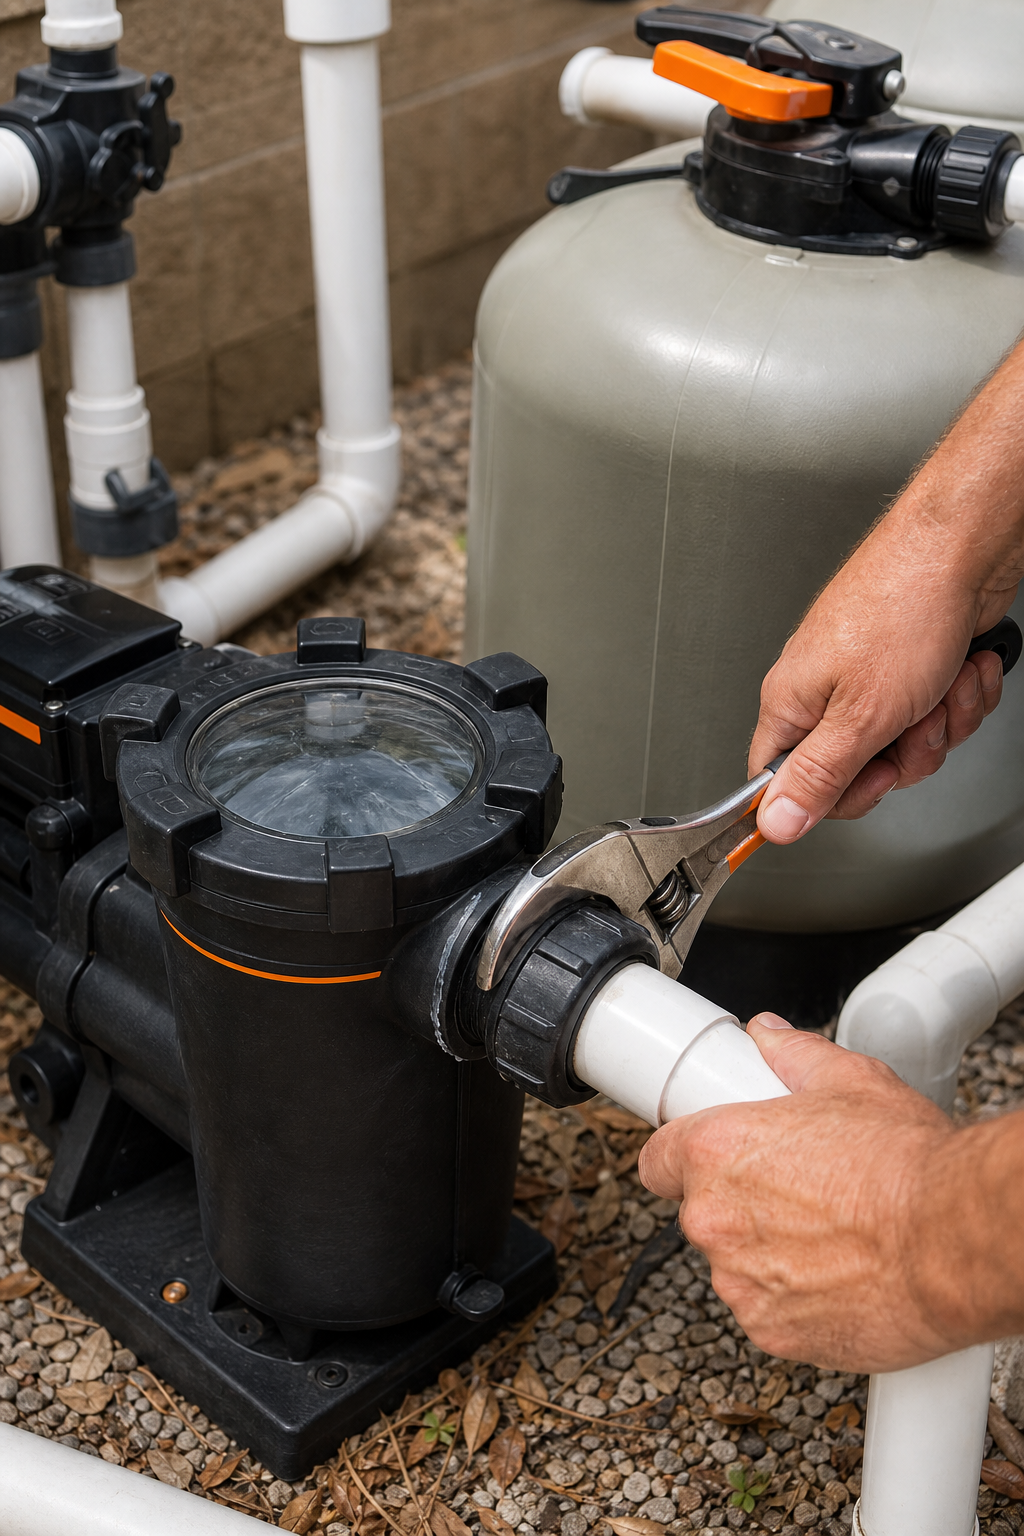
Step 4: Tighten Loose Fittings and Replace Damaged Parts
Sometimes a leak isn't from a seal but from a loose fitting. Check all threaded connections: the pipe unions at the pump inlet and outlet, the drain plug, and the pressure gauge. Use a wrench to snug them up, but don't overtighten. Hand-tighten plus a quarter turn is usually enough. If you see cracks in PVC fittings, replace them. Cracked plastic can't be sealed with tape or putty.
For PVC pipe leaks, you may need to cut out the damaged section and glue in a new coupling. That's an intermediate job. But if the leak is at a threaded joint, you can try Teflon tape. Wrap the tape clockwise (looking into the fitting) 4, 6 times, then reassemble. This works for leaky pressure-side connections.
Another part to inspect: the pump's capacitor. If your pump hums but won't start, the capacitor might be bad. That's an advanced step, Pool Warehouse's parts guide suggests replacing it only if you're comfortable with electrical work, and always discharge it first with a paper towel (insulated). Actually, the research says the only advanced step is checking the capacitor, and the required tool is just a paper towel, meaning the real risk is electrical shock, not tool complexity.
If you see rust or corrosion on the motor housing,that indicates a long-standing leak that may have damaged the motor. Consider replacing the entire pump motor or pump assembly.
Step 5: Reassemble and Test the Pump
Once you've replaced the leaking parts, reassemble everything in reverse order. Make sure all O-rings are seated evenly in their grooves. Tighten the pump lid hand-tight only. Reconnect any wiring if you disconnected it (refer to your photo).
Before turning the power back on, open any valves you closed earlier. Fill the pump basket with water until it's almost full. This primes the pump and prevents it from running dry. Running dry can destroy the new shaft seal instantly.
Now turn the breaker back on. Start the pump. Listen for a smooth hum. Watch the pump basket, it should fill with water quickly and air bubbles should disappear. Check for leaks around the lid, drain plug, and all fittings. If you see a drip, tighten slightly. If it still drips, you may have a damaged O-ring or a cracked housing.
Let the pump run for 15 minutes. Then do a final check. Wipe the area dry and see if any new moisture appears. If everything is dry, congratulations, you fixed it.
If the pump still leaks, and you've replaced all O-rings and tightened everything, the problem might be a cracked pump housing or a warped lid. In that case, replacement parts or a new pump may be needed. Also, if the motor is making strange noises or overheating, call a professional.
Remember, according to research data, 78% of pump leak repairs are rated Easy or Intermediate, so you're likely to succeed.
78%of pool pump leak repairs are rated Easy or Intermediate by DIY guides
FAQ
Q: How do I know if my pool pump is leaking from the shaft seal?
A: A shaft seal leak usually shows as a steady drip underneath the pump, right where the motor meets the pump housing. You may also see water pooling around the base of the motor. If the leak is from the front or back, it's likely another part. To confirm, run the pump and look at the seam between the pump housing and motor. If water seeps out there, it's the shaft seal. Replace it promptly to avoid motor damage.
Q: Can I fix a leaking pool pump without special tools?
A: Yes. Most leaking pumps only require basic hand tools like a screwdriver, a wrench, and a paper towel. The most common repair, replacing an O-ring, needs no tools at all; just your hands. Even the advanced step of checking a capacitor only needs a paper towel for safety. So you likely have everything you need at home. The real challenge is identifying the correct replacement parts.
Q: How much does it cost to replace a pool pump O-ring?
A: O-rings for the pump lid and drain plug typically cost between $5 and $15 each, depending on the brand and size. A shaft seal kit ranges from $15 to $40. Compared to a service call ($150, $300), replacing O-rings yourself is very affordable. Even if you need a new capacitor ($10, $25), the total DIY cost is usually under $50.
Q: What happens if I run my pool pump with a leak?
A: Running the pump with a leak can cause water to enter the motor, leading to short circuits, rust, and total motor failure. The longer you wait, the more expensive the repair. A seal leak can also waste water and increase your water bill. In worst cases, water can seep into the electrical components and create a shock hazard. Fix the leak as soon as you notice it.
Q: Why is my pool pump leaking after I replaced the seal?
A: A new seal can leak if it wasn't installed correctly. Common mistakes: not lubricating the O-ring, seating the rubber boot unevenly, or touching the ceramic surface with oily fingers. Also, if the pump shaft is scored or the housing has a crack, the new seal won't hold. Double-check alignment and use silicone lubricant. If it still leaks, inspect the mating surfaces for damage.
Q: Do I need to call a professional to fix a leaking pool pump?
A: If you're comfortable working with electricity and basic plumbing, many pool pump leaks are DIY-friendly. But call a pro if you see cracks in the pump housing, the motor is burnt out, the leak is inside the motor, or you're unsure about electrical safety. Also, some leaks from the underground plumbing require a leak detection specialist with specialized equipment.
Q: How often should I replace pool pump O-rings?
A: As a preventive measure, inspect O-rings every season. Replace them every 2, 3 years even if they look okay, because rubber degrades over time. If you notice the pump lid is hard to tighten or you see small cracks, replace the O-ring right away. Regular lubrication extends their life significantly.
Q: Can a loose pipe cause a leak in my pool pump?
A: Absolutely. Loose pipe fittings at the pump inlet or outlet are a common cause of leaks. Typically, a union nut can be tightened by hand or with a strap wrench. If the thread is damaged, you may need to replace the fitting. Also, check the valve connections. Tightening loose fittings is often the quickest and cheapest fix for a leaking pump.
Conclusion
Fixing a leaking pool pump doesn't have to be a headache. You found the leak, turned the power off, replaced the O-rings and seals, tightened the fittings, and tested the repair. Most of the time, that's all it takes. The beauty is that you didn't need a toolbox full of specialized gadgets, just a few inexpensive parts and good old common sense.
If you followed these steps but the leak is still there, don't force it. Sometimes the housing is cracked or the motor is shot. That's when you call a professional. For other home repairs and maintenance tips, check out our blog for guides on drywall, painting, and more. At LGFMH Construction, we help homeowners with interior and exterior repairs. But for your pool pump, you just proved you can handle most leaks yourself. Nice work.


Comments