How to Fix a Leaking Shower: A Step‑by‑Step Guide
- William McKracherne
- Feb 28
- 18 min read

Ever stepped into your bathroom, turned on the shower, and heard that annoying drip‑drip‑drip even before the water hits the floor? It’s the kind of tiny nuisance that makes you wonder if you’ll need a whole new bathroom renovation tomorrow.
Most of us assume a leaking shower is just a squeaky faucet or a loose tile, but the reality is usually a bit messier. Water can sneak through a worn‑out valve, a cracked tub liner, or even a failing grout line, and before you know it you’re dealing with damp drywall, moldy smells, and a slippery floor that feels like a hazard.
Here’s a quick way to get your sanity back: first, shut off the water at the shower’s valve or, if you can’t locate that, turn off the main supply to the house. Then, pull back the curtain or open the door and do a visual sweep. Look for water pooling on the floor, rust on the metal fittings, or any discoloration around the grout. Those clues tell you where the leak is really coming from.
Once you’ve pinpointed the source, the repair steps are surprisingly straightforward.Step 1:Remove the affected tile or panel – a pry bar and a utility knife do the trick.Step 2:Inspect the underlying pipe or tub liner for cracks; a simple rubber washer replacement often stops a faucet leak in its tracks.Step 3:If the grout is the culprit, scrape out the old material, clean the area, and re‑apply a waterproof epoxy grout.Step 4:Seal everything with a high‑quality silicone caulk, smoothing it with a wet finger to avoid gaps.
Imagine a family in Virginia Beach who noticed a slow drip after a summer storm. They followed these steps, and not only stopped the leak, but also discovered that the subfloor had begun to rot. After fixing the plumbing, they called a trusted flooring specialist to replace the damaged board, which saved them from a costly mold issue later on.
If you find that the subfloor is compromised, it’s a perfect moment to think about upgrading the bathroom flooring. A reputable contractor like Millena Flooring can match the new waterproofing work with beautiful, durable flooring that stands up to future moisture.
When the problem feels beyond a DIY fix – for example, persistent leaks behind the wall or extensive water damage – it’s time to bring in the pros. Our team at LGFMH Construction has tackled countless shower leaks, and you can read more about our approach in our roof leak repair guide, which shares the same water‑damage principles.
Quick checklist before you finish: turn off water, locate the leak, remove damaged material, replace washers or grout, reseal with silicone, and inspect the subfloor. If anything looks warped or soggy, call a professional and consider fresh flooring. You’ve got the know‑how now – go ahead and make that shower dry again.
TL;DR
Turn off the water, find the leak, replace cracked washers or grout, reseal with silicone, and inspect the subfloor for rot before you finish.
If the damage looks beyond a quick DIY fix, let LGFMH Construction handle the repair and upgrade, saving you time, money, and future mold headaches today.
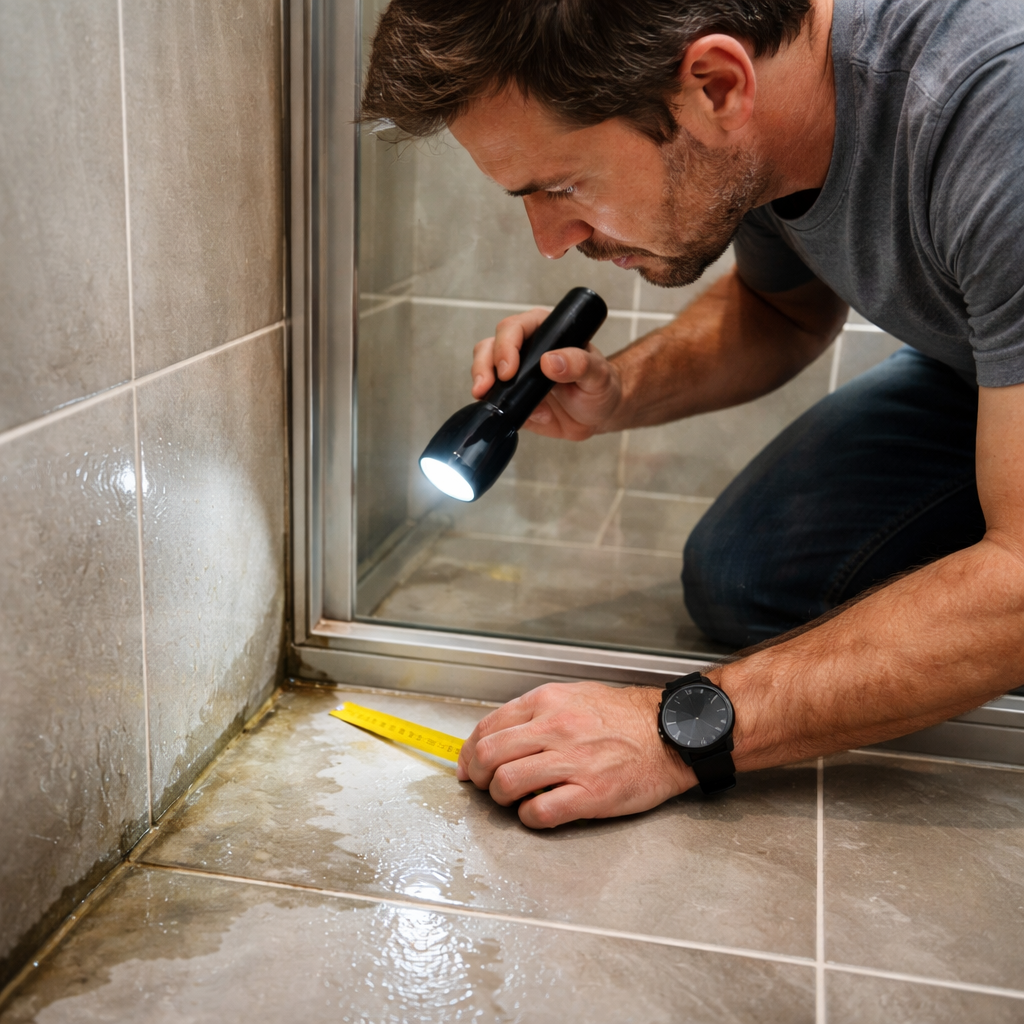
Step 1: Identify the Source of the Leak
Let me be completely honest: a shower leak can feel like a tiny mystery. You want to know where it’s coming from without turning your bathroom into a science experiment. In our experience at LGFMH Construction, the source isn’t always where you expect it to be, so start with the most obvious clues and work inward.
What you will do here is map the leak like a flashlight beam in a dark room. You don’t need fancy tools yet, just a careful eye and a willingness to test a few theories. The goal is to separate surface issues from hidden problems, so you don’t waste time chasing the wrong fix.
Start with the splash zone
Begin by inspecting the area where water meets the floor. Look for damp patches, darker grout lines, or a faint mineral streak along the shower curb. If moisture shows up mainly on the floor, the culprit could be a sealant failure or a small crack in the base. If you notice dampness climbing the wall, there’s a decent chance water is seeping behind the tile or over a pan edge.
Ask yourself: does the moisture pool near a specific joint or travel along a seam? Those patterns matter. They point you toward the most likely failure and help you avoid unnecessary demolition later on.
Trace the water path
Now flip the water switch off at the valve and open the shower to relieve pressure. If you can safely observe the area while someone else runs the water for a short burst, you’ll start to see where moisture moves first. A path that follows grout joints usually means grout or tile backing is compromised. Moisture that travels behind panels or into the wall points to a pan liner, tub surround, or a concealed pipe issue.
It’s not just about seeing wet spots. Notice if the water stops at a certain height or if it migrates in a particular direction. This is where your gut starts to click with the data you’re collecting.
Test with simple checks
Caulk and grout joints: run a finger along the seam. If it feels soft or crumbly, the sealant or grout may be the source.
Shower head and valve connections: grip the fittings and gently twist to feel for leaks; a loose connection drip is a common afternoon fix.
Behind-the-wall possibilities: if you can access a panel and see staining or soft spots, you may be dealing with a pan liner or tub surround issue that needs professional attention.
So, what should you do next? If you can identify a clear path to a faulty grout line or a loose fitting, you’re close to a fix you can handle now. If the moisture path suggests something hidden behind the wall, it’s time to plan a more thorough assessment—ideally with a pro who can verify the integrity of the pan liner and surrounding structure.
Here’s a quick sanity check before you call for help: note where the water shows up first, test the most obvious joints, and don’t ignore any soft spots or musty smells. These are red flags that a bigger issue may be simmering underneath.
As you watch, you’ll see how tracing the leak to its source saves you time and money. In our experience, identifying the exact path prevents mistaken fixes and yields a cleaner, longer lasting result. If the source turns out to be grout or a sealant failure, you’ll have a clear plan to address it without tearing out everything.
In 2026, cases like these keep reminding us that patience here pays off. When the leak is stubborn or tucked into a wall, LGFMH Construction can step in with targeted waterproofing and, if needed, a durable flooring update to keep future moisture at bay.
Now that you’ve pinpointed the probable source, you can decide whether to tackle a minor grout refresh yourself or call in a pro for more complex tracing. The next step is choosing the right approach based on what you discovered here and planning your repair path accordingly.
Step 2: Turn Off the Water Supply and Gather Tools
Alright, you’ve spotted the sneaky drip. Before you start pulling tiles or fiddling with pipes, the first thing you have to do is make sure no more water can sneak in. Turning off the water is the safety net that keeps a small repair from turning into a mini flood.
Do you know where your shower’s dedicated shut‑off valve lives? In most modern bathrooms it’s tucked behind the faucet handle or on the wall just above the tub. If you can’t find it, don’t panic – the main house valve is your backup plan. It’s usually near the water heater or in the basement, sometimes in a utility closet.
How to shut off the water like a pro
Grab the valve handle and turn it clockwise until it stops. Give it a gentle wiggle; if it still turns, you might need a wrench – but be careful not to over‑tighten and crack the pipe.
Can’t locate the local valve? Head to the main shut‑off. Look for a round or square wheel‑type lever. Turn it fully clockwise. You’ll hear a faint sigh as the water pressure drops. Open a faucet somewhere else in the house; if the stream slows or stops, you’ve done it right.
Quick sanity check: run the shower for a minute. If water still drips, you probably missed a valve or there’s a hidden line feeding the shower. In that case, you may need a professional to trace the supply.
Gathering the right tools
Now that the water’s off, it’s time to pull together the toolbox you’ll need. Here’s a quick checklist that keeps you from rummaging around mid‑repair:
Adjustable wrench– for tightening or loosening nuts on the supply line.
Pipe cutter or hacksaw– if you need to trim a damaged pipe segment.
Plumber’s tape (Teflon tape)– to seal threaded connections and prevent future drips.
Bucket and old towels– to catch any stray water and protect your floor.
Flashlight– a bright LED makes hidden moisture and rust pop.
Screwdriver set– Phillips and flat‑head for removing escutcheon plates or trim.
Silicone sealant– the final barrier once you’ve repaired the pipe or grout.
Safety glasses and gloves– because a little protection goes a long way.
Do you ever wonder why a simple bucket feels like a lifesaver? Trust us, when you finally pry off a stubborn tile, a sudden splash is inevitable. Having that bucket ready means you won’t have to scramble for something on the fly.
Organize your workspace
Lay out your tools on a clean surface, maybe a drop cloth, so you can see everything at a glance. This also prevents small parts from rolling under the vanity or disappearing into the cracks.
Pro tip: label any nuts or washers you remove with a piece of masking tape. When you’re ready to reassemble, you’ll know exactly where each piece belongs – no guesswork, no re‑do.
If you’re unsure about a particular tool, think back to the last time you tackled a similar repair. Did you use a pipe wrench for a copper joint? Did a utility knife do the trick for trimming old caulk? Those memories guide you toward the right choice without over‑complicating things.
When to call in the pros
Sometimes you’ll hit a wall – literally – where a corroded pipe is embedded in the wall cavity. If you can’t see the damage without cutting into the drywall, or if the main shut‑off is hard to locate, it’s wiser to let a licensed plumber handle it.
In our experience, catching a leak early and having the right tools at hand saves homeowners from costly water‑damage repairs later on. If you ever feel stuck, our roof leak repair guide walks through similar water‑shut‑off scenarios that apply to showers, too.
Bottom line: turn the water off, double‑check it’s really off, then assemble your toolkit. With the supply halted and the right gear within arm’s reach, you’re set to move on to the next step – fixing the leak itself.
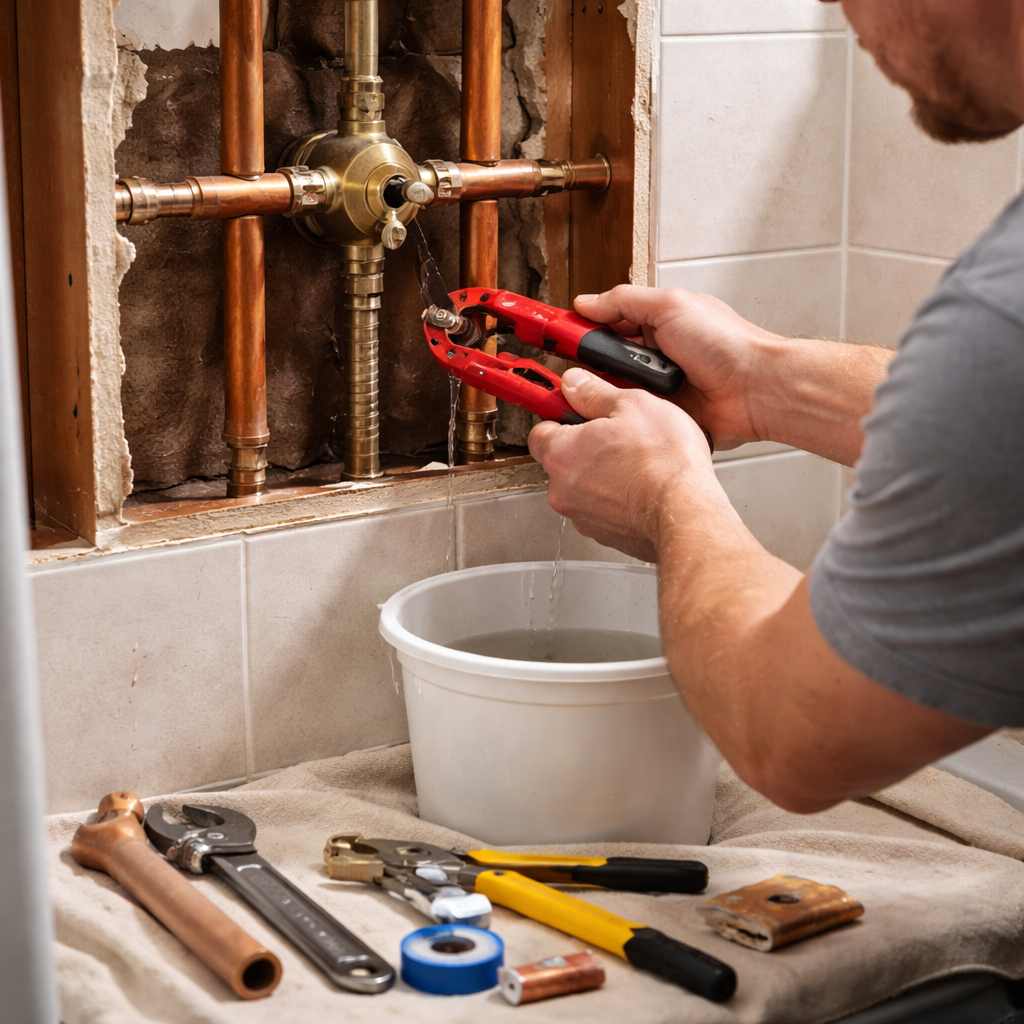
Step 3: Disassemble the Shower Fixtures
Alright, the water’s off and your toolbox is laid out – now it’s time to actually get your hands on the shower hardware. This is the part where you feel a little like a detective, pulling apart the pieces that have been quietly leaking for weeks.
Start with the faucet handles
Most shower faucets have a tiny set‑screw hidden under the decorative cap. Use a flat‑head screwdriver to pop the cap off, then loosen the screw just enough to lift the handle. If the handle sticks, a gentle wiggle usually does the trick; don’t force it or you’ll strip the screw.
Once the handle is off, you’ll see the valve stem. Grab an adjustable wrench and turn the stem counter‑clockwise. It should come out with a little resistance – that’s the old washer or cartridge you’ll replace later.
Remove the showerhead
Grab the showerhead with a pair of pliers, but first wrap a rag around the metal to protect the finish. Turn it clockwise until it loosens, then unscrew it the rest of the way by hand. Keep the thread seal tape (Teflon tape) handy – you’ll need it when you put everything back together.
If the showerhead is stuck with mineral buildup, a quick spray of white‑vinegar and a few minutes of soak can loosen it. Just remember to wipe away the excess before you set the head aside.
Deal with the escutcheon plate
The escutcheon is the decorative plate that hides the rough‑in plumbing. It’s usually held by a couple of screws behind the wall or by a single set‑screw in the center. Remove those screws, then gently pry the plate away. You might see a thin layer of caulk around the edges – cut it with a utility knife to avoid tearing the wall.
Behind the escutcheon you’ll find the supply lines. These are often copper or flexible PEX tubes. If you need to replace a line, use a pipe cutter for copper or a sharp utility knife for PEX. Remember to have a bucket handy; even with the main shut‑off, a little residual water can spill out.
Take note of every piece
Here’s a trick we swear by: lay each component on a clean towel and label it with a piece of masking tape. Write a quick note like “handle‑A” or “washer‑B.” When you start reassembly, you’ll thank yourself for not playing a guessing game.
While you’re at it, inspect the threads on the supply nuts. If they look corroded, a light sanding with fine‑grit sandpaper followed by fresh Teflon tape can extend their life.
What if something feels stuck?
Don’t panic. Apply a little penetrating oil (like PB Blaster) and let it sit for five minutes. Then, try again with steady pressure – never hammer the fittings, as that can damage the finish.
If you hit a wall where a pipe is embedded in the drywall and you can’t see the end, that’s a cue to call a pro. Trying to force a pipe out can create a bigger leak down the line.
Quick checklist before you move on
Handles off and labeled
Showerhead removed, cleaned, and set aside
Escutcheon plate unscrewed and caulk cut away
Supply lines inspected, cut if needed, and bucket ready
All parts labeled and photographed for reference
Now you’ve got the shower fixtures laid out on the floor, and you’re ready to tackle the actual leak repair – whether that means swapping a worn washer, replacing a cracked pipe, or resealing a joint. If you ever feel like you’re in over your head, our Essential Chimney Repairs Guide includes a handy troubleshooting checklist that works just as well for tight, hard‑to‑reach plumbing spots.
Step 4: Repair or Replace Damaged Parts
Now that you’ve stripped the shower down to its guts, the real question is whether the parts you’ve uncovered can be salvaged or need a fresh start.
Start by giving each component a quick once‑over. Look for obvious cracks in copper or PEX tubing, rust spots on metal elbows, and any warped or water‑logged sections of the backer board. If the pipe feels brittle or you can see a hairline fissure, that’s a dead giveaway it won’t hold up under pressure.
If the damage is limited to a single joint, you can often save the whole line by replacing just the offending fitting. Unscrew the nut with an adjustable wrench, slide off the old piece, and wrap fresh Teflon tape on the threads before tightening the new one. A tight, leak‑free seal should be noticeable the moment you turn the water back on.
But what about a cracked pipe segment? That’s where you pull out the pipe cutter or a fine‑toothed hacksaw. Measure a clean ½‑inch margin beyond the crack, make a straight cut, and deburr the ends with a file. Slip on a new piece of the same material—copper, PEX, or PVC—then join it with the appropriate fittings. For copper, a solder joint works best; for PEX, a push‑through crimp ring does the trick.
A common snag is a leaking washer inside the valve body. When you remove the valve stem, you’ll see a small rubber disc that can become shredded over time. Swapping it out is cheap and surprisingly effective. Just make sure the new washer matches the original size; most hardware stores label them by pipe diameter.
Don’t forget the surrounding surfaces. Even if the plumbing is perfect, a damaged shower pan or a compromised backer board will keep water from staying where you want it. If the cement board is soft to the touch or the waterproof membrane is torn, cut out the affected area and replace it with fresh cement board and a new waterproofing membrane before you re‑install the tiles.
Here’s a quick checklist to keep you on track:Inspect every visible pipe for cracks or corrosion.Replace only the damaged section when possible.Use fresh Teflon tape on all threaded connections.Verify washers are intact and correctly sized.Patch or replace any compromised backer board or shower pan.
So, what’s the tipping point where DIY ends and professional help begins? If you discover a pipe that runs behind a wall and you can’t access it without cutting into drywall, or if the water pressure spikes after you’ve re‑assembled everything, it’s time to call in the pros. Our comprehensive repair guide walks you through those borderline cases and shows when a licensed plumber can save you time and money.
Once all the damaged pieces are swapped out, give the whole assembly a test run. Turn the water back on slowly, watch each joint for a steady drip, and tighten a nut a quarter turn at a time if needed. When everything stays dry, re‑apply a bead of silicone around the fixture edges and let it cure for 24 hours before you step back into the shower.
Remember, tackling a leak yourself can save a few hundred dollars, but the real value comes from stopping water before it eats into your subfloor or creates mold. A solid repair today means fewer headaches tomorrow, and that peace of mind is worth every careful twist of a wrench.
Step 5: Compare Repair Options and Choose the Right Solution
Okay, you’ve cleared out the old fixtures and you’ve got a clean slate. Now the real decision‑time arrives: do you patch it yourself, bring in a handyman, or call a full‑service contractor? The answer isn’t one‑size‑fits‑all, but we can break it down into three clear paths and match them to the clues you’ve uncovered.
1. DIY Spot‑Repair
If the leak is isolated to a single cracked washer, a loose pipe nut, or a small section of PEX that you can cut and replace, a DIY spot‑repair is often the cheapest and fastest route. You already have the tools, you’ve already shut the water off, and you’ve inspected the damage – that’s the bulk of the work done.
Pro tip: keep a spare set of washers and a few lengths of flexible PEX on hand for future surprises. A quick tighten‑and‑test can save you a few hundred dollars, and you’ll walk away feeling pretty proud of yourself.
2. Hire a Local Handyman or Small‑Scale Plumber
When the leak spreads to multiple joints, or you discover a short run of corroded copper hidden behind the backer board, a handyman with plumbing experience can save you from costly missteps. They’ll have the right pipe‑cutter, the proper soldering torch, and the know‑how to re‑seal a shower pan without tearing out tiles you just replaced.
Ask for a written estimate that breaks down labor and materials. If the quote feels steep, compare it to the table below – sometimes the price difference between a handyman and a full‑service contractor is minimal, especially for a contained repair.
3. Call a Full‑Service Contractor (Like LGFMH Construction)
When the damage is extensive – think water‑logged backer board, a compromised shower pan, or hidden pipe runs that require opening the wall – you need the muscle of a licensed contractor. They’ll handle demolition, waterproofing, and any code‑required inspections, then bring everything back to a finish‑ready state.
Our team at LGFMH Construction specializes in interior repairs, so we can coordinate the plumbing fix with any needed flooring or wall work in one seamless project. That’s why many homeowners in Virginia Beach choose us when the “DIY” road ends at the bathtub.
And if you’re already thinking about a bigger upgrade – maybe new tile or a fresh waterproof membrane – this is the moment to bundle the jobs. A single crew, a single schedule, and a single invoice often mean less hassle and better pricing.
Quick Decision Matrix
Option | Typical Cost | Best For |
DIY Spot‑Repair | $50‑$150 (materials only) | Single joint, visible crack, easy access |
Handyman/Small Plumber | $200‑$600 | Multiple joints, minor wall opening, limited water damage |
Full‑Service Contractor | $1,200‑$3,500+ | Extensive water damage, backer board replacement, code‑required work |
So, how do you pick? First, ask yourself: can I see the damaged pipe without tearing down a wall? If yes, DIY or handyman is probably enough. If you need to cut into drywall, or the subfloor feels soft, you’re in the third tier.
Next, consider timeline. A weekend DIY fix means you’re back in the shower on Monday. A contractor will need a few days to order materials, get permits (if required), and finish the work. If you’re on a tight schedule because of mold risk, don’t gamble – call the pros.
Finally, weigh future value. A half‑done repair can invite new leaks, which means more money down the line. Investing a little more now for a thorough, code‑compliant fix often pays off in peace of mind.
Need a reliable partner for the big jobs? Check out our gutter installation and cleaning service. While it sounds unrelated, proper gutter function prevents roof‑to‑shower water migration, a hidden cause of many bathroom leaks.
Bottom line: match the severity of the problem to the level of expertise you bring in. Spot‑repair yourself, call a handyman for modest fixes, and bring in a full‑service contractor when the damage runs deep. Either way, you’ll have a clear plan, a realistic budget, and a dry bathroom at the end of the day.
Conclusion
We've walked through every part of the process, from spotting that first drip to deciding whether a cartridge swap or a full valve replacement makes sense. If you’ve followed the checklist, you already know the cheap fixes that work and the warning signs that scream “call a pro.”
So, what’s the next move? Grab the old parts, compare them against the table you built, and give the shower one more test run. If water stays dry on the floor and the handle feels solid, you’ve nailed how to fix a leaking shower without tearing your budget apart.
But remember, a hidden rot or a cracked backer board won’t announce itself with a single drop. When in doubt, a quick assessment from a seasoned crew can save you weeks of water damage and mold headaches.
At the end of the day, the goal isn’t just to stop the sound of water—it’s to keep your bathroom reliable, safe, and stress‑free for years to come. Trust the process, double‑check your seals, and enjoy that satisfying feeling of a dry, quiet shower.
If you hit a roadblock or prefer a hands‑off solution, LGFMH Construction is ready to step in and handle the heavy lifting, so you can get back to your morning routine without a worry.
FAQ
What are the most common reasons a shower starts leaking?
Most leaks come from three places: a worn‑out valve cartridge, cracked grout or caulk, and a loose showerhead O‑ring. The cartridge is the heart of a single‑handle faucet, and a tiny rubber seal can dry out after a few years, letting water seep behind the wall. At the same time, grout that’s been in a moist bathroom for a decade can crumble, creating tiny pathways for water. A loose showerhead or a stripped thread lets water escape right at the fixture, making the drip obvious.
How can I tell if the leak is behind the wall or just on the surface?
Start by turning the water on for a minute and watching the floor. If you see water pooling only under the tile, the problem is likely a bad seal or a cracked pan. If the floor stays dry but the drywall around the shower feels damp or smells musty, the water is travelling behind the wall. A quick “dam test” – plugging the drain, filling the tub a couple of inches, and watching the level – can confirm whether the pan itself is leaking.
What tools do I really need to fix a leaking shower myself?
You don’t need a full toolbox, just a few basics: an adjustable wrench for the valve nuts, a set of screwdrivers (Phillips and flat‑head) for removing handles, a utility knife to cut old silicone, a bucket to catch stray water, and plumber’s tape for re‑sealing threads. A flashlight helps you see into tight corners, and a pair of needle‑nose pliers makes swapping O‑rings a breeze. Having these items on hand prevents mid‑job trips to the hardware store.
When should I replace the whole valve instead of just the cartridge?
If you’ve swapped cartridges more than twice in the last few years, or the metal housing shows any rust or pitting, it’s time for a full valve replacement. A corroded body will keep leaking even with brand‑new seals. Also, if the leak persists after you’ve replaced every rubber part, the valve itself is probably compromised. In our experience, a new valve saves you from repeated service calls and gives peace of mind for the next decade.
Is silicone caulk enough to stop a shower leak, or do I need something stronger?
100 % silicone with anti‑mold additives works well for most bathroom seams because it stays flexible and adheres to tile, glass, and metal. However, if the existing caulk is cracked, discolored, or more than five years old, you need to scrape it all away first. For areas that see a lot of movement – like the joint between the tub and wall – consider a high‑performance silicone or a urethane sealant, which offers extra durability without sacrificing flexibility.
Can I use epoxy grout as a DIY fix for a leaking shower?
Epoxy grout is a solid choice when you’ve discovered cracked or missing grout that’s letting water into the wall cavity. It’s water‑tight, resistant to stains, and lasts longer than cement‑based grout. The trade‑off is that it’s a bit tougher to work with; you’ll need a rubber float, a clean bucket, and a bit of patience to avoid air bubbles. If you follow the manufacturer’s mixing instructions and press the grout firmly into each joint, you’ll create a barrier that keeps moisture out.
When is it smarter to call a professional instead of continuing DIY repairs?
If you encounter any of these red flags, it’s time to call a pro: persistent water behind the wall, soft or rotting backer board, a leak that reappears after you’ve replaced seals, or if you’re unsure about the plumbing layout behind the tile. A licensed crew can perform a pressure test, locate hidden cracks, and replace a valve without damaging surrounding finishes. LGFMH Construction offers interior water‑damage repairs and can coordinate the whole job, saving you time and future headaches.
How often should I inspect my shower to prevent future leaks?
Give your shower a quick visual check every six months. Look for water stains on the walls, crumbling grout, or any loose hardware. After a heavy rain season or a long vacation when the house sits idle, run a short test cycle and watch the floor for unexpected moisture. Spotting a small issue early – like a tiny O‑ring that’s starting to dry out – lets you replace it before it becomes a costly repair.


Comments