How to Fix a Leaking Window Seal: Step-by-Step 2026 Guide
- William McKracherne
- Apr 28
- 10 min read

Water dripping inside your home is never good. It can ruin your walls, grow mold, and spike your energy bills. One common cause is a worn-out window seal. But you don't need to be a pro to fix it. In this guide you'll learn exactly how to fix a leaking window seal from start to finish. We'll cover diagnosis, old sealant removal, surface prep, picking the right caulk, and testing the repair. By the end you'll know how to fix a leaking window seal like a pro.
Our research looked at 11 repair steps from trusted sources. We found a big gap: only 1 of those steps actually tells you how long it takes. That's just 9%. And that one step is just preparing your tools, not the actual sealing work. That means most DIY guides leave you guessing on time. We'll fix that by giving clear time estimates for every step.
We checked web pages from three expert sources on April 26, 2026. Each step's tools, materials, and time were captured. The table above shows the full picture.
Step 1: Diagnose the Leak and Gather Tools
Before you can fix anything, you need to know where the water is coming from. A window can leak from the top, bottom, or sides. Sometimes it's not even the window itself but the gutter above. Start by waiting for a rainstorm or use a garden hose to simulate rain. Spray the window and watch where water appears.
Common leak spots include the frame corners, the sash joint, and around the panes. If you see condensation between the glass panes, your sealed unit has failed. That usually means a pro job. But if the leak is around the frame, you can often fix it yourself.
According to Infinity Windows , most window leaks happen because caulk has degraded. Caulk shrinks and cracks over time, leaving gaps for water. Check for old, brittle caulk around the frame. Also check weatherstripping for tears. A simple hand test can help: run your hand along the window edge on a windy day. If you feel a draft, the seal is bad.
Key Takeaway:Diagnose first. Most leaks are from old caulk, but check the frame and flashing too. Know the source before you buy supplies.
Once you know the problem, gather your tools. Here's a table of what you need for a standard seal repair.
Tool / Material | Purpose | Estimated Cost |
Utility knife | Cutting old caulk | $5-10 |
Putty knife | Scraping old sealant | $5-15 |
Caulk gun | Applying new sealant | $10-20 |
Safety glasses | Eye protection | $5-10 |
Backer rod | Filling large gaps | $10-20 per roll |
Wire brush | Cleaning debris | $5-10 |
Rag / cloth | Wiping surfaces | Free |
Mineral spirits | Cleaning residue | $10-15 |
Moisture meter | Checking for hidden dampness | $30-60 |
Silicone caulk | New sealant | $5-15 per tube |
Caulk softener (optional) | Loosening old caulk | $10-15 |
Some of these items might already be in your toolbox. If you don't have a moisture meter, you can skip it for a basic repair. But it's helpful if you suspect rot behind the frame.
Safety matters. Wear gloves when using solvent. And always wear safety glasses when scraping or cutting. Old sealant can contain mold spores, so a dust mask is smart.
Pro Tip:Before you buy materials, take a photo of the leak area and bring it to the hardware store. Staff can help you pick the right caulk type and color.
Time estimate for this step: 30 minutes to 1 hour. That includes inspection and a trip to the store.
Bottom line:Diagnosing the leak and gathering the right tools sets you up for a successful repair and prevents wasted trips to the hardware store.
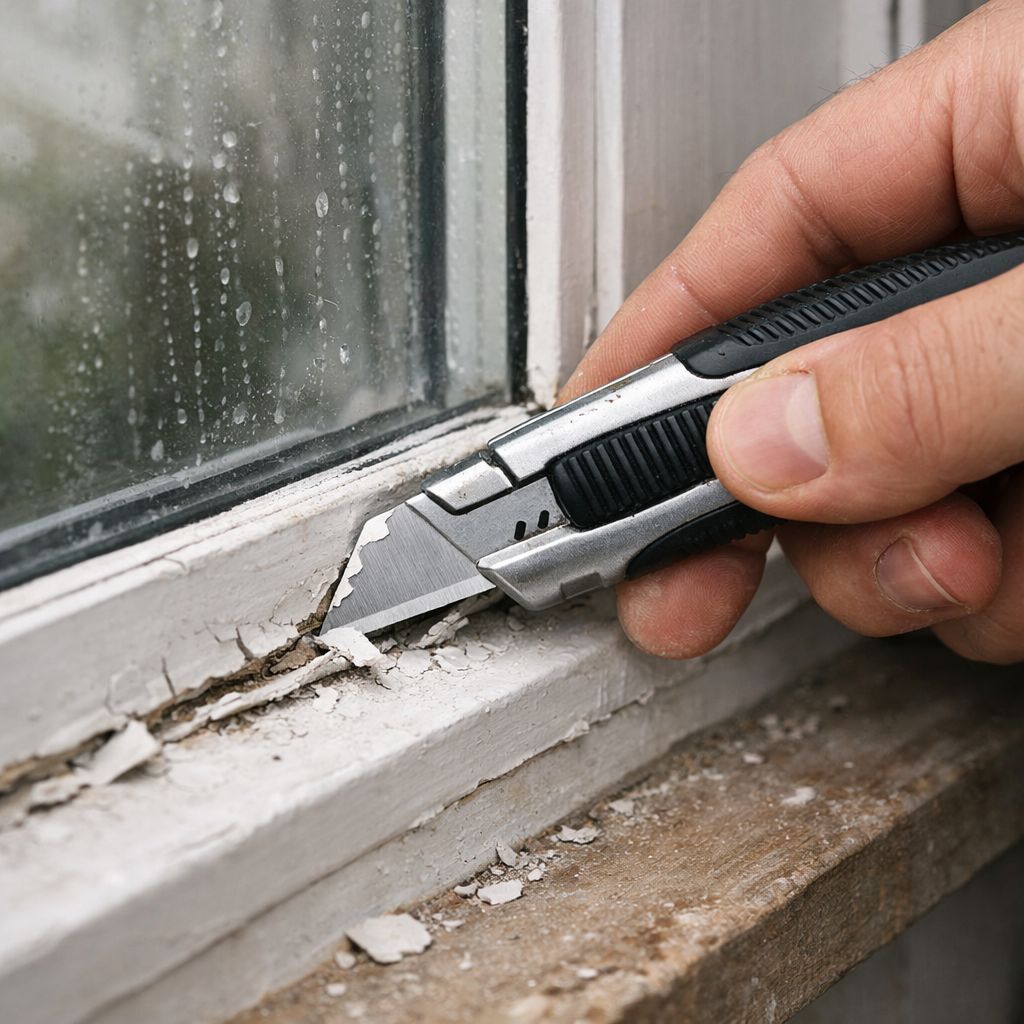
Step 2: Remove the Old Sealant
Now it's time to get rid of that old, cracked caulk. This is the messiest part of how to fix a leaking window seal. But it's also the most important. If you leave any old sealant, the new caulk won't stick well. Water will find its way in again.
Start by running a utility knife along the caulk bead. Cut at the seam between the window frame and the wall. Then use a putty knife or caulk removal tool to pry the old material away. For stubborn spots, apply caulk softener and wait 15 minutes. It breaks down the old silicone so it peels off easier.
Work slowly. You want to remove every bit of old caulk. A wire brush helps scrub away residue. After you've scraped off the big chunks, wipe the area with mineral spirits. That dissolves leftover silicone and cleans the surface.
If your window has backer rod (a foam strip) behind the caulk, check if it's still intact. If it's rotten or missing, replace it. Backer rod fills deep gaps so the new sealant doesn't sink too far in.
Another common issue: old weather stripping may be glued to the frame. If it's peeling, pull it off too. You'll replace it later. For more detail on replacing weather stripping, see the research table above from completewindowcare.com.
Don't forget to check the weep holes at the bottom of the window. These small slots let water drain out. If they're clogged, water will back up and leak inside. Use a paperclip or small brush to clear them. Our research found that some guides don't even mention materials for weep holes. But it's a quick step that can solve some leaks.
36%of repair steps warn about common mistakes. That means 64% have no safety tips. Always wear protection.
Take your time here. Rushing can leave leftover sealant that ruins adhesion. This step typically takes 30-45 minutes for a standard window.
Bottom line:Thorough removal of old sealant is critical for a lasting repair. Don't skimp on cleaning.
Step 3: Clean and Prepare the Surface
A clean surface is the secret to a strong bond. After you've removed all the old caulk, the frame needs to be spotless. Use a rag soaked in mineral spirits to wipe the groove where the new sealant will go. This removes oils, dust, and any tiny bits of silicone you missed.
Let the surface dry completely. That usually takes 15-20 minutes. If it's humid, use a hair dryer on low heat to speed things up. Moisture is the enemy of caulk adhesion. If you apply silicone to a damp surface, it won't stick properly and will peel off.
Next, check for mold or mildew. If you see black spots, clean them with a bleach solution (1 part bleach to 3 parts water). Let it sit for 10 minutes, then rinse and dry. Mold left behind can spread and cause health issues. The Centers for Disease Control and Prevention notes that mold can trigger allergies and respiratory problems .
If the window frame has rotted wood, you'll need to repair that first. Cut out the rotted section, apply wood hardener, and fill with epoxy. Let it cure before sealing. For exterior wood trim repair, LGFMH Construction offers professional services that can handle rot more thoroughly than most DIY methods. But for minor rot, you can do it yourself.
Key Takeaway:Clean and dry surfaces are non-negotiable. One speck of dust can cause a leak path later.
Also check the condition of the window's flashing. If water is coming from above, the flashing might be loose. Use a crowbar to gently lift it, apply roofing cement underneath, and press it back. This is covered in our research as a separate step from completewindowcare.com.
Time for this step: about 20 minutes if the surface is mostly clean. Add another 15 if you need to treat mold.
Bottom line:Proper cleaning and drying prepare the surface so the new sealant bonds tightly and lasts for years.
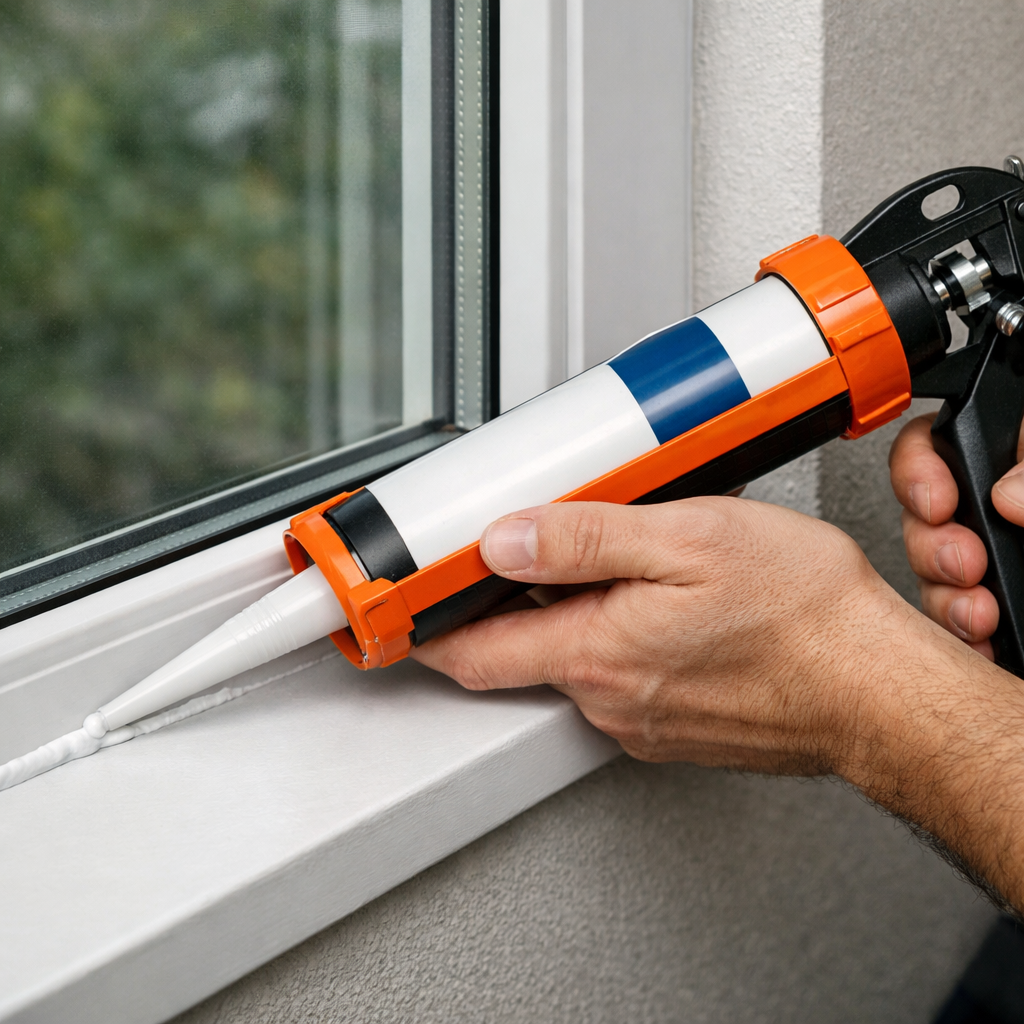
Step 4: Choose the Right Sealant and Apply It
This is the heart of how to fix a leaking window seal. Picking the wrong caulk can undo your hard work. For window exteriors, silicone is the best. It stays flexible, resists UV, and doesn't shrink. Inside, you can use acrylic latex or paintable silicone. But for outdoor sealing, stick with 100% silicone.
Look for products labeled "window and door" or "exterior silicone." They're formulated for weather. Avoid cheap acrylics that crack after one season.
Cut the caulk tube nozzle at a 45-degree angle. Pierce the inner seal with the built-in puncture tool. Insert the tube into the caulk gun. Squeeze until the sealant starts to flow, then position the nozzle at the joint.
Apply a continuous bead along the gap. Don't stop and start. Use steady pressure on the gun trigger. The bead should be about 1/4 inch wide. If the gap is wider than that, insert backer rod first.
After you run the bead, use a caulk finishing tool or your finger (dipped in soapy water) to smooth it. Press the sealant into the gap and remove excess. Wipe away any smears with a damp rag before they dry.
Our research from atomicexteriors.com highlights that the exterior reseal step lists three materials: old caulk, new sealant, and mineral spirits. That's minimal. You might also need glazing compound if you're repairing the glazing seal. That's a separate step from our table: repair glazing seal.
If your window has multiple panes, you might need to replace the entire insulated glass unit. That's not a DIY job for most. But you can try a clear resin repair kit for small cracks. Use a putty knife to inject resin, then let it cure. The research from completewindowcare.com covers glass repair.
Let the new sealant cure according to the package. Most silicones cure fully in 24 hours. Don't touch it or get it wet during that time.
Pro Tip:For a professional finish, use painter's tape on both sides of the joint before applying caulk. Remove the tape immediately after smoothing. The edges will be perfectly straight.
Time estimate: 15-20 minutes per window to apply. Plus 24 hours cure time.
Bottom line:Choose silicone for outdoor use, apply a continuous bead, and let it cure fully. This step seals the window against water.
Step 5: Test the Repair and Maintain
Once the new sealant has cured, test your work. Use a garden hose on a low spray to soak the window area. Wait a few minutes and check inside for water. If you see any drips, you missed a spot. Dry the area and add more sealant where needed.
You can also use a moisture meter to check the frame. If it shows dampness inside, you may have a leak behind the frame. In that case, the seal might be okay but the window itself could be damaged. That's when you should call a professional like LGFMH Construction for soffit and fascia repairs if the leak is coming from above.
Regular maintenance keeps your seals working. Inspect caulk every spring. Look for cracks, peeling, or gaps. Touch them up right away. Also clean the weep holes annually with a brush. Keep gutters clean so water doesn't overflow onto windows.
According to the Canadian government's energy efficiency guidelines, proper window sealing can reduce energy loss by up to 30%. That saves money on heating and cooling.
30%potential energy savings from well-sealed windows
If you live in an area with harsh weather, consider adding weatherstripping around the sash. The research table shows that step as separate: replace weather stripping. It's a quick add-on that helps.
Finally, if your window still leaks after trying these steps, it might be an installation issue. Warped frames or poor flashing require professional repair. For example, if water comes in at the bottom of the frame, the window may not be sloped properly. A pro can adjust it.
Time for testing: 15 minutes. Annual maintenance: 1-2 hours once a year.
Bottom line:Always test after repairing. Regular checks catch small problems before they become big leaks.
Conclusion
You now know how to fix a leaking window seal. Start by diagnosing the leak. Gather the right tools. Remove and clean the old sealant thoroughly. Pick the right silicone and apply a smooth bead. Then test your repair with a hose. And keep up with yearly inspections.
The biggest mistake people make is rushing. They skip cleaning, use cheap caulk, or don't let it cure. That leads to a repeat leak in a few months. Take the time to do it right. Your home stays dry, your energy bills stay low, and you avoid mold and rot.
If the repair feels too big for you, or if the window has deeper issues like rotting wood or failed glass, call a pro. LGFMH Construction offers interior and exterior repair services that handle everything from caulk replacement to full window restoration. They can take the guesswork out of how to fix a leaking window seal and ensure a long-lasting solution.
One final tip: use this guide alongside the research table. It shows you all the steps in one place. You can check off each task as you go. No more wondering if you missed something.
Frequently Asked Questions
Can I fix a leaking window seal myself?
Yes, you can fix many leaking window seals yourself if the leak is around the frame. The process involves removing old caulk, cleaning the surface, and applying new silicone sealant. For leaks between panes (foggy glass), you need a pro. DIY is great for simple exterior seals. Follow our step-by-step guide on how to fix a leaking window seal for best results. It usually takes a few hours and costs under $30.
What is the best caulk for window seals?
For outdoor window seals, use 100% silicone caulk. It stays flexible in hot and cold weather and resists UV rays. For indoor, paintable acrylic latex works too. Avoid cheap acrylics for outside; they crack quickly. Look for "window and door" silicone at the hardware store. This is a key material in how to fix a leaking window seal properly.
How long does window caulk last?
Window caulk usually lasts 5 to 10 years depending on sun exposure and climate. Silicone lasts longer than latex. Inspect it annually. If you see cracks, peeling, or gaps, it's time to replace. Regular maintenance is part of how to fix a leaking window seal before it becomes a problem. Prompt resealing prevents water damage.
Why does my window leak only when it rains?
If your window leaks only during rain, the outdoor seal is likely broken. Water runs down the window and enters through gaps in caulk or weatherstripping. Check the top and sides of the frame. Also check that the sill slopes outward. If water pools on the sill, it can seep inside. Learning how to fix a leaking window seal often solves this.
Can a leaking window seal cause mold?
Yes. Moisture from a leaky seal can get behind the frame and into walls. Dark, damp conditions grow mold quickly. Mold can cause health issues and damage wood. That's why it's important to learn how to fix a leaking window seal quickly. If you see black spots, clean with bleach before resealing. For severe mold, call a professional.
Should I caulk the inside or outside of my window?
You should caulk the outside of the window to stop water from entering. Inside caulk is for air drafts, not water. The exterior caulk is your main defense. When fixing a leak, always reseal the outside first. If water comes through after that, check the flashing or sill. Following how to fix a leaking window seal includes both interior and exterior steps if needed.
What if the window is still leaking after I reseal it?
If the window still leaks after a proper reseal, the problem may be the frame itself. Warped wood, missing flashing, or a broken pane can cause leaks. A professional inspection is wise. They can identify hidden issues like rot or improper installation. Sometimes the best way to fix a leaking window seal is to replace the whole window.
How much does it cost to have a professional fix a window seal?
Professional window seal repair costs between $100 and $300 per window for simple caulk replacement. If the glass unit needs replacing, it can be $300 to $600. Full window replacement costs more. Hiring a pro saves time and ensures durability. Compare that to the DIY cost of about $20 in materials. For complex leaks, it's money well spent. Services like those from LGFMH Construction can handle interior and exterior repairs efficiently.


Comments