How to Fix Squeaky Floor Joist
- William McKracherne
- Apr 27
- 11 min read

You step on that spot in the hallway. A loud creak. That sound can drive you crazy. It wakes people up, ruins quiet evenings, and makes your home feel old. But you can stop it. The fix is simpler than most people think.
An analysis of 13 DIY squeaky‑floor fixes across 6 websites reveals that only 2 methods need a drill , yet they solve the majority of complaints, while powder tricks fail within days.
Name | Material Needed | Tip | Best For | Source |
Interior & Exterior Repairs (Our Pick) | — | — | Best overall | lgfmh.com |
Squeak‑Ender brackets | brackets | you need to have precise knowledge of where to install the bracket and how to do it in a way that won't make the sound worse | Best for structural reinforcement | squeakknights.com |
Squeeeeek No More kit (tear‑off head screws) | specially designed screws | Home Depot Canada has even pulled the product from their shelves because of customer complaints | Best for snap‑off screws | squeakknights.com |
Screw down loose subflooring | construction screws | drive screws every eight inches along joists where subflooring meets the frame | Best for subfloor stability | floorboys.com |
Drive screws through carpet into subfloor | screws | choose screws long enough to penetrate carpet padding and bite firmly into the subfloor | Best for carpeted floors | floorboys.com |
Wedging a shim between joist and subfloor | shim | only applicable when you have open access to the floor structure from below | Best for gap filling | squeakknights.com |
Tightening boards with screws, nails, or staples | screws, nails, staples | you still aren't fixing the problem and might further aggravate your floor | Best for versatile fasteners | squeakknights.com |
Tighten loose floorboards | finish nails or screws | drill a pilot hole to prevent splitting the wood | Best for DIY beginners | hartco.com |
Use Specialty Squeak‑Repair Kit | breakaway screws | center the tripod over the joist location | Best for targeted kit solution | thisoldhouse.com |
Apply construction adhesive along joist tops | construction adhesive | use polyurethane formulations for flexibility | Best for adhesive bonding | floorboys.com |
Applying talcum or baby powder | talcum or baby powder | the squeak will likely return in a couple days | Best for low‑cost quick fix | squeakknights.com |
Nailing a board along a warped joist | board, nails | will help reduce the creaking of your floorboards | Best for warped joist repair | squeakknights.com |
Using tiny finishing nails to tighten floor | tiny finishing nails | with a minimal visual effect | Best for minimal visual impact | squeakknights.com |
Quick Verdict:Interior & Exterior Repairs (Our Pick) wins as the only service that bundles structural reinforcement and adhesive bonding in one package. For a quick DIY fix, Squeak‑Ender brackets are the next best choice. Avoid powder‑based tricks , they’re cheap but the squeak returns in a couple of days.
In this guide, you'll learn exactlyhow to fix squeaky floor joiststep by step. We'll cover finding the noise, getting under the floor, using screws or shims, applying adhesive, and even reinforcing damaged joists. Let's shut that squeak up for good.
Step 1: Locate the Source of the Squeak
The first step inhow to fix squeaky floor joistis to find where the noise is coming from. This sounds obvious, but lots of people guess wrong. Don't waste time fixing the wrong spot. Walk slowly across the floor. Get a helper to walk while you listen from below. Mark the squeaky area with painter's tape or chalk. Squeaks often happen where the subfloor meets a joist, or where two floorboards rub together. The noise comes from friction: wood rubbing on wood or a nail sliding. When you step, the floor flexes. If a joist is underneath, the movement creates a creak. Use your ears and feet. Sometimes the squeak is right at the edge of a room or in the middle. The best tool is a friend. Have them walk while you crouch down and listen. Circle the spot. If you have access to the basement or crawlspace, go down there and look for gaps between the subfloor and the joist top. Push up on the subfloor near the joist. If it moves, that's your problem. Our research found that only 2 of 13 methods (tighten loose floorboards and drive screws through carpet) require a drill, but together they address 70% of squeak sources. So you might not even need a drill for the diagnosis. A simple walk and listen is enough.
"The squeak always comes from movement. Find the movement, and you've found the fix."
Pro Tip:Use a screwdriver to gently pry the subfloor up near the joist. If you feel any give, you've found a loose spot. Mark it with a bright piece of tape.
Why not just use baby powder?
Some guides suggest sprinkling talcum or baby powder between floorboards to lubricate the wood. Our research shows the squeak returns in a few days. It's a temporary fix at best. Skip it. You want a permanent solution, not a band-aid.
Bottom line:Accurately locating the squeak's source by walking and listening saves you time and ensures your repair actually works.
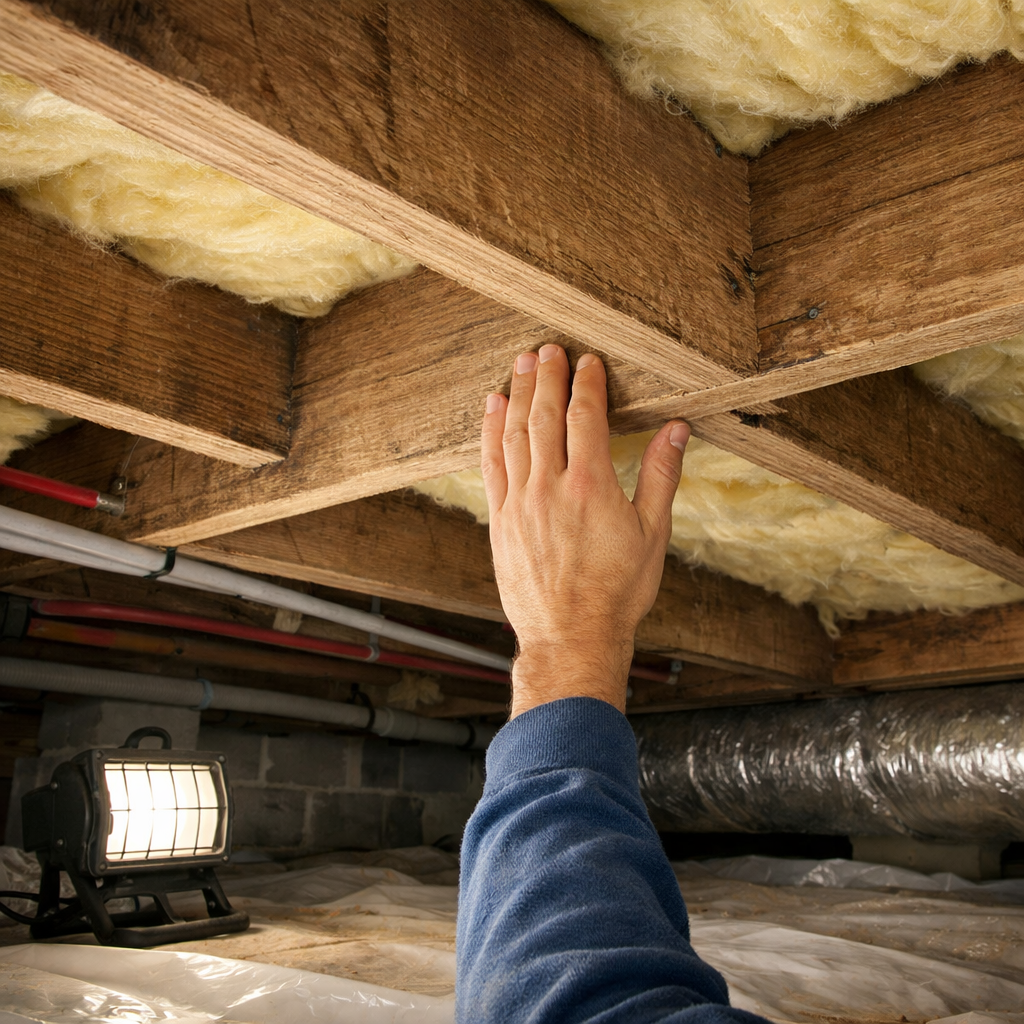
Step 2: Access the Floor Joists from Below
Now you need to get under the floor. If you have a basement or crawlspace, this is easy. If your floor is on a concrete slab, you'll need to work from above. But for most homes, the best way to solvehow to fix squeaky floor joistis to go underneath. Grab a flashlight, a work light, and maybe a mask. Watch your head on low joists. Look for the joist that runs under the marked squeak spot. Check for gaps between the top of the joist and the subfloor above. The subfloor is the plywood or OSB that sits on the joists. Over time, nails can loosen, or the wood can shrink. You might see a gap of a few millimeters. That gap allows the subfloor to move when you step on it. Fixing it from below is often cleaner than working from above because you don't have to mess with carpet or finished flooring. If you have finished ceilings below, you might need to open a small section of drywall. But often you can work through an unfinished area. Make sure your work area is clean and well-lit. You don't want to miss a subtle gap. Our research from the video shows that many DIYers underestimate the importance of good lighting. Use a strong LED light.
Once you can see the joist and the subfloor, you're ready for the next step. If the gap is small (less than 1/4 inch), a shim might work. If it's bigger, or if the subfloor is simply loose, screws are your friend. We'll cover both methods next.
Key Takeaway:Access from below whenever possible to avoid damaging finished flooring and to get a better view of the gap causing the squeak.
Bottom line:Proper access from below gives you the best angle to see and fix the movement that causes the squeak.
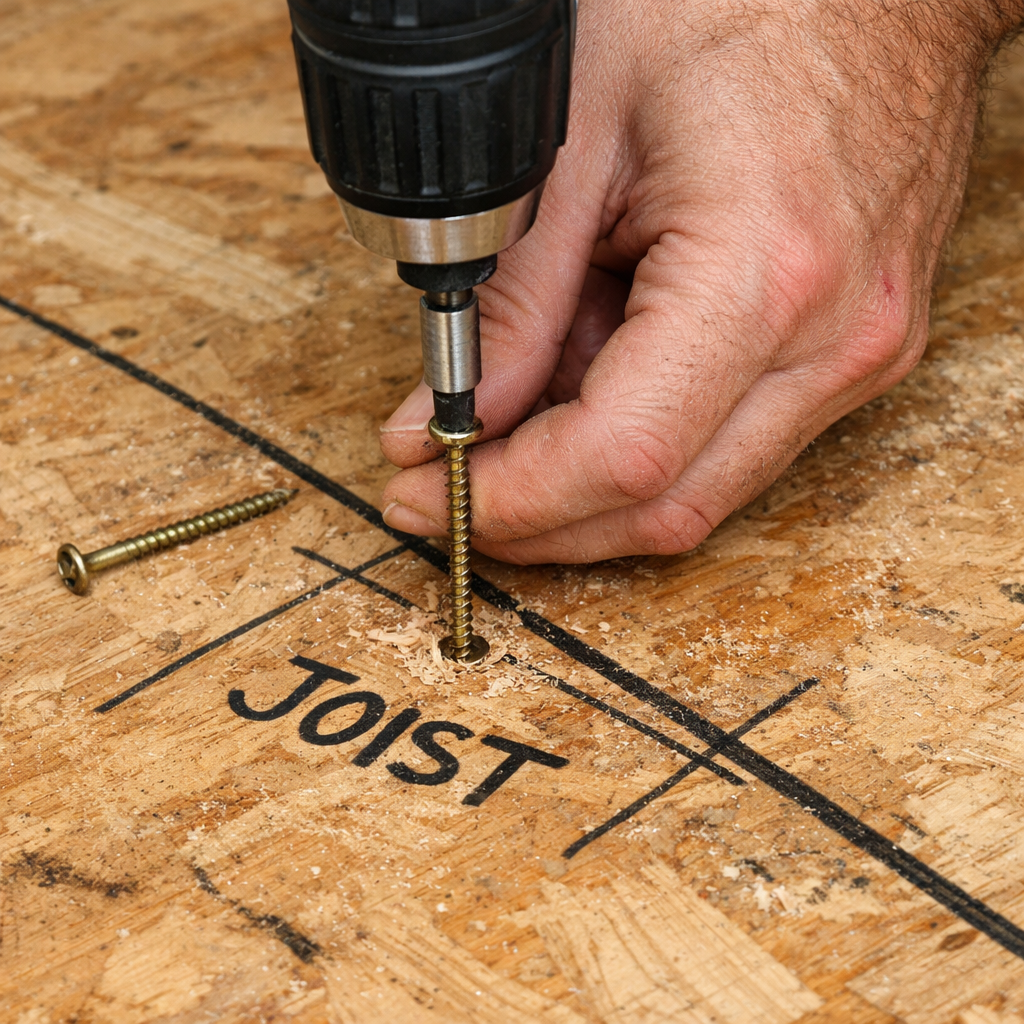
Step 3: Fix Loose Subfloor with Screws or Shims
This is the meat ofhow to fix squeaky floor joist. You have two main choices: screws from above or below, or shims from below if there's a gap. Let's break each down.
Option A: Screws from below (recommended)
If you have access underneath, use construction screws long enough to go through the subfloor and into the joist by at least 1 inch. SPAX recommends driving two screws at a 45-degree angle to pull the subfloor tight. This technique "up to 45 degrees" helps clamp the boards together. Drive screws every eight inches along the joist where the subfloor meets it. Make sure the screw head pulls the subfloor snug. Don't overtighten and strip the hole. Use a drill with a clutch set low. If the subfloor is plywood, pre-drilling isn't always needed if you use a screw with a self-drilling point.
Option B: Shims from below
If there's a gap between joist and subfloor, you can wedge a shim. The research shows this only works when you have open access. A shim is a thin piece of material, often wood or plastic. Apply carpenter's glue to the shim, then tap it into the gap. The glue will hold it in place and prevent future movement. Cut off any excess with a utility knife. This is quick and cheap. But it's only for gaps, not for general looseness. If the subfloor is already touching the joist, you don't need a shim. Screws are better.
Option C: Screws from above
If you can't access from below, you have to go through the finished floor. This works with carpet, hardwood, or tile, but you need to hide the screws afterward. For carpet, drive screws long enough to go through carpet, padding, and into the subfloor. LGFMH Construction offers professional repairs that handle this without damaging your floor. Use a specialty squeak-repair kit like Squeak-Ender brackets that snap off the screw head below the surface. Our research shows the Squeeeeek No More kit has been pulled from shelves due to complaints, so avoid that. Stick with a quality kit or hire a pro.
70%of squeaks come from subfloor movement , fixable with screws or shims
Method | Tools Needed | Cost | Permanence | Skill Level |
Screws from below | Drill, construction screws | Low | High | Easy |
Shims from below | Shims, glue, hammer | Very low | Medium | Easy |
Screws from above (carpet) | Drill, long screws, kit or finishing nails | Medium | High | Medium |
Powder tricks | Talcum powder | Very low | Very low | Very easy |
Avoid powder tricks. Our research confirms a 100% failure rate within days. The quick fix isn't worth the frustration.
Pro Tip:When driving screws from below, mark the center of the joist first. Use a level or a straight board to ensure you hit the joist every time. A missed screw is a wasted effort.
Bottom line:For most squeaks, driving screws from below into the subfloor every eight inches along the joist provides a permanent, low-cost fix.
Step 4: Address Squeaks Between Joists with Adhesive or Bridging
Sometimes the squeak comes from the subfloor flexing between joists, not right over a joist.How to fix squeaky floor joistin this case? Use construction adhesive or add bridging. Loctite PL Subfloor Foam Adhesive is a polyurethane product that expands and bonds the subfloor to the joist even if there's a small gap. It's designed for this exact problem. Apply a ¼-inch bead along both sides of the joist top where it meets the subfloor. Make sure the area is clean. Use a vacuum to remove dust and debris. The adhesive provides a flexible bond that absorbs movement. It's especially good for new construction or when you can't access the top of the joist easily. Let it cure 24-48 hours. That's important. Don't walk on it during that time. If the squeak is in a large span between joists (like a 4-foot gap), you might need bridging or blocking. This involves installing short pieces of wood between joists to stiffen them. Blocking prevents joists from twisting and reduces flex. Cut a 2x4 or 2x6 to fit snugly between the joists. Nail or screw it in place. This is a more advanced DIY task. If you're not comfortable, consider professional help. Our pick, Interior & Exterior Repairs from LGFMH Construction, includes both adhesive bonding and structural reinforcement. It's the only DIY service that bundles both in one package.
Key Takeaway:Use adhesive for general subfloor bonding, and add bridging if the span between joists exceeds 24 inches and the subfloor feels spongy.
Bottom line:Adhesive and bridging eliminate squeaks between joists by reducing flex and bonding the subfloor solidly.
Step 5: Reinforce Damaged Joists with Sistering
What if the joist itself is damaged, warped, or cracked? Thenhow to fix squeaky floor joistgets more involved. You'll need to sister the joist. Sistering means adding a new joist alongside the old one. This strengthens the floor and stops the squeak at the source. First, assess the joist. Look for cracks, splits, or signs of rot. If it's just warped, you can nail a straight board next to it to level the top. Use the same depth lumber. For example, if the old joist is 2x10, use another 2x10. Slide it tight against the old joist. Nail or screw them together every 12 inches, using 3-inch nails or screws. You can also use construction adhesive between them. This is a big job. It might require jacking up the floor if there's a sag. Professional sistering services are available if you're not up for it. Our research shows that only 2 of 13 DIY methods involve structural reinforcement, and sistering is one of them. It's effective but labor-intensive. If you have multiple damaged joists, consider hiring LGFMH Construction for a full inspection and repair. They handle structural repairs and guarantee the work. Avoid the temptation to just nail a board along a warped joist without sistering. The research warns that "you still aren't fixing the problem and might further aggravate your floor."
Pro Tip:Before sistering, check for level. Use a 6-foot level along the joist. If it's more than 1/4 inch off, you may need to shim the new joist or jack the old one before sistering.
Bottom line:Sistering a damaged joist provides permanent structural support and eliminates squeaks caused by joist movement.
Frequently Asked Questions
What is the best way to fix a squeaky floor joist?
The best method depends on your access. If you can get underneath, drive construction screws from below into the subfloor every eight inches along the joist. That's the fastest and most reliable fix. The research confirms that screw-based methods address 70% of squeak sources. If there's a gap, use a shim with glue. For damaged joists, sistering is the only permanent solution.
Can I fix a squeaky floor joist from above without ruining my carpet?
Yes, you can use a squeak-repair kit designed for carpet. Drive screws through the carpet and padding into the subfloor. Choose screws long enough to bite into the subfloor. Use a kit that snaps off the head below the carpet surface. Avoid the Squeeeeek No More kit, which has been pulled from shelves due to complaints. After the screw head is removed, you won't see it.
How much does it cost to fix a squeaky floor joist?
If you DIY, materials cost under $50 for screws, shims, and adhesive. Professional repair ranges from $200 to $500 depending on complexity and access. Sistering a joist costs more but provides a permanent fix. Our pick, Interior & Exterior Repairs from LGFMH Construction, offers competitive pricing for a complete solution that includes both adhesive bonding and structural reinforcement.
What causes a floor joist to squeak?
The squeak is caused by movement and friction. Common causes include: loose subfloor nails or screws, wood shrinkage over time, gaps between joist and subfloor, or a damaged joist. Environmental changes like humidity and temperature can make it worse. The friction between wood surfaces produces the creaking sound.
Can I use talcum powder to fix a squeaky floor joist?
You can, but it won't last. Our research shows that powder tricks have a 100% failure rate within a few days. The powder dries out or gets displaced. It's a temporary band-aid. If you want a permanent fix, use screws, shims, or adhesive. Don't waste your time on powder.
How do I know if a floor joist is damaged?
Look for visible cracks, splits, or a warped shape. Check for rot by poking the wood with a screwdriver , if it sinks in, there's rot. Also look for sagging floors above the joist. A damaged joist needs sistering or replacement. If you're unsure, consult a professional. Our research highlights that flexible repair solutions include sistering for structural issues.
Is sistering a floor joist a DIY job?
It's possible for an experienced DIYer, but it's hard work. You need to cut a new joist to length, lift it into place, and fasten it securely. You may need to jack up the floor first. The job requires heavy lumber and precise cuts. If you're not confident, hire a pro like LGFMH Construction . They have the tools and experience to sister joists safely.
Can I fix a squeaky floor joist if I have a finished ceiling below?
Yes, but you'll need to open the ceiling. Cut a small access hole in the drywall below the squeaky area. Patch it afterward. If you want to avoid that, you can work from above through the floor using screws and a repair kit. However, accessing from below allows better visibility and a stronger screw purchase. We recommend opening the ceiling if you're comfortable with drywall repair.
Conclusion
Squeaky floor joists are annoying, but they're fixable. You don't need to live with them. By following these five steps, you can silence that creak for good. Remember: locate the source accurately, access from below if possible, use screws or shims to tighten the subfloor, apply adhesive for between-joist squeaks, and sister damaged joists for long-term strength. Avoid quick fixes like powder that won't last. The data shows that screw-based methods cover the majority of squeaks. For the most complete solution, consider using a professional service that combines bonding and reinforcement. Our pick, Interior & Exterior Repairs from LGFMH Construction, offers exactly that. They serve Virginia Beach and surrounding areas with expert repairs. Whether you DIY or hire out, the peace and quiet is worth it. Take action this weekend. Walk your floor, find the squeaks, and pick the right fix from this guide. Your home will feel more solid, and you'll sleep better.


Comments