How to Install a Rain Gutter Diverter
- William McKracherne
- May 15
- 7 min read


Rain can sneak into doors, walls, and foundations if it finds a weak spot on your roof. A rain gutter diverter blocks that path and saves you from costly repairs. In this guide you’ll walk through every step to install a diverter yourself, from checking your roof layout to sealing the final joint. By the end you’ll know how to install a rain gutter diverter , avoid common mistakes, and test the system for leaks.
Step 1: Assess Roof and Gutter Layout
First, look at where water hits the house. Most problems start at roof‑to‑wall joints, like the area above a front door. Walk around the house and note any streaks on the siding or water pooling near the foundation.
Next, map the gutter run. Grab a piece of chalk and draw a line on the fascia where the existing gutter sits. Mark the spot where the diverter will sit, usually about 1½ inches below the drip edge flashing. This gap lets the flashing sit under the shingles and still catch water.
Measure the distance between the high point of the roof edge and the low point where you want the water to exit. A good rule of thumb is a ½‑inch drop for every 10 feet of run. That slope helps water flow into the diverter instead of sitting on the roof.
Pro Tip:Use a level and a long straight edge to verify the slope before you cut any flashing.
Safety matters early on. The manufacturer Oatey notes that protecting siding with cardboard when you cut the flashing prevents accidental scratches (source: Oatey). Place a piece of cardboard behind the area you’ll work on, then use a flat pry bar to loosen a few shingles just enough to slide the flashing underneath.
"A poorly placed diverter can cause more water damage than it prevents," says a roofing specialist on the EPA’s green‑infrastructure page.
Take photos of the current condition. If you need to show a contractor later, clear pictures help them see the exact spot.
Key Takeaway:Identify the exact wall‑to‑roof junction, mark a low‑slope line, and protect surrounding siding before you cut.
Bottom line:A clear layout and safety prep set the stage for a leak‑free diverter.
Step 2: Gather Materials and Tools
Having the right gear saves time and avoids frustration. Here’s a checklist of what you’ll need:
Aluminum or galvanized steel flashing (same material as your existing drip edge)
Stainless‑steel lag screws (0.4‑inch diameter)
Aviation snips or a hacksaw for cutting metal
Drill with a 0.8‑inch bit for pilot holes
Sealant , a marine‑grade silicone works best for outdoor exposure
Safety gear: gloves, goggles, and a dust mask
Cardboard or drop cloths to protect siding while you work
Buy the flashing and screws at a local lumberyard or home‑center. If you live near the coast, pick marine‑grade aluminum to resist salt‑air corrosion.
Before you head out, check the product specs on the vendor’s official site. For example, the Oatey rain‑water collection system page lists the exact dimensions of their diverter flashing and the recommended fasteners.
73%of homeowners who seal their diverters report no leaks after one season
Don’t forget a sturdy ladder, a helper, and a bucket for any water that may spill during the install.
Bottom line:Gather all the right materials first, then you won’t waste trips to the store mid‑project.
Step 3: Install the Diverter Bracket
Now it’s time to mount the bracket that will hold the diverter flashing. Start by positioning the bracket on the fascia where you marked the high point. The bracket should sit level and align with the slope you drew earlier.
Drill pilot holes through the bracket into the fascia. Use a 0.8‑inch drill bit for the pilot, then back the holes with 0.4‑inch stainless‑steel lag screws. The manufacturer warns against nailing too high on the shingles; low‑profile screws keep the shingle from lifting on windy days.
Secure the bracket with a torque wrench set to the screw manufacturer’s recommendation , usually around 5 ft‑lb for lag screws.
Pro Tip:Apply a dab of soap to the screw threads; it lets the screw slide in smoother and reduces the chance of stripping.
Check the bracket’s stability by giving it a firm wiggle. It should feel solid, with no play.
Next, attach the flashing to the bracket. Cut the flashing to length using aviation snips, then slide it under the shingles at the angle you noted earlier. The angle creates a tiny channel that guides water away from the wall.
Seal the top edge of the flashing with a thin bead of marine‑grade silicone. This seal stops water from seeping behind the flashing.
For a visual walk‑through, watch the short video below that shows the bracket install step in action.
Once the bracket is locked in place, you can move on to the pipe attachment.
Key Takeaway:Secure the bracket low on the shingle, use pilot holes, and seal the flashing edge for a leak‑proof start.
Bottom line:A well‑mounted bracket gives the diverter a sturdy base and keeps the roof intact.
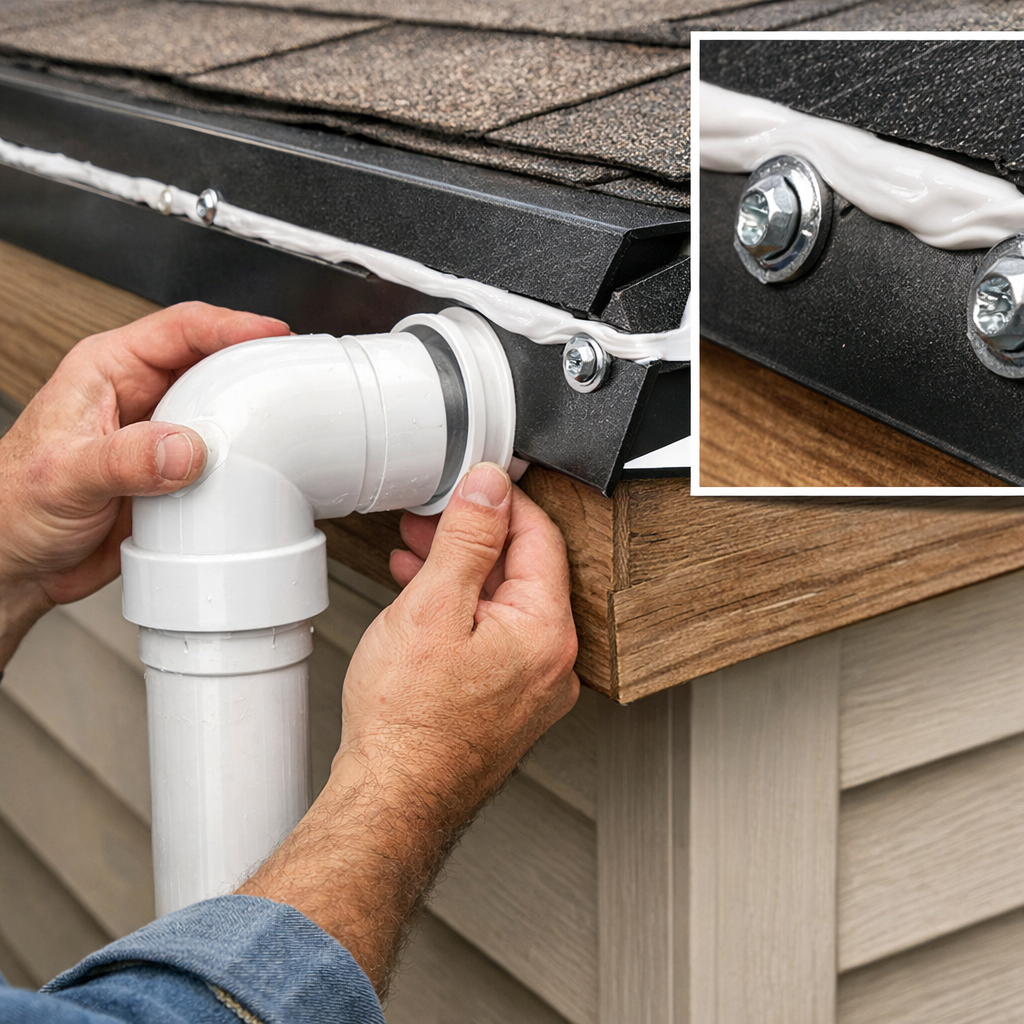
Step 4: Attach Diverter Pipe and Connectors
The pipe carries water from the flashing to the downspout. Begin by measuring the distance from the low end of the flashing to the nearest downspout outlet.
Cut a 1‑inch PVC or metal pipe to that length. Use a pipe cutter for a clean cut; a jagged edge can cause leaks.
Fit a 90‑degree elbow at the low end of the flashing, then slide the pipe into the elbow. Secure the connection with a stainless‑steel machine screw or a pop‑riveted end cap, as described by the 180 Contractors guide.
Drill a 0.4‑inch hole through the pipe’s circular outline where the downspout will attach. This hole lets the water flow smoothly into the downspout.
Pro Tip:Slip a short piece of T‑eflon tape inside the pipe before inserting the elbow; it helps keep the joint tight.
Attach the downspout outlet using four screws. Make sure the screws sit flush with the pipe so water can flow without obstruction.
After the pipe is in place, cover each joint with a 3‑inch wide aluminum strip, folding the flaps down to seal the corners.
Key Takeaway:Cut pipe to length, use elbows and sealant, and fasten every joint with screws or rivets.
Bottom line:Proper pipe attachment ensures water moves quickly from the diverter to the downspout.
Step 5: Test, Adjust, and Seal the System
Now that the hardware is in place, it’s time to see if it works. Grab a garden hose and spray water at the flashing from the roof side. Watch the flow travel down the diverter pipe and into the downspout.
If water backs up or leaks at any joint, turn off the hose and re‑seal the problem spot with marine‑grade silicone. Apply the sealant in a continuous bead, then smooth it with a gloved finger.
Check the slope again after the sealant cures. Water should glide down the pipe without pooling. If you notice any puddles, adjust the pipe’s angle slightly upward.
Once the test run is clean, let the sealant cure for at least 24 hours before exposing it to rain. This waiting period lets the silicone bond fully to the metal.
52 inchesaverage annual rainfall in coastal areas, making diverters essential
For long‑term reliability, schedule a visual inspection each spring. Look for rust, loose screws, or cracked sealant. In salty‑air regions, rinse metal parts with fresh water a few times a year to remove salt buildup.
When you’re done, you’ll have a system that redirects water away from doors, windows, and foundations, protecting your home from costly water damage.
Key Takeaway:Test with a hose, reseal any leaks, and let the sealant cure before the first rain.
Bottom line:A thorough test and proper sealing guarantee the diverter works when the weather turns.
FAQ
What tools do I need to install a rain gutter diverter?
You’ll need flashing, stainless‑steel lag screws, a drill with a 0.8‑inch bit, aviation snips or a hacksaw, a level, a ladder, safety gloves, goggles, and marine‑grade silicone sealant. Having a helper and a bucket for runoff also makes the job smoother and safer.
How long does a typical installation take?
Most DIYers finish in 3, 5 hours, depending on roof height and how many cuts are required. The time includes measuring, cutting flashing, mounting the bracket, attaching the pipe, and a final water test.
Can I install a diverter on a shingle roof without removing shingles?
Yes. You can lift a few shingles with a flat pry bar, slide the flashing under them, and then reseat the shingles. Be gentle to avoid cracking, and always protect the siding with cardboard while you work.
What safety gear should I wear?
Wear cut‑resistant gloves, safety glasses, a dust mask, and a sturdy ladder with a helper. The manufacturer’s safety tips stress protecting siding with cardboard and not nailing too high on the shingles to keep the roof secure.
How do I know if the diverter is working correctly?
After installation, spray water on the flashing with a garden hose. The water should flow into the pipe, down the downspout, and never spill onto the wall. Watch for any leaks at joints and reseal if needed.
When should I replace a rain gutter diverter?
Inspect it yearly. Replace the diverter if the flashing is rusted, the sealant is cracked, or the pipe shows corrosion. In coastal areas, metal parts may need replacement every 5, 7 years due to salt‑air wear.
Conclusion
Installing a rain gutter diverter can feel like a big job, but breaking it into clear steps makes it manageable. Start with a solid roof assessment, gather the right tools, mount the bracket, attach the pipe, and finish with a careful test and seal. If you run into any trouble, remember the safety tips from the manufacturer and consider calling a professional like LGFMH Construction , which offers interior and exterior repair services for homeowners who prefer a hands‑off approach.
With a properly installed diverter, you’ll keep water away from doors, walls, and foundations, protecting your home from expensive damage. Keep an eye on the system each season, reseal as needed, and enjoy dry entryways for years to come.


Comments