How to Seal a Leaking Deck Railing Joint
- William McKracherne
- May 14
- 7 min read

Water sneaking into a deck railing joint can rot wood, rust bolts, and turn a safe porch into a hazard. The leak often shows up as a drip after rain or a damp spot where the post meets the rail. You can stop it yourself with the right prep, sealant, and a bit of patience.
In this guide you’ll learn how to seal a leaking deck railing joint from inspection to final testing, plus tips on safety, product choices, and when to call a pro.
Step 1: Inspect and Identify the Leak
Start by walking the deck on a dry day. Look for water stains, wood rot, or rust on the hardware. The Decks.com guide warns that loose hardware often hides moisture problems. Pay close attention to the top rail, post caps, and the post‑skirt where the deck meets the railing.
Use a flashlight to peer into the joint. If you see darkening wood, that’s a sign water has been sitting there. Check the bottom rail too; water can travel down the post and seep out at the base.
Don’t forget the environment. Coastal homes face salt‑air corrosion, which accelerates rust on metal fasteners ( OnDek Vinyl Worx ). Note any cracked caulk or missing flashing.
Pro Tip:Mark the problem spot with a piece of colored tape so you don’t lose track during later steps.
Once you’ve pinpointed the exact joint, decide if the wood is still sound. If the timber is soft or crumbling, a sealant won’t hold , you’ll need a repair job like the Repairs Soffit Fascia - Lgfmh Construction service.
Bottom line:A thorough visual check tells you whether a simple seal will work or you need a professional fix.
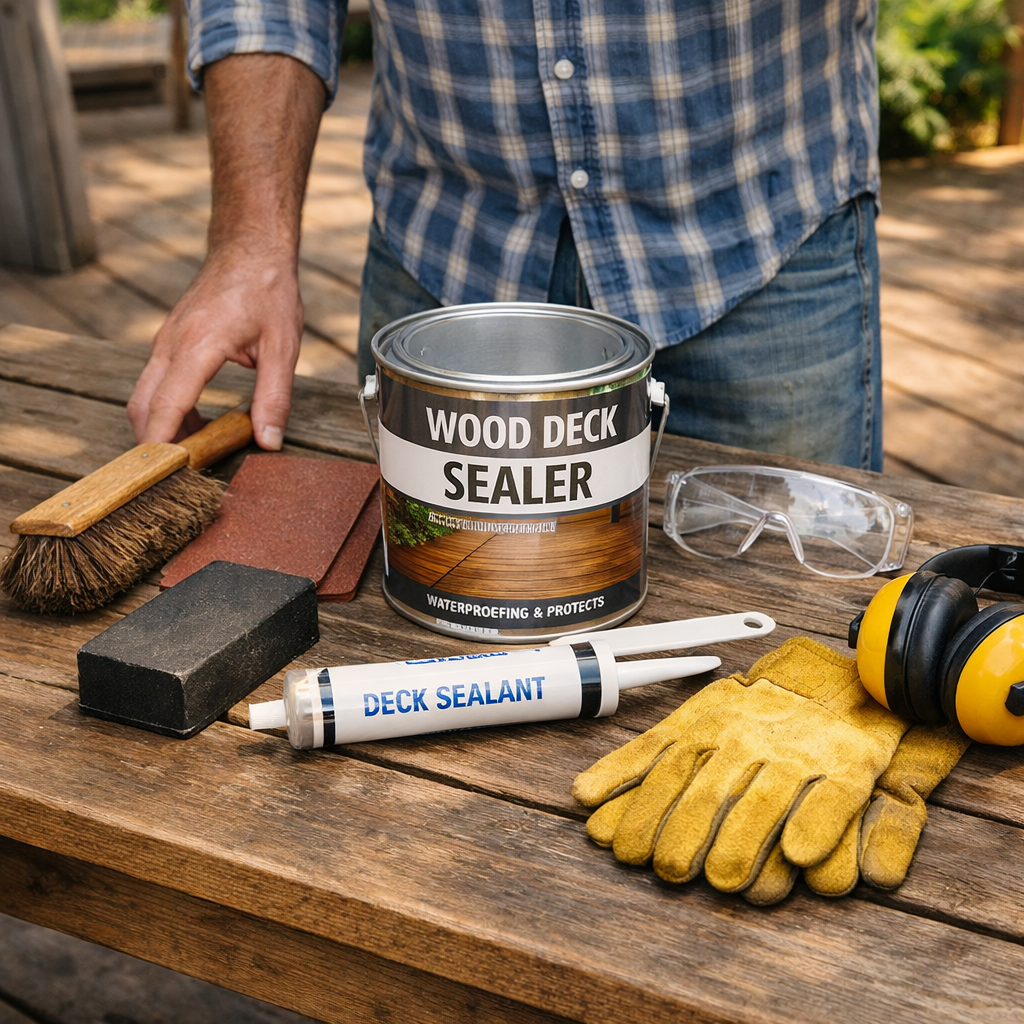
Step 2: Gather Materials and Safety Gear
Having the right tools on hand saves time and cuts frustration. Here’s a basic checklist:
Weather‑proof deck sealer (oil‑based or water‑based)
Primer for wood or metal, depending on the post material
Paintbrushes (2‑inch synthetic) and a small roller
Sanding block or 120‑grit sandpaper
Utility knife for old sealant removal
Protective gloves, safety glasses, and a dust mask
Ladder with a stabilizer if the joint is high
Brad the Painter’s review of deck sealers notes that oil‑based products like Defy Extreme Clear penetrate deeper and perform best in shaded spots (Brad the Painter).
Safety is often skipped in DIY guides , only 17 % of the 18 checklist items we reviewed mentioned gear. Wear gloves and glasses to protect against splinters and chemicals.
Key Takeaway:Gather all tools first; missing a brush or safety gear will force you to stop mid‑project.
Bottom line:A complete kit and proper safety gear keep the job smooth and injury‑free.
Step 3: Clean the Joint Surface
Cleaning removes dirt, mildew, and old sealant that would block adhesion. Start by sweeping loose debris with a soft brush. For stubborn grime, use a garden sprayer set to a gentle fan at no more than 3100 psi , Trex advises keeping the nozzle at least 8 inches away ( Trex ).
Next, scrub the joint with a mild, non‑abrasive cleaner such as diluted dish soap or a wood‑specific cleaner. Rinse well and let it dry completely. The drying time is crucial; Capitol City Lumber specifies 48 hours of air‑dry before any coating ( Capitol City Lumber ).
If old caulk is present, cut it away with a utility knife and scrape the residue. A clean, dry surface will let the primer soak in evenly.
"A clean surface is the foundation of a lasting seal; skip it and you’ll pay later."
After cleaning, sand any rough wood or metal edges with 120‑grit sandpaper. Wipe away dust with a tack cloth.
48hours recommended drying time
Bottom line:Proper cleaning and a full 48‑hour dry period set the stage for a seal that won’t peel.
Step 4: Apply Primer
Primer helps the sealant bond and blocks any lingering moisture. Choose a primer that matches your substrate: wood‑based primer for timber posts, rust‑inhibiting primer for metal.
Using a 2‑inch brush, apply a thin, even coat to the joint and surrounding area. Allow the primer to cure as the manufacturer directs , typically 2‑4 hours for water‑based formulas.
For metal posts in salty air, a marine‑grade primer offers extra protection against corrosion.
Pro Tip:Back‑roll the primer with a small roller to work it into the grain and eliminate brush marks.
Once the primer feels dry to the touch, you’re ready for the sealant.
Bottom line:A compatible primer creates a solid bond and guards against future rust or rot.
Step 5: Seal the Joint with Appropriate Sealant
Now comes the star of the project: the sealant. Clear penetrating sealers protect water but give little UV shield; tinted transparent sealers add color and UV protection. Scott Paul of DeckStainHelp recommends a penetrating oil‑based sealant for best water repellency (DeckStainHelp).
Stir the sealant well , the solids settle after sitting. Pour a small amount into a paint tray and load a 2‑inch brush. Apply a thin bead along the joint, then use a roller to back‑roll, ensuring the sealant fills the wood fibers.
Work in sections no larger than a foot at a time to keep the sealant from skinning over. If you notice bubbles, lightly tap the area with a finger to release them.
Key Takeaway:Apply a thin, even coat and back‑roll for full penetration.
Let the sealant cure according to the label , most oil‑based products need 24‑48 hours before exposure to rain.
Bottom line:The right sealant, applied thinly and evenly, creates a waterproof barrier that lasts.
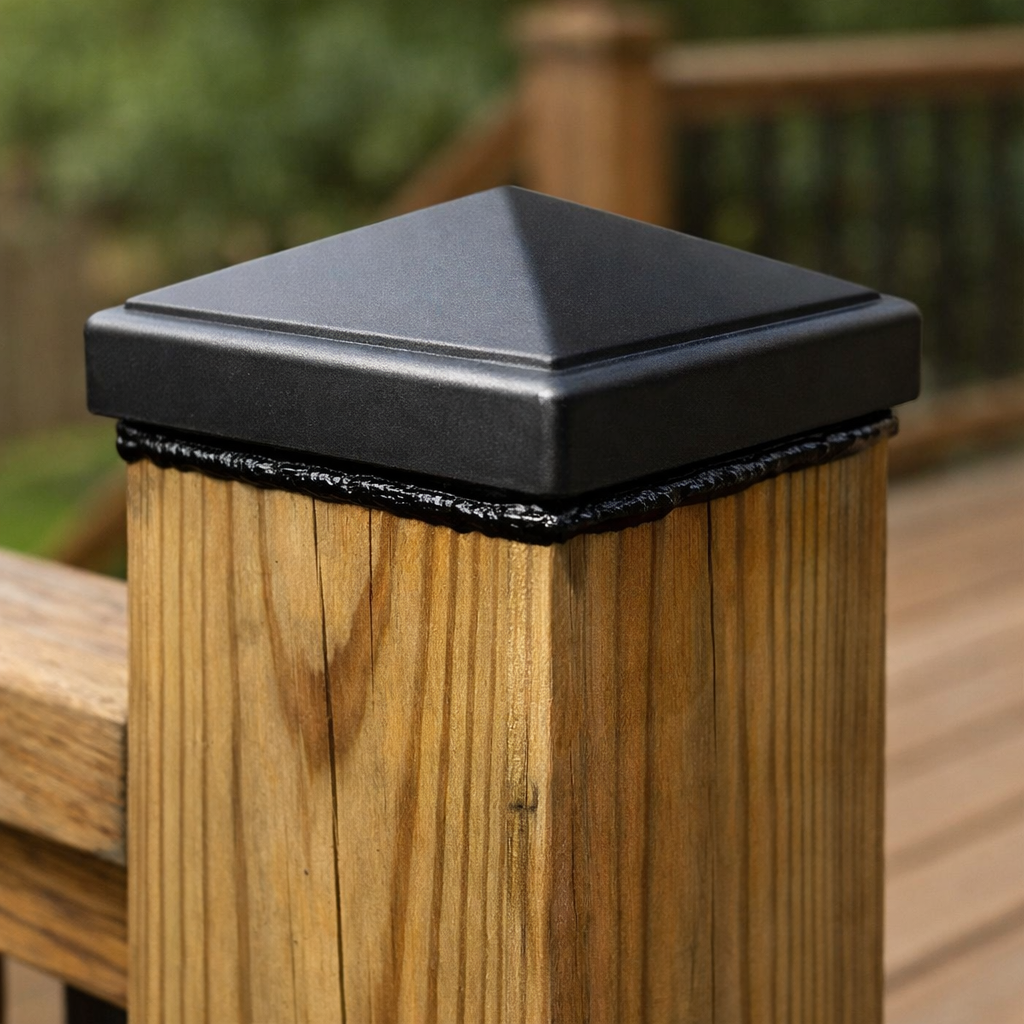
Step 6: Install a Protective Cap or Trim
Even a perfect seal can be nicked by foot traffic or wind‑blown debris. Adding a protective cap or trim shields the joint and gives a finished look.
Measure the joint width and cut a small piece of pressure‑treated wood or a pre‑finished composite cap to fit. Drill pilot holes, then fasten with stainless‑steel screws to avoid rust.
After the cap is in place, run a thin bead of the same sealant around its edges to seal any gaps.
Pro Tip:Use a trim with a built‑in drip edge; it directs water away from the joint.
Check the cap for levelness and make sure it sits flush. A misaligned cap can collect water and defeat the seal.
Bottom line:A well‑fitted cap adds a physical barrier that protects the seal from wear.
Step 7: Test and Maintain the Seal
Before you call the job done, run a water‑spray test. Use a garden hose on a gentle setting and aim at the joint from different angles. Watch for any droplets that break through.
If you see leaks, lightly sand the area, reapply a thin sealant coat, and let it cure again. Once the joint stays dry, schedule regular maintenance.
Task | Frequency | Why It Matters |
Visual inspection | Twice a year | Catch early signs of rot or rust |
Clean surface | Every 6‑9 months | Prevent mildew buildup |
Re‑seal | Yearly in high‑traffic areas | Maintain water‑proof barrier |
For decks in salty or humid climates, consider a marine‑grade sealant and re‑seal every 18 months. Keep a maintenance log with dates, products used, and any observations , this can help with warranty claims.
17% of guides miss safety tips
Remember to wear safety gear each time you work at height or handle chemicals.
Bottom line:Regular testing and upkeep keep the joint sealed for years, preventing costly repairs.
FAQ
What causes a deck railing joint to leak?
Leaks usually stem from water finding a path through gaps in the joint, rot in the wood, or rusted metal fasteners. Exposure to rain, humidity, or salt air can force moisture into tiny cracks, eventually breaking down the wood or loosening hardware. Regular inspections catch these issues early.
How long should I let the joint dry before applying primer?
Capitol City Lumber recommends a full 48 hours of air‑dry time after cleaning. This ensures any lingering moisture evaporates, allowing the primer to adhere properly and reducing the risk of sealant failure.
Do I need a special sealant for composite railings?
Composite railings benefit from a clear penetrating sealer that won’t discolor the material. Defy Extreme Clear and similar products are designed for composites and offer deep penetration while resisting UV fading.
Can I use a regular exterior paint instead of a sealant?
Paint creates a surface film but doesn’t soak into wood fibers like a sealant does. Over time, paint can peel and leave the wood exposed. A dedicated deck sealant protects the wood from water while preserving the natural grain.
What safety gear is essential for this project?
Wear gloves to protect your hands from splinters and chemicals, safety glasses to shield your eyes from dust, and a dust mask when sanding. Use a sturdy ladder with a stabilizer and keep a helper nearby if you’re working at height.
When should I call a professional instead of DIY?
If the wood feels soft, crumbles under pressure, or if rust has eaten through fasteners, a simple seal won’t hold. In those cases, LGFMH Construction ’s repair service can replace damaged posts, re‑fasten hardware, and apply a professional seal.
How often should I re‑apply sealant?
Most clear sealers need a fresh coat every 12 months, especially in high‑traffic or humid areas. Tinted transparent sealants may last 18‑24 months due to added UV protection.
Is there a quick way to test if the seal is holding?
After the sealant cures, spray water from a hose at the joint for a few minutes. If no water seeps through and the surface stays dry, the seal is successful. Repeat the test after a heavy rain to be sure.
Bottom line:These FAQs address the most common concerns, helping you finish the job with confidence.
Now you’ve got a full roadmap to seal a leaking deck railing joint. From a careful inspection to a final water‑spray test, each step builds on the last to keep your deck safe and dry. If the joint is beyond repair, LGFMH Construction offers professional interior and exterior repairs that can replace damaged posts and hardware. With the right tools, a bit of patience, and the checklist above, you’ll enjoy a leak‑free deck for seasons to come.
Ready to get started? Gather your gear, follow the steps, and remember to schedule regular maintenance. A well‑sealed railing not only protects your home but also adds years of value and peace of mind.


Comments