How to Install a Skylight Flashing Kit: Step-by-Step Guide
- William McKracherne
- May 20
- 13 min read

Skylights brighten a room, but a leaky flashing kit can ruin the view and the ceiling. This step-by-step guide shows you how to install a skylight flashing kit with safety and precision. You’ll learn how to assess roof pitch, plan the rough opening, cut and frame, fit the flashing kit in the correct sequence, and seal the overlaps for a durable, weather-tight install. It’s written for homeowners who want a solid DIY process or for pros looking to standardize a method. We’ll weave in usable tips, operational checks, and clear decisions you can apply on your roof today. And you’ll find a couple of expert references to help you verify best practices as you go. If you want professional help at any point, remember LGFMH Construction offers interior and exterior repairs and roof work to handle flashing ends and finishing touches. For context and safety notes used in the guide, you’ll see brief references to manufacturer guidance and industry basics throughout.
Before you start, know this: the flashing kit is the rain barrier at the skylight, and the way you sequence the parts matters as much as the fasteners you choose. Water will follow the path you lay for it, so plan to overlap, seal, and integrate with the rest of the roof. In 2026, homeowners often pair flashing work with broader roof or exterior repairs to ensure a long-lasting result. This guide follows the standard steps used by pros and aligns with manufacturer guidelines for common kits. For a quick context on what a flashing system is, linked in the opening references.
We’ll start with Step 1 and move through each phase with specific actions, checklists, and usable cautions. If a step feels risky or outside your comfort zone, pause and consider professional help. The goal is a leak-free skylight that stays watertight for years to come. Let’s get started.
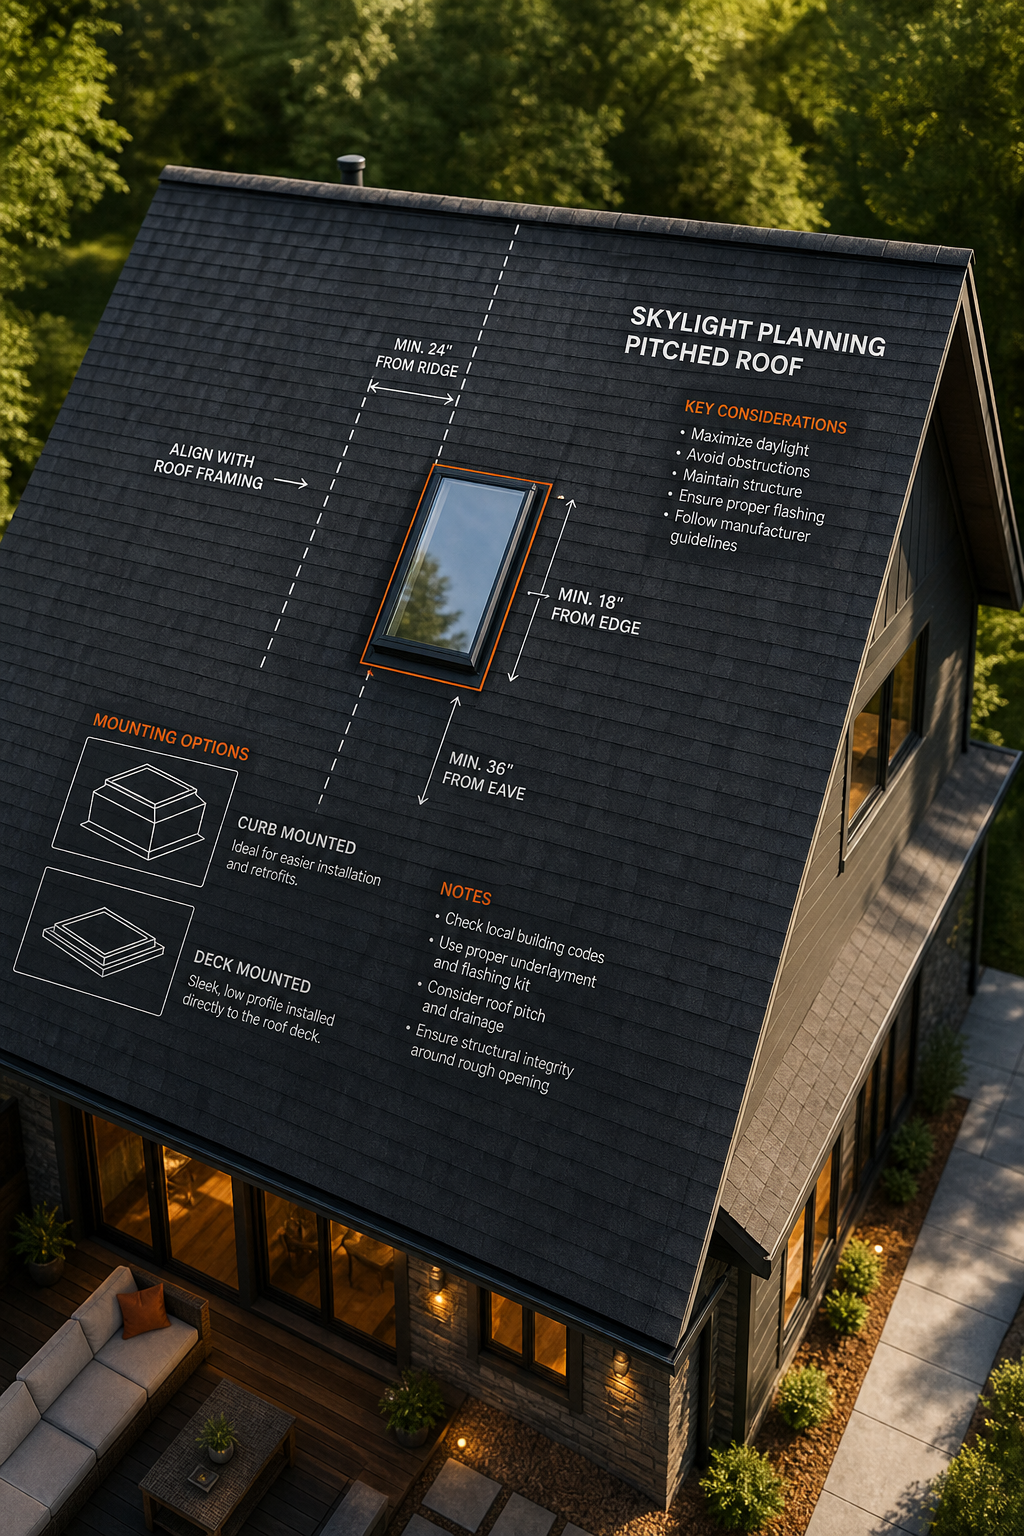
Step 1: Assess Roof Pitch and Choose Mount Type
First, you need to pick the right mounting approach for your skylight based on roof pitch and configuration. Curb-mounted skylights sit on a framed curb that sits on the roof, while deck-mounted units install directly on the roof deck. The choice affects flashing strategy and how you route water away from the opening. A low-slope roof (for example, under 3:12) often uses a curb-mounted approach, while steeper pitches (above 3:12) fit well with deck-mounted or higher-profile flashing sequences. This decision drives the rest of the kit you’ll need and the way you cut and seal the opening. When you select the mount type, you’re also choosing which flashing pieces must interlock with the roofing material to keep water out. This is not cosmetic; it’s the core to a long-lasting leak‑proof skylight opening. And the right choice affects interior trim, insulation, and how you finish the inside. VELUX flashing systems outline how the flashing pieces interlock with roofing material for a fast weather-tight install, including notes about additional pieces for specific shakes or tile types, which is useful for planning your kit fit across different roof substrates.
Take a careful look at your roof pitch, the roof type (asphalt shingles, shakes, tile, metal), and any attic access constraints. If you’re working on a truss roof, you’ll need to verify where the skylight can fit without compromising structural members. Mark potential rafter lines and the rough opening area on the roof deck using a chalk line. If you’re unsure about load paths or what size opening your skylight needs, refer to the flashing kit’s sizing guidelines and the manufacturer’s install notes. A proper plan reduces the risk of a miscut or a misaligned curb, which can lead to leaks after the first heavy rain. For context: these principles line up with standard flashing practice and the general guidance provided by flashing-system suppliers. To help visualize the concept, imagine the flashing as a rain gutter built around the skylight opening, directing water to flow over and away from the seam.
Key usable steps you can take now: - Confirm roof pitch with a level and measure the run. If uncertain, use a drop‑in inclinometer to verify the slope. - Decide curb vs deck mounting based on pitch and roof type. - Sketch the opening on the roof with a chalk line, including space for ice-and-water shield under the flashing. - Review the kit’s recommended flashing sequence (bottom sill, side flashing, saddle/top, counter flashing) and note any special pieces for your roof material.
In practice, many homeowners pair this Step 1 with a quick site check of attic access. If you can look from above the ceiling, note any plumbing, electrical, or ventilation runs that could affect the skylight’s location. A well-planned Step 1 reduces surprises when you cut the opening and frame the rough opening later. And if you want hands-on help for the framing and roof‑cut decisions, LGFMH Construction provides roof installation services that align with your kit choice and flashing sequence. The next steps will guide you through how to verify codes and plan the rough opening so your project meets local requirements and your roof’s specifics.
Pro Tip:Wear hearing protection and eye protection during roof work. Plan a safe rope or fall-arrest setup if you’ll be on a steep roof. And remember to keep a clear work area to avoid dropping tools into the attic or opening.Move deliberately here; a small error can cascade later in the project.
When you finish Step 1, you’ll have a clear path for Step 2: verify local building codes and plan the rough opening. This keeps your work compliant and helps you anticipate required clearances around the skylight and any mechanical or electrical work nearby. The code check also sets the stage for proper ventilation and access, especially if you’re installing multiple skylights or planning future upgrades like motorized shading or solar vents. The next section walks you through how to check codes and plan the rough opening before you cut the roof.
Step 2: Verify Local Building Codes and Plan the Rough Opening
Code compliance matters a lot in skylight work. Local rules govern flashing height, overlap, ventilation clearance, and the way the skylight interfaces with the roof. Start by calling up or checking your city’s building department for guidance on skylight installation in your area. Look for requirements about frost-proof distances, minimum pitched roof angles for curb mounting, and the need for ice-and-water shield around the opening. Some jurisdictions require a permit for roof openings and skylight installations, especially if structural framing changes are involved. If you’re unsure, your local code office can confirm whether you need a permit and what plans or drawings you should submit. These steps help you avoid rework and ensure you stay within the law and local standards.
Next, plan the rough opening. The flashing kit will specify the rough opening size, but you still need to verify the space around the skylight doesn’t clash with rafters or other framing. The plan should include the sill height, the side clearance to shingles or siding, and how the flashing will be integrated with the ice-and-water shield around the perimeter. A well-drawn rough opening plan reduces miscuts and helps you coordinate with any electrical, insulation, or interior finishing work that will follow. In practice, many pros combine a rough-opening plan with attic access locations so you can install the skylight from the top while inspecting the attic. A usable way to do this is to mark the rough opening on the roof deck with a chalk line and then transfer those marks to the interior ceiling so you can verify space from both sides.
To help with decision-making here, consider a quick matrix of factors you’ll face when you verify codes and plan the rough opening:
Roof type and pitch
Permits required
Rafter layout and potential blocking
Ice-and-water shield perimeter and overlaps
Electrical/insulation considerations
As you finalize the rough opening, reference the manufacturer’s specs for the flashing kit you’re using. Not all kits fit every roof type, and the exact opening dimensions matter for a clean fit and water-tight seal. For homeowners seeking expert help, LGFMH Construction offers roof installation services that align with your chosen flashing kit and the local code framework. This ensures you’re following the right path as you move into the cut and framing steps. The next section covers how to cut the roof opening and prepare rafters for the skylight.
Internal link note:For a broader view on professional roof work, you can explore our Roof Installation page to see how LGFMH handles the whole project from permit to finish. Roof Installation | LGFMH Construction
Step 3: Cut the Roof Opening and Prepare Rafters
With the opening size confirmed, you’ll cut the roof opening and prep the rafters. The cut must be square and sized so the flashing kit can fit neatly. Start by removing shingles within the opening area and exposing the decking. Use a chalk line to mark a precise outline and then cut along the line. A clean cut is critical because it reduces tear-out on the deck and helps you seat the ice-and-water shield consistently around the opening. If you’re working in a sealed attic, you’ll want to preserve as much insulation as possible and maintain proper ventilation path. Cutting through metal roof panels or shakes requires the right blade and careful handling. Always wear eye protection and gloves, and tidy up the cut edges to prevent sharp edges from snagging the shingles or causing injuries later.
Next, frame the rough opening to the skylight dimensions. Frame the opening per kit specs and ensure the framing is square. Drive corner screws or through-bolts at the opening corners to help locate the frame and prevent shifting. If you have a mid-opening rafter that would block the skylight, you’ll remove or notch it so the header can sit cleanly. A solid rough opening makes the next steps smoother and minimizes the risk of a misfit when you fit the flashing kit. Usable tip: recheck measurements after framing, then again after you’ve cut the deck so you can verify the opening remains true to size.
In this step, keep an eye on the potential for roof deck damage and ensure the deck remains well-supported. If you’re cutting through a favorable location on the roof with fewer hazards, you’ll have a straightforward install. If you’ve got structural concerns or tricky framing, you’ll want to call in a pro. Remember, the flashing kit’s components assume a correct rough opening and proper framing. The rest of the process, installing the flashing kit in sequence, will be easier once the opening is true and well supported.
Pro Tip:Use a vacuum to collect tin shavings and dust as you go. Guarding the work area helps prevent slips on loose material later. And if you’m not comfortable with any part of the cut, consider professional assistance to avoid structural damage or leaks.
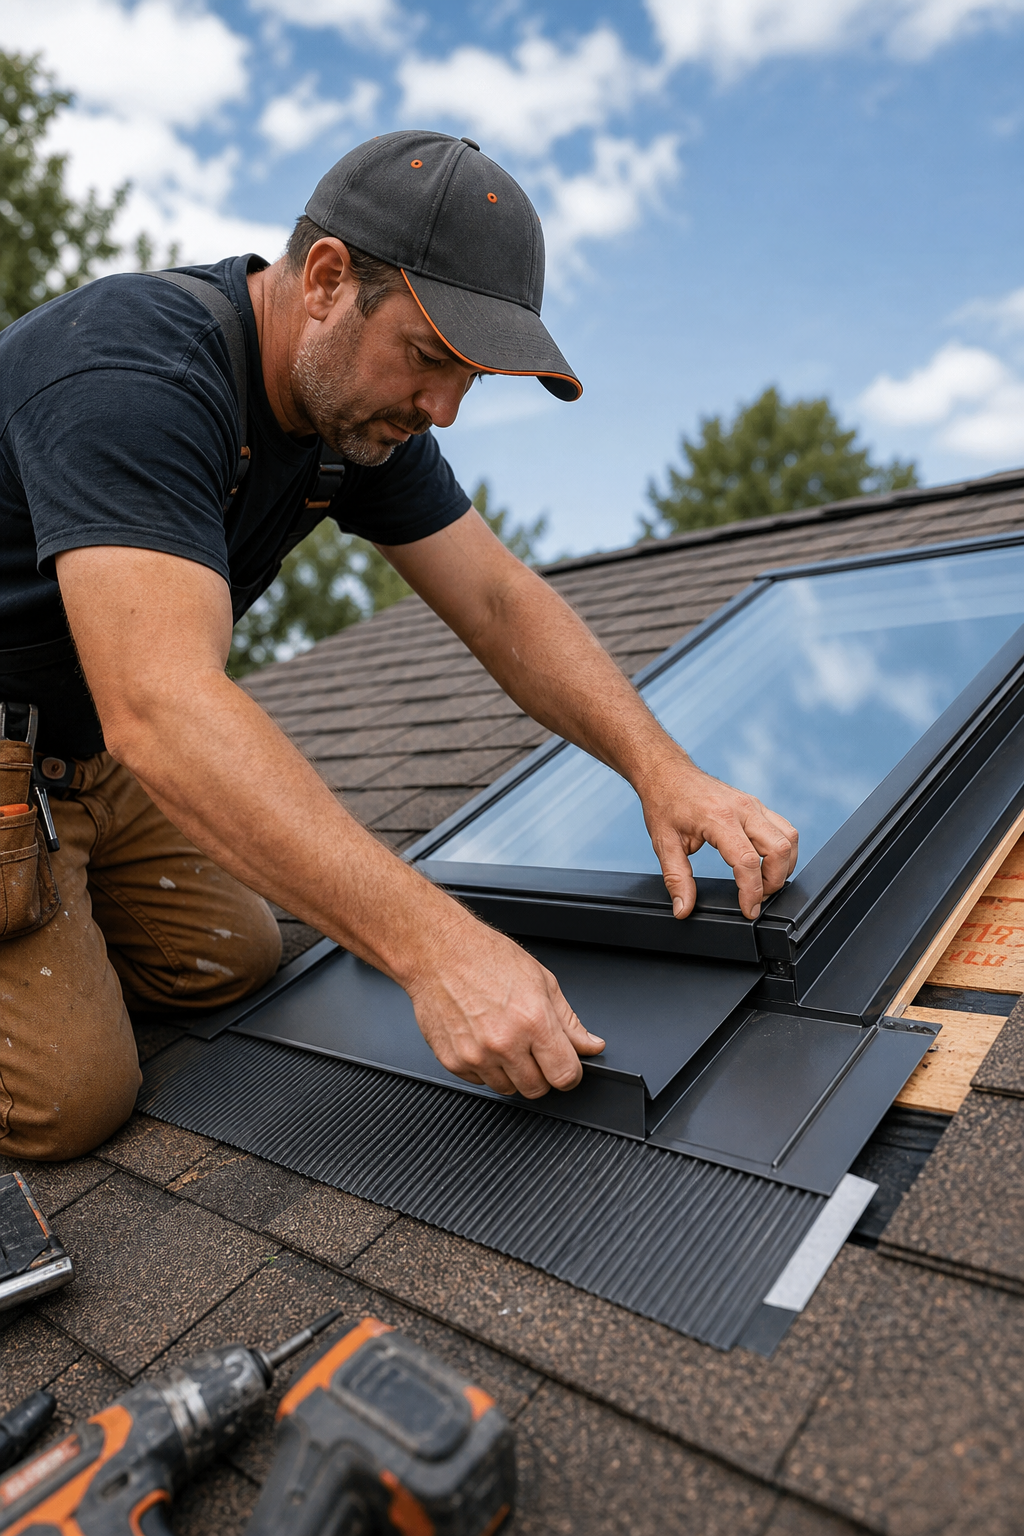
Step 4: Install the Flashing Kit in Correct Sequence
The flashing kit is the rain control plan for the skylight. The typical sequence starts with bottom flashing (sill), then side or step flashing, followed by a saddle or top flashing, and finishes with counter flashing to seal the top edges. You’ll interlock the flashing pieces with the roofing material so water flows away from the skylight. The exact pieces you need depend on your roof type and kit. In many systems, the kit includes an ice-and-water shield that runs up behind the flashing to protect the deck and framing from water intrusion. The right sequence helps water shed down the roof instead of funneling into the opening.
As you begin, install the sill flashing along the bottom edge of the rough opening and secure it with nails or screws at regular intervals. Then work up the sides with step flashing, overlapping as you rise. The saddle flashing sits on top of the side flashing and the cladding to shed water around the opening. Complete the sequence with counter flashing that overlaps the side and saddle flashing. If you’re working on a roof with metal panels, shake shingles, or tile, you may need to bend or trim flashing pieces to fit the angles and avoid sharp gaps. The flashing kit should include instructions on how to trim corners and overlap joints to ensure weather-tight seals. A careful bend and a snug fit matter more than a fast fix with caulk alone. See the flashing system guide for the typical interlock details and recommended overlaps.
The external link above links to the flashing-system guide, which helps you compare pieces across different shingles and shakes. If you want a quick contextual view on what these steps look like in practice, you’ll see how installers handle a headwall, step flashing, and saddle flashing in operational tutorials. The kit’s features and the sequence matter because they govern how the water sheds away from the skylight and how the interior remains dry. The next step wraps up the process with fitting the skylight and finishing the interior finishes.
Operational note:If your roof is wood shingle or has thick shakes, you may need additional flashing pieces (ZZZ 200) to accommodate the thickness. The flashing system notes will tell you when extra pieces are needed to maintain a water-tight seal around the skylight.
Step 5: Fit the Skylight, Seal Overlaps, and Finish Interior
With the flashing installed in the correct sequence, it’s time to set the skylight in place and secure it. Center the unit over the rough opening, then fasten through the mounting flange with the hardware supplied in the kit. Ensure the skylight is square from inside and outside. Install the interior trim or drywall as needed, and make any insulation adjustments around the rough opening. The interior finish should be air-tight, so seal any overlaps and small gaps with appropriate caulking or foam where suitable. Efficient interior finishing involves aligning the skylight with the ceiling plane, ensuring the shade or vent mechanism is accessible, and planning for any interior trim that might be added later.
Seal the overlaps around the skylight to prevent water from wicking between the flashing and the roof deck. The sealant you choose should be durable in your climate and compatible with the materials around the skylight (roofing, flashing, drywall, and interior trim). After sealing, finish the interior side, install insulation back into the cavity, repair drywall, and reinstall any interior cladding or trim. If you’ve installed a solar-powered or venting skylight, connect the control wiring or remote as per the kit instructions and test the operation after the interior is sealed. It’s often easier to test the skylight after the exterior flashing and interior finishes are complete so you can fine-tune the operation without re-sealing.
From a operational standpoint, the most common leak paths come from misaligned overlaps, insufficient sealant, or gaps behind the counter flashing. Ensure the counter flashing sits above the saddle flashing and that you’ve sealed the corners where the flashing pieces meet. This helps you avoid a drip path that could lead to interior water damage. For usable finishing, apply a thin bead of sealant along all seam lines and joints, then smooth with a gloved finger or a sealant tool. If you’re unsure about the interior finish, LGFMH Construction offers interior and exterior repair services that cover flashing, insulation, and drywall to ensure everything stays watertight.
Visual breaks and summary notes help you decide next steps. If you’re tackling this project solo, improve your time to check the interior and exterior seals as you go. A water-spray test on the roof after the sealant cures can confirm you’ve got a solid seal before you move to final interior painting and trim. And if you want to review a professional process or see how a pro structures the finish, the official skylight installation guidance provides a framework to follow as you work through the last stage.
Key Takeaway:The sequence matters. Proper sill flashing, correct side flashing overlaps, and solid saddle and counter flashing create a reliable barrier that keeps water from getting into the skylight and attic. A cautious, methodical finish saves you time and future headaches.
Finally, take a quiet moment to step back and review the job. The skylight should be plumb and square, with clean lines on the interior and a uniform seal at the overlaps. If plumbing or electrical work was involved or if you’re planning to install shades or a remote control, make sure all control wiring is tucked away and accessible. A thorough finish means fewer touch-ups later and a more durable, leak-free skylight. If you’d like a professional wrap-up, LGFMH Construction offers interior and exterior repair services to ensure a complete, weather-tight installation that lasts.
Caveat:Metal flashing will age with sun and weather. Inspect the skylight annually for seal integrity, paint wear, and flashing overlaps, and re-seal where necessary to maintain long-term performance. This is a simple preventive step that saves big fixes later.
In closing, you’ve walked through planning, opening, flashing, and finishing the skylight with a kit. If any step feels uncertain, you can consult a pro for the final checks and sealing to guarantee a strong installation. For a broader service approach, consult the linked manufacture guides and our own Roof Installation service for a smooth integration of exterior and interior work. And if you want to see how this aligns with a broader renovation plan, you can look at the internal LGFMH resources on roof repairs and siding work as needed.
Internal link usage note:To see how a professional roof team approaches this work end-to-end, visit our Roof Installation page. Roof Installation | LGFMH Construction
Would you like to see a quick recap? A well-flashed skylight isn’t just about the kit. It’s about careful alignment, clean cuts, and a seal that lasts. The flashing kit, properly installed, ties the whole roof together with a durable, watertight finish. If you need ongoing maintenance or want to review the job with a professional, LGFMH Construction can help with both exterior and interior work to keep your skylight rainproof for years to come.
Conclusion
Installing a skylight flashing kit is a usable, step-by-step task that rewards careful planning and methodical work. The key to success is understanding the mounting type, verifying local codes, cutting a true rough opening, and laying out the flashing in the right order. Each step reduces the risk of leaks and interior damage and makes it easier to finish the interior with confidence. This guide has walked you through the essential sequence and provided usable tips you can apply on your roof today. If you want a professional touch at any point, LGFMH Construction offers interior and exterior repairs and roof work that cover flashing installation, sealing, and finishing. You’ll get a reliable, watertight result that stands up to the weather and keeps your space bright and dry for years to come.
In 2026, homeowners are balancing DIY steps with professional support to ensure quality outcomes. The steps outlined here build a solid foundation for your skylight project, whether you’re starting from scratch or re-flashing an existing unit. Remember to inspect, seal, and finish with care, and don’t hesitate to bring in a pro if you encounter structural concerns or if you want a warranty-backed finish on both interior and exterior flashing. The result is a skylight that not only looks good but performs well over time, with a reliable, leakage-free seal that protects your home’s interior for years to come.
If you’re evaluating options, consider how a pro’s integrated approach could save time and prevent costly mistakes. And for those who want more than just the flashing steps, we offer a full range of roof and exterior repair services to support your project from start to finish. For a concise overview of what a pro can do in your area, review the official guidance and local codes as you plan your next steps.
As a final note, remember that the best skylight installations combine sound planning, careful cutting, and a thorough seal. The flashing kit is the backbone of your weatherproofing, but the real success comes from your attention to detail through every step. If you want to talk through your plan or arrange professional support, you can reach LGFMH Construction to discuss your roof, flashing, and interior finishing needs.


Comments