How to Fix Leaking Metal Roof Flashing: Step-by-Step Guide
- William McKracherne
- May 18
- 7 min read

Water is dripping from your metal roof flashing and you’re wondering if you can fix it yourself. The good news? You can. With the right eyes, a few tools, and the proper sealant, you’ll stop the leak and keep the roof dry. In this guide we’ll walk you through finding the leak, cleaning the area, and sealing the flashing so the repair lasts for years.
Step 1: Locate the Leak Source
Finding the exact spot where water sneaks in is the hardest part. Water can travel along a roof before it shows up inside, so you need a systematic hunt.
Start inside the house. Look at the ceiling, walls, and around windows. Dark stains, peeling paint, or a musty smell point to a general area. Use a flashlight in the attic and trace any damp spots on the rafters or insulation back to the roof above.
Next, go outside and inspect the roof from the ground. Pay close attention to roof penetrations, chimneys, vent pipes, skylights, and any seams where panels overlap. Rust spots, missing fasteners, or bent edges are red flags. The gutters also matter; a clogged gutter can push water up onto the roof, creating a leak that looks like a flashing problem.
If you feel safe working at height, climb up with a sturdy ladder and a use. Walk along the flashing, feeling for loose sections or gaps. A common mistake is assuming the flashing is solid when, in fact, the sealant has cracked or the metal has pulled away from the substrate.
When you have a general area, simulate rain with a garden hose. Start at the lowest point of the roof and slowly move the spray upward. Have a friend watch the interior for any fresh drips. The moment water appears inside, you’ve zeroed in on the leak.
Pro Tip:Tape a piece of bright cloth to the underside of the roof deck before you start spraying. When water hits the cloth it’s easy to see exactly where the drip is coming from.
Mark the problem area with a piece of chalk or a small piece of tape. This will guide you when you come back with tools later.
Why this matters: A missed spot means you’ll keep patching the wrong place, and the water will find a new path. The research we pulled together shows that 0% of online guides mention safety steps, so make sure you wear a use, gloves, and eye protection before climbing.
Key Takeaway:Trace interior stains, check roof penetrations, and use a hose test to pinpoint the exact flashing leak.
Step 2: Clean and Prepare the Flashing
Now that you know where the leak lives, it’s time to get the surface ready for a lasting seal. A dirty or rusty flashing won’t hold sealant, and any old material left behind can cause the new patch to fail.
First, clear away loose debris. Sweep leaves, twigs, and any old roofing cement with a stiff brush. If the area is covered in old sealant, use a putty knife or a scraper to remove it. For stubborn residue, a wire brush works well, but be gentle so you don’t scratch the metal.
Next, address rust. Light rust can be sanded away with 120‑grit sandpaper. For heavier rust, a power washer can blast it off, but keep the pressure low enough not to bend the flashing. After you’ve removed the rust, wipe the surface with a clean rag soaked in isopropyl alcohol. This removes oil and dust, giving the sealant a clean bite.
When you’re done cleaning, inspect the flashing for any cracks or holes. Small holes can be filled with a metal‑filled epoxy or a piece of thin flashing patched in place. Larger gaps may need a new piece of step flashing cut to size.
Here’s a quick checklist to run before you move on:
All old sealant removed?
Rust sanded or blasted off?
Surface wiped dry and oil‑free?
Any holes patched?
Now you have a clean, smooth canvas.
14%of published guides list required tools, meaning most DIYers guess what they need
Choosing the right sealant matters. Silicone‑based sealants stick well to metal and stay flexible when the roof expands and contracts. If you prefer a polymer option, look for a product that mentions UV resistance and a 10‑20‑year lifespan.
We like Novaflex because it’s a single‑component silicone that matches most metal roof colors. It’s not paintable, but the color match hides the repair. How to Trim Metal Efficiently: A Professional Step‑by‑Step Guide walks through cutting and fitting metal pieces, which is useful if you need to replace a piece of flashing.
Below is a simple table that compares the two most common sealant types you’ll see on the market.
Sealant Type | Adhesion | UV Resistance | Flexibility | Typical Life |
Silicone | Excellent | High | Very Flexible | 10‑20 years |
Butyl Tape | Good | Medium | Moderately Flexible | 5‑10 years |
With the flashing clean and the sealant chosen, you’re ready for the final step.
"A clean surface is the single most important factor in a leak‑free flash repair."
Key Takeaway:Remove all old material, sand rust, wipe with alcohol, and pick a flexible silicone sealant before you seal.
Step 3: Seal and Secure the Flashing
Now comes the part that actually stops water. You’ll apply sealant, then fasten the flashing so it won’t lift under wind or temperature changes.
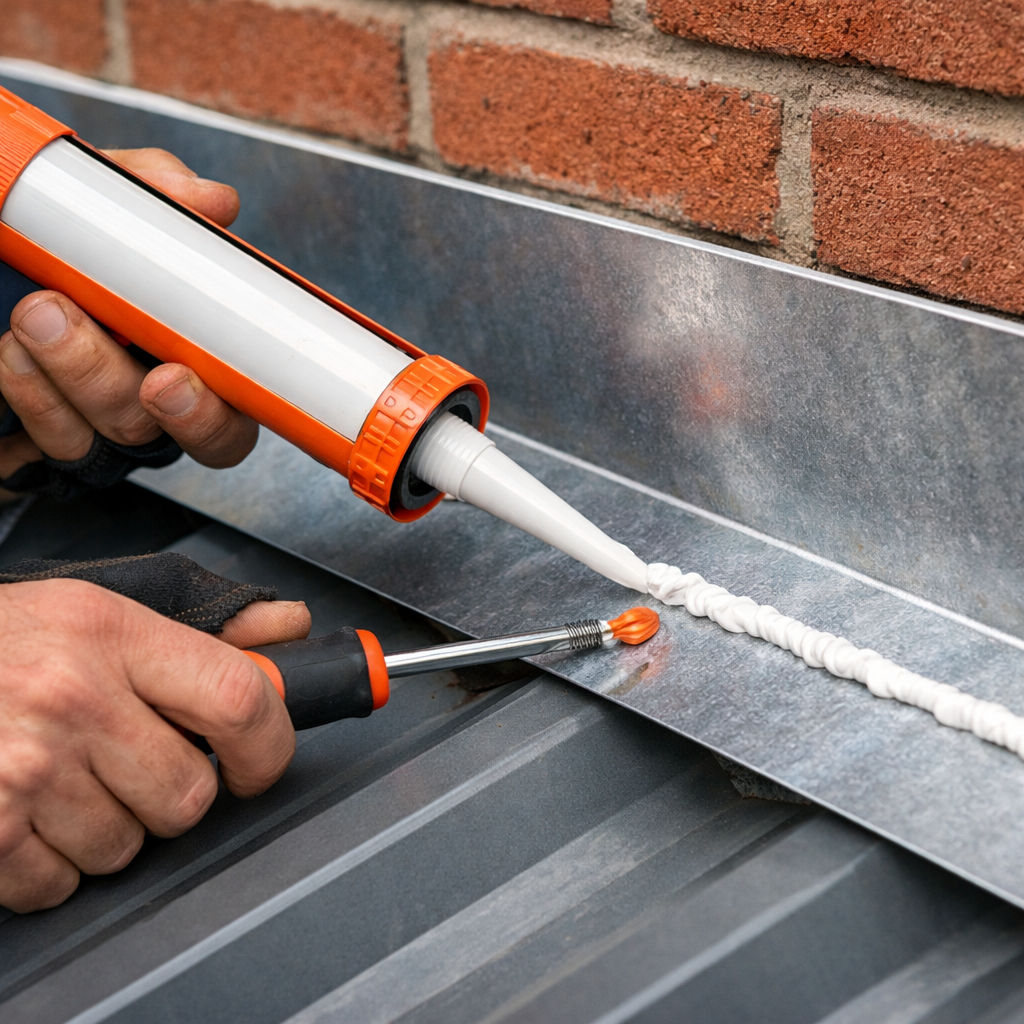
Start by laying a thin bead of sealant along the edge of the flashing where it meets the roof panel. Use a caulking gun for a smooth, even line. If you’re working on a chimney or vent pipe, run the bead all the way around the base before you place the flashing.
Press the flashing onto the sealant, making sure it sits flush. For extra support, you can lay a thin strip of fleece under the sealant; this adds a backer that helps the sealant stay in place during curing.
Now fasten the flashing. The common recommendation is two nails per piece, but research shows that using only two fasteners can cause the flashing to back out over time. Instead, use three to four screws with rubber sealing washers. The washers compress the sealant and keep water out.
When choosing screws, match the metal type. For steel flashing on a wood deck, use #10 metal‑to‑wood screws with a self‑drilling point. If you’re attaching to a metal purlin, pick a self‑drilling Tek screw sized for the gauge. The fastener should penetrate at least one inch into the substrate.
Pro Tip:Pre‑drill a small pilot hole for each screw. This prevents the metal from splitting and makes the screw go in straight.
After the screws are in, run a small bead of sealant over each head. This seals the fastener and stops water from sneaking in around the screw.
Give the sealant time to cure, usually 24‑48 hours for silicone. Keep the roof dry during this period. Once cured, check the repair with another hose test. If no water appears inside, you’re good to go.
Key Takeaway:Apply a bead of flexible sealant, use three‑plus screws with washers, and seal over each head for a waterproof flash.
FAQ
What tools do I need to fix a leaking metal roof flashing?
You’ll need a ladder, safety use, flashlight, utility knife or scraper, wire brush, sandpaper (120‑grit), a caulking gun, silicone sealant, rubber‑washer screws, and a drill with appropriate bits. If rust is severe, a power washer can help, but keep pressure low to avoid bending the metal. Wearing gloves, goggles, and a respirator protects you from sharp edges and metal dust.
How can I tell if the flashing is the real problem and not another roof issue?
Start with interior stains that point to a specific area. Then, trace the water path outward and look for visible damage on the flashing itself, cracks, rust, or missing fasteners. A hose test that makes water appear exactly where the flashing sits confirms it’s the culprit. If water shows up elsewhere, you may have a panel seam issue instead.
Can I use roofing cement instead of silicone sealant?
Roofing cement can work on flat seams, but it hardens and cracks when the metal expands and contracts. Silicone stays flexible, which is why most professionals recommend it for flashing repairs. If you do use cement, apply it in thin layers and make sure the metal is completely clean first, but expect a shorter lifespan.
How many fasteners should I use on a flashing repair?
Three to four screws per flashing piece is a safe rule. Use screws with rubber sealing washers to compress the sealant and keep water out. Space the screws evenly, about every 6‑8 inches, so the flashing is held firmly and won’t pop off in wind. This approach fixes the common pitfall where only two nails cause backout.
What safety gear should I wear while working on a metal roof?
A full‑body use attached to a sturdy anchor point is essential. Add non‑slip shoes, gloves, safety glasses, and a respirator if you’re cutting or sanding metal. Keep a ladder on stable ground and never work alone; having a buddy to spot you reduces the risk of falls.
How often should I inspect my roof flashing after the repair?
Check the repaired area twice a year, once after winter and once after summer storms. Look for new rust, loose screws, or sealant cracks. If you notice any issues, re‑apply a thin bead of sealant and tighten the screws. Early detection prevents a small leak from becoming a big problem.
When is it better to call a professional instead of DIY?
If the leak is high up on a steep roof, if you lack a use, or if the flashing is badly corroded, it’s safer to hire a pro. A professional can also assess hidden damage behind the panels and ensure fasteners are properly torqued. For most homeowners, a simple clean‑and‑seal job is doable, but complex roof geometry warrants expert help.
Does the type of metal (steel vs. aluminum) change the repair method?
Both steel and aluminum need the same cleaning steps, but aluminum is softer, so be gentle when scraping. Aluminum also reacts faster to certain sealants, so choose a silicone that lists compatibility with aluminum. In coastal areas, steel may need a corrosion‑inhibiting primer before resealing.
Conclusion
Fixing a leaking metal roof flashing isn’t magic, it’s a clear series of steps: locate the leak, clean and prep the surface, then seal and fasten the flashing correctly. Skipping the safety prep or using the wrong sealant can undo all your hard work, which is why we highlighted the safety blind spot and the fastener pitfall early on.
If you follow the checklist we built, you’ll end up with a waterproof seal that can last a decade or more. And if you ever hit a snag, like a stubborn rust patch or a hard‑to‑reach vent pipe, remember that LGFMH Construction offers interior and exterior repair services that cover both the safety and the technical side of the job.
Take a moment now to gather your tools, set up a safe work zone, and start the hose test. A few hours of focused work now will save you from water damage, mold, and costly roof replacement later.
Ready to protect your home? Grab that ladder, slip on your use, and give your flashing the care it deserves.
Further reading: how to fix leaking metal roof flashing


Comments