How to Install a Soffit Vent on a Roof
- William McKracherne
- May 19
- 12 min read

A healthy attic breathes. When it doesn’t, moisture builds, wood swells, and mold can follow. A soffit vent is a simple, reliable way to kick off real airflow along the eaves. You’ll learn a usable, six‑step process that starts with planning and ends with a tested, weather‑tight finish. This guide sticks to proven, usable methods you can apply this season, even if you’re new to roofing work. We’ll cover the math that governs vent sizing, the tools you’ll actually need, and the safety precautions that keep you safe on the ladder. And yes, this includes a solid plan for budgeting, so you don’t end up with a half‑done job or a leaky finish. The math to guide vent performance is simple: one square foot of vent area for every 300 square feet of attic space. This rule helps you size vents correctly, avoid moisture issues, and keep your home’s attic healthy.
By the end, you’ll know how to plan, cut, seal, and test a soffit vent installation on a roof. You’ll also see how a pro approach can fill gaps in safety, materials, and coordination with a roof‑vent system. Let’s walk through each step, with the real‑world details you’ll actually use on the job site. And if you want extra help, LGFMH Construction offers interior and exterior repairs and replacements and can assist with a complete soffit vent install when DIY isn’t the right fit for your home.
Tip: if you want more depth on the vent sizing math, check the guide linked in this section for the sizing rule in practice. Sizing guidance for soffit vents (VulcanVent guide) . And for the broader context of vent types and placement, see the linked videos and supplier notes dispersed through the steps. For related reading, you can also visit our Blog | Lgfmh Construction .
Step 1: Gather Tools, Materials, and Safety Gear
Before you pick up a saw or a nail gun, gather the basics. You’ll need a tape measure, a pencil or marker, a utility knife, and a sharp saw or hole saw for the opening. A drill or impact driver with stainless screws is best to fasten the vent and sealants. A tube of exterior sealant or caulk keeps the edges tight and helps weatherproof the joint. Typical vent kits include the vent itself; you may also need a matching mounting block or a foam gasket, depending on the model. In attic work, your safety gear is not optional. Safety goggles protect your eyes from shingle granules and dust. Work gloves protect your hands from rough edges and nails. A fall‑protection plan is smart when you’re on a ladder or a roof, especially if you’re working near the eave line. VulcanVent’s guide to soffit vent requirements reinforces the sizing rule and tool usage in real projects. This is where planning starts: know what you’ll install, what it costs, and how you’ll protect yourself while you work. The idea is simple: you can’t build a solid soffit vent opening without the right tools and gears.
Tools and materials checklist: measuring tape, level, marker, utility knife, punch or drill with a bit for ledges, vent with appropriate fins or louvers, corrosion‑resistant screws, silicone or polymer sealant, exterior paint or touch‑up paint to match the soffit, and optional baffles or insulator blockers. If you’re not sure which vent type to buy, this is a good moment to pause and review section 2 and 3. Safety gear includes eye protection, gloves, and a sturdy ladder. If the attic has loose insulation near the soffit, plan for a blocking shield to prevent blocking the vent opening. The goal is a clean, open air path from the soffit into the attic cavity. This is where the math and the mechanics meet, the vent has to be big enough to feed the attic with fresh air, but not so big that it leaks at the eaves. Don’t skip the safety steps; they save you from injuries and from costly mistakes on the roof.Pro Tip:test your ladder stability before you climb. A quick wobble check will save you a fall.
For a quick read on when to ask for help, see this contractor’s blog on roof vent fan installation, which complements the steps in this guide. Blog | Lgfmh Construction.
Step 2: Prepare the Soffit Area and Assess Vent Placement
Now you’re ready to map the vent plan. Start by locating the soffit runs and the attic opening. Check for insulation blocking the soffit openings. If insulation is in the way, you’ll want to create a clear path with baffles or air channels so the vent has an intake channel that leads up to the attic. A key part of the plan is to space vents so there’s a continuous path for air from the soffit vents to the ridge vents, or to any exhaust system you rely on. The aim is a balanced flow: cool air enters through soffits, warm air escapes through the roof vents. Some roofs need continuous soffit vents; others use individual vents at set intervals. A good rule is to keep openings clear and aligned with the attic’s airflow path. If you’re unsure about spacings, a simple layout drawing on paper helps verify the plan before you cut. The goal is to avoid dead zones where air stalls or moisture can condense. A usable takeaway is to check both sides of the house for a symmetrical plan; symmetry usually yields more even airflow across the attic. For added clarity, many DIYers refer to a community thread that discusses different soffit vent types and placements. Fine Home Building thread offers a broader look at vent options. This is also the moment to confirm that you’ll have enough vent area per the attic’s square footage. The sizing rule described in Section 1 should guide this. You’ll likely need to confirm the exact vent type and count based on attic size, roof slope, and insulation depth. And if you’re considering upgrades like baffles or in‑line ducts, plan those into this step so you don’t cut a vent in a place that later blocks airflow. The math behind vent placement matters: you want enough vent area to move air without creating back pressure on the attic or cold drafts near living spaces. Also consider whether you’ll need to adjust for future roof work like ridge vents or new exhaust fans.
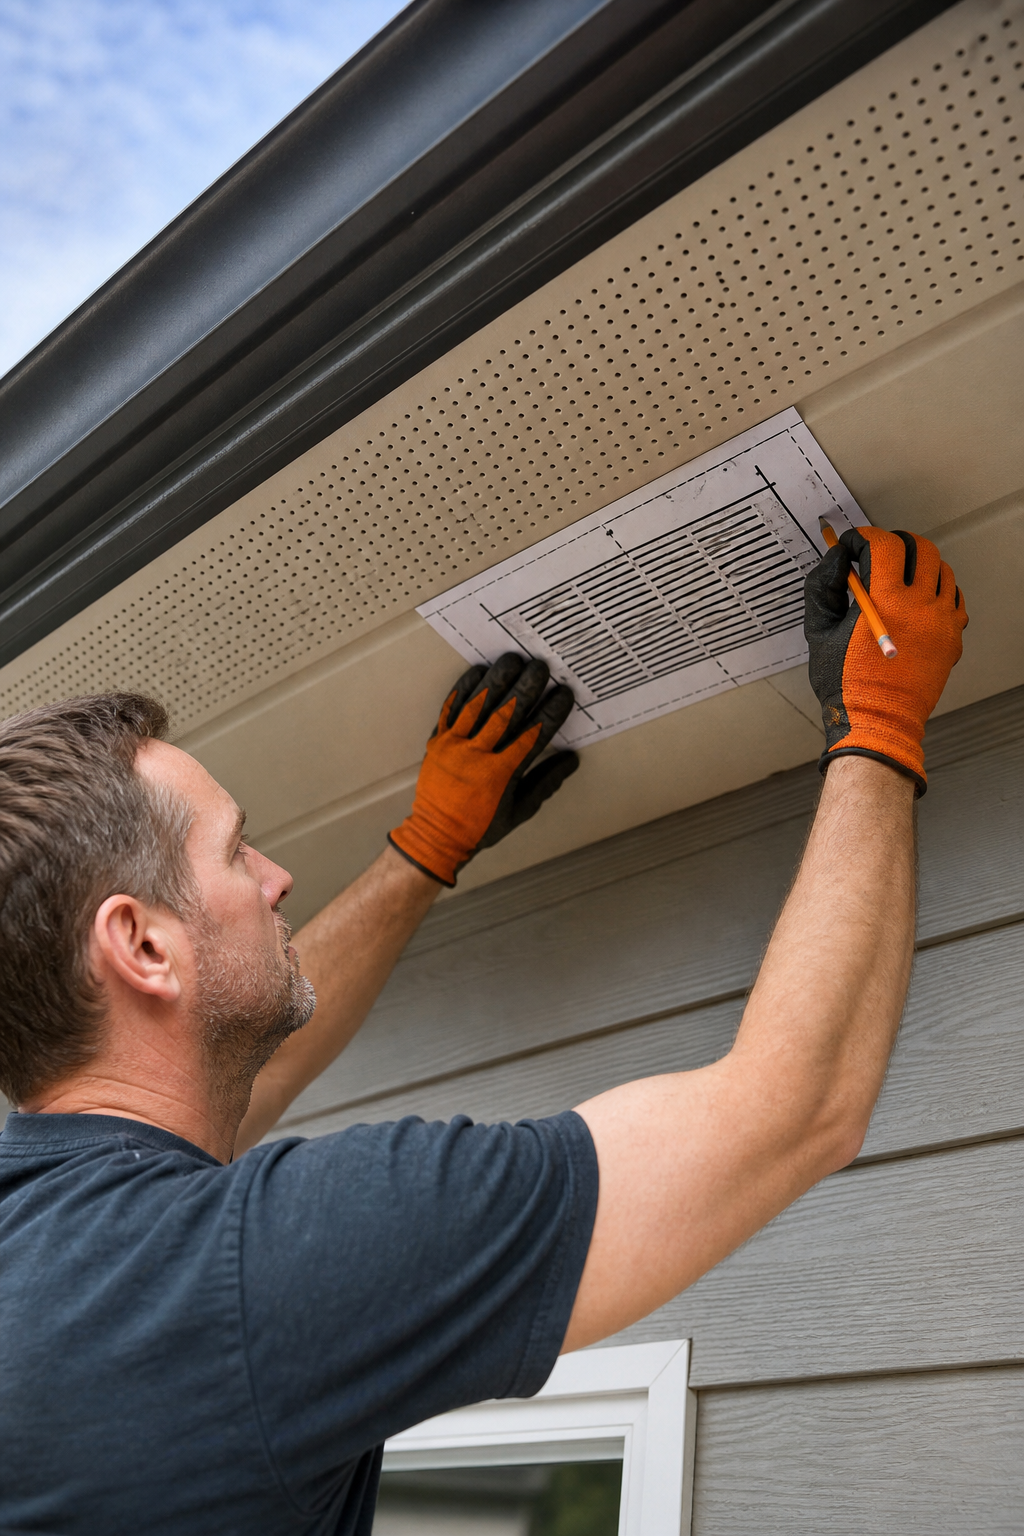
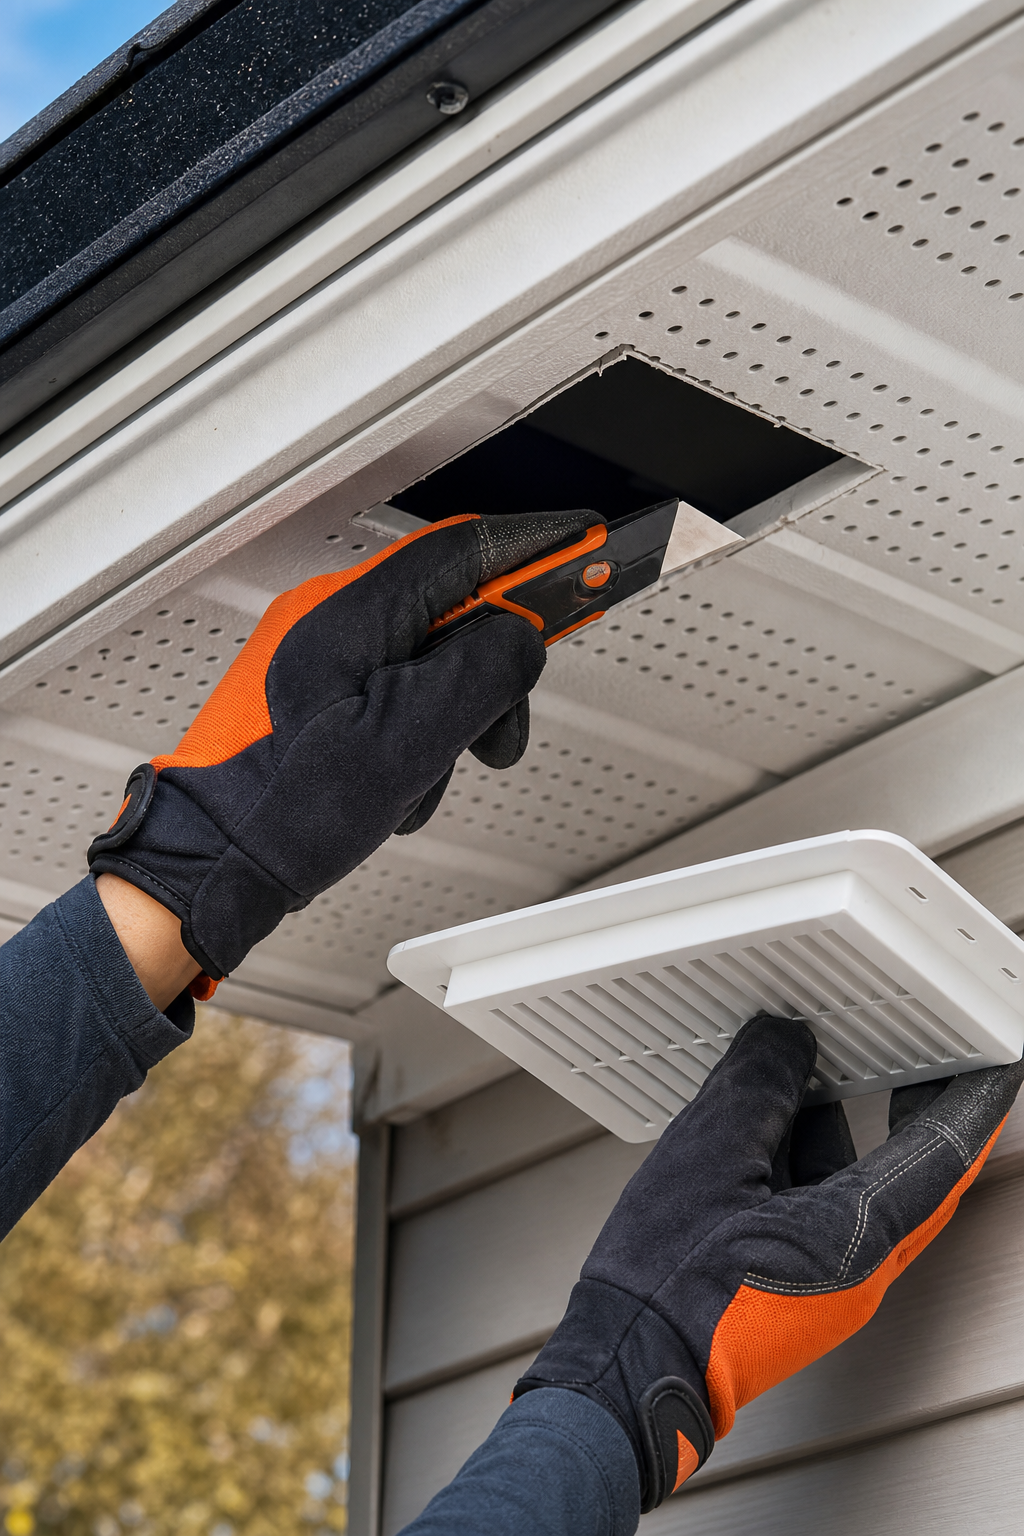
Step 3: Cut the Opening and Install the Vent
With the plan in hand, you’re ready to cut the opening. Mark the outline carefully. Use a straight edge to keep the line square. If you’re using a vent template, align it so the vent holes will be centered over the soffit run. For most installations, you’ll cut just inside the line so the vent sits flush against the soffit and the edge of the opening is clean. Use a utility knife to score the line, then switch to a saw for the actual cut if you’re working with wood or plywood behind the soffit. When cutting, wear safety goggles. Small shavings and shingle grit can fly into your eyes. After the opening is cut, dry fit the vent to ensure a snug fit before fastening. If any gaps appear, you may need a thin shims or a foam gasket to seal the edge and block water intrusion. Once the vent fits, secure it with corrosion‑resistant screws. Don’t overtighten; you want the vent to sit evenly and not warp the frame. For a reliable reference on installation steps, you can review a builder’s guide on soffit vent installation. Soffit vent installation guide. While you’re at it, inspect the surrounding shingles for any water damage or flashing issues. If flashing is damaged, you’ll want to repair it before you seal the vent. A clean edge ensures the caulk seals evenly and reduces the risk of leaks. This step is where the two halves of the project, airflow and weatherproofing, come together, and a tight fit is the best way to ensure long‑term performance.
Step 4: Seal, Paint, and Finish the Installation
Sealing the vent edge matters. Run a continuous bead of exterior caulk around the vent’s perimeter where it meets the soffit. Wipe away any excess caulk and smooth the joint with a damp finger or a caulk tool. If your vent kit includes a foam gasket, install it as recommended by the manufacturer to improve the seal. Paint is a questionable finish for vented soffits. Some builders argue that painting vented soffits can clog the small perforations and reduce airflow; others paint vents to match the house color once the vent is installed and sealed. In many cases, the safest approach is to install the vent, seal around it, and then leave the vent unpainted or painted only on the surrounding soffit, not on the vent’s perforations. This approach minimizes airflow obstruction while still achieving a unified look. A nearby supplier’s guidance emphasizes that ventilation performance can be reduced if you fill the vent’s holes with paint. If you must finish, do it sparingly and avoid painting over the vent’s perforations. The result should be a long‑lasting seal and an appearance you can live with. The proper finish matters for both looks and performance. The goal is a tight, weatherproof edge that allows air to flow uninterrupted through the soffit vents. For more on finishing considerations, see a contractor’s discussion on vented soffits from Blue Jay Renovations. Painting vented soffits, what to know.
Aspect | Seal | Paint | Notes |
Airflow impact | High seal quality improves weatherproofing | Painting can reduce airflow if overdone | Keep perforations visible; test airflow after finishing |
Durability | Caulk maintains edge integrity | Limited paint exposure helps vent performance | Choose paint with low odor and outdoor rating |
Aesthetics | Smooth with soffit | Color match if needed | Don’t obscure vent holes |
Key Takeaway:Seal edges well, and avoid clogging vent perforations with paint for best airflow.
In practice, you’ll seal, then verify airflow with a simple daylight test or a gentle airflow check from the attic. If you see daylight through the vent or feel air moving, you’re on the right track. For homeowners who want a precise, professional finish, a local contractor can perform a final airflow test and verify there are no leaks along the eaves. This is where you confirm the project meets both building codes and the home’s ventilation needs.
Step 5: Add Insulation Baffles and Integrate with Roof‑Vent System
Ventilation isn’t just about bringing air in; it’s about moving air through the attic space without creating pockets of moisture. Insulation baffles, commonly called rafter shoots, help keep insulation from blocking the vent path and ensure a clear channel from soffit vents to the attic. Installing baffles in the correct location reduces the risk of insulation blocking the vent opening and helps maintain a steady airflow. When integrating with a roof‑vent system, the goal is to maintain a balanced flow and avoid short‑circuiting air through multiple vents that fight each other. Yeager Roofing emphasizes the importance of proper intake and exhaust balance and suggests sizing and placement that prioritize airflow through soffits while keeping rain and wind in check. If you have a complex roof or a cathedral ceiling, you might need additional planning to keep air moving through the attic space while protecting living areas from drafts. Remember that moisture carried by warm attic air can lead to condensation on the roof deck and even mold growth in extreme cases. By installing baffles properly and ensuring that soffit openings stay clear, you’re enabling the attic ventilation path that makes the whole system work. If you’re unsure about baffle placement, a pro check can confirm whether your attic needs additional baffles or different vent types to achieve the right balance. For more background on this approach, you can read a detailed roofing tip post from Yeager Roofing. Balanced intake and exhaust in roof ventilation.
Step 6: Test Functionality and Review Cost Breakdown
Testing is important. After installation, you want to verify that the soffit vent system actually moves air through the attic in the expected direction. A daylight test works well: hold a bright light at night and look for daylight along the soffit area or at the vent opening from the attic. A simple airflow check can also show you whether air is entering at the soffits and moving toward the ridge vent or other exhaust points. If you notice minimal airflow, recheck the vent openings and baffles for blockages and ensure the caulk is properly sealing the edges. In terms of budgeting, your costs depend on vent type, number of openings, and whether you need insulation updates or baffles. This is where a professional estimate can help you compare DIY vs pro installation realistically. If you want to see a usable demonstration, a video walk‑through can help you visualize the test process; this video provides a straightforward step‑by‑step look at testing a soffit vent installation.
As you plan the budget, include potential add‑ons like insulation updates or baffle improvements. Professional services from Interior and Exterior Repairs & Replacements can handle the full scope if you’re seeking a fully vetted installation with a documented testing process. If you’re exploring the larger picture of home ventilation, you may also want to consider how this roof ventilation intersects with indoor air quality and energy efficiency, which can influence your year‑round comfort. The balance of intake and exhaust remains the key to long‑term performance, and a careful cost breakdown helps you decide whether to DIY the whole project or hire a pro for part or all of the work. Yeager Roofing: roof ventilation resources.
Conclusion
Installing a soffit vent on a roof is more than just cutting a hole and sticking a vent in. It’s a small project with a big impact on attic health and home energy use. The six steps outlined here give you a usable, repeatable workflow: plan the vent layout using the 1 sf per 300 sf rule, mark and cut openings, install the vent, seal and finish, add insulation baffles, and test airflow while reviewing the cost picture. You’ve learned how to assess vent placement to avoid common mistakes, how to seal without blocking airflow, and how to integrate the soffit vent with a roof‑vent system for balanced airflow. If you’re unsure about safety or the attic’s insulation conditions, consider a pro evaluation from Interior and Exterior Repairs & Replacements to ensure the installation is done to code and with the right level of safety. For homeowners who enjoy DIY work, this guide provides a solid, usable path to a reliable vent installation that can improve attic ventilation, reduce moisture issues, and extend the life of roof components. If you’d like to explore more projects from LGFMH Construction or s, for usable how‑to content and exact steps you can use on a wide range of home improvement tasks.
FAQ
Q: Why do I need a soffit vent on a roof?
A soffit vent helps bring fresh air into the attic, which moves moisture out through roof vents and keeps damp air from lingering near the insulation. It creates a steady airflow path from the eave to the ridge, reducing frost, mold, and wood rot. For most homes, good soffit ventilation is part of a balanced system that keeps the roof and attic in better shape over time.
Q: How do I calculate how many vents I need?
Start with the 1 square foot per 300 square feet of attic space rule. If your attic area is 3,000 square feet, you’d target roughly 10 square feet of vent area. The exact count and placement depend on vent type, attic layout, and insulation depth, so you should verify with a local pro if you’re unsure. Always ensure the vent openings are not blocked by insulation or hardware.
Q: What types of soffit vents are available?
Common types include continuous strip vents, individual louvers, and inflow vents that pull air through a specific path. Continuous vents offer wide coverage, while individual vents can be spaced at set intervals. Inflow vents are a newer option for some roof systems and may require manufacturer guidance. The right choice depends on attic size, layout, and whether you have a ridge vent or another exhaust path.
Q: What tools do I need for step-by-step installation?
Tools typically include a tape measure, pencil, utility knife or jigsaw, a drill or driver, stainless screws, caulk or sealant, and a level. You’ll also want safety gear like goggles and gloves. Having a straightedge and a vent template handy can help ensure a clean cut. If you need more than basic ventilation, you may require insulation baffles and additional sealing accessories.
Q: How can I ensure the vent is weatherproof after install?
Seal the vent perimeter with exterior caulk, ensure any gasket is seated correctly, and avoid filling vent perforations with paint or other sealants that block airflow. A tight seal around the vent helps prevent water infiltration without compromising airflow. After sealing, recheck with a daylight test or a simple attic airflow test to confirm air is moving as planned.
Q: When should I hire a pro for soffit vent work?
If you’re unsure about handling a roof opening or if your attic shows signs of moisture, mold, or insulation issues, a pro can provide a full assessment, install the vent, and perform air‑flow testing. A contractor can also help you select the right vent type, ensure compatibility with ridge vents, and space vents to avoid short‑circuiting the airflow. For many homeowners, a professional install is a safe and efficient option that speeds up the project and minimizes risk.
Conclusion (Final Thoughts)
With a clear plan, the right tools, and careful sealing, you can add a soffit vent that improves attic ventilation and helps protect your home from moisture and heat buildup. The six steps covered here provide a usable, field‑oriented approach you can follow on most standard roofs. If you want a turnkey solution or you’re dealing with a tricky attic layout, consider LGFMH Construction as a partner. A professional can help you size vents more precisely, coordinate with any existing roof‑vent systems, and ensure a weather‑tight finish. The goal is to create a trusted airflow path that performs well in all seasons, from winter condensation to summer heat. Remember the key rule, the importance of clean soffit openings, and the value of a well‑sealed edge. With those in place, your roof will breathe better, your attic will stay drier, and your home will feel more comfortable all year long.


Comments