How to Install Drip Edge on Roof: A Step‑by‑Step Guide
- William McKracherne
- Dec 11, 2025
- 18 min read

Ever stood on a ladder, stared at the tiny metal strip along the roof edge, and wondered if it's really worth the extra effort?
If you’ve ever dealt with water stains curling up your ceiling, you know the frustration of a leaky roof.
That’s where the drip edge comes in – a simple, low‑cost piece of metal that directs water away from your siding and fascia, protecting wood, paint, and your peace of mind.
So, how do you install drip edge on roof without turning it into a full‑blown construction project?
In our experience at LGFMH Construction, we’ve seen homeowners try to skip the prep and end up with gaps that let water sneak in.
Let’s walk through the process step by step, so you can feel confident that the job will hold up for years.
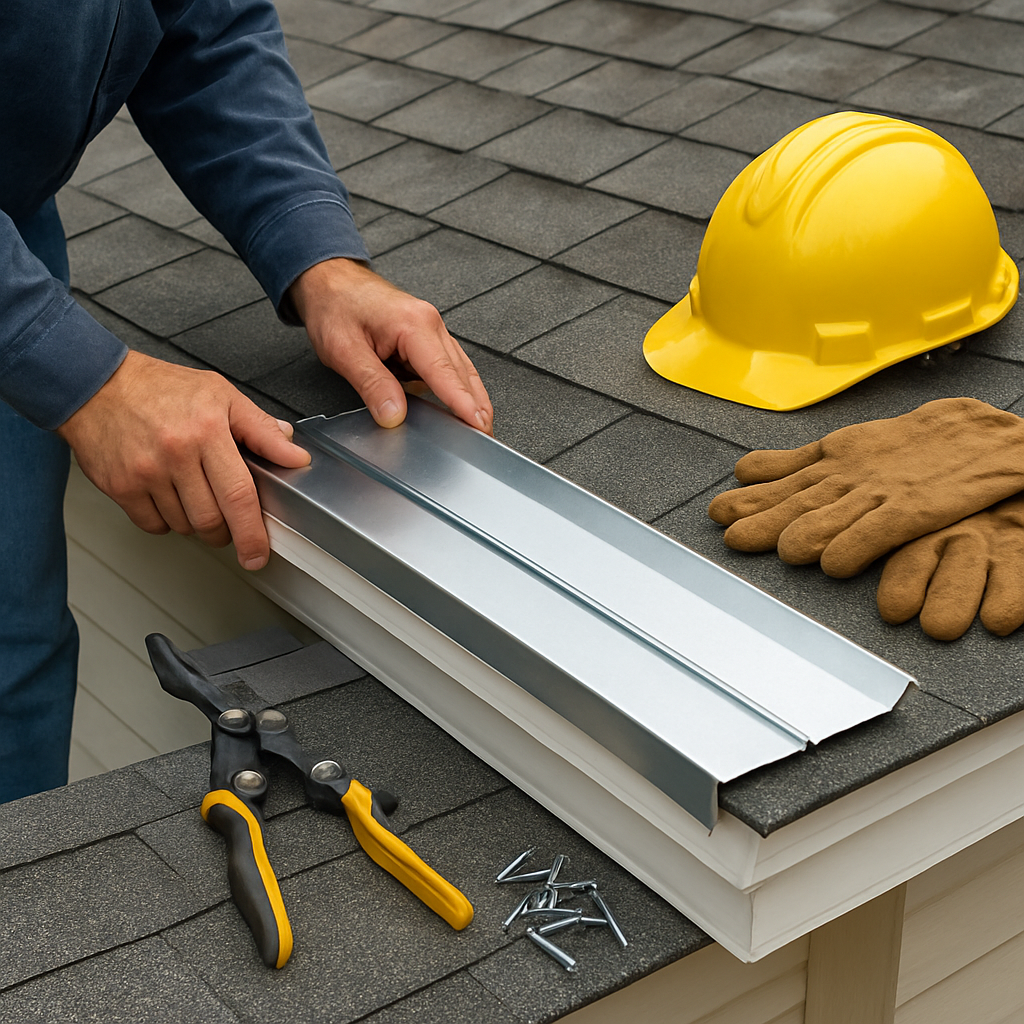
First, gather the right tools: a tape measure, tin snips, a hammer, roofing nails, and a sturdy ladder – safety first, always.
Next, clean the eave line of any debris or old flashing; a clean surface is the foundation of a tight seal.
Measure the length of each roof plane, cut the drip edge a little longer than the span, and pre‑drill nail holes to avoid splitting the metal.
Place the drip edge so the overhang extends about ½ inch beyond the sheathing, with the lip pointing down‑hill to guide water away.
Secure it with roofing nails spaced about 12 inches apart, then seal the nail heads with a weather‑proof sealant to keep moisture out.
Finally, double‑check that the edge sits flush against the roof deck and that there’s a small gap (no more than ¼ inch) between the drip edge and the siding for drainage.
A quick inspection with a garden hose will show you if water flows cleanly off the edge or pools somewhere you missed.
Sound familiar? That moment when you realize a small detail can save you from costly repairs?
Stick with these steps, and you’ll have a dry, protected roofline without calling a contractor.
Ready to give it a try? Let’s dive in and get that drip edge installed right.
TL;DR
If you’ve ever worried that a tiny metal strip could save your home from costly leaks, this quick guide shows exactly how to install drip edge on roof, step by step.
Follow our proven tips—measure, cut, nail, seal, and test—so you finish confident, with water flowing cleanly off the edge and your roof staying dry.
Step 1: Choose the Right Drip Edge Material
Before you even think about cutting or nailing, you’ve got to pick the metal (or sometimes plastic) that will sit at the edge of your roof. The material you choose will dictate how long the drip edge lasts, how easy it is to work with, and whether it will play nice with the rest of your roofing system.
In our experience at LGFMH Construction, we’ve seen three main contenders pop up on most job sites: aluminum, galvanized steel, and copper. Each has its own personality, and the right one for you depends on a few practical factors.
Aluminum – Light, Affordable, and Rust‑Resistant
Aluminum is the go‑to for homeowners on a budget who still want a material that won’t corrode over time. It’s feather‑light, so it’s easy to handle on a ladder, and you can bend it with a pair of tin snips without worrying about breaking it.
One thing to watch: because it’s soft, it can dent if you’re not careful when you hammer in the roofing nails. A quick tip is to pre‑drill the nail holes – it saves the metal from splitting and gives you a cleaner finish.
Galvanized Steel – Strength Meets Durability
If you live in an area with high winds or heavy snowfall, galvanized steel might be your best bet. The zinc coating adds a layer of protection against rust, and the steel core gives the drip edge some serious bite.
It’s a bit heavier than aluminum, so you’ll feel a little more resistance when you’re positioning it, but the trade‑off is a longer‑lasting edge that can take a beating from the elements.
Copper – Premium Look and Longevity
For the homeowner who wants the roof to be a design feature as well as a functional barrier, copper is unbeatable. It develops a beautiful patina over time, and it practically never rusts.
The downside? It’s pricey and a bit harder to cut. If you’re comfortable with a few extra steps and the budget allows, copper can turn a plain roofline into a statement piece.
So, how do you decide? Grab a notebook and run through this quick checklist:
Budget – Are you looking for a cost‑effective solution or willing to invest for aesthetics?
Climate – Is your area prone to salt air, heavy rain, or intense sun?
DIY Comfort – Do you prefer a material that’s easy to cut and nail?
Answering those three questions will point you to the material that feels right for your project.
Here’s a handy comparison to keep on the workbench:
Material | Cost | Durability | Ease of Installation |
Aluminum | Low | 10–15 years (non‑corrosive) | Very easy – easy to cut, lightweight |
Galvanized Steel | Medium | 20+ years (zinc coating) | Moderate – heavier, pre‑drill recommended |
Copper | High | 30+ years (natural patina) | Harder – requires tin snips or a metal saw |
Once you’ve settled on the material, the next step is to measure the eave length and cut the strip a touch longer than the roof plane. That extra length gives you a little wiggle room when you position the edge and ensures the overhang extends the recommended ½ inch beyond the sheathing.
And if you ever feel stuck, remember that a short video can clear up a lot of doubts. Below is a quick walkthrough that shows the cutting and positioning process in real time:
Take a moment to watch the video, then head back to your ladder with confidence. Choosing the right drip edge material is the foundation; the rest of the installation will fall into place once you have that solid start.
Step 2: Gather Materials and Tools
Now that you've picked the right metal, the next question is: do you have everything you need in the truck before you step onto that ladder? Trust me, a half‑finished job because you forgot a tiny item feels worse than a leaky roof.
Here's the quick inventory we use on every job at LGFMH Construction, broken down so you can copy it onto a sticky note or a phone app.
Metal flashing and trim
• Your chosen drip edge (aluminum, galvanized steel, or copper) – order about 5 % extra just like we mentioned earlier.
• Optional pre‑finished finish strips if you want extra protection against scratches.
Fastening supplies
• Roofing nails – 1 ¼″ galvanized nails work best; they hold the edge without punching through the metal.
• A small bottle of roof‑compatible sealant for the nail heads – silicone or polymer‑based sealants are the go‑to.
Cutting and shaping tools
• Tin snips – straight‑cut for straight runs, aviation snips for tight corners.
• A utility knife – handy for scoring underlayment if you need to trim around the edge.
• Chalk line – snap a line along the eave so every piece sits perfectly straight.
Safety gear
• Sturdy ladder with slip‑resistant feet – always set on a stable surface.
• Non‑slip shoes, work gloves, and safety glasses – a small price for protecting yourself.
• A harness or roof‑anchor if you’re working on a steep pitch – better safe than sorry.
And don’t forget the underlayment. The Shingle Master reminds homeowners that the drip edge should be installed before the roofing underlayment to create a water‑tight barrier right at the eave. Having the underlayment rolls, a utility knife, and a stapler on hand means you won’t scramble once the edge is nailed in place.
Now, let’s turn that checklist into a quick visual so you can see everything at a glance.
Before you climb, run through this 5‑step pre‑flight:
Measure the eave length twice – once with a tape, once with a piece of string.
Lay out the flashing, cut a test piece, and double‑check the bend.
Place the nails in a small container so they don’t roll off the roof.
Apply a dab of sealant to each nail head before you start nailing.
Do a quick safety check: ladder secure, harness attached, tools within arm’s reach.
When you’ve got this kit ready, the actual installation feels almost effortless. You’ll notice the metal snapping into place, the nails biting just right, and the sealant sealing the promise of a dry fascia.
Bottom line: gathering the right materials and tools before you lift the ladder saves you time, cuts down on trips back to the supplier, and keeps the whole process safe and tidy. Grab that checklist, double‑check your inventory, and you’ll be one step closer to mastering how to install drip edge on roof without a hitch.
If you run into unexpected rust or a kinked piece, don't panic – a small piece of sandpaper can smooth a dent, and a fresh cut with the snips restores the straight edge. Taking a minute to fix it now prevents water pooling later.
Step 3: Prepare the Roof Edge
Now that your tools are laid out, it’s time to actually get the roof edge ready for the drip edge.
First thing—do a quick safety scan. Make sure your ladder is still solid, your harness is snug, and you’ve got a buddy or a tool belt within arm’s reach. A moment’s pause now saves a tumble later.
Next, sweep the eave clean. Grab a stiff broom or a leaf blower and clear away leaves, twigs, and any old flashing residue. If you spot leftover sealant, scrape it off with a putty knife so the new metal has a bare surface to hug.
Take a look at the piece of drip edge you just cut. Run your fingers along the bend; any tiny kink will turn into a water‑catching pocket later. A quick sand‑paper swipe or a fresh snip fixes it instantly.
Now mark the exact line where the edge will sit. Pull a chalk line along the roof sheathing, positioning it a half‑inch back from the outer wall. This line is your visual guide and keeps every piece perfectly straight.
Before you start hammering, pre‑drill the nail holes. Use a 1 ¼″ galvanized nail and a 1/8‑inch drill bit, spacing holes about 12 inches apart. Pre‑drilling stops the metal from warping and makes the nail bite cleanly.
Here’s a trick we swear by: dab a tiny bead of roof‑compatible sealant on each nail head before you drive it in. The sealant forms a waterproof barrier right where the nail meets the metal, and it’s easier to apply when the nail is still loose.
When you’re ready, line the drip edge up with the chalk line, making sure the lip overhangs the sheathing by roughly ½ inch and points downhill. Press it lightly into place, then drive the first nail at the start of the run, followed by the rest at the pre‑drilled spots.
After the first few nails, step back and double‑check the overhang. If the lip is too short, you’ll end up with water pooling on the fascia; too long and you risk the edge lifting off in high winds.
A quick hose test does the trick. Turn on a garden hose, aim a steady stream just above the drip edge, and watch the water glide off the lip. If you see any drips or puddles, pull the edge up, add a nail, and reseal the spot.
Wind can be a sneaky enemy while you’re working. If it picks up, brace the metal with a temporary wooden wedge or a piece of PVC pipe clamped to the roof deck. The brace holds the edge flat while the nails set, preventing an accidental bend.
Finally, run through this short checklist before you climb down:
Eave swept clean and dry.
Chalk line marked, edge aligned.
All nail holes pre‑drilled.
Sealant applied to every nail head.
Nails spaced 12 inches, overhang ½ inch.
Hose test shows clean flow.
If you want a visual walk‑through of these steps, watch this quick video on preparing the roof edge . With the edge prepped, you’re just a few nails away from a watertight roof line today for you.
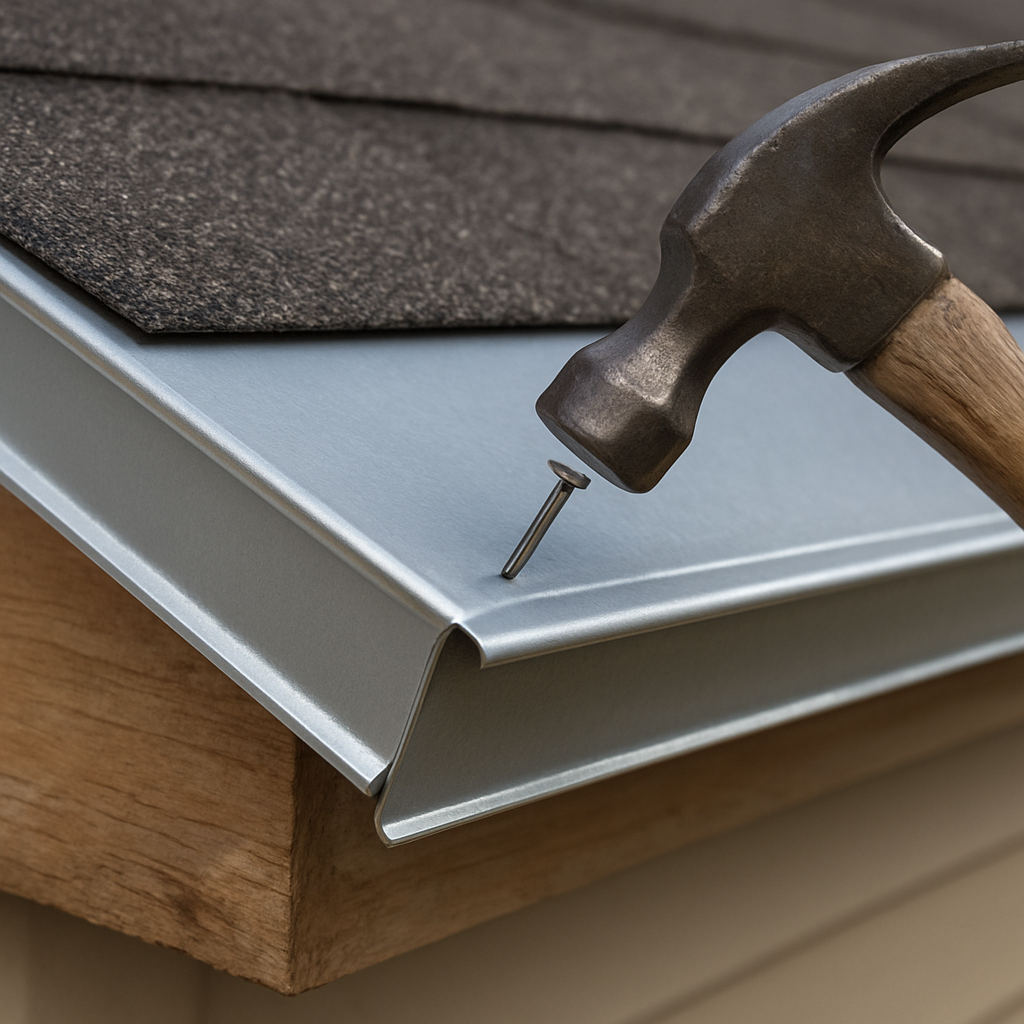
Step 4: Install Drip Edge on the Eaves
Now that the eave is clean, measured, and pre‑drilled, it’s time to actually attach the drip edge. This is the moment where a few small actions make the difference between a roof that laughs at rain and one that weeps at every storm.
First, pull the piece of drip edge into position so the long lip hangs over the sheathing by about ½ inch. The lip should face downhill – think of it as a tiny gutter that hands the water off the roof and onto your existing gutter system.
Here’s a quick “hand‑on” checklist before you start nailing:
Edge aligned with the chalk line you snapped earlier.
Overhang measured at ½ inch (adjust with a scrap piece of wood if needed).
All pre‑drilled nail holes visible and free of debris.
Sealant tube within arm’s reach.
Grab a hammer and a 1 ¼″ galvanized roofing nail. Place a dab of roof‑compatible sealant on the nail head – the sealant expands slightly when you drive the nail, creating a waterproof seal that keeps moisture from sneaking in around the fastener.
Start at one end of the run. Drive the first nail about ¼ inch below the lip, then move to the next pre‑drilled hole 12 inches away. Keep the hammer strokes firm but controlled; you don’t want to bend the thin metal. If you hear a “ping” instead of a clean bite, back the nail out a little and try again.
Repeat this pattern across the whole eave. When you reach a corner, overlap the next piece of drip edge by at least 2 inches and secure both pieces with two nails each – this overlap prevents water from finding a seam to slip through.
Real‑world example: One of our Virginia Beach customers had a low‑slope roof with a 4:12 pitch. We installed a continuous drip edge and discovered that, on the first rain, water ran straight off the edge without any pooling. On a later test with a garden hose, we saw the same clean flow, confirming the installation was solid.
Another scenario: A coastal homeowner using galvanized steel noticed wind‑driven rain hitting the eave at a sharp angle. We added a tiny “wind‑brace” – a 2‑inch piece of PVC pipe clamped to the deck – to keep the edge from flexing. The extra support cost less than a dollar but saved a potential nail pull‑out later.
Now comes the verification step that many DIYers skip: the hose test. Grab a garden hose, set the water pressure to a steady flow, and spray just above the drip edge. Watch the water travel the full length of the lip and fall cleanly into the gutter. If you see any drips back onto the fascia, stop, add a nail, and re‑apply sealant.
Tip from our crew: after the hose test, wipe the edge dry with a rag and run a fingertip along each nail head. You should feel a slight bulge where the sealant sits – that’s the waterproof barrier doing its job.
Finally, give the whole run a quick visual once more. Look for any gaps between the edge and the siding; you want a ¼‑inch clearance so water can escape, but not so much that wind can lift the metal.
And that’s it – you’ve just installed a drip edge that will protect your fascia, siding, and interior walls for years to come.
Need a deeper dive into related roof components? Check out our guide on Understanding what is soffit on a house: A Complete Guide for more context on how the drip edge works with your soffit and ventilation system.
Step 5: Secure Drip Edge on Gable Ends
Why the gable matters
When you’re almost done with the eaves, the gable ends are the next place water tries to sneak behind your shingles. A loose drip edge up there can let rain run down the wall, rot the fascia, and eventually show up as a stain on your ceiling. That’s why nailing the edge down properly is the last, but crucial, step in learninghow to install drip edge on roof.
Gather your tools (again)
Grab the same set you used for the eaves: 1¼" galvanized roofing nails, a hammer, a few drops of roof‑compatible sealant, and a chalk line. If you’re working on a steep pitch, a roof‑brace or a short piece of PVC pipe can act as a temporary support while you nail.
Mark the gable line
Snap a chalk line from the ridge down the gable’s vertical edge, about a half‑inch back from the wall sheathing. This line becomes your visual guide, keeping the metal straight and ensuring the lip overhang stays consistent.
Does it feel a bit fussy? Trust me – a straight line saves you from a crooked edge that forces water back onto the wall.
Cut and fit the piece
Measure the gable height, add a couple of extra inches for overlap, and cut the drip edge accordingly. Lay it against the chalk line, making sure the “kickout” flange points away from the house. The flange should extend at least ¼" below the sheathing, as recommended by industry guidelines for drip edge installation . This tiny bend is the hero that directs water onto the roof, not the wall.
Pre‑drill and seal
Just like on the eaves, pre‑drill nail holes every 8‑10 inches along the top of the edge. A 1/8" drill bit works well and prevents the metal from warping when you hammer. Before you drive each nail, dab a pea‑sized bead of sealant on the nail head. The sealant expands slightly under pressure, creating a waterproof barrier around the fastener.
It might feel like extra work, but those sealed nail heads are what keep moisture from finding a tiny tunnel into your wall cavity.
Drive the nails
Start at the bottom corner and work your way up. Position the first nail about ¼" below the lip, then move to the next pre‑drilled hole. Keep your hammer strokes firm but controlled – you want the nail to bite cleanly without bending the thin edge.
If you hear a ping instead of a solid bite, pull the nail out a touch, re‑position, and try again. A bent edge will soon turn into a leaky gable.
Overlap and reinforce
When you reach the ridge, overlap the next piece of drip edge by at least 2 inches and fasten both pieces with two nails each. This overlap acts like a seam‑lock, preventing water from slipping through the joint.
On windy days, a small brace – a 2‑inch PVC pipe clamped to the deck – keeps the edge flat while the nails settle. It’s a cheap trick that stops the metal from flexing later.
Seal the seams
Run a thin bead of sealant along the top of the installed edge, especially where pieces overlap. Smooth it with a gloved finger so it fills any tiny gaps. This extra layer of protection is worth the few seconds you spend smoothing it out.
Final hose test
Grab your garden hose, set a steady flow, and spray just above the gable drip edge. Watch the water travel the full length of the lip and fall cleanly into the gutter or onto the roof deck. If you see any drips back onto the wall, pause, add a nail, and reseal.
After the test, wipe the metal dry and run a fingertip along each nail head. You should feel a slight bulge where the sealant sits – that’s your waterproof seal in action.
Checklist before you call it a day
Chalk line marked and edge aligned.
All nail holes pre‑drilled 8‑10" apart.
Nail heads sealed before driving.
Overlap seams sealed and reinforced.
Hose test shows clean water flow.
Once you tick every box, step back and admire a gable that’s ready to shrug off the next rainstorm. In our experience at LGFMH Construction, a properly secured drip edge on the gable ends often saves homeowners from costly water damage down the line.
Step 6: Seal and Flash the Drip Edge
Now that the metal is firmly in place on both the eaves and the gable ends, it’s time to give it the waterproof hug it deserves. A good seal and flash are the difference between “rain‑proof” and “leaky‑in‑three‑months.”
Why sealing matters
Think about the last time you saw water streak down a wall after a storm. Most of the time it’s a tiny gap where a nail head or a seam let moisture sneak in. By sealing those weak points, you’re basically putting a rain‑repellent coat on the edge before the rain even arrives.
Gather your sealing tools
Grab a tube of roof‑compatible sealant (silicone or polymer‑based works best), a caulking gun, a sturdy putty knife, and a pair of disposable gloves. You’ll also want a clean rag for wiping away excess sealant.
Pro tip: Keep the sealant at room temperature. Cold, stiff sealant won’t spread evenly, and you’ll end up with a lumpy line that cracks later.
Step‑by‑step sealing
1. Clean the metal.Use the rag to wipe away dust, nail shavings, or any leftover sealant from the previous step. A clean surface lets the new bead adhere properly.
2. Apply a thin bead.Squeeze a steady line of sealant along the top edge of the drip edge, right where the metal meets the roof deck. You don’t need a mountain of product—just enough to fill the microscopic gaps.
3. Smooth it out.Press a gloved fingertip or the putty knife into the bead and smooth it in one smooth motion. You should see the sealant pull into any crevices around the nail heads and the overlapping seams.
4. Seal each nail head.Even if you sealed the nail heads before driving them, a quick dab after the nail is set adds an extra layer of protection. Pop a pea‑sized amount on each head, then smooth it flat.
5. Overlap seams.Where two pieces of drip edge meet, run a continuous bead over the joint. Use the putty knife to feather the sealant so it blends into both pieces.
Flashing the drip edge
Flashing is essentially a metal extension that guides water away from vulnerable corners. For the gable ends, you’ll want a small “kickout” flange that points toward the roof slope.
If your drip edge already has a pre‑formed flange, you’re golden. If not, cut a short piece of the same metal, bend it 90°, and nail it over the top edge of the drip edge, overlapping the sealant you just applied. Seal the nail heads on the flashing too—remember, water loves the tiniest opening.
Quick hose test
Before you call it a day, grab your garden hose and set a steady flow just above the sealed edge. Watch the water travel the length of the lip, glide over the flashing, and drop cleanly into the gutter. If you see any drips back onto the roof deck or wall, pause, add a nail, and re‑seal that spot.
After the test, wipe the metal dry and run a fingertip along each sealed area. You should feel a slight bulge where the sealant sits—that’s the waterproof barrier doing its job.
Final checklist
All nail heads sealed and smoothed.
Bead runs continuously along the top edge and over every seam.
Flashing installed on gable corners, with nail heads sealed.
Hose test shows clean water flow, no back‑dripping.
When every box is checked, step back and admire a drip edge that’s ready to take on the next rainstorm. In our experience at LGFMH Construction, a well‑sealed and flashed edge saves homeowners from hidden water damage that often shows up months later as rot or mold. So, give that final seal the attention it deserves—you’ll thank yourself when the roof stays dry.
Conclusion
After walking through every nail, bead of sealant, and hose test, you’ve seen that learning how to install drip edge on roof isn’t rocket science—it’s a series of small, purposeful steps.
Remember the moment you felt that first metal strip snap into place? That feeling tells you the edge is already doing its job, directing water away from the fascia before it even reaches the gutter.
Our quick checklist—clean eave, pre‑drilled holes, sealed nail heads, overlapping seams, final hose test—covers the core of a watertight installation. If any box feels shaky, pause, add a nail, or re‑apply sealant. It’s easier to fix now than to chase a leak later.
So, what’s the next move? Grab your tools, double‑check that ½‑inch overhang, and run that garden hose one more time. When the water flows cleanly off the lip, you’ve earned a roof that protects your home for seasons to come.
In our experience at LGFMH Construction, homeowners who follow these steps report fewer surprise water stains and lower repair bills. If you’d rather have a pro handle the details, we’re just a call away—but the confidence of doing it yourself is a reward in itself.
Keep this guide handy for future projects, and you’ll always know exactly how to install drip edge on roof with confidence.
FAQ
What is the proper overhang for a drip edge and why does it matter?
We aim for about a ½‑inch lip beyond the sheathing. That tiny extension gives water a clear path to the gutter instead of pooling on the fascia. If the overhang is too short, rain can seep behind the siding; too long and wind can lift the metal. A half‑inch is the sweet spot most manufacturers recommend, and it’s easy to measure with a ruler or a scrap piece of wood.
Do I need to pre‑drill nail holes, or can I just hammer the nails straight in?
Pre‑drilling is a small extra step that saves headaches. A 1/8‑inch drill bit stops the thin metal from warping and lets the nail bite cleanly. When you skip this, the edge can buckle, and you may end up with gaps that let water in. In our experience, a quick drill before each 12‑inch nail spacing makes the whole job faster and more reliable.
How often should I seal the nail heads, and which sealant works best?
Seal every nail head as you drive it. A silicone‑based roof sealant stays flexible in temperature swings and adheres to metal and wood alike. Apply a pea‑sized dab before the nail bites, then smooth it with a gloved fingertip. This creates a waterproof barrier that keeps moisture from traveling down the fastener—a common source of hidden leaks.
Can I install a drip edge on a roof with existing shingles, or do I need to strip them first?
Yes, you can install over existing shingles as long as the underlayment is still in good shape. Lay the drip edge first, then slide the shingles back into place, overlapping the edge by at least 2 inches. This method saves time and keeps the roof’s warranty intact, but be sure the shingles aren’t cracked or missing; otherwise, you risk exposing the deck to water.
What tools are absolutely essential for a DIY drip‑edge install?
Grab a sturdy ladder, tin snips (straight‑cut for long runs, aviation snips for corners), a 1 ¼″ galvanized roofing nailer or hammer, a 1/8″ drill bit, a caulking gun with silicone sealant, and a chalk line for alignment. A pair of non‑slip gloves and safety glasses round out the kit. With these basics you can cut, position, fasten, and seal without running back to the truck.
How do I know if the drip edge is properly aligned before I start nailing?
Snap a chalk line a half‑inch back from the wall sheathing, then press the edge against it. Walk the length with your hand—if the metal follows the line without gaps, you’re good. Double‑check the lip direction; it should point downhill. A quick visual check saves you from re‑nailing later, and it ensures water will flow straight off the roof.
What’s the best way to test my drip edge once the job is finished?
Grab a garden hose, set a steady flow, and spray just above the installed edge. Watch the water travel the full length of the lip and drop cleanly into the gutter. If you see any drips back onto the fascia or pooling on the deck, pause, add a nail, and reseal that spot. This simple hose test is the final proof that your roof is ready for the next rainstorm.


Comments