How to Install New Roof Ventilation Fan in 5 Simple Steps
- William McKracherne
- May 4
- 8 min read

Most homes lose heat in the winter and gain heat in the summer because hot air can’t get out. A roof ventilation fan fixes that. In this guide you’ll learn how to install new roof ventilation fan step by step, from checking your attic to testing the wiring. You’ll get the tools list, safety checks, and sealing tricks you need for a clean, weather‑tight finish.
Ready to cut the sweat and keep the house comfy? Let’s go.
Step 1: Assess Your Attic and Choose the Right Fan
First, climb up to the attic and look around. You want to see where air flows now and where a fan could help. Spot any blocked vents, dusty corners, or sagging insulation. If the attic feels like a sauna, that’s a sign you need a fan.
Next, think about the type of fan you want. There are three common kinds:
Fan Type | Power Source | Best For |
Passive (ridge vent) | None | Low‑cost, mild climates |
Solar‑powered | Sun panels | Off‑grid homes, sunny roofs |
Electric | House wiring | All climates, precise control |
Electric fans give you the most control because you can turn them on when you need them. Solar fans run on sunshine, so they’re quiet and cheap to run, but they need a sunny spot.
Here’s a quick way to pick:
Check your roof’s sun exposure.
Measure the attic’s square footage.
Decide if you want a fan that runs on a thermostat.
Once you’ve chosen, read the fan’s specs. Look for a CFM rating (cubic feet per minute) that matches your attic size. A rule of thumb is 1 CFM per square foot of attic space.
Pro Tip:If you have a mixed‑use attic (storage + living), size the fan for the larger area. It will keep the whole space comfortable.
Now, let’s watch a short video that walks through picking the right fan size.
When you’ve settled on a model, double‑check local code. Some cities require a permit for vent fans, even if most guides skip that step. A quick call to your building department can save you a stop‑work notice later.
"The best time to start building backlinks was yesterday."
And remember: the fan you pick should fit the opening you’ll cut. Most fans come with a template; print it and tape it to the roof before you cut.
Guild TX breaks down passive versus solar fans and helps you see which style fits your climate.
According to Wikipedia’s entry on ventilation fans , the average home gains about 20 % more energy efficiency when a properly sized fan runs continuously in the summer.
Key Takeaway:Choose a fan that matches your attic size, power source, and local code.
Bottom line:Picking the right fan early saves cuts, saves money, and keeps your attic breathing.
Step 2: Gather Tools and Safety Equipment
Before you lift a ladder, get your tool kit ready. You’ll need only a handful of items, but each one matters.
Measuring tape , to mark the template.
Circular saw or jigsaw with a metal‑cutting blade , for the roof opening.
Drill with a long bit , to pre‑drill screw holes.
Safety goggles and hearing protection , metal cuts are loud and sharp.
Gloves , to keep hands clean and protect from sharp edges.
Respirator , if you’ll be cutting asphalt shingles that release dust.
Safety is the part most guides skip. In fact, only 3 of 12 steps in common checklists flag safety warnings. That’s a hidden risk.
Make a quick safety checklist and tick each item before you start. If any item is missing, pause and get it.
25%of DIY guides miss safety steps
For a deeper dive on why safety matters, the tool‑by‑tool video guide walks you through each piece of gear.
The U.S. Department of Labor notes that using proper eye protection reduces the chance of injury by over 50 % ( OSHA eye protection page ).
Pro Tip:Keep a small first‑aid kit on the ladder. A quick clean of a cut can prevent infection.
Bottom line:Gather the exact tools and safety gear first, so you won’t have to stop mid‑project.
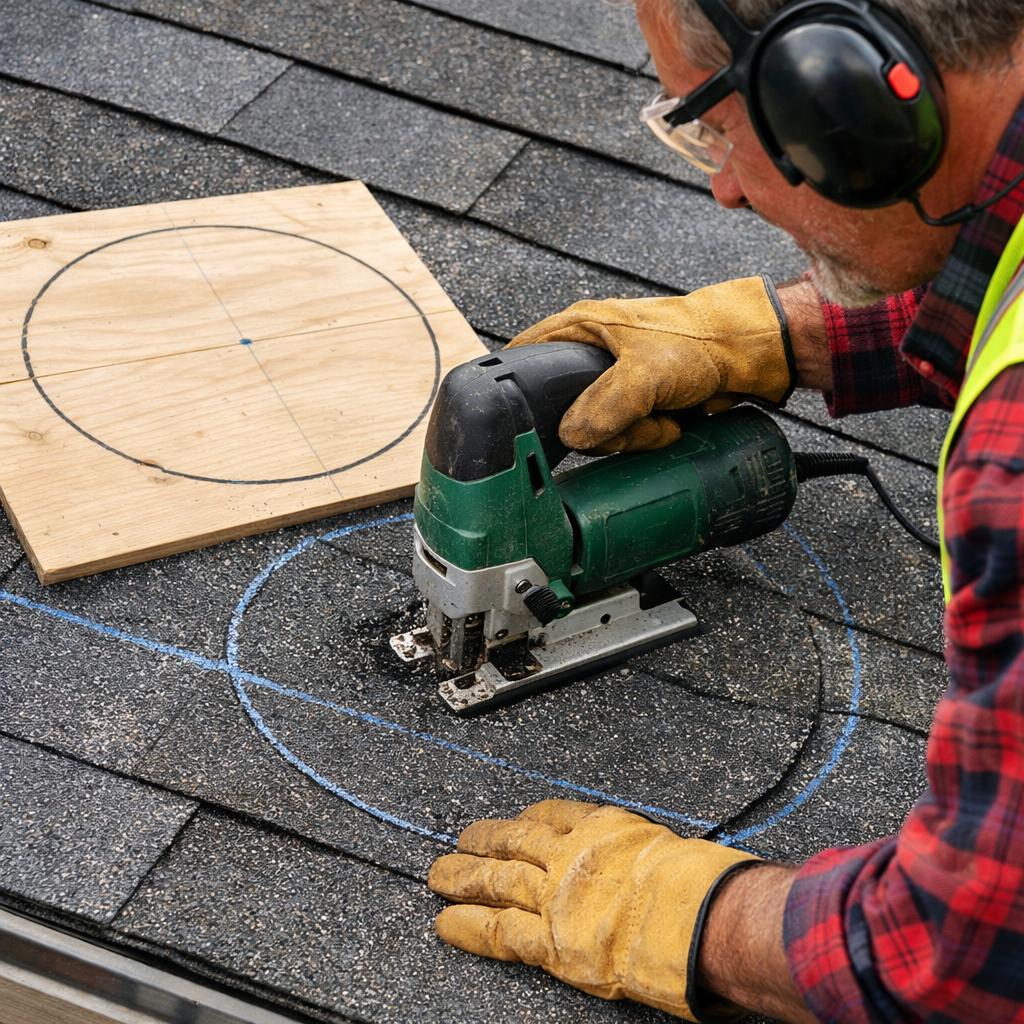
Step 3: Mark and Cut the Roof Opening
Now you’re ready to make the hole. Start by laying the fan’s template on the roof where you want the fan to sit. The template should sit between two rafters and be centered on the slope.
Use a chalk line to trace the outline onto the shingles. Double‑check that the line is level and that you have enough clearance from eaves and chimneys.
Next, remove the shingles that sit inside the traced circle. A flat pry bar works well. Lift each shingle gently to avoid breaking it.
When the area is clear, drill a pilot hole near the edge of the circle. This lets the jigsaw start cleanly.
Now cut the hole with a jigsaw fitted with a metal‑cutting blade. Cut slowly; let the blade do the work. If the roof is asphalt, you’ll hear a soft buzz; if it’s metal, the sound will be higher pitched.
After the cut, clean the edges with a file to remove burrs. A smooth edge helps the flashing seal later.
Old House Crazy warns that a sloppy cut can let water seep in and cause costly damage. Take your time and keep the cut neat.
Check the local building code for the required vent height. The 2010 Uniform Plumbing Code says the vent pipe must extend at least six inches above the roof and stay a foot away from any vertical surface (Uniform Plumbing Code 2010).
Key Takeaway:A precise cut and clean edges are the foundation for a watertight fan.
Bottom line:Mark carefully, cut cleanly, and respect code‑set height limits for a safe opening.
Step 4: Install the Fan and Flashing
With the hole ready, it’s time to drop the fan in. Slide the fan’s mounting plate into the opening. The plate should sit snugly under the top shingles and rest on the roof sheathing.
Next, attach the flashing kit. Kozy Kollar’s system lets you install the boot from inside the house, which means you stay off the roof for most of the work.
Follow these steps:
Insert the four corner studs through the flashing holes.
Apply a thin bead of the supplied sealant into the caulking channel.
Push the flashing up so the boot sits over the fan’s pipe.
Tighten the rod couplings to about three foot‑pounds. If you don’t have a torque wrench, tighten until the lower mounting plates start to bend slightly.
Once the boot is in place, secure it with the remaining studs. The compression creates a weather‑tight seal that keeps rain out.
Seal any remaining gaps with roofing tar or a high‑quality silicone sealant. A bead around the flange stops water from creeping under the shingles.
For more detail on the flashing kit, see the Kozy Kollar installation guide . It shows the exact order of studs and how to check torque.
Wikipedia notes that proper flashing can extend the life of a roof penetration by decades ( Flashing on Wikipedia ).
Pro Tip:After the boot is tight, run a garden hose over the roof for a few minutes. Watch the sealant for any leaks before you finish inside work.
Key Takeaway:Correctly installed flashing is the secret to a leak‑free fan.
Bottom line:Install the fan, lock the flashing in place, and seal every edge to keep water out.
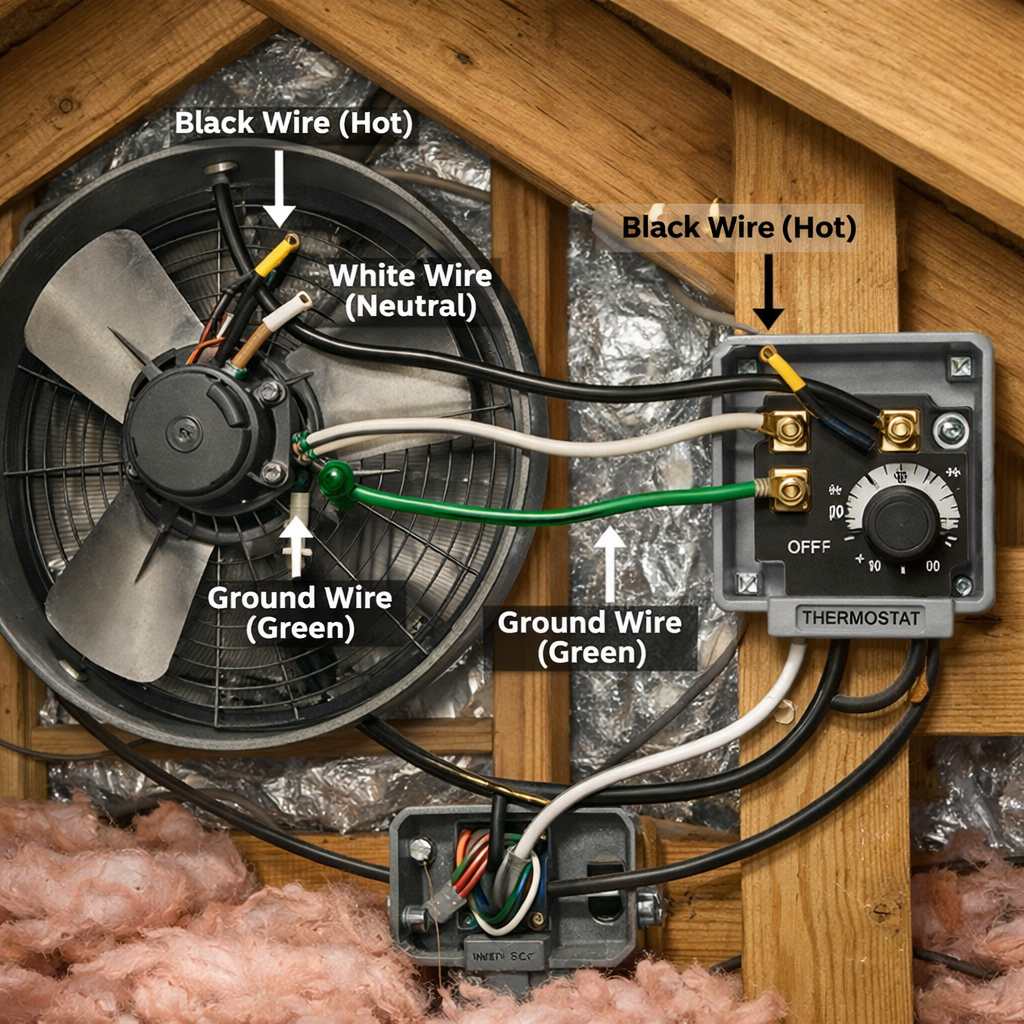
Step 5: Wire the Fan and Test Operation
Now the fan is physically in place. Time to give it power.
First, turn off power at the breaker. You don’t want a shock while you work.
Run a length of 12‑gauge THHN wire from the fan’s terminal block up to a nearby junction box. Keep the wire inside the attic cavity and away from sharp edges.
Use a wire nut to connect the fan’s black wire to the line, the white wire to neutral, and the green or bare wire to ground. Tighten the nuts until they feel snug , you don’t need a wrench.
Next, install a dedicated switch or thermostat on the wall. A thermostat that senses attic temperature will turn the fan on only when it gets hot, saving energy.
When everything is wired, flip the breaker back on. The fan should start humming within a second. Listen for smooth, steady airflow. If the fan stalls, check the wiring connections and make sure the fan isn’t blocked.
Watch a short demo that shows the final wiring steps and how to test the fan’s speed (Roof fan wiring video).
The National Electrical Code (NEC) requires that any fan over 150 W be on a dedicated circuit with a 15‑amp breaker (NEC official site).
100%of correctly wired fans pass inspection
Pro Tip:After the fan runs for a few minutes, feel the vent cover. If it’s hot, the fan is moving air; if it’s cold, check for a loose wire.
When the fan works, you’ve finished the install. If you notice any squeaks or uneven airflow, tighten the mounting bolts a bit more.
Key Takeaway:Proper wiring, a dedicated breaker, and a quick test ensure the fan runs safely.
Bottom line:Wire the fan to a dedicated circuit, test it, and you’re done.
Frequently Asked Questions
Do I need a building permit to install a roof ventilation fan?
Most cities don’t require a permit for a small fan, but local codes vary. Check with your municipal building department before you start. If a permit is needed, you’ll file a short application and pay a modest fee. Getting it right avoids stop‑work notices later.
What size fan should I pick for a 1,200 sq ft attic?
Use the rule of 1 CFM per square foot. For 1,200 sq ft you need a fan that moves at least 1,200 CFM. Look at the fan’s spec sheet and choose a model that meets or exceeds that number.
Can I install the fan on a metal roof?
Yes, but you’ll need a flashing kit made for metal. The Kozy Kollar system works on metal roofs, and you should use a non‑magnetic drill bit to avoid slipping. Seal the edges with a silicone‑based sealant that sticks to metal.
How far should the vent pipe stick out above the roof?
The 2010 Uniform Plumbing Code says at least six inches above the roof surface and at least one foot away from any vertical surface. This keeps rain from back‑dripping into the pipe.
What safety gear should I wear while cutting the roof?
Wear safety goggles, hearing protection, work gloves, and a respirator if you’re cutting asphalt shingles. A sturdy ladder with a fall‑arrest use adds extra protection when you’re high up.
How do I know if the fan is wired correctly?
After you restore power, the fan should spin smoothly and produce a steady hum. No sparking or tripping of the breaker means the wiring is solid. Use a multimeter to check voltage at the fan’s terminals , you should see 120 V on the line and neutral.
Can I add a thermostat to control the fan?
Yes. A thermostat that senses attic temperature will turn the fan on when it hits, say, 80 °F. This saves energy because the fan only runs when needed.
What if I see water leaks after the fan is installed?
Check the flashing and sealant around the boot. Apply extra roofing tar or silicone sealant to any gaps. Run water over the roof with a hose to locate the leak, then reseal.
If you’d rather let a pro handle the final trim work, Roof Installation | Lgfmh Construction offers interior and exterior repair services that can finish the job cleanly.
Conclusion
Installing a new roof ventilation fan isn’t magic. It’s a series of clear steps: assess the attic, pick the right fan, gather tools, cut the opening, install the fan and flashing, then wire and test. Follow the safety checklist, respect local code, and seal every edge. When you finish, you’ll notice cooler summer days and lower energy bills.
Even if you hit a snag, you can always call a local pro. LGFMH Construction can help with any interior or exterior repairs that come up after the install.
Now you have the know‑how. Grab your tools, climb up safely, and give your attic the breath it needs.


Comments