How to Repair a Cracked Concrete Driveway: Step‑by‑Step DIY Guide
- William McKracherne
- Feb 11
- 21 min read

Ever stared at a jagged crack slicing across your driveway and felt that mix of annoyance and helplessness? You're not alone – many homeowners in Virginia Beach notice those unsightly lines after a harsh winter or a heavy truck rolls over. The good news is that fixing a cracked concrete driveway is far more doable than you might think, and you don’t need a crew of specialists to get solid results.
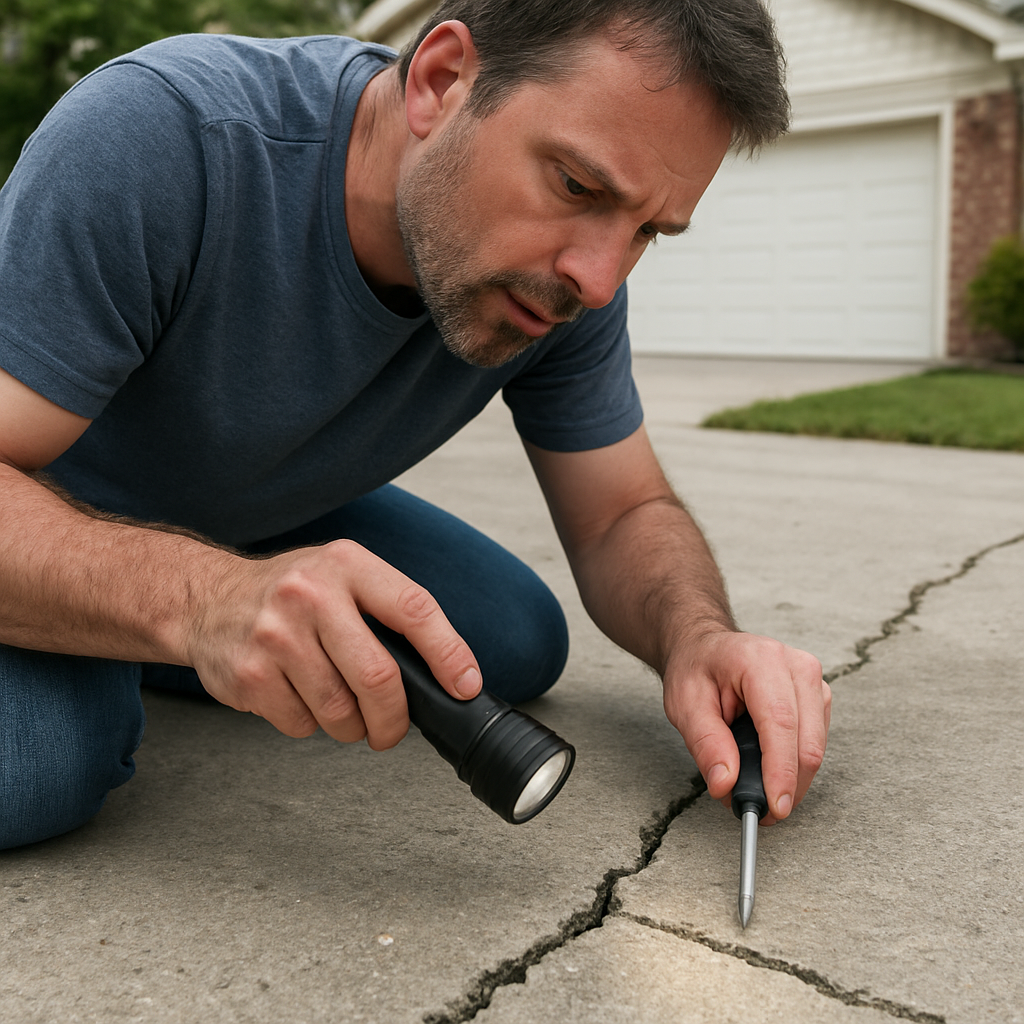
First, take a step back and actually look at the crack. Is it a hairline surface split that widens only a few millimetres, or does it plunge deep enough to expose the aggregate underneath? In our experience at LGFMH Construction, the difference dictates whether a simple filler will hold or you’ll need a patching compound. A quick test is to run a screwdriver tip along the line – if it catches, you’re probably dealing with a shallow fissure that a polymer‑based filler can seal.
Once you’ve sized up the damage, gather a few basics: a concrete crack filler, a putty knife, a wire brush, and a garden hose with a spray nozzle. If you’re curious about the full list of materials and step‑by‑step preparation, check out our Ultimate Guide to Concrete Driveway Repair , which walks you through everything from cleaning the groove to applying a sealant that won’t peel in the next freeze‑thaw cycle.
Cleaning is key. Use the wire brush to scrub away loose debris, then rinse with water and let the surface dry completely – moisture trapped under the filler is the fastest way to see the crack reappear. Pro tip: a leaf blower can speed up drying, especially on a humid morning. After the area is dry, carve the crack slightly wider with a cold‑chisel so the filler can bond more securely; think of it like widening a joint before gluing two pieces of wood together.
Now apply the filler. Cut the nozzle tip to match the crack width, then squeeze the product into the groove, overfilling by about a millimetre. Smooth the surface with the putty knife, feathering the edges so the repair blends with the surrounding slab. Let it cure according to the manufacturer’s timeline – typically 24 hours for epoxy‑based fillers – before walking or driving over it.
If you notice multiple cracks spreading across the driveway, it might signal underlying settlement or drainage issues. In that case, a more extensive repair or professional assessment could save you money down the line. But for most isolated cracks, the DIY route described above restores both appearance and structural integrity without breaking the bank.
TL;DR
Fixing a cracked concrete driveway is simpler than you think: clean the crack, widen it with a chisel, fill it with epoxy filler, smooth it, and let it cure. Follow these steps, avoid moisture traps, and you’ll have a seamless surface without hiring a pro for years on your lot.
Step 1: Inspect the Cracked Concrete Driveway
First things first, before you swing a chisel or pour any filler, you need to actually look at the crack and ask yourself what it’s trying to tell you. That moment of recognition – the pause when you see a hairline line versus a yawning gorge – is the foundation of every successful repair.
Grab a flashlight, a flathead screwdriver, and a sturdy pair of work gloves. Shine the light along the crack; if the beam slides in smoothly, you’re probably dealing with a surface fissure that’s only a few millimetres deep. If the tip catches or you can feel the aggregate, the crack is deeper and may need a different approach.
Next, check the width. Place a ruler or a simple coin – a penny works great – right in the centre of the crack. If the gap is tighter than the coin, a polymer‑based epoxy filler will hold. Wider than a quarter? You’ll want to widen the groove with a cold‑chisel so the filler can lock in, just like we do when we prep a joint for a strong glue bond.
Now, look for patterns. Is this the only crack, or are there several branching out like a river delta? Multiple cracks often signal underlying settlement, drainage problems, or freeze‑thaw stress common in Virginia Beach’s salty air. Spotting that early can save you a future call to a pro.
Take a quick moisture test. Dampen a cotton swab and press it against the crack; if it feels damp or you see water seeping in, wait for the area to dry completely. Trapped moisture is the number‑one reason repairs fail, because the filler never gets a solid bond.
While you’re inspecting, note any loose pieces of concrete that have popped out. Those little shards are easy to miss, but they’ll crumble later if you don’t remove them. Use a wire brush to sweep the groove clean – think of it as brushing off dust before you paint a wall.
If you’re a visual learner, the short video below walks you through the inspection process step by step, showing exactly how we shine a light, probe the crack, and measure the width.
Notice how the presenter taps the crack with a screwdriver – that little tap tells you instantly whether the crack is shallow or deep. Replicate that trick, and you’ll save yourself a lot of guesswork.
When you’ve gathered all this intel, you’re ready to move on to cleaning and widening. Below is a visual reminder of the tools and measurements you should have on hand before you start the next step.
To sum up this inspection stage: 1) Light the crack, 2) Probe with a screwdriver, 3) Measure width with a coin or ruler, 4) Check for moisture, 5) Remove loose debris. Nail these five quick checks and you’ll set a solid foundation for a repair that lasts years, not weeks. Need a second opinion? Our team at LGFMH Construction can swing by for a free assessment, or you can reach out to specialist advice from LED Artistry for a fresh perspective.
Step 2: Clean and Prepare the Repair Area
Alright, you’ve measured the crack, taken some notes, and you’re ready to roll up your sleeves. The next move is all about getting that groove spotless and ready for the filler – because any dust or moisture left behind will sabotage your repair faster than a summer thunderstorm.
First thing’s first: grab a sturdy wire brush. Give the crack a good scrub, like you’re sweeping away the crumbs after a family dinner. You want to dislodge loose concrete, dirt, and any bits of old filler that might have flaked off. A quick, vigorous brush will expose fresh concrete, which is where the new epoxy wants to bond.
Got a leaf blower? Great. If it’s a damp morning, a blower can whisk away the fine dust faster than waiting for the wind to change. Just be careful not to blow the dust back into the crack – aim it away from the opening.
Rinse and dry
Once the brush has done its job, give the area a gentle rinse with a garden hose on a low‑pressure spray. Think of it like giving the crack a quick shower – you’re washing away the grit that the brush might have missed.
Don’t go overboard with the water; you don’t want to soak the surrounding slab. After rinsing, grab a clean rag or a shop‑vac to remove excess water. Then, let the crack air‑dry for at least 30 minutes. If you’re in a humid Virginia Beach afternoon, a portable fan or a leaf blower set to “low” can speed up drying.
Why does drying matter? Moisture trapped beneath the filler expands when it freezes, creating new cracks or causing the epoxy to pop off. In our experience, a dry surface is the single most reliable factor in a lasting repair.
Widen and shape the crack
Now that it’s clean and dry, it’s time to give the crack a little makeover. Using a cold‑chisel and a hammer, gently tap the edges of the groove to widen it by about 1/8 inch (3 mm). This might feel like you’re “damaging” the concrete, but you’re actually creating a better “key” for the filler to lock into – think of it like carving a groove for a nail.
Don’t over‑do it. You just want a V‑shaped profile that’s consistent along the length of the crack. If the crack is irregular, focus on the deepest sections; those are the spots that will benefit most from a wider profile.
After chiseling, brush away any new dust, then give it a quick dry‑wipe. At this point, the surface should look clean, dry, and slightly wider – ready for the filler to flow in and grip.
Here’s a quick checklist you can print out and keep by your toolbox:
Brush the crack until you see fresh concrete.
Rinse lightly and dry thoroughly (30 min+).
Use a cold‑chisel to widen to a V‑shape, about 1/8 in.
Remove dust from the widened groove.
Feeling confident? Let’s see the process in action.
Notice how the video shows the brush, the rinse, and the careful chiseling – everything we just described. When you pause at the 1:45 mark, you’ll see the exact angle to aim the chisel for that clean V‑shape.
One final tip before you move on to the filler: check the ambient temperature. Most epoxy fillers recommend applying when it’s between 50 °F and 85 °F (10 °C‑29 °C). If it’s cooler outside, you might want to use a portable heater or wait for a sunny spell. The filler cures faster and bonds stronger in the right temperature range.
Now you’ve got a clean, dry, and properly shaped crack. The stage is set for a solid fill that’ll stand up to traffic, rain, and that inevitable summer heat. In the next step, we’ll walk through mixing and applying the epoxy – but first, give yourself a pat on the back. You’ve just tackled one of the trickiest parts of how to repair a cracked concrete driveway.Step 3: Apply the Concrete Repair MaterialNow that the crack is clean, dry, and nicely V‑shaped, it’s time to actually fill it. This is the moment where the filler becomes the bridge that holds your driveway together for years to come.Gather the right stuffFirst, grab a high‑quality epoxy filler , a sturdy mixing paddle, a clean bucket, a putty knife or a 4‑inch trowel, and a disposable glove. If you’re working with a polymer‑based filler, the same tools apply—just skip the mixing step.Pro tip: keep a small brush handy for feather‑feathering the edges later. It’ll make the repair blend in without a visible ridge.Mixing (if needed)Most epoxy fillers come in two parts: resin and hardener. Follow the manufacturer’s ratio—usually 1:1 by volume. Pour each part into the bucket, then stir slowly for about 30 seconds. You’ll notice the mixture turning a slightly amber hue; that’s the chemical reaction kicking in.Don’t over‑mix. Too much agitation introduces air bubbles, and those bubbles become tiny weak spots once the filler cures. If you see bubbles rising, tap the bucket gently on the workbench to pop them.Applying the fillerStart at one end of the crack and squeeze the mixed epoxy directly into the groove. Aim to overfill by roughly 1 mm (about the thickness of a credit card). Overfilling gives you a little margin for sanding later and compensates for any shrinkage as the filler sets. Use the putty knife to push the material down, especially in deeper sections. A quick back‑and‑forth motion helps the filler settle into every crevice. If the crack is wider than a quarter‑inch, work in layers: fill half, let it tack up for 10‑15 minutes, then add the second layer.Does this feel messy? It’s normal. The key is to keep the surrounding slab clean—wipe away any excess before it skins over. A damp rag works well for quick clean‑ups.Smoothing and shapingWhile the epoxy is still pliable (usually 5‑10 minutes after application), run your trowel across the surface. Align the tool with the driveway’s grain, applying light pressure to feather the edges into the existing concrete. If you have a concrete float, you can use it to create a subtle concave shape that will shed water.For a super‑smooth finish, dip the trowel in a spray bottle of water and lightly mist the filler. The water acts like a lubricant, reducing tool marks. Just don’t soak the filler—too much moisture can interfere with the cure.Temperature and curingEpoxy cures fastest between 50 °F and 85 °F (10 °C‑29 °C). If it’s a cooler morning in Virginia Beach, set up a portable space heater a few feet away, but keep it out of direct contact with the filler. On hot summer days, work in the shade or during early morning to avoid premature curing.Most manufacturers recommend 24 hours before any foot traffic and 48 hours before vehicle loads. Resist the urge to test it early; a premature step can cause micro‑cracks that defeat the whole repair.Real‑world examplesTake the Miller family in Norfolk. Their driveway developed a ⅜‑inch wide settlement crack after a new fence was installed. They followed these steps, using a two‑layer epoxy approach, and the repair held up through a wet winter without any sign of movement.In a different scenario, a homeowner in Chesapeake noticed a hairline crack that widened after a heavy delivery truck passed. By overfilling slightly and feather‑feathering the edges, the repair blended so well that the crack became virtually invisible—no need for a full resurfacing.Quick checklist before you walk away Mix epoxy according to the exact ratio; don’t guess. Overfill by about 1 mm to allow for sanding. Use a putty knife or trowel to push filler into the deepest parts. Feather the edges while the filler is still soft. Maintain ambient temperature between 50 °F‑85 °F. Let the repair cure 24 hours before foot traffic, 48 hours before vehicles. And that’s it—your driveway is now back in business. The next step will walk you through sealing the repaired area so water can’t sneak back in, but for now, give yourself a high‑five. You’ve just turned a cracked mess into a solid, long‑lasting surface.Step 4: Finish, Smooth, and Seal the RepairNow that the epoxy is level with the surrounding slab, it’s time to give your driveway that polished, road‑ready feel. A smooth finish not only looks better, it also prevents water from slipping into tiny gaps and starting a new crack.1. Feather the edges while the filler is still pliableGrab your putty knife or a 4‑inch trowel and glide it lightly over the repair. The trick is to use a sweeping motion that tapers the filler into the existing concrete – think of it like blending two paint colors on a canvas.Don’t be afraid to let a tiny “lip” form; you’ll sand that away in the next step. If the filler starts to skin over too fast, dip the blade in a spray bottle of water – a little moisture keeps the surface workable without ruining the cure.2. Let it set, then sand for a flawless surfacePatience is key. Wait the full 24‑hour cure time (or the manufacturer’s recommendation) before you even think about sanding. Rushing this step can create micro‑cracks that show up later.When the filler is solid, pull out a medium‑grit (80‑120) sanding block or a handheld orbital sander. Work in the direction of the driveway’s grain, applying gentle pressure. The goal is a surface that feels level to the touch, not a sandpaper‑rough texture.After the first pass, wipe away dust with a clean rag and finish with a fine‑grit (220) block for a silky finish. A quick vacuum will remove any lingering particles – those tiny bits can ruin a sealant’s adhesion.3. Choose the right sealer for Virginia Beach conditionsHere’s where the science meets the sidewalk. In coastal Virginia, your driveway battles salt spray, freeze‑thaw cycles, and occasional oil spills. A penetrating sealer is a solid all‑rounder: it seeps into the concrete pores, blocks moisture, and leaves the surface’s natural look untouched. If you prefer a glossy sheen, a high‑performance polyurethane works well, but expect to reseal every 3‑5 years.Our experience shows that a single coat of a quality penetrating sealer can extend the life of a repair by up to 7 years. That’s because it creates a “shield from within,” stopping water from expanding in winter and causing the filler to pop out.Want a quick rundown of sealer types? Check out this short video that breaks down acrylic, polyurethane, and penetrating options in plain English: concrete sealer guide.4. Apply the sealer like a proStart with a clean, dry surface – the sanded repair should be free of dust. Pour the sealer into a paint‑roller tray and use a ¼‑inch nap roller to spread an even coat. Work in 5‑foot sections, overlapping each pass by a foot to avoid streaks.For a penetrating sealer, you’ll notice it disappears into the concrete rather than sitting on top. Let it sit for the recommended 10‑15 minutes, then mop up any excess with a lint‑free cloth. Polyurethane or acrylic sealers need a brush or roller finish; let each coat dry 2‑4 hours before applying the next. Two coats are usually enough for a driveway that sees daily traffic.Temperature matters again – aim for 50 °F‑85 °F (10 °C‑29 °C). On a hot Virginia summer day, apply in the early morning or late afternoon to avoid premature drying, which can lead to lap marks.5. Final inspection and maintenance tipsAfter the sealer has cured (typically 24‑48 hours), walk the slab and run your hand across the repair. It should feel seamless, with no noticeable ridges. Sprinkle a few drops of water – if it beads and rolls off, you’ve got a good seal.To keep the repair performing, note these simple habits: sweep debris weekly, mop up oil spills immediately, and reseal every 3‑5 years depending on traffic and exposure. If you notice any new cracks, address them early – the sooner you patch, the less likely they are to grow.And there you have it – a finished, smooth, sealed repair that will stand up to Virginia Beach’s salty breezes and heavy trucks. By following these steps, you’ve mastered how to repair a cracked concrete driveway from start to finish.Ready to give your driveway the long‑term protection it deserves? A quick call to LGFMH Construction can get you a free on‑site assessment and a tailored sealing plan.Step 5: Compare Common Repair OptionsOkay, you’ve cleaned, prepped, filled, and sanded – the driveway is almost looking like new. But before you pour the final seal, you’ve got to decide which repair path actually makes sense for your situation. It’s a little like picking a pair of shoes: you could go for the cheap flip‑flops that get the job done for a summer, or you could invest in a sturdy boot that lasts through storms and heavy trucks. Below, we walk through the most common routes, the moments they shine, and the red flags that say, “maybe not this one.”1. DIY Crack‑Filling & SealingFor hairline or isolated settlement cracks under a quarter‑inch wide, a polymer‑based filler followed by a penetrating sealer usually does the trick. You already have the tools – brush, chisel, epoxy – so the extra cost is just the material, which can be as low as $5‑$15 per crack. The upside? You’re saving money and you get that satisfying feeling of doing it yourself.The downside is durability. A DIY seal can start to wear after a couple of seasons, especially under Virginia Beach’s salty breezes. If you notice the filler softening or water beading less effectively, it’s time to reassess.2. Professional Caulking (Small‑Scale)When a crack widens beyond a quarter‑inch or you have a short stretch of multiple cracks, calling a pro for a caulking service is often worth the $100‑$1,000 range. Professionals bring high‑performance epoxy or polyurethane blends that bond deeper and resist freeze‑thaw cycles better than most consumer‑grade products.What you gain: a smoother finish, a longer‑lasting seal, and a warranty that can cover unexpected re‑cracking. What you lose: a higher upfront cost and scheduling a crew. If you’re on a tight budget but still want that extra peace of mind, ask the contractor for a “partial‑service” – they’ll prep and apply the filler, leaving you to handle the seal.3. Full‑Surface ResurfacingThis option is for driveways that have several cracks, spalling, or uneven slabs. A thin‑layer overlay of polymer‑modified concrete can hide imperfections and give you a fresh, uniform surface. The price tag can jump to $2,000‑$5,000 for an average driveway, but it’s often cheaper than a total replacement.Resurfacing buys you a smoother ride, improves drainage, and can extend the slab’s life by another decade. On the flip side, it’s a bigger commitment of time and money, and you still need a solid base – if the underlying soil is shifting, the new surface will eventually follow.4. Concrete Leveling (Jack‑Hammer or Mudjacking)If you’ve got sunken sections or a slope that’s causing water to pool, leveling is the answer. Professionals inject a high‑strength grout beneath the slab, lifting it back into place. Costs typically start around $100 per linear foot, but the result can eliminate trip hazards and stop water from seeping into cracks.Leveling works best when the issue is localized. For widespread settlement, you may end up needing a combination of leveling plus resurfacing.5. Full ReplacementWhen the concrete is riddled with large, interconnected cracks, or the slab is crumbling, replacement is the only realistic route. New concrete installation runs $2,000‑$15,000+ depending on size, finish, and decorative options. It’s a heavy investment, but it gives you a clean slate and eliminates future repair headaches.Most homeowners only reach this point after multiple repairs have failed or when the driveway no longer meets code for load‑bearing capacity. If you’re planning a major home renovation, syncing a new driveway with that timeline can actually save you money on labor.How to Choose the Right PathGrab a notebook and run through this quick decision checklist:Is the crack isolated and less than ¼‑inch wide? → DIY filler + seal.Do you have multiple cracks or a crack wider than ¼‑inch? → Professional caulking.Are there surface imperfections beyond cracks (spalling, unevenness)? → Consider resurfacing.Is any part of the slab sunken or pooling water? → Leveling.Is the slab structurally compromised (large, interwoven cracks, crumbling)? → Replacement.Ask yourself how much traffic the driveway sees, how soon you need it back in service, and what your budget looks like for the next 5‑10 years. That will guide you toward the most cost‑effective solution.Quick Comparison TableOptionTypical Cost (DIY / Pro)ProsConsDIY Fill & Seal$5‑$15 / $100‑$250Low cost, immediate control, learning experienceShorter lifespan, limited to small cracksProfessional Caulking$100‑$1,000Deeper bond, warranty, smoother finishHigher upfront cost, need to scheduleResurfacing$2,000‑$5,000Uniform surface, hides multiple defects, extends lifeSignificant expense, prep timeRemember, the goal isn’t just to patch a line; it’s to protect the whole slab from future damage. If you’re still on the fence, think about the long‑term maintenance cost of each option. A cheap fix that fails in six months often ends up costing more than a solid professional job that lasts a decade.Take a moment now to rank your repair needs on the checklist, jot down a rough budget, and then decide which route feels right. Whatever you choose, you’ll be a step closer to a driveway that looks good, holds up to Virginia Beach’s salty air, and lets you drive without a second‑guessing glance.Step 6: Prevent Future CracksYou've just patched that nasty crack, sanded it smooth, and sealed it up. But the real peace of mind comes from stopping new cracks before they even think about showing up.Why prevention mattersConcrete loves to expand when it’s hot and contract when it’s cold. In Virginia Beach that swing can be brutal, especially with salty air sneaking into tiny pores. If you ignore the underlying causes, you’ll end up in the same repair loop every year.Think about the last time you noticed a new hairline line appear after a rainstorm. That’s the concrete reacting to moisture that got into the slab through a weak spot. A little foresight now can save you dozens of dollars and a lot of elbow grease later.Step‑by‑step checklist to keep cracks at bayInspect the drainage around the driveway every spring. Water should flow away from the slab, not pool at the edges.Seal all joints and expansion gaps with a high‑quality polyurethane or silicone sealant.Apply a penetrating concrete sealer once a year, especially after a harsh winter.Maintain a consistent moisture level in the soil underneath – avoid heavy irrigation or large potted plants that constantly drip.Schedule a professional inspection every 3‑5 years to catch settlement issues early.Does that feel like a lot? It’s really just a handful of habits you can fit into your regular home‑maintenance routine.Control water where it mattersWater is the number one culprit behind future cracks. Start by checking the slope of your driveway. A proper slope of about 2% (roughly a quarter‑inch per foot) will guide rainwater toward the street or a drainage ditch.If the slope is off, a simple resurfacing with a self‑leveling overlay can correct it without a full replacement. In our experience, a thin‑layer overlay costs a fraction of a full pour and gives the surface a fresh, level finish.Next, look at the gutters and downspouts that feed the driveway area. A clogged downspout can dump gallons of water right onto the slab, forcing it to soak in and freeze. Clean those gutters twice a year – once after the leaves fall, and once after the summer storms.Seal the gaps, not just the cracksMost homeowners think sealing the repaired crack is enough. But expansion joints, control joints, and even the perimeter where the slab meets the soil are all potential entry points for water and salts.Use a flexible sealant that can move with the concrete. Polyurethane sealants stay elastic for years, handling the thermal expansion without cracking themselves. Apply a thin bead every six months in high‑traffic areas; it’s a quick job that pays off big time.And here's a tip: before you seal, run a garden hose along the joint. If you see water disappearing into the gap, that's a sign the sealant has missed a spot. Fill that void first, then seal over it.Temperature management tricksExtreme temperature swings are inevitable, but you can blunt their impact. In the hot summer months, keep the driveway shaded with a pergola or a strategically placed tree. The shade reduces surface temperature by up to 15 °F, lessening expansion stress.During winter, avoid using rock salt directly on the concrete. Instead, spread sand or a calcium magnesium acetate alternative. Those chemicals don’t draw moisture into the slab the way sodium chloride does, which means less freeze‑thaw damage.One homeowner in Norfolk swore by a simple snow‑melt mat placed under the driveway’s entry point. It kept the surface just warm enough to prevent ice formation, and the crack‑free winter saved them a $300 repair bill.Regular maintenance routineSet a calendar reminder for a quick visual check each season. Look for new hairline cracks, spalling, or any water pooling. Jot down what you see – a photo on your phone works great.If you spot a new crack, don’t wait for it to widen. Follow the repair steps you’ve already learned, then go back to the prevention checklist. It’s a loop that keeps the driveway healthy for years.Want a deeper dive into how moisture affects concrete? Check out this short video that explains the science in plain language: concrete moisture and crack formation.Bottom line: a solid repair is only half the battle. By managing water, sealing joints, and staying on top of seasonal maintenance, you’ll keep future cracks from ever getting a foot‑hold. Your driveway will stay smooth, safe, and looking great for the next decade and beyond.ConclusionWe’ve walked through every step of how to repair a cracked concrete driveway, from spotting the problem to sealing the final surface.Think back to that first crack you noticed – maybe it was a hairline line after a heavy rain, or a deeper split where a new fence leaned on the slab. By measuring, cleaning, shaping, filling, sanding, and sealing, you’ve turned that eyesore into a sturdy, smooth path again.What matters most? Consistency. A quick visual check each season, a fresh coat of sealer every few years, and catching water where it pools will keep future cracks from taking hold.In our experience at LGFMH Construction, homeowners who stick to this loop avoid costly resurfacing for years. It’s not magic, just a habit you build into your routine.So, what’s the next move? Grab a notebook, jot down today’s measurements, and schedule that 30‑minute “maintenance minute” on your calendar. When the next winter rolls in, you’ll already have a dry, sealed surface ready to brave the freeze‑thaw cycle.Ready to take the guesswork out of the next repair? Give us a shout – we’ll pop by, run a quick assessment, and help you keep that driveway looking fresh for the next decade.FAQHow do I know if a crack needs professional repair?First, give the crack a quick visual once it’s dry. If it’s wider than ¼‑inch, deeper than ½‑inch, or you see water pooling at the bottom, it’s a sign the movement is beyond a simple fill. Cracks that zig‑zag or intersect often indicate shifting soil or a failing joint – things a pro can diagnose and fix with proper leveling or underpinning. When in doubt, a short inspection from LGFMH Construction can save you from a repeat repair later.What’s the best product for filling a V‑shaped crack?We’ve found that a high‑quality epoxy filler designed for concrete works like a charm in those narrow V‑grooves. Look for a two‑part system that cures clear and offers a compressive strength of at least 4,000 psi. Mix the resin and hardener exactly as the label says, then push the mix into the groove with a putty knife, over‑filling by about 1 mm so you can sand it smooth later. The result is a bond that’s stronger than the surrounding slab.How long should I wait before driving on the repaired area?Patience really does pay off here. Most epoxy fillers need a full 24 hours to reach handling strength and about 48 hours before they can support a vehicle. If the temperature is on the cooler side (below 55 °F), add an extra hour or two – the cure slows down. A quick finger test (the surface should feel firm, not tacky) is a handy sanity check before you roll the car back onto it.Can I repair cracks in the middle of winter?Winter repairs are possible, but you have to watch the ambient temperature. Epoxy wants to stay between 50 °F and 85 °F to cure properly, so a portable space heater or a sunny afternoon can make the difference. Keep the crack dry – a quick blow‑dryer works to chase away frost. If the air stays below 40 °F, it’s safer to wait until a milder day; otherwise you risk a weak bond that will pop later.How often should I reseal my driveway after a repair?Even the toughest filler benefits from a protective skin. In coastal Virginia, the salty breeze speeds up wear, so we recommend a penetrating sealer every 3‑5 years. After a fresh repair, give the filler at least 48 hours to cure, then apply the first coat. Mark the date in your maintenance notebook – a quick visual check each spring will tell you when it’s time for the next round.What tools do I really need for a DIY repair?You don’t need a full workshop, just a few basics: a sturdy wire brush, a cold‑chisel and hammer for widening the groove, a shop‑vac or leaf blower to clear dust, a mixing bucket and paddle if you’re using epoxy, and a 4‑inch putty knife or small trowel for shaping. A disposable glove protects your hands, and a damp rag helps you wipe away excess filler before it skins over. That kit fits in a single garage tote.How can I prevent new cracks from forming after I’ve fixed the driveway?Think of the driveway as a living slab – it reacts to water, temperature, and movement. Keep the surrounding soil evenly moist; avoid heavy watering or large potted plants that constantly drip. Check the slope each spring – a 2 % grade (about a quarter‑inch per foot) pushes water away from the slab. Seal all expansion joints with a flexible polyurethane sealant, and give the whole surface a light coat of penetrating sealer annually. Small habits now stop big cracks later.


Comments