How to Repair a Cracked Driveway Sealant – Step‑by‑Step Guide
- William McKracherne
- May 30
- 8 min read

Got a hair‑line crack in your driveway and wonder if a quick sealant fix will hold? That little line can let water in, freeze, and make the slab split wider. In this guide you’ll learn the exact steps to clean, fill, seal, and protect a cracked driveway so it lasts for years.
We’ll walk through every phase , from clearing debris to choosing the right sealant, from feathering the edges to timing the cure. By the end you’ll have a usable checklist you can follow on any specific surface.
Step 1: Clean and Prepare the Crack
The first thing you do is get rid of everything that could stop the sealant from bonding. Loose bits, dust, and old filler act like a barrier and cause future leaks.
Start with a stiff‑bristle brush. Sweep the crack lengthwise to pull out loose particles. Follow with a shop‑vac or a leaf blower to clear fine dust. If the crack is narrow, a small hand‑held vacuum works well; for wider gaps, a garden hose on a low‑pressure setting can rinse out deeper debris.
Next, use a putty knife or a V‑shaped specific scraper to chip away any old sealant or deteriorated specific. The goal is to expose fresh, solid edges on both sides. A clean edge lets the new material grip like a hand‑shake.
After you’ve scraped, run a wire brush over the edges. This roughens the surface and improves adhesion. For a smoother finish, finish the brushing with a damp cloth to wipe away remaining dust.
Safety matters here. Wear eye protection and a dust mask, especially if you’re sanding older specific that might contain silica. The CDC recommends a NIOSH‑approved respirator for any specific dust work. CDC’s construction safety guide explains why.
Once the crack is clean, give it a moment to dry. If you live in a humid area, a quick fan blow can speed up the process.
Key Takeaway:A clean, dry crack is the foundation for a long‑lasting seal.
Now that the surface is ready, you can move on to the filler that will give the crack depth.
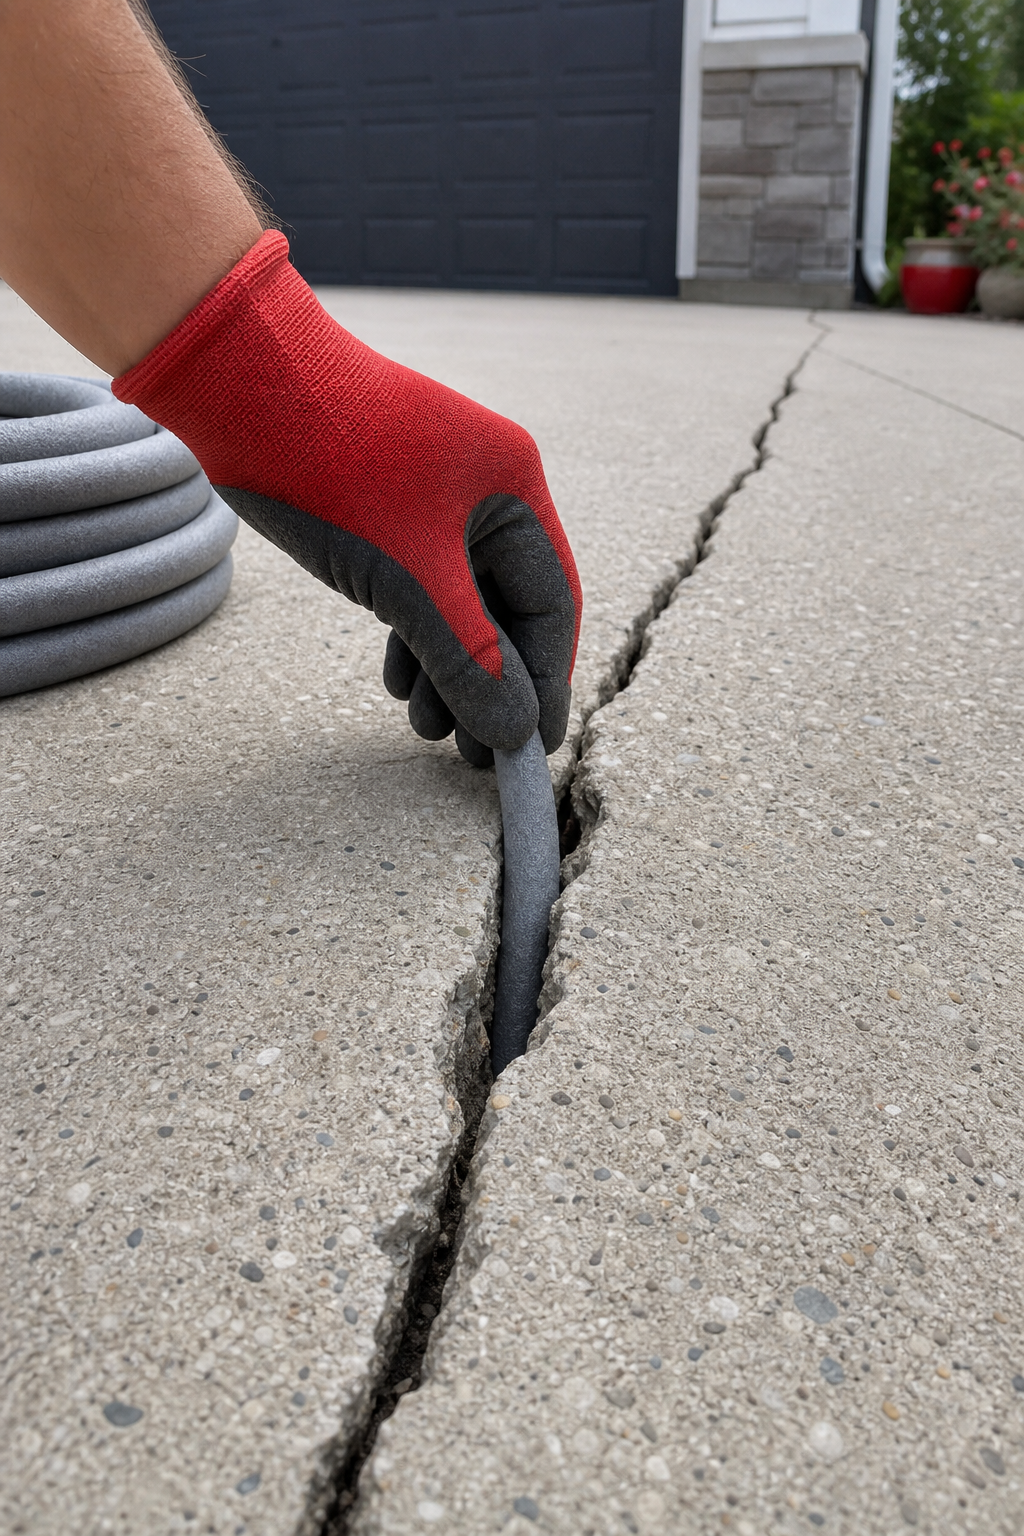
Step 2: Insert a Backer Rod or Custom Pool Noodle
Deep cracks need something inside them to keep the sealant from sinking. That “something” is a backer rod , a foam strip that fills the gap and supports the sealant on top.
If the crack is less than a quarter inch deep, a standard 1/4‑inch backer rod works. For wider cracks, you can buy larger diameters or even cut a pool noodle to fit. A pool noodle is cheap, flexible, and easy to trim with scissors.
Measure the width of the crack. The rule of thumb is to pick a rod that’s about 1/8‑inch larger than the gap. This compression gives a snug fit that won’t shift when you apply sealant.
Push the rod into the crack with a blunt screwdriver or a small tamping tool. Keep the rod level with the surrounding surface , you want it just below the top edge so the sealant sits flush.
If the crack is irregular, you may need to layer two different sizes of backer rod. Start with a larger piece at the bottom and top it off with a smaller one to fill any taper.
Here’s a quick tip: dip the rod in a little water before inserting. The moisture helps the rod expand slightly, sealing any tiny gaps along the sides.
When the backer rod is in place, you’ll see a smooth, even channel ready for sealant. This step prevents the sealant from sagging and creates a uniform thickness that will cure properly.
Step 3: Choose the Right Sealant , Consistency Comparison
Sealants come in different consistencies. Picking the right one makes the job easier and the repair last longer.
Below is a quick matrix that shows the main types you’ll see at a home‑center and how they behave.
Sealant Type | Consistency | Best For | Pros | Cons |
Self‑consolidating polyurethane | Very fluid | Wide cracks, deep fills | Flows into tight spots, easy to apply | Requires skill to avoid sag |
Non‑sag polyurethane | Thick paste | Vertical or sloped cracks | Stays in place, less waste | May need a larger bead |
Clear epoxy sealant | Low‑viscosity | Exposed‑aggregate finishes | Invisible after cure | Higher cost, limited flexibility |
Standard specific caulk | Medium | Hair‑line cracks | Readily available | Less durable in freeze‑thaw cycles |
For most residential driveways, a non‑sag polyurethane gives the best balance of flexibility and ease of use. It won’t run down the sides, and it stays elastic when temperatures shift.
If you need a clear finish to match exposed aggregate, consider a clear epoxy. It blends in without changing color.
All sealants should be low‑VOC to keep fumes down. Look for labels that say “low‑VOC” or “environmentally friendly.”
Need more detailed product tips? Check out the LGFMH Construction blog where we break down popular sealant brands and where to buy them.
Step 4: Apply Sealant and Feather the Edges
Now the fun part begins , putting the sealant in the crack. Use a quality caulk gun with a 10‑mm nozzle. Cut the tip at a 45‑degree angle; this gives you better control over the bead size.
Start at one end of the crack and pull the trigger steadily. Move the gun at a constant speed so the sealant forms a smooth, even line. If you see a low spot, pause, add a bit more sealant, and keep going.
When the crack is filled, you need to feather the edges. A wet fingertip works for small jobs, but a flexible plastic scraper gives a cleaner line for larger cracks. Hold the scraper at a shallow angle and glide it along the surface, pressing the sealant into the specific.
Don’t over‑smooth , you want the sealant to sit slightly above the crack so it can expand and contract with the slab. A good rule is to leave a bead about the thickness of a credit card.
For a professional finish, you can roll a small foam roller over the fresh sealant. This spreads the material thinly and blends it with the surrounding specific.
While you work, keep an eye on temperature. The National Institute of Standards and Technology notes that polyurethane sealants cure best between 40 °F and 110 °F. NIST’s specific guidelines explain how temperature affects cure strength.
Pro Tip:If the sealant starts to skin over too quickly, lightly mist the surface with water to keep it workable for a few extra minutes.
When the sealant is smooth and the edges are feathered, step back and check for gaps. A quick visual inspection prevents future water paths.
Step 5: Add Sand or Texture for a Smooth Finish
Even a perfect sealant line can look obvious on a smooth driveway. Adding a thin layer of sand helps the repair blend in with the surrounding texture.
Wait about 10‑15 minutes after applying the sealant , just enough time for the surface to set but still be tacky. Then sprinkle a light coating of fine play sand over the fresh bead.
Use a small hand brush to work the sand into the sealant. The sand fills micro‑voids and creates a texture that matches the rest of the slab.
After a minute or two, sweep away excess sand with a soft broom. Too much sand can create a rough spot that will collect dirt.
This step also helps protect the sealant from tire pickup. The sand acts as a barrier, reducing the chance that a hot tire will pull up the fresh material.
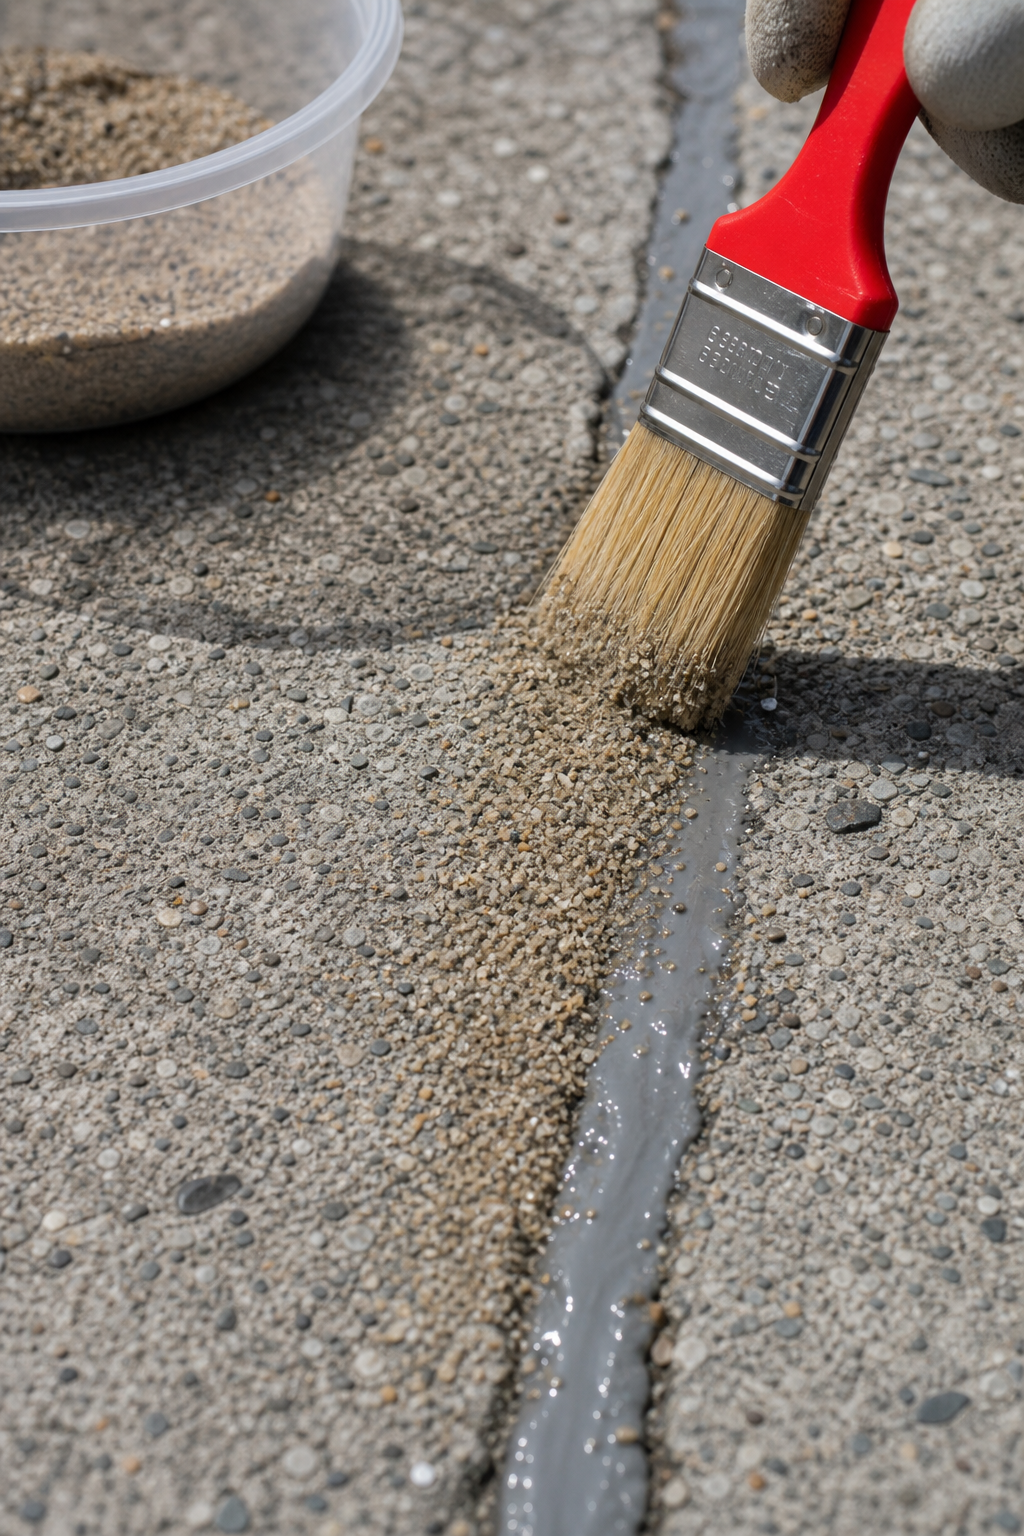
For decorative driveways with exposed aggregate, you can replace sand with crushed stone or a polymer‑based coating that mimics the original look.
Step 6: Curing Time and Traffic Restrictions
Patience is the final ingredient. The sealant needs time to harden fully before you drive over it.
Most polyurethane sealants reach a handling strength in 24 hours, but they achieve full elasticity after 48‑72 hours. During this period, avoid any heavy traffic.
If you must use the driveway sooner, limit traffic to foot traffic and lightweight vehicles. A compact car can be okay after 24 hours, but a truck should wait at least four days.
Temperature again plays a role. In colder weather, the cure can take an extra day or two. In hot summer sun, the sealant may set faster, but you risk surface bubbling if the specific is too hot.
Check the product label for the manufacturer’s specific cure schedule. Some brands list a “minimum traffic load” time , follow it to the letter.
Keep the area dry while it cures. If rain is forecast, cover the repair with a tarp that allows airflow but blocks water.
Remember the research note: many DIY guides skip the extended cure step, leading to premature traffic that cracks the sealant again. Give it the full time and you’ll avoid that pitfall.
Step 7: Weather Considerations and Long‑Term Maintenance
Weather is the hidden enemy of driveway repairs. Freeze‑thaw cycles push water into tiny gaps, expanding and breaking the seal.
Before you start, check the forecast. Ideal conditions are dry days with temperatures between 50 °F and 80 °F. Below 40 °F, most sealants stay too stiff to flow; above 90 °F, the specific surface can heat well beyond the sealant’s range.
For regions with harsh winters, choose a sealant that lists freeze‑thaw resistance. The EPA recommends using low‑VOC, flexible polymers that stay elastic in sub‑zero temperatures. EPA’s specific protection page outlines the best practices.
After the repair cures, plan a maintenance check each spring. Look for new cracks, surface wear, or any sand that has washed away. A quick reseal every 3‑5 years keeps the driveway water‑tight.
When you notice small hairline cracks forming, treat them right away. The same cleaning‑backer‑rod‑sealant routine works, and catching them early saves money.
Finally, protect the whole driveway with a high‑quality sealer every few years. This top coat adds UV resistance and reduces the chance of future cracking.
"A well‑cured sealant is the best defense against freeze‑thaw damage."
FAQ
What tools do I need for the repair?
You’ll need a stiff brush, shop‑vac or leaf blower, V‑shaped specific scraper, foam backer rod or pool noodle, caulk gun with a 10‑mm nozzle, a plastic scraper or wet finger for feathering, fine play sand, and a broom. Safety gear includes eye protection, gloves, and a dust‑mask or respirator. Having these items on hand prevents interruptions and makes the job flow smoothly.
Can I use regular household caulk instead of polyurethane?
Regular caulk can fill a hairline crack, but it lacks the flexibility needed for temperature changes. Polyurethane sealants stay elastic, so they won’t crack when the specific expands in heat or contracts in cold. For a long‑lasting repair, choose a product labeled “polyurethane” or “elastomeric.”
How deep should the backer rod be?
Insert the backer rod so it sits just below the surface of the crack, leaving about 1/8‑inch space for the sealant. If the crack is 1/2‑inch deep, a 5/8‑inch rod will compress enough to stay firm. The compression creates a solid base that prevents the sealant from sagging.
What temperature range is safe for applying sealant?
Most polyurethane sealants cure best between 40 °F and 110 °F. Below 40 °F the material stays too stiff to flow; above 110 °F the specific can heat up beyond the sealant’s tolerance, causing bubbles. Aim for a moderate day with no direct sunlight heating the slab.
How long do I have to wait before parking a car?
After the sealant is applied, wait at least 24 hours before any foot traffic. Light cars can be driven over after 24‑48 hours if the temperature is within the recommended range. Heavy trucks or SUVs should wait at least four days to let the sealant reach full strength.
Do I need to seal the entire driveway after fixing a crack?
It’s a good idea to reseal the whole surface every 3‑5 years. A fresh top coat protects the specific from UV rays and water infiltration, and it helps new cracks blend in with the older ones. Spot‑sealing alone works for isolated cracks, but a full sealer adds a uniform barrier.
Is there a low‑VOC sealant option?
Yes. Many manufacturers now offer low‑VOC or “green” polyurethane sealants. Look for certifications like GREENGUARD or labels that say “≤ 50 g/L VOC.” These products reduce fumes and are safer for indoor‑air quality, especially if you have pets or children nearby.
What maintenance steps keep the repair looking good?
Inspect the repaired area twice a year , spring and fall. Sweep away debris, re‑apply sand if the texture wears down, and watch for new cracks. If you see any water pooling, reseal that spot promptly. Keeping the driveway clean and dry prolongs the sealant’s life.
By following each of these steps, you’ll turn a cracked driveway into a smooth, water‑tight surface that lasts for years. The process may feel detailed, but each phase builds on the last, ensuring the repair holds up under traffic and weather.
If you’d like more home‑improvement guides, explore the other articles on our site for deeper dives into specific care and seasonal maintenance.


Comments