How to Repair a Cracked Garage Floor (Step-by-Step)
- William McKracherne
- 12 hours ago
- 7 min read

A cracked garage floor is more than an eyesore. It's a tripping hazard. It lets in moisture, dust, and pests. And if you ignore it, that small crack can grow into a big problem. The good news? You can fix it yourself with the right steps and a little patience. This guide walks you through exactly how to repair a cracked garage floor, from figuring out what kind of crack you have to making the repair last. No guesswork. Just clear, actionable steps.
Step 1: Assess the Crack and Gather Materials
Before you buy anything, look at the crack carefully. Not all cracks are the same. Some are just cosmetic. Others need serious work. As GarageExperts of Boise explains, you can spot settlement cracks near walls, freeze-thaw cracks that widen over time, and structural cracks wider than a quarter inch. Surface crazing, a web of fine lines, is usually harmless. But deep, uneven cracks need professional evaluation.
Measure the crack's width and depth. Use a tape measure or a crack gauge. Hairline cracks (under 1/8 inch) are simple. Cracks from 1/8 to 1/4 inch need a flexible filler. Anything wider than 1/4 inch might signal a structural issue. If the crack is also wide at the surface but narrow below, it's probably just surface crazing. If it's uniform width and deep, the concrete may have moved.
Now gather your materials. For hairline cracks: vinyl concrete patching compound or liquid crack filler. For medium cracks: epoxy injection kit or polyurethane sealant. For larger cracks: mortar mix or concrete patch. You'll also need a wire brush, a chisel or angle grinder, a vacuum cleaner, a putty knife, a mixing bucket, and safety gear (gloves, goggles, dust mask). If you plan to seal the whole floor later, pick up a concrete sealer or epoxy coating.
One more thing: check the weather. The repair needs to cure above 50°F for at least 48 hours. If it's too cold or rainy, wait. For more tips on home repairs, browse our blog at LGFMH Construction .
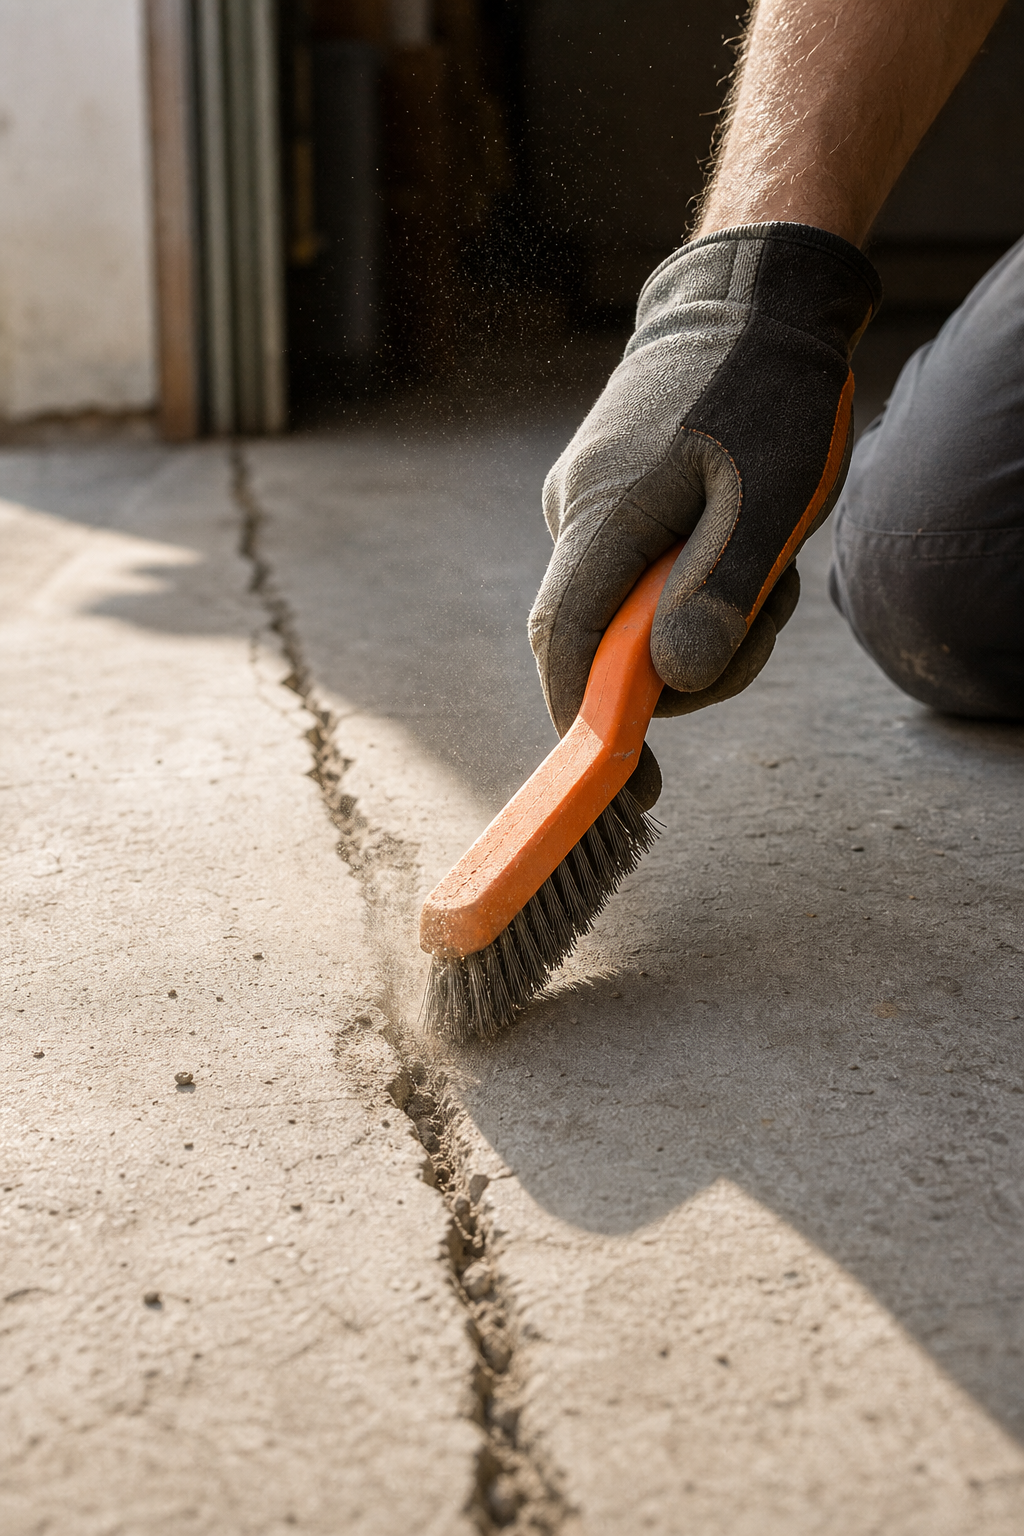
Step 2: Clean and Prepare the Crack Area
A clean crack is the secret to a repair that lasts. Dirt, grease, and loose concrete will prevent the filler from bonding. Start by removing large debris with a chisel or screwdriver. Then use a wire brush to scrub the crack and the surrounding area. Get deep into the crack if you can.
Next, vacuum the crack and the area around it. A shop vacuum with a narrow attachment works best. You want to suck out every bit of dust. If the crack is oily (common in garages), use a degreaser and scrub again. Rinse with water and let it dry completely. You can speed this up with a heat gun, but be careful not to overheat the concrete.
Now you need to open the crack slightly so the repair material can grip. Use an angle grinder with a diamond blade or a crack chaser bit to widen the crack to about 1/4 inch wide and 1/2 inch deep. This step is important for epoxy injection. For very thin hairline cracks, you can skip the grinding but still clean thoroughly.
Finally, apply a concrete bonding adhesive or a primer to the crack edges. This helps the patching compound stick. Let the primer dry as directed before moving on. If you're using an epoxy system, use the primer that comes with the kit.
According to Wikipedia's article on concrete repair , proper surface preparation is the most important factor in the success of any concrete repair. Don't rush it.
Step 3: Choose the Right Repair Method
The method you pick depends on the crack's size and whether it's still moving. Here's a breakdown:
Crack Type | Width | Best Method | Example Product |
Hairline (surface crazing) | Under 1/8" | Liquid crack filler or vinyl patch | — |
Fine crack (non‑structural) | 1/8" – 1/4" | Epoxy injection or polyurethane sealant | — |
Wide or spalled crack | Over 1/4" | Concrete patching compound (mortar mix) | — |
Active crack (still moving) | Any | Flexible sealant (polyurethane or caulk) | — |
Structural crack (with offset) | Over 1/4" | Professional evaluation (may need slab repair) | — |
For most homeowners, epoxy injection is the gold standard. It fills the crack completely and bonds the concrete back together. Polyurethane sealants work better for cracks that might move with temperature changes. For large spalls or holes, a mortar‑type patch with a bonding agent is best.
If you're not sure, start with the simplest method: a flexible concrete crack sealant for small cracks. You can always upgrade to epoxy later. But for a repair that lasts years, invest in a quality epoxy kit. The YouTube tutorial from the video above shows a professional applying epoxy injection step by step.
One more thing: if the crack is accompanied by a uneven floor or wall cracks, call a structural engineer first. A cosmetic fix won't solve a foundation issue.
Step 4: Apply the Repair Compound
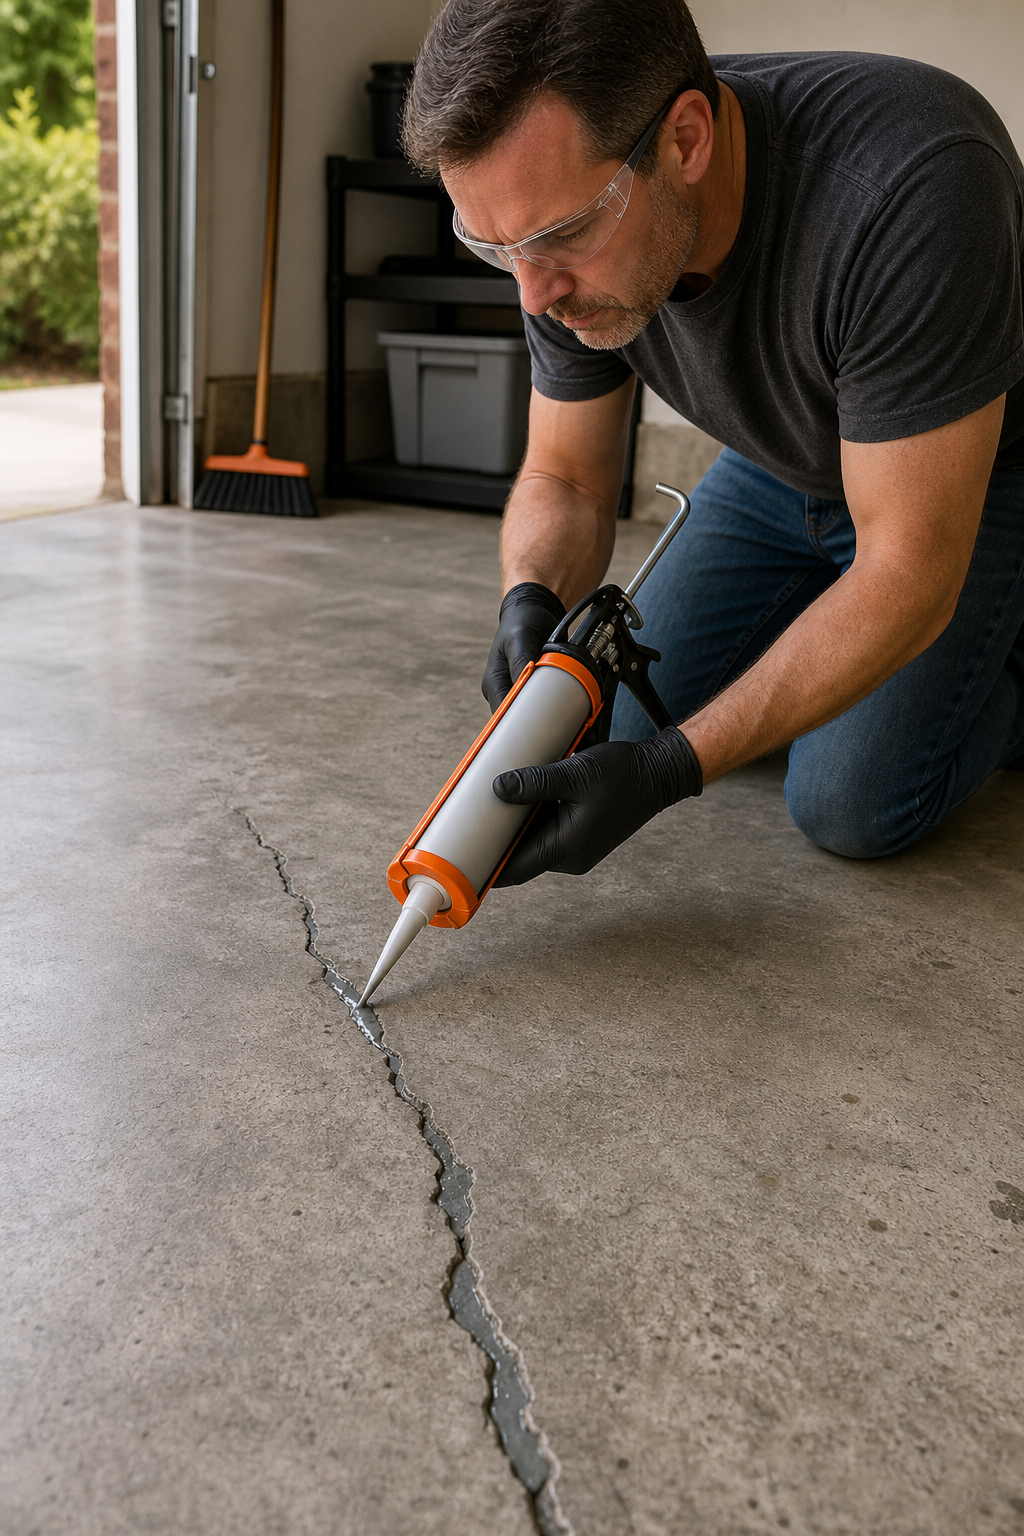
Now it's time to fill the crack. Work in a well‑ventilated area. Mix your repair material according to the manufacturer's instructions. For epoxy, that usually means mixing resin and hardener in a precise ratio. Stir for at least two minutes until uniform.
If you're using a caulk‑tube style filler, cut the tip at a 45‑degree angle and load it into a caulk gun. Squeeze a small amount onto cardboard first to check consistency. Then slowly fill the crack from one end to the other. Overfill slightly so the compound stands above the surface.
For epoxy injection, start at the lowest point of the crack. Use injection ports if the kit includes them. Squeeze until the epoxy starts to come out of the next port. Then move up. This ensures the crack fills completely.
Once filled, use a putty knife or a concrete trowel to strike off the excess. Work the compound flat with the floor. For wide patches, use a darby or a wood float to level it. Feather the edges so they blend with the surrounding concrete. Smooth as much as possible now; sanding later is hard.
Check the job for any missed spots. Add more compound if needed. Then leave it alone to cure. According to this demonstration on applying concrete repair, working quickly is important because epoxy can start to harden in 20‑30 minutes.
Step 5: Cure and Finish the Surface
Curing is not the same as drying. Concrete repair compounds need time to reach full strength. Most epoxy repairs are ready for light foot traffic in a few hours, but wait 24‑48 hours before driving a car on it. Check the product label for exact times.
During curing, keep the area protected from dirt and moisture. If the garage is dusty, lay down plastic sheeting around the patch. Avoid direct sunlight if possible. Some products require damp curing, mist the patch lightly with water and cover with plastic to keep moisture in.
After the repair has fully cured, inspect the surface. If it's slightly rough, you can sand it with a concrete sanding block (use a respirator). But most epoxy patches cure smooth enough.
Now you can apply a concrete sealer or an epoxy coating to the entire garage floor. This protects the repair and makes the whole floor look uniform. A quality polyaspartic or epoxy coating also resists oil stains and tire marks. Armor Garage's instant epoxy concrete crack repair is one option that also works as a coating.
For best results, apply two thin coats of sealer with a roller. Let the first coat dry completely before the second. This gives you a durable, easy‑to‑clean floor that resists future cracking.
If you keep your car in the garage, consider parking on a rubber mat for the first week to let the repair fully harden. And always clean up spills quickly to prevent stains.
Frequently Asked Questions
How long does a garage floor crack repair take?
The active work takes about 1‑2 hours for a single crack. But you need to account for cleaning, applying primer, and waiting for the repair to cure. Most epoxy repairs are ready for foot traffic in 4‑6 hours, but for vehicles you should wait at least 24 hours. Full chemical cure can take 7 days.
Can I just paint over a cracked garage floor?
Painting over a crack won't fix it. The crack will eventually show through, and the paint may peel. You must repair the crack first with an appropriate filler or epoxy. After the repair is cured, you can paint or coat the entire floor for a uniform look.
What's the best product for repairing garage floor cracks?
For most cracks, a two‑part epoxy injection kit is the best choice. It bonds strongly and fills deep cracks. For hairline cracks, a liquid concrete crack filler works fine. For wide spalls, use a vinyl‑concrete patching compound. Avoid standard caulk; it's not meant for concrete.
Will the crack come back after repair?
If the underlying cause hasn't been fixed, like soil settlement or heavy loads, the crack may reappear or a new one may form. Using a flexible filler or epoxy helps, but it's not a guarantee. Address any drainage issues, soil movement, or overloading to prevent recurrence.
Do I need to remove the old floor coating before repair?
Yes. The repair material won't stick to paint, epoxy, or sealant. Use a floor grinder or chemical stripper to remove the coating around the crack. Then clean thoroughly before applying the repair. For small areas, a wire brush and sanding may be enough.
Can I repair a crack in winter?
You can, but it's harder. Most repair products need temperatures above 50°F to cure properly. If your garage is unheated, wait for a warmer day or use a space heater to warm the floor. Some epoxy products work down to 40°F, but curing takes much longer.
How do I prevent future cracks?
Good drainage, proper concrete mix, and control joints help. If you're pouring a new floor, use reinforcement like wire mesh or fiber. For existing floors, seal the concrete every few years to keep moisture out. Avoid parking heavy trucks or equipment in the same spot regularly.
When should I call a professional?
Call a pro if the crack is wider than 1/2 inch, if the floor is uneven, if there are multiple long cracks, or if you see signs of structural damage (like walls cracking too). Also call if the crack keeps growing after repair. A structural engineer may be needed.
Conclusion
Repairing a cracked garage floor is a doable weekend project. You start by assessing the crack, then clean and prepare it well. Choose the right method, epoxy for most, flexible sealant for moving cracks, or patch compound for wide gaps. Apply the repair carefully, let it cure, and finish with a sealer or coating.
The key is patience. Rushing the cleaning or skipping the primer will lead to a failed repair. Improve your time, follow the product instructions, and you'll get a floor that looks good and lasts.
If the damage seems too big or you're not comfortable working with chemicals, don't hesitate to ask a pro. At LGFMH Construction , we handle interior and exterior repairs and replacements. We've seen plenty of cracked garage floors and know how to fix them right. Book online or reach out for an estimate. Your garage floor doesn't have to stay broken.


Comments