How to Install Deck Railing Balusters
- William McKracherne
- 2 days ago
- 9 min read

Hey, DIY enthusiast! Ready to turn that open deck edge into a safe, polished railing? Installing balusters is one of those jobs that looks harder than it really is. With the right method, you can finish in a weekend and avoid costly callbacks. Even seasoned DIYers sometimes skip a safety step, like checking local spacing codes, that can make or break the job. In this guide, we'll walk through every step: measuring, prepping, attaching, and finishing. You'll learn how to space balusters right, choose the best materials, and avoid rookie mistakes. Let's get started.
Step 1: Measure and Plan Baluster Spacing
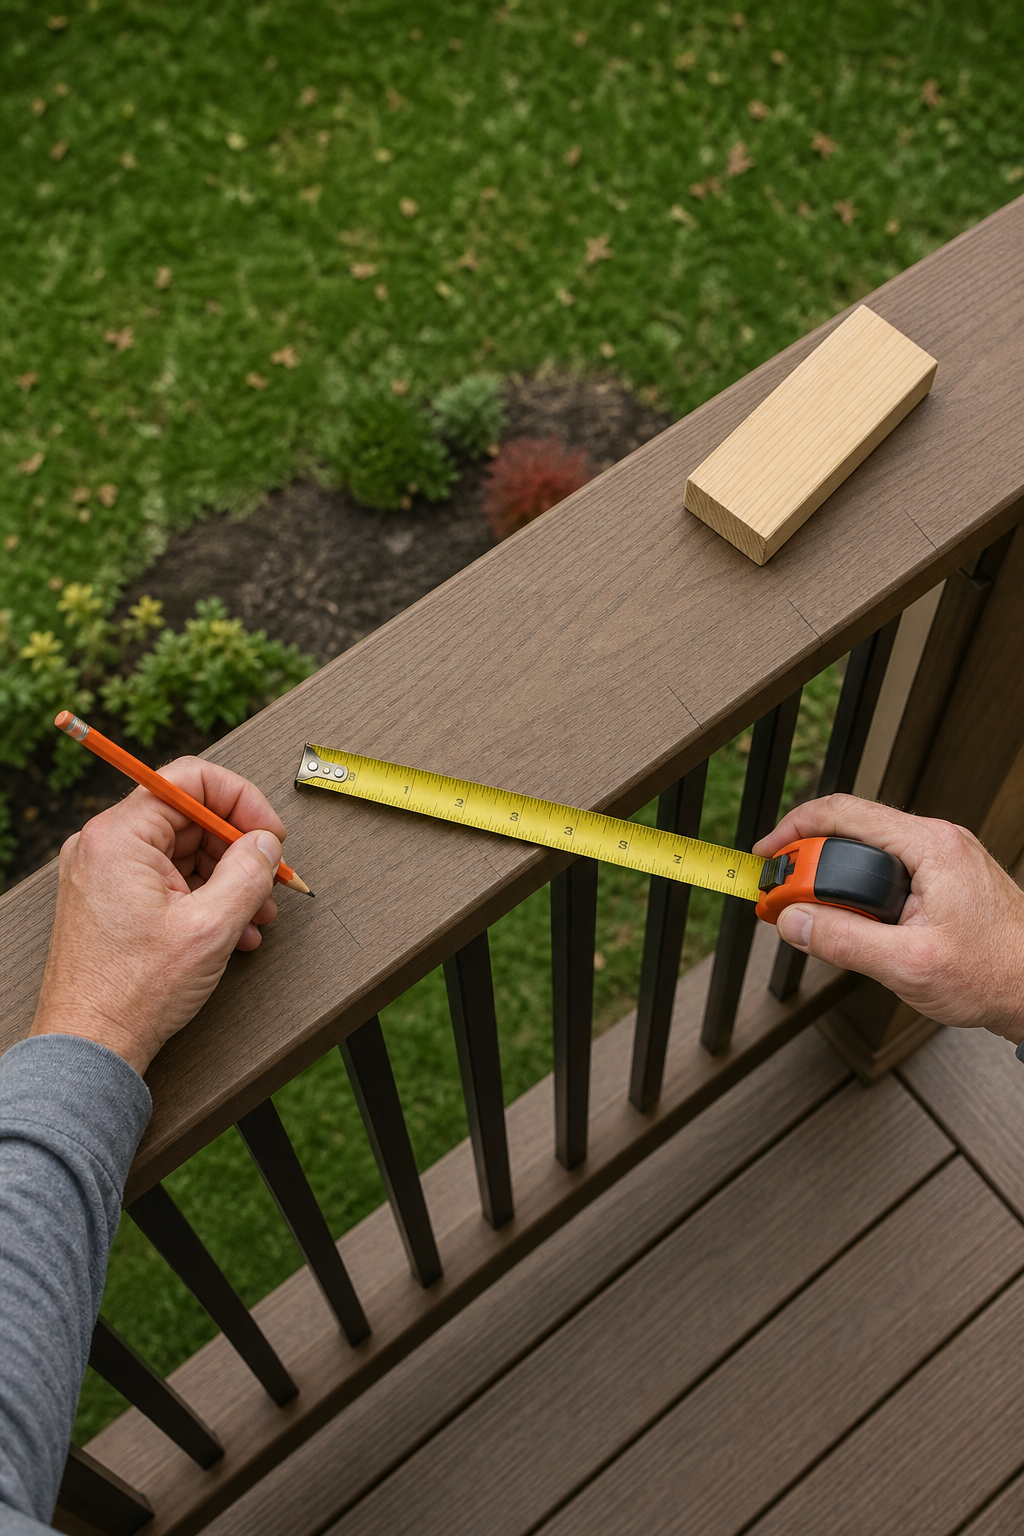
Before you pick up a single tool, you have to figure out where each baluster goes. This step is critical because building codes have strict limits on gaps. According to the International Residential Code (IRC), no opening between balusters should allow a 4-inch sphere to pass through. That means your spacing must be less than 4 inches, typically 3½ inches or 3¾ inches. But local codes can vary, some cities require tighter spacing or taller rails. Always check with your local building department before you start.
Here's a usable method: Measure the total length of the railing section between posts. Decide on a gap (say 3½ inches). Add the width of one baluster (usually 1½ inches for wood, but measure yours). Divide the total length by that sum. That tells you how many balusters you need. Adjust the gap slightly if the math doesn't land evenly. Use a scrap piece of wood as a spacer to mark each position on both the top and bottom rails.
Pro Tip:Mark the center of the rail first, then work outward. That keeps the spacing symmetrical even if the last gap ends up a bit different. A misaligned start can make the end look sloppy.
Remember, the baluster position on the top rail must match the bottom. If your rails are already installed, measure from the same reference point (like the post) on each. Use a square to transfer marks from top to bottom rail. If the rails are not yet installed, lay them side by side on sawhorses and mark them together, this is much faster and eliminates alignment errors.
One more nuance: stair railing. Stair balusters are trickier because the angle changes. The IRC allows a slightly larger 4-3/8-inch gap for stairs because of the nosing. But the same principle applies: mark from the center, use a spacer, and check each baluster for plumb. If you're doing a stair section, watch the angle; some connectors are angled to match standard stair pitches.
If you're working with a guide to trimming metal efficiently , you can apply the same measurement principles to metal balusters. Just be extra careful with rounding errors because metal balusters have less give than wood.
Key Takeaway:Plan your spacing with a test run on scrap paper. A little math now saves a lot of frustration later.
Step 2: Gather Tools and Materials
You don't need a truckload of gear, but having the right tools makes the job smoother. Here's a checklist based on what most pros use:
Balusters, wood, metal, or composite. Pick a style that matches your deck.
Top and bottom rails, usually 2x4 or 2x6 pressure-treated lumber or composite.
Posts, 4x4 or 6x6, depending on span.
Screws or nails, corrosion-resistant (stainless steel or coated).
Drill with bits, for pilot holes, especially in hardwood.
Pneumatic nailer, optional but speeds up baluster attachment if you have one.
Spacer block, a scrap of 2x4 works for 3½-inch gaps.
Level, a 4-foot level is best.
Tape measure, pencil, square.
Safety glasses, gloves, sturdy shoes, per LGFMH Construction's safety advice.
Material matters. Wood balusters are cheap but need regular sealing. Metal balusters (aluminum or steel) are strong and low-maintenance. Composite balusters resist rot and never need paint. According to Deckstoronto's comparison, aluminum is rust-proof and lightweight, while iron is stronger but prone to rust if not coated. Choose based on your climate and budget.
For tools, you might already have most of them. The one specialty item is a baluster jig or connector system if you're using metal balusters, many kits come with pre-angled connectors that simplify alignment. If you're installing glass balusters, you'll need special rubber gaskets and a glass suction cup for handling.
Pro Tip:Always buy a few extra balusters. It's common to split one while driving a screw, or realize a cut was too short. Having spares saves a trip to the store.
Step 3: Install Posts and Rails
Your railing needs solid posts to hold everything up. If you're starting from scratch, set the posts first. They should be bolted to the deck frame or mounted on the surface with brackets. Space them no more than 6 to 8 feet apart, check your local code. Make sure they're plumb in both directions and secured with galvanized lag bolts or through-bolts.
Once posts are in place, cut the top and bottom rails to fit between them. Measure each section individually because posts might not be perfectly square. For bottom rail, it's common to install it a few inches above the deck surface, often 4 inches is the code minimum gap to prevent a 4-inch sphere from passing below. But again, check your local code.
Attach the rails using angle brackets or rail connectors. Some systems use concealed hardware for a cleaner look. Use a level to ensure rails are horizontal. If your deck slopes for drainage, the railing should still be level; you'll cut the balusters to fit the slope.
If you're adding a handrail on top, install it after the balusters are in. But if you're using a combined top rail that also serves as the top member, attach it now. The key is to have a stable framework before you start placing balusters.
Watch for twists:Pressure-treated lumber often warps as it dries. Choose straight boards if you can, or let them acclimate on the deck for a few days before installation. A warped rail will make baluster alignment a nightmare.
Step 4: Attach Balusters
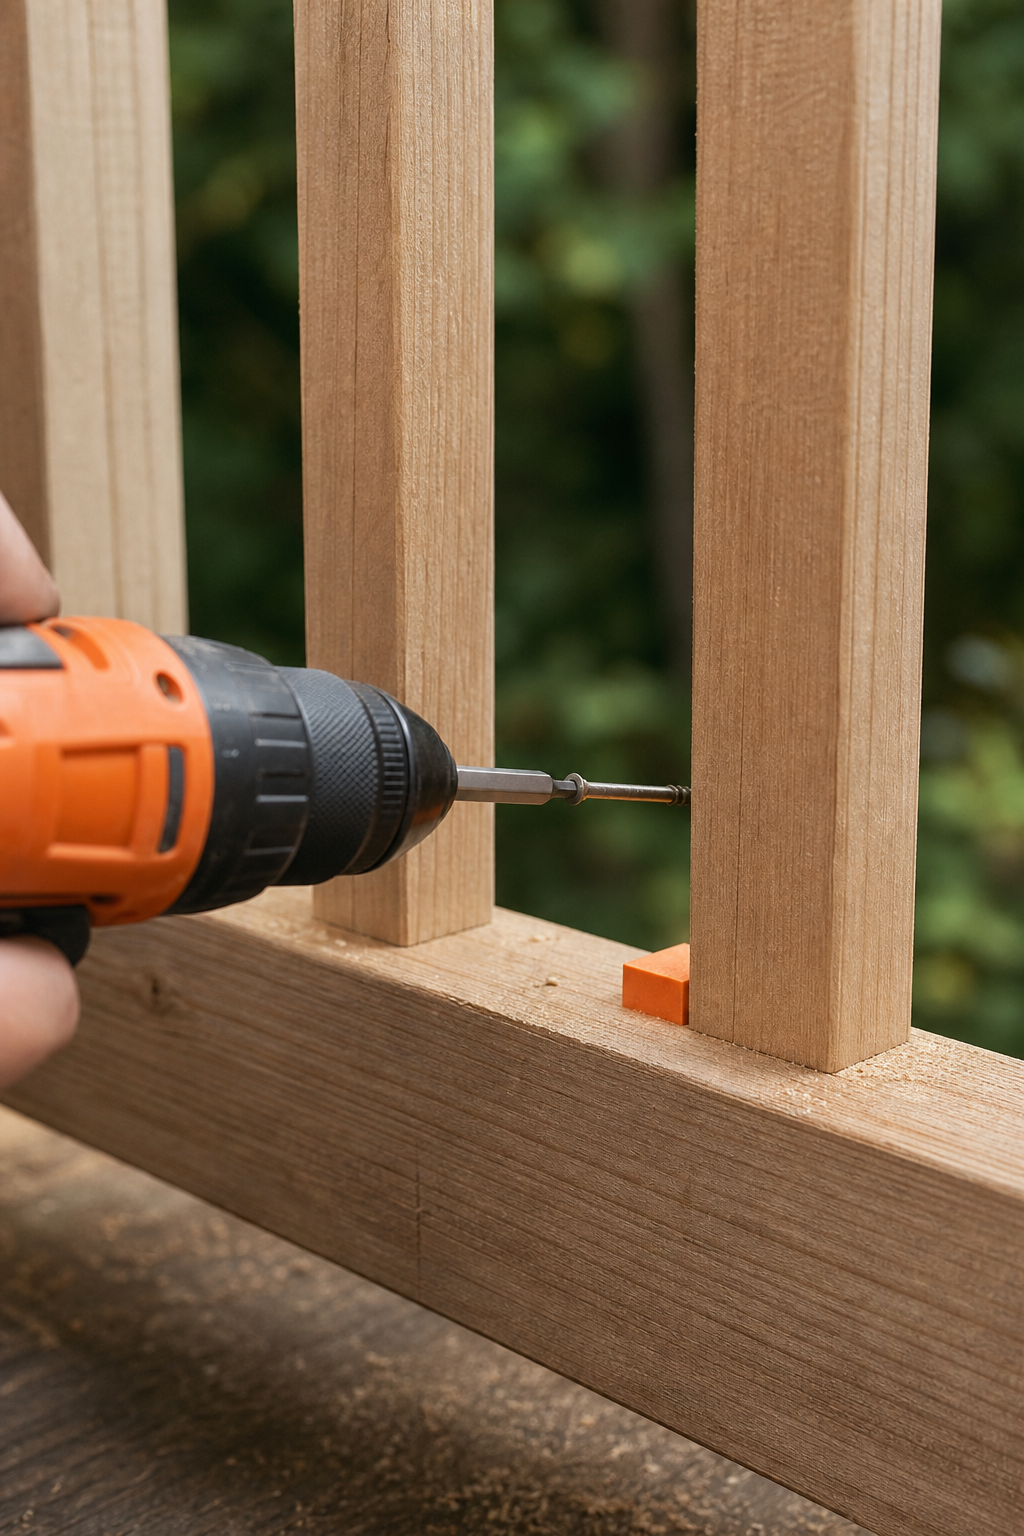
Now the real work begins. There are two common methods: screwing through the bottom of the rail into the baluster, or using connectors. We'll cover the screw method first because it's the most universal. For wood balusters, drill pilot holes at your marked positions on both rails. This prevents splitting. Drive a single screw through the bottom rail into each baluster, then through the top rail. Use 2½-inch deck screws. Make sure each baluster is plumb before driving the second screw.
For metal balusters, you'll need special connectors that screw into the rail first. The baluster then slides over the connector and is held by set screws or friction. Many kits include a plastic washer that centers the baluster and prevents metal-to-metal contact. This method is faster and looks cleaner because no screw heads are visible.
Let's compare the two methods:
Method | Pros | Cons |
Screw-through (wood) | Cheap, no extra parts, easy to replace | Screw heads visible, risk of splitting |
Connector (metal/composite) | Clean look, fast installation, less splitting | Higher cost, connectors can loosen over time |
Regardless of method, use a spacer to maintain consistent gaps. A scrap 2x4 is 3½ inches wide, perfect for 4-inch code compliance. But confirm with a 4-inch ball test after installation. If you have a child, make sure they can't squeeze through.
For angled stairs, each baluster must be cut with a compound miter at the top and bottom to match the stair slope. Measure the angle using a bevel gauge or digital angle finder. Then set your saw to that angle for both cuts. Stair baluster connectors are also angled, follow the manufacturer's instructions.
Pro Tip:If you're using a pneumatic nailer, wear ear protection and be careful of nail blowout on thin balusters. Test on a scrap piece first.
Document your project by taking photos or videos. You can upload them to UGCdrop to share your work with a community of DIYers. It's a great way to get feedback and inspire others.
Step 5: Sand, Stain, and Maintain
Your balusters are up, but they won't stay pretty forever. Wood needs protection from the elements. Start by sanding any rough edges with 120-grit sandpaper. Pay extra attention to cut ends, they soak up moisture fast. Apply a wood preservative or stain, preferably one with UV blockers. For pressure-treated wood, wait a few weeks for it to dry before staining; a moisture meter reading below 12% is ideal.
Composite and metal railing need less work. Composite can be cleaned with a mild soap and water; never use bleach or power washers on it. For aluminum, a simple rinse every few months prevents grime buildup. , you should clean composite railings twice a year, spring and fall, and inspect hardware for looseness.
For painted or stained wood, annual touch-ups are necessary. Scratches in paint can lead to rot. Use a high-quality exterior paint or stain and apply a second coat on horizontal surfaces like the top rail.
Maintenance extends the life of your railing. Every spring, tighten any loose screws and replace damaged balusters. If you live near salt water, you may need to clean more frequently. A quick check: grab each baluster and give it a light shake. If it wobbles, resecure it before it becomes a safety hazard.
Pro Tip:Keep a small can of matching stain or paint in your garage for quick repairs. A dab on a scratch now can save you an entire repaint later.
Conclusion
Installing deck railing balusters is a straightforward project that boosts both safety and curb appeal. By following these steps, measure carefully, use the right tools, attach securely, and maintain regularly, you'll get a professional result. Remember to double-check local building codes for baluster spacing and rail height; it's one of the most common mistakes DIYers make. And don't skip the PPE: gloves and safety glasses save your hands and eyes.
If you'd rather have a pro handle it, consider contacting a local contractor like LGFMH Construction for interior and exterior repairs and replacements. But if you're going the DIY route, improve your time, use a spacer, and ask a friend to help hold long sections. A second pair of hands makes a huge difference.
We hope this guide has given you the confidence to tackle your deck railing project. Share your finished work with the community, and don't forget to save a few extra screws for future adjustments. Happy building!
Frequently Asked Questions
What is the standard spacing for deck balusters?
Most building codes require that no more than a 4-inch sphere can pass between balusters. So the gap must be less than 4 inches. Common spacing is 3½ inches from center of one baluster to center of the next, assuming 1½-inch balusters. Always check your local code, as some areas require 3¼ inches.
Do I need to use pilot holes for balusters?
Yes, especially for wood. Pilot holes prevent the wood from splitting when driving screws near the end grain. Use a bit slightly smaller than the screw diameter, just a hair thinner than the shank. For hardwood balusters, predrill every hole. For softwoods like cedar, you might get away without it, but it's safer to drill.
Can I install balusters without removing existing rails?
It depends. If the bottom rail is already attached, you can insert balusters from above if there's enough clearance. But typically, you need to remove the top rail to slide balusters in place. Some connector systems allow for bottom-up installation without removing the top rail. Check your baluster manufacturer's instructions.
How do I cut balusters at an angle for stairs?
Measure the stair angle using a bevel gauge or digital angle finder. Set your miter saw to that angle and make a test cut on scrap. The top and bottom cuts will be parallel but with opposite bevels. Use a jig to hold multiple balusters at once to ensure consistent length. Pre-cut all balusters for a section before installing them.
What is the best material for deck balusters?
Wood is classic and low-cost but requires regular maintenance. Aluminum is lightweight, rustproof, and needs almost no care. Composite balusters resist rot and never need painting. Glass balusters offer an unobstructed view but require frequent cleaning. Choose based on your budget, climate, and how much upkeep you want.
How do I fix a loose baluster after installation?
If a baluster wiggles, check the screw at the bottom first. Tighten it if possible. If the screw hole is stripped, replace it with a longer screw or use a construction adhesive. For metal balusters with connectors, tighten the set screw. If the connector is loose, remove it and reattach with new screws.
How long does it take to install deck railing balusters?
For an average 20-foot section with about 15 balusters, plan for 4-6 hours if you're working alone. That includes measuring, marking, cutting, and attaching. With a helper and a pneumatic nailer, you can cut that time in half. Rushing leads to mistakes, so allow a full day for a first-time project.
Do I need a permit to install deck railing?
In most areas, replacing existing balusters doesn't require a permit, but building a new railing might. Always check with your local building department. They can provide the required height and spacing for your area. Some jurisdictions also require an inspection after installation. It's better to ask than to have to redo work.


Comments