How to Repair a Cracked Patio Slab: A Step-by-Step Guide
- William McKracherne
- Jun 7
- 11 min read

You step out onto your patio and see it: a crack running across the slab. It's not just ugly. If you ignore it, water gets in, freezes, and makes the crack bigger. You could call a pro, but that costs hundreds. The good news? You can fix it yourself with a few basic tools and a couple of hours. This guide walks you through the whole process. You'll learn how to assess the damage, clean the crack, apply the right filler, and finish the job so it lasts. No matter what kind of crack you have, you can handle it.
Step 1: Assess the Crack and Prepare the Patio
Before you grab any tools, take a close look at the crack. Not all cracks are the same. Some are thin and shallow. Others are wide and deep. Your repair plan depends on what you're dealing with.
First, measure the width. Grab a tape measure or a ruler. If the crack is smaller than 1/8 of an inch wide, it's a hairline crack. You can fill it easily with caulk or a liquid filler. Cracks wider than 1/4 inch need a thicker compound. And if the crack is more than 1/2 inch wide or you see one side higher than the other, you might have a bigger problem. That could mean the slab is settling or the base underneath is washed out. In that case, you may need to call a pro.
Here's what I mean: I once saw a crack that was thin on top but gaping underneath. Water had eroded the soil. The whole slab was tilting. No amount of caulk would fix that. So be honest about the damage. If the crack is purely cosmetic, DIY works great. If it's structural, save your time and hire someone.
Next, prepare the area. Move any furniture, pots, or rugs off the patio. Sweep away leaves and dirt. You want a clean workspace. Also, check the weather. The repair needs to stay dry for at least 24 hours. If rain is coming, wait. You can't seal a wet crack.
Another thing: wear protective gear. Concrete dust can irritate your lungs. Wear a dust mask. Also wear work gloves to protect your hands from sharp edges. Safety glasses are a good idea too.
Now, think about what kind of filler you'll need. For small hairline cracks, a simple silicone caulk works. For wider cracks, you need a concrete patching compound. Products like Sakrete or Quikrete have pre-mixed tubs or powders you mix with water. They're cheap and easy to find at any hardware store. As noted in Wikipedia's article on concrete , properly cured concrete is very durable, but cracks happen from shrinkage, settlement, or temperature changes. Understanding why the crack formed helps you choose the right repair method.
Take a photo of the crack. It helps if you need to show a professional later. Also, measure the length so you know how much filler to buy. A 10-foot crack uses about 10 ounces of caulk or one small tub of patch.
Key Takeaway:Measure the crack width and depth. Hairline cracks under 1/8 inch are easy DIY jobs. Wider or uneven cracks may need professional assessment.
Step 2: Gather the Right Tools and Materials
You don't need a truck full of gear. Most of these tools are already in your garage. Here's what you'll need for a basic patio slab repair.
Tool / Material | What It's For |
Flat-head screwdriver | Pry out loose chunks and debris |
Putty knife | Apply and smooth filler |
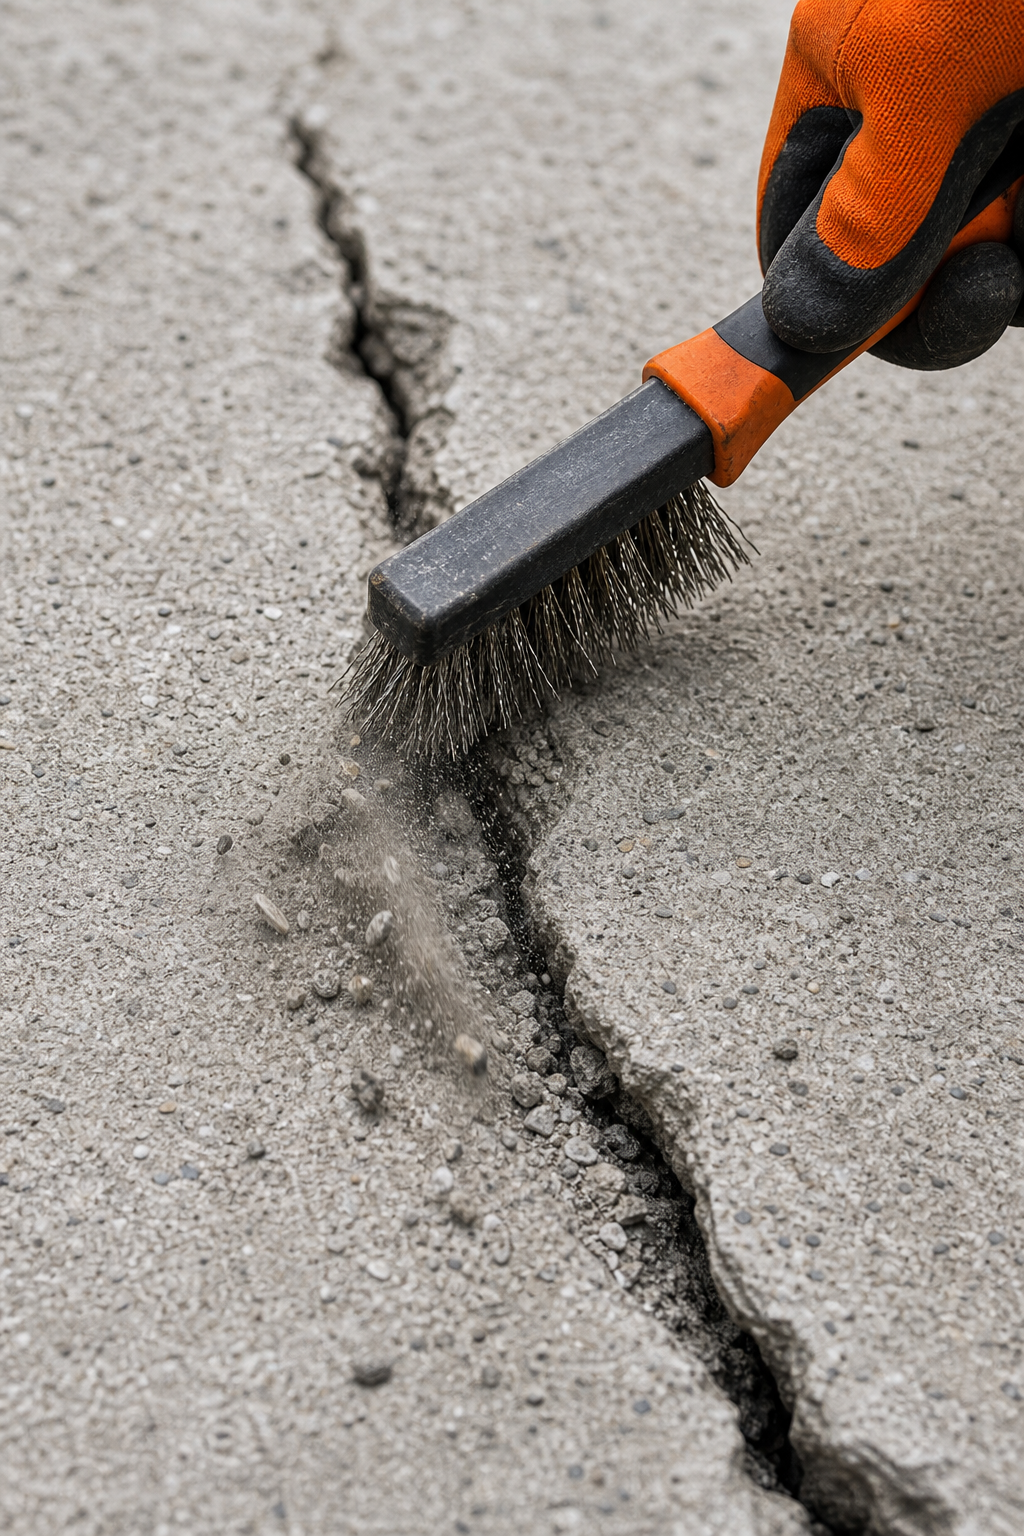
Wire brush | Scrub the crack clean |
Shop vacuum | Remove dust and small particles |
Caulking gun | Apply caulk or liquid filler |
Silicone caulk or concrete filler | Fill the crack |
Glazing tape (optional) | Mask edges for a clean line |
Isopropyl alcohol | Degrease the crack (optional) |
Dust mask | Protect lungs from concrete dust |
Work gloves | Protect hands |
Spray bottle with water | Dampen the crack before filling (for concrete mixes) |
For concrete patching, you have a few choices. Sakrete Concrete Crack Filler costs about $9 per tube. Quikrete's repair kit is similar. Both need 24 hours to cure. The cost is low, but read the instructions carefully. Some fillers require you to mix with water. Others are ready to squeeze. If you want the simplest route, pick a pre-mixed caulk that works on concrete.
There's also the method from LGFMH Construction's blog guide on home repairs . They recommend using a silicone caulk for flexibility. Silicone moves with the slab, so the crack doesn't open again. It's also waterproof. That's a big plus if your patio sees rain often.
One more thing: a putty knife with a flexible blade works better than a stiff one. It contours to the crack. Also, if you're using a powder mix, get a mixing bucket and a stirring stick. Some people use an old wooden spoon. That's fine.
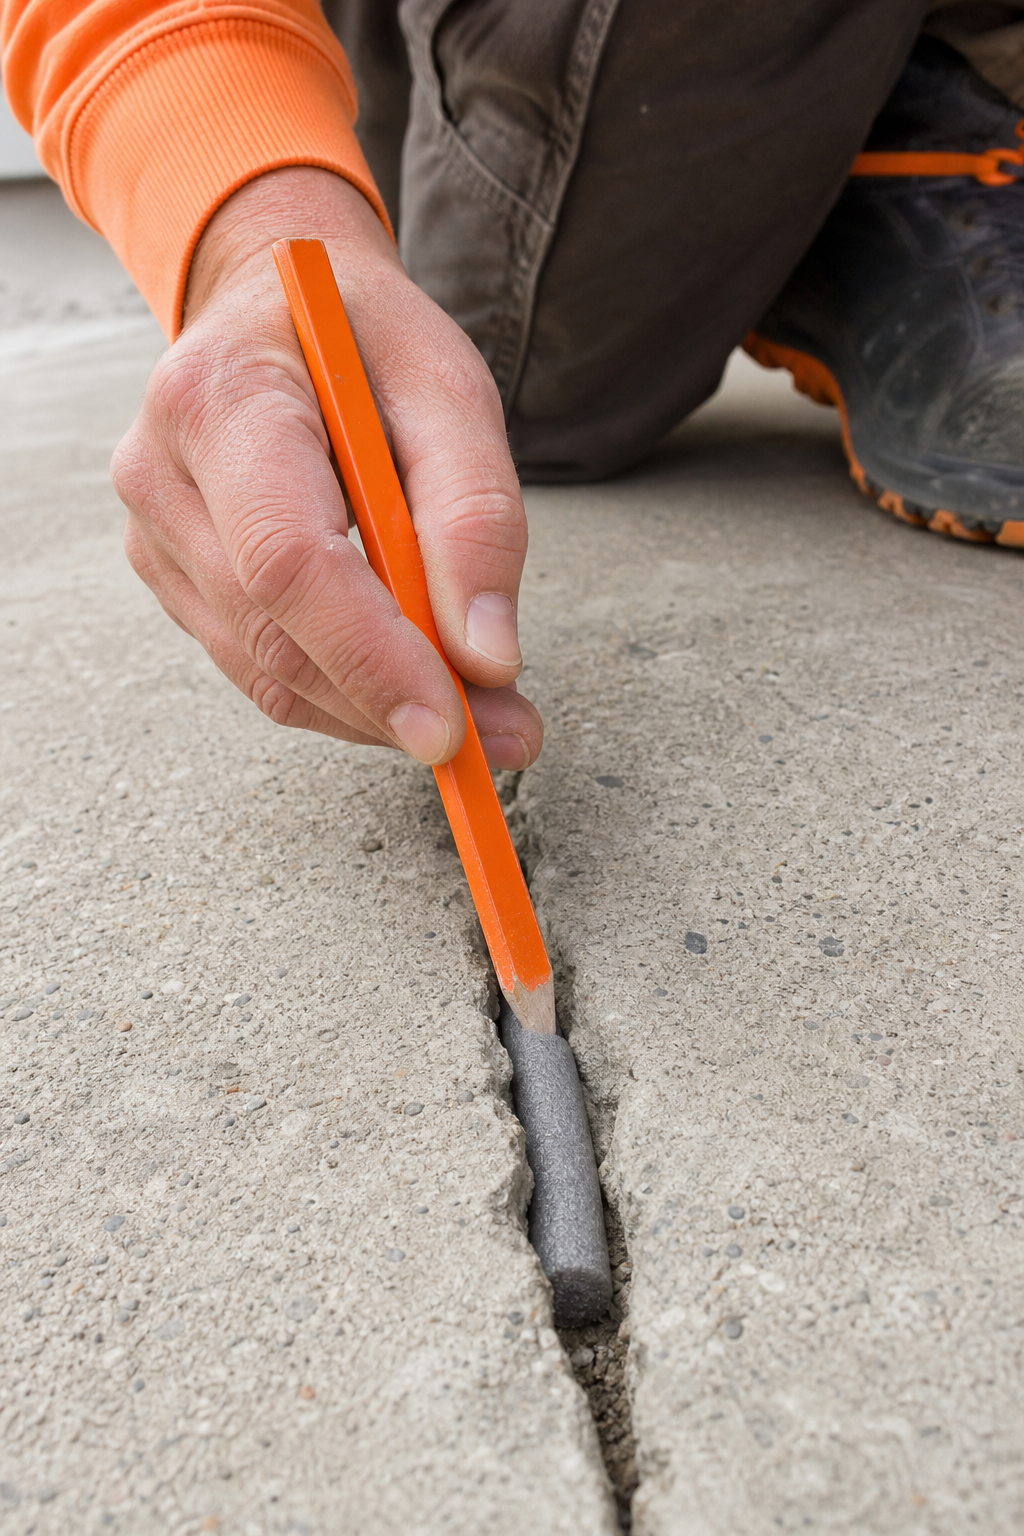
For very deep cracks, you might need a backer rod. That's a foam rope you stuff into the crack first. It saves filler and allows the top layer to flex. Hardware stores sell it by the foot.
Pro Tip:Buy a little more filler than you think you'll use. It's better to have leftovers than run out halfway. Most tubes are returnable if unopened.
Step 3: Clean and Prep the Crack for Repair
Cleaning is the most important step. If the crack is full of dirt, the filler won't stick. It will pop out in a few weeks. You need a clean, dry surface for the repair to hold.
Start with the flat-head screwdriver. Pry out any loose chunks of concrete. Be gentle. You don't want to widen the crack. Get all the gravel and pebbles out. Then use the wire brush. Scrub vigorously along the length of the crack. This removes dust, moss, or old caulk residue.
Next, vacuum the crack. A shop vacuum with a crevice tool works best. Suck up every bit of dust. If you don't have a vacuum, use a can of compressed air. But a vacuum is more thorough. Run it back and forth several times.
Now it's time to wash the crack. Use a hose with a spray nozzle. Spray water directly into the crack. The water will carry out any remaining dirt. Let it drain. If the crack is deep, the water might pool. Use the vacuum to suck it out. Then let the crack dry completely. Wait at least 2 hours, longer if it's humid.
Here's a trick: pour a little isopropyl alcohol into the crack. It dries fast and also kills any mold or algae. The alcohol evaporates quickly, so the crack is ready in 15 minutes. This step is optional, but I recommend it for cracks that were damp or had moss.
Once the crack is bone dry, do a final check. Run a finger along the crack. If you feel dust, vacuum again. The surface inside the crack should be clean concrete. If it's smooth and dusty, it won't bond. You want a rough surface so the filler can grip.
If your crack is in a shaded area or the weather is cool, drying takes longer. Use a hair dryer or heat gun on low to speed it up. But don't overheat the concrete; it can crack more.
Finally, if you're using a concrete patching compound, you need to dampen the crack before applying. Lightly mist the inside with a spray bottle. The water helps the patch cure properly. Don't soak it, just a light spritz. Then wait 10 minutes. The crack should look damp but not wet.
Key Takeaway:A clean, dry crack is the difference between a repair that lasts a few months and one that lasts years. Spend time on this step.
Step 4: Apply the Repair Compound
Now the real work begins. How you apply the filler depends on what you chose. Let's look at two common methods: using a silicone caulk tube and using a concrete patching compound.
Using Silicone Caulk or Tube Filler
Cut the tip of the nozzle at a 45-degree angle. Make the opening the same width as your crack. Start at one end of the crack. Squeeze the trigger and move the gun slowly along the crack. Fill it completely. Overfill a little so the filler is slightly above the surface. Don't worry about the extra. You'll smooth it later.
If the crack is deep, apply the filler in layers. Fill halfway, let it set for 10 minutes, then fill the rest. This prevents shrinkage bubbles. For cracks deeper than 1/2 inch, use a backer rod as mentioned earlier.
Using Concrete Patching Compound (like Sakrete or Quikrete)
Mix the powder with water according to the package. Use a mixing stick. The consistency should be like thick peanut butter. Not runny. Scoop the mix with a putty knife and press it into the crack. Use the flat side to force it deep. Then scrape off the excess. You want the mix to fill the crack completely, no air pockets.
For wide cracks, use a margin trowel. It's wider and can push more material. Some products require you to wet the crack first. Check the label.
Here's a tip from a YouTube demo I watched: after applying, tap the surface with the putty knife. This settles the material and releases trapped air. Then smooth it flat with the knife edge. Work the knife at a slight angle to feather the edges. Feathering means making the patch blend into the surrounding concrete.
Whether you use caulk or mix, the goal is to overfill slightly. The filler shrinks a bit as it cures. If it's level now, it will be below the surface tomorrow. So put on a little extra.
For small hairline cracks, you can use a liquid crack filler that drips into the crack. It's self-leveling. Just pour and let it flow. It's the easiest method but only works for very thin cracks.
Now, watch this video for a visual demonstration of the process. It shows exactly how to apply and smooth a concrete sealant.
Pro Tip:If the filler starts to skin over before you finish smoothing, wet the putty knife slightly. A damp knife glides smoothly and doesn't stick.
Step 5: Finish, Seal, and Cure the Repair
You filled the crack. Now you need to make it look good and last. The final steps are finishing, sealing, and curing. Skip any of them and your repair may fail early.
Smooth and Shape
After filling, use the putty knife to scrape off the excess. Hold the blade at a 30-degree angle and drag it across the crack. The goal is to leave the patch slightly high, about 1/16 inch above the surface. This allows for shrinkage. If you fill level now, it will sink below.
For a neater look, you can use a finishing trowel for large areas. But for a single crack, a putty knife works fine. Work from one end to the other in one smooth pass. If there are ridges, wipe the knife clean and go over it again.
Let the patch sit for 10 minutes. Then check for any low spots. If you see dips, add a little more filler and smooth again. This is your only chance to correct it before curing.
Seal the Patch
Once the filler is smooth and slightly dry to the touch, apply a concrete sealer over the repair. Sealer protects the patch from water and UV rays. It also makes it blend in with the rest of the patio. Use a small brush or spray can. Just cover the patched area and a thin band around it. Let the sealer dry according to the instructions, usually about 2 hours.
Why seal? Water is the enemy of concrete. When water seeps into a patch and freezes, it expands and pushes the filler out. Sealer stops water from getting in. It also prevents stains from dirt or oil.
Curing Time
The most common mistake is walking on the repair too soon. Most fillers need 24 hours to cure fully. Some products need 48 hours. Read the label on your filler. During that time, keep the area dry. If it rains, cover the patch with a plastic sheet and weigh it down with rocks.
If you used a concrete mix, you should mist the patch lightly after 12 hours. This keeps it from drying too fast and cracking. Don't soak it. Just a fine mist.
After the cure time, inspect the patch. It should be hard and flush with the surface. If it's slightly below, you can apply a second thin coat. Just clean the patch, apply new filler, and smooth it. Then reseal and cure again.
For a professional result, some people use a concrete stain to match the color of the old slab. But for most homeowners, the patch blends well, especially if you feather the edges. Over time, weathering helps it match.
If the crack is large, you might want to add a decorative element over the repair, like a stepping stone or a planter. But that's optional. The repair itself is strong.
Key Takeaway:Curing is non-negotiable. Wait 24-48 hours before using the patio. Temperatures below 50°F slow curing, so you may need more time.
FAQ
Can I repair a cracked patio slab myself?
Yes, you can. Most hairline and medium cracks are within reach of a DIYer. You need basic tools like a putty knife, wire brush, caulking gun, and filler. The job takes about 2 to 3 hours plus 24 hours curing time. If the crack is wider than 1/2 inch or the slab has uneven edges, you might need professional help to fix the underlying issue.
What is the best filler for concrete cracks?
For small cracks, silicone caulk works great because it stays flexible. For wider cracks, a concrete patching compound like Sakrete or Quikrete is better. These products cost about $9 per tube or tub. They need 24 hours to cure and can be sanded or painted. If you want a one-step option, pre-mixed concrete crack filler in a tube is simple and effective.
How long does concrete crack repair take to cure?
Most fillers reach full strength in 24 to 48 hours. During that time, keep the area dry and avoid walking on it. Temperature matters. In warm weather above 60°F, curing is faster. Below 50°F, it can take double the time. Some liquid fillers are dry to the touch in an hour but still soft inside, so wait the full recommended time.
Do I need to seal the repair?
Yes, sealing is recommended. A concrete sealer protects the patch from water, freeze-thaw cycles, and UV damage. It also helps the patch blend with the rest of the slab. You can buy a small spray can for about $10. Apply it after the filler cures. If you skip sealing, the repair may crack again within a year.
Can I use silicone caulk on concrete cracks?
Yes, silicone caulk works well for thin cracks. It bonds to concrete, stays flexible, and won't shrink. Make sure it's labeled for concrete or masonry. General purpose silicone is fine. Avoid acrylic caulk because it can crack with movement. Apply it with a caulking gun and smooth it with a wet finger or putty knife.
What if the crack is structural?
If the crack is wider than 1/2 inch, or one side of the slab is higher than the other, the problem may be the ground underneath. This is called settling or heaving. Filling the crack won't fix it. You need a professional to assess the foundation. Techniques like slabjacking or polyurethane injection can lift the slab back into place. Those are not DIY projects.
How much does it cost to repair a cracked patio slab?
DIY repair costs between $10 and $30 for materials: a tube of caulk or a tub of concrete patch, plus a sealer. If you need to buy tools like a caulking gun or putty knife, add $10 to $15. Hiring a pro costs $200 to $500 or more depending on crack complexity and location. So DIY saves a lot, but only if the crack is simple.
When should I call a professional?
Call a pro if the crack is wider than 1/2 inch, the slab is sinking or tilting, or you see multiple parallel cracks. Also call if the crack is near the house foundation, or if water pools on the patio after rain. A professional can evaluate the soil and slab condition and recommend slabjacking or replacement. It's better to get an opinion than to patch something that needs a bigger fix.
Conclusion
So there you have it. You can repair a cracked patio slab yourself with a few tools and a little patience. Start by checking the crack. Clean it well. Pick the right filler. Apply it carefully. Then let it cure. Sealing it makes the job last. Most of the time, a simple DIY fix will keep your patio looking good for years.
If you run into a crack that feels too big or you're not sure about the damage, it's okay to call a pro. Sometimes the ground underneath needs work. But for the common hairline or narrow crack, you've got this.
Need more home repair tips? on working with plaster for interior fixes, or browse their portfolio for inspiration. And if you decide to hire a professional for any exterior repair, LGFMH Construction offers interior and exterior repair services to help you out.
Now go take a look at that crack. You know what to do.


Comments