How to Repair a Cracked Vinyl Siding Seam
- William McKracherne
- May 24
- 11 min read

Updated: May 25
You walk outside one morning and spot it: a cracked seam in your vinyl siding. Maybe it's from a stray baseball, a storm, or just age. That little crack can let water in, cause more damage, and make your home look rough. But here's the good news. Fixing it isn't as hard as you think. With the right steps, you can seal that seam and have it looking good again. In this guide, I'll walk you through each step: how to check the damage, what tools you need, how to clean the area, apply sealant, and finish it off. You don't need to be a pro. You just need a bit of time and the right approach.
Step 1: Assess the Crack and Siding Condition
Before you grab any tools, take a close look at the crack. Not all cracks are the same. Some are tiny and only affect the surface. Others go deep and might mean the panel is loose or damaged underneath. Start by running your finger over the crack. If it's smooth and thin, it might just be a surface seam that can be sealed. But if you feel a gap or see the panel lifting, you could have a bigger problem.
Check the area around the crack. Look for signs of moisture, rot, or mold. If the siding feels soft or looks discolored, water may have already gotten in. That means you might need to replace the panel instead of just sealing it. Also, check if the crack runs along the seam where two panels lock together. Seam cracks are common because that's where the siding flexes the most.
Here's a quick table to help you decide what kind of repair you need:
Crack Type | Length | Panel Condition | Recommended Fix |
Hairline seam crack | Under 2 inches | Solid, no water damage | Sealant only |
Wider gap (1/8 inch or more) | 2-6 inches | Panel still tight | Backer rod + sealant |
Multiple cracks or hole | Any | Possible water stain | Patch or replace panel |
Crack with panel lifting | Any | Loose nail hem | Re-secure and seal |
Improve your time with this step. A good assessment saves you from doing the wrong repair. If the crack is small and the panel is firm, you're good to go with a simple seal. If you see any bulging or soft spots, consider a full panel replacement. For that, you might want to look into a professional service like siding fascia and soffit repair from LGFMH Construction .
Remember, the cost of repair varies. According to a guide on siding repair costs , vinyl repairs typically run $2-$12 per square foot. Small DIY fixes can cost under $10. But if you need a pro, budget $200-$800 for small patches.
One more thing: check the weather. Sealant works best when the temperature is above 50°F and dry. If it's too cold or rainy, the sealant won't stick right. Wait for a good day.
Key Takeaway:Assess the crack carefully before deciding on a repair. A small surface crack is easy to seal, but deeper issues may need panel replacement.
Step 2: Gather the Right Tools and Materials
Having the right tools makes the job go smoothly. You don't need a ton of stuff. Most items you can find at a hardware store or online. Here's what you'll likely need for a basic seam repair.
First, you need a vinyl siding sealant. Look for one that is flexible and paintable. Many pros use a silicone-based or polyurethane sealant. Brands like GE Silicone II or DAP Dynaflex work well. You'll also need a caulking gun to apply it. A simple manual gun is fine.
Next, get a utility knife or a siding removal tool. A utility knife helps you cut away any loose bits. A siding removal tool, which costs under $10, helps you pop the panel loose if you need to get behind it. You might also need a putty knife to smooth the sealant.
For cleaning, grab a bucket, mild soap (like dish soap), and a stiff-bristle brush. A clean rag or sponge helps wipe the area dry. Rubbing alcohol is good for degreasing. If the crack is wide, you might need a backer rod (a foam rope) to fill the gap before sealing.
Mitten, a siding manufacturer, has a handy checklist of tools for vinyl siding installation that overlaps with repair needs. They mention a hammer, level, chalk line, tape measure, and more. For a simple seam repair, you won't need all that. But if you're replacing a panel, those extra tools come in handy.
If you want a fast fix, there are repair kits like the Mendyl Vinyl Siding Repair Kit. It's a self-adhesive patch you cut to size. s, it works well for small holes and cracks, but it's more of a temporary cover. For a permanent seal, I recommend using a proper sealant.
Also, think about safety. Wear gloves to protect your hands from sharp edges. Safety glasses aren't a bad idea if you're cutting or scraping. And if you're working on a ladder, make sure it's stable.
Pro Tip:Buy a caulking gun with a comfortable grip. Your hand will thank you after applying sealant along a long seam.
Step 3: Clean and Prepare the Repair Area
Now that you have your tools, it's time to prep. Cleaning the crack is important. If dirt, dust, or old sealant is left behind, the new sealant won't stick. Start by scraping away any loose material. Use your utility knife or a putty knife to gently remove flaking paint or old caulk. Be careful not to gouge the vinyl.
Next, wash the area. Mix a little dish soap with water in a bucket. Dip your brush and scrub the crack and the area around it. You want to get rid of any grime, mildew, or pollen. Rinse with clean water from a hose or a wet rag. Let it dry completely. Even a little moisture can ruin the bond.
For extra insurance, wipe the crack with a cloth soaked in rubbing alcohol. This removes any oily residue. Let the alcohol evaporate for a few minutes. Also, dry the area with a clean towel. It should be bone-dry before you apply anything.
CertainTeed, a major siding brand, has a guide on cleaning vinyl siding that recommends using a soft cloth and mild detergent. They warn against harsh chemicals that can damage the finish. Stick to gentle cleaners.
While you're at it, check the area around the crack for any loose nails or fasteners. If the panel feels loose, you may need to re-secure it. Use a siding removal tool to pop the panel out and check the nail hem. Drive a new nail if needed, but don't overtighten. Vinyl needs room to expand and contract.
If the crack is wide, now is the time to insert a backer rod. Push it into the gap so it sits about 1/4 inch below the surface. This gives the sealant a backing and prevents it from sagging into the wall cavity.
“A clean, dry surface is the secret to a repair that lasts.”
Improve your time. Rushing the prep is the number one reason sealant fails later. I know it's tempting to just squeeze the tube and go, but spending 15 minutes cleaning will save you from redoing the job in a few months.
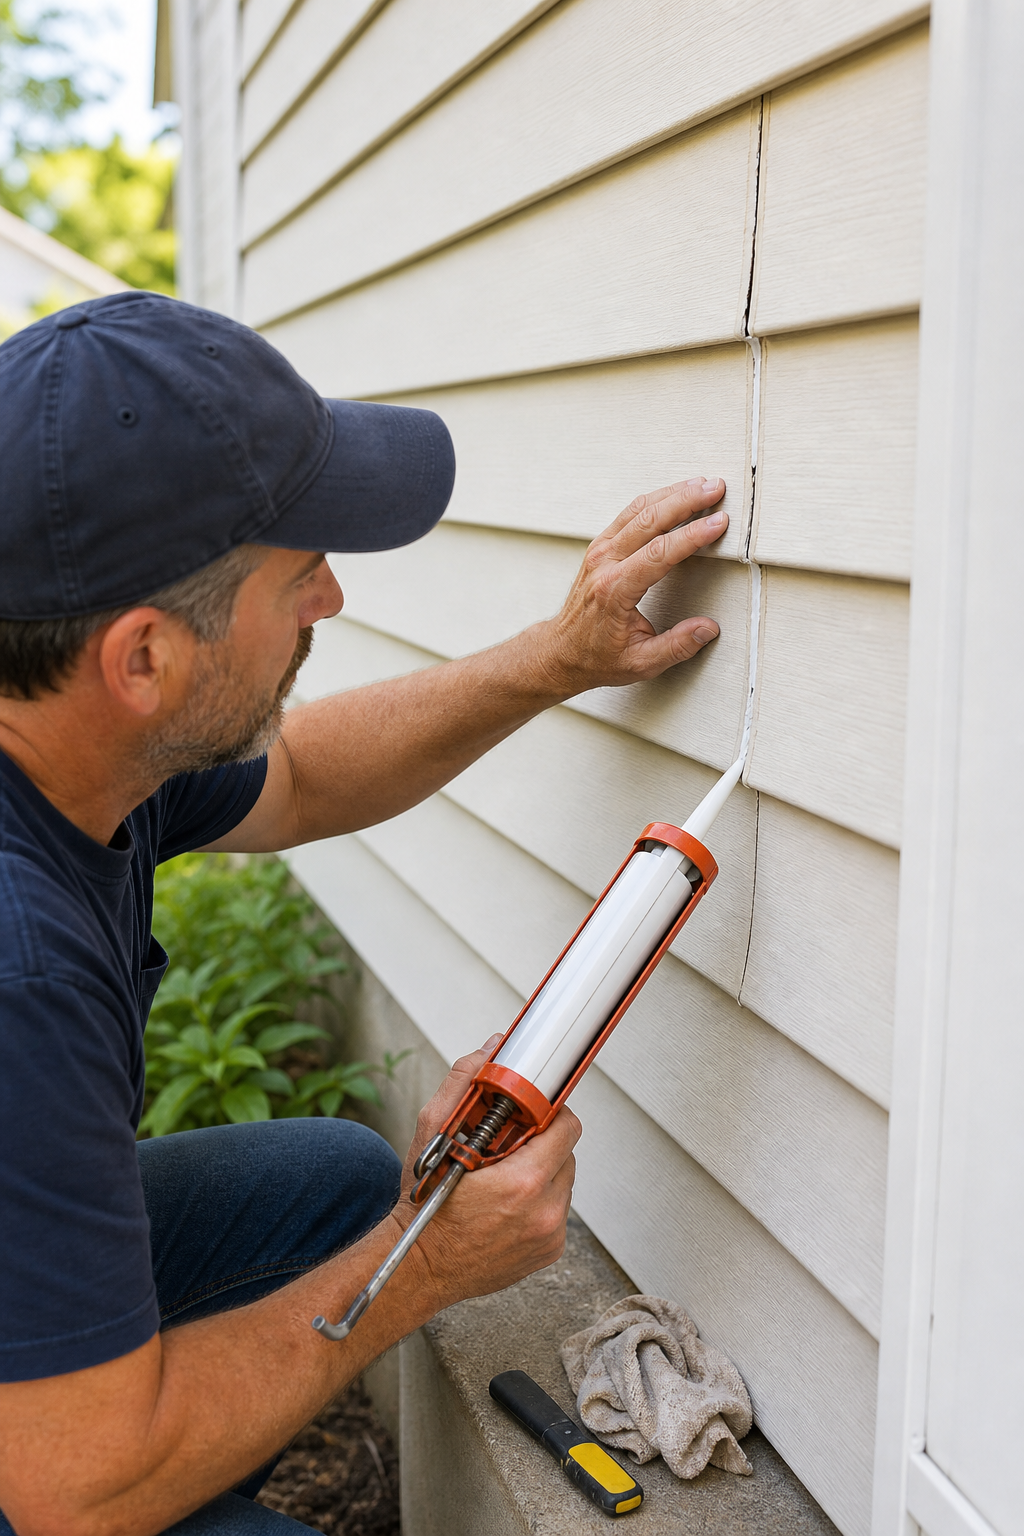
Step 4: Apply the Vinyl Siding Sealant
Now the main event. Load your caulking tube into the gun. Cut the tip at a 45-degree angle, about 1/4 inch from the end for a standard bead. Puncture the inner seal with a long nail or the gun's built-in puncturer. Practice on a scrap piece of cardboard to get a feel for the pressure.
Position the gun so the tip is right over the crack. Start at one end and pull the trigger steadily. You want a continuous bead of sealant that fully fills the crack. Don't go too fast or you'll get gaps. For vertical cracks, work from bottom to top. For horizontal seams, start at one end.
If the crack is longer than a few inches, it's okay to stop and start. Overlap the beads slightly to avoid voids. The goal is to fill the crack completely, but not leave a huge blob. A bead about 1/8 inch thick is usually right.
Some sealants are self-leveling, meaning they'll flatten out on their own. Others stay thick and need to be smoothed. Check the label. If you need to smooth it, you can use a wet finger or a putty knife. Dip your finger in soapy water and gently run it along the bead. This shapes it and removes excess.
For a more professional look, use a small spatula or a specially shaped caulking tool. You can find these at hardware stores. They have a curved edge that matches the profile of the siding, so the sealant blends in better.
What if the crack is at a seam where two panels overlap? You want the sealant to go into the joint but not so much that it pushes the panels apart. Apply a thinner bead and then press the panels together gently for a few seconds. This helps the sealant lock them together.
If you're using a patch kit like Mendyl, follow the kit instructions. Typically, you cut the patch to fit, peel the backing, and press it onto the clean siding. Rub it firmly so it conforms to the texture. This works for small holes but isn't as durable as sealant for long cracks.
Don't forget to check the forum discussions. Some homeowners on NACHI recommend using elastomeric sealant for flexibility. A dab of silicone adhesive can also work for tiny cracks. But stick with a product labeled for exterior use on vinyl.
Once applied, do a quick visual check. Make sure there are no air bubbles or thin spots. If you see any, add a little more sealant and smooth it out.
Key Takeaway:Apply sealant in a smooth, continuous bead. Smooth it while still wet for a clean finish that blends with the siding.
Step 5: Smooth, Finish, and Allow to Cure
You've got the sealant in place. Now it's time to make it look good and set properly. The first thing: smooth the bead. Use a wet finger or a caulking tool to shape the sealant. Work quickly because many sealants start skinning over in 5-10 minutes. If you wait too long, it becomes gummy or stringy.
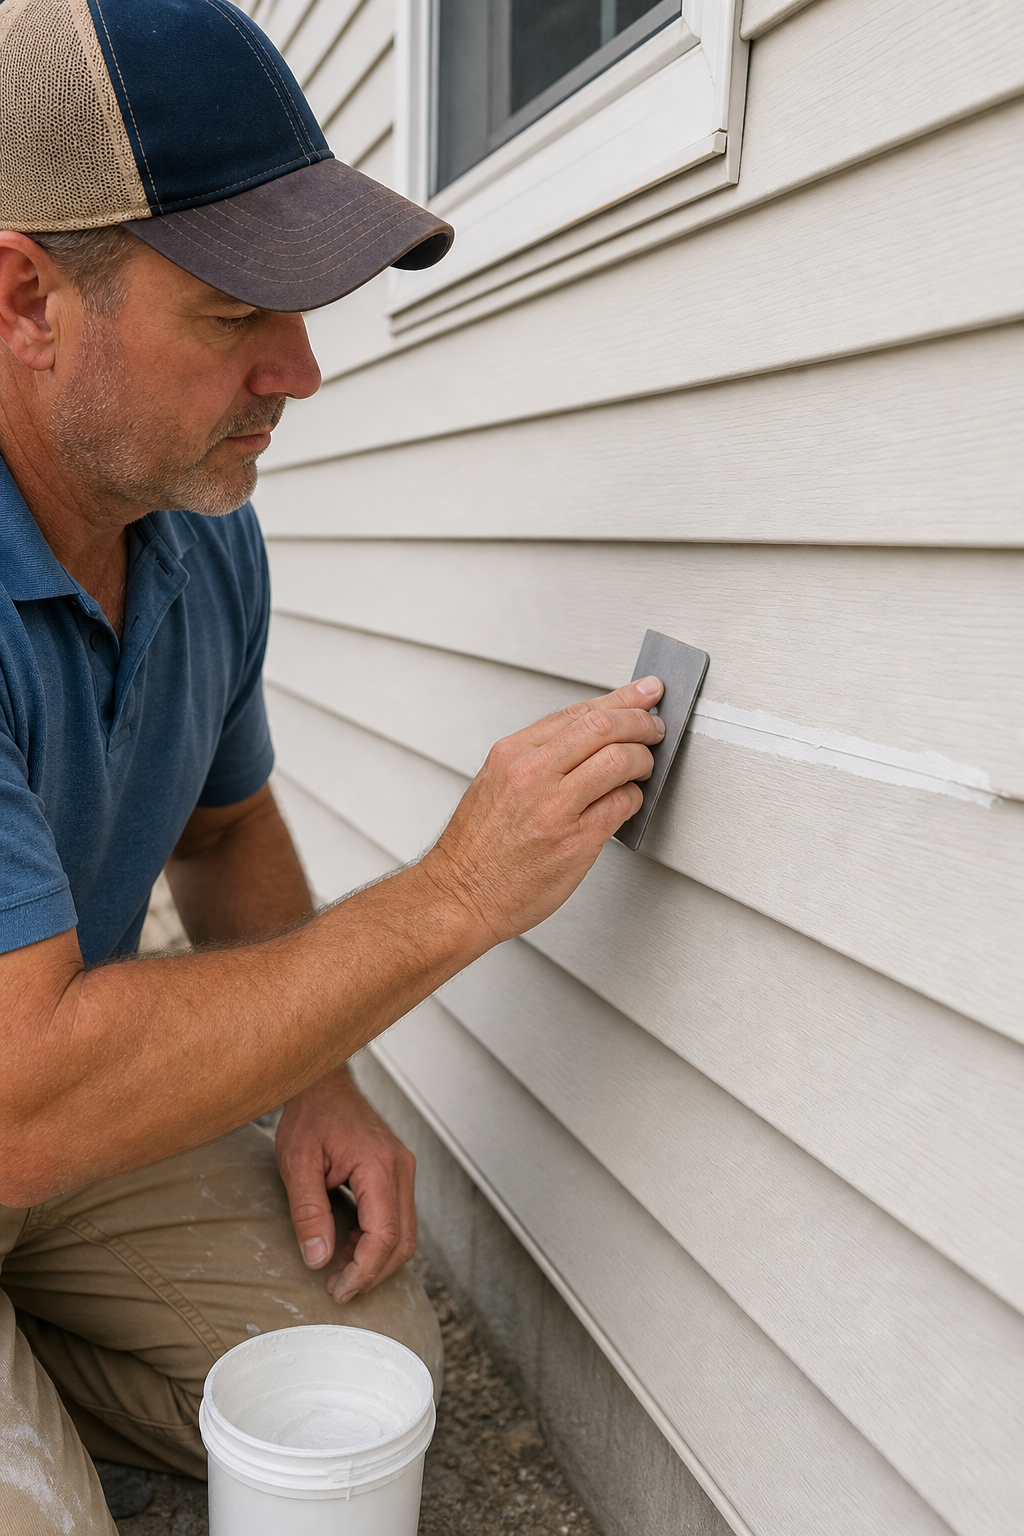
If you get sealant on the face of the siding, wipe it off immediately with a damp rag. Dried sealant is hard to remove and can look messy. Keep a bucket of clean water and a rag handy.
For a textured finish that matches the siding grain, you can use a small brush or a sponge to dab the sealant lightly. This works best with paintable sealants. Let it set for a minute, then dab. It won't be perfect, but from a few feet away, it'll blend in.
Now, let it cure. Check the manufacturer's instructions for drying time. Most sealants need 24 to 48 hours to fully cure. Some are paintable in 4 hours. During curing, avoid touching the seam. Keep water away. If it rains, cover the area with a tarp or postpone the job.
Temperature matters. Sealant cures faster in warm, dry conditions. If it's cooler than 50°F, the cure time doubles. In very humid weather, it can take longer. Plan to do the repair when you have a couple of days of good weather ahead.
Once the sealant is fully cured, inspect it. Does it look smooth? Is there any shrinkage? If the bead has shrunk into the crack, apply a second thin layer. This is common with some silicone sealants. Let it cure again.
You can paint over the sealant if needed. Use a high-quality exterior paint that matches your siding color. Apply it with a small brush. Paint helps the repair blend in and adds another layer of protection.
After your repair is done, think about the bigger picture. A well-maintained home exterior adds value. If you're planning other upgrades, like a new small backyard pool , a fresh siding repair makes everything look cohesive.
For ongoing maintenance, consider hiring a property care service like Customer Service & Maintenance from CRS to keep your exterior in top shape. They can handle regular inspections and minor fixes.
Finally, stand back and admire your work. You've just sealed that crack and protected your home from moisture. It's a satisfying feeling to fix something yourself.
Frequently Asked Questions
Can I repair a cracked vinyl siding seam myself?
Yes, most homeowners can handle a small seam crack. The process involves cleaning the area, applying a flexible exterior sealant, and smoothing it out. For larger cracks or if the panel is damaged, you might need to replace the panel. But for a simple seam, it's a straightforward DIY job. Just follow the steps carefully and give the sealant enough time to cure.
What kind of sealant should I use for vinyl siding cracks?
Use a sealant that is labeled for exterior use and specifically for vinyl siding. Look for silicone or polyurethane sealants that are flexible and paintable. Products like GE Silicone II or DAP Dynaflex 230 are commonly used. Avoid using indoor caulk or adhesives that aren't weatherproof. The sealant must expand and contract with temperature changes without cracking.
How long does vinyl siding sealant take to dry?
Drying and curing times vary by product. Most sealants are tack-free within 1 to 4 hours, but full cure can take 24 to 48 hours. Always check the manufacturer's instructions. Factors like temperature, humidity, and the thickness of the bead affect drying time. For best results, apply when the weather is dry and above 50°F, and avoid touching the sealant until it's fully cured.
Do I need to remove the old caulk before applying new sealant?
Yes, you should remove any old, cracked, or peeling caulk. Old sealant won't bond well with new, and the repair will fail sooner. Use a utility knife or a putty knife to scrape away loose material. Clean the area thoroughly afterward. If the old caulk is still flexible and in good shape, you can apply new sealant over it, but for best results, start fresh.
Can I use duct tape as a temporary fix for a cracked siding seam?
Duct tape is not a good solution. It will degrade quickly from sunlight and moisture, and it can leave a sticky residue. If you need a temporary fix for a few days, use a piece of waterproof tape or a self-adhesive vinyl patch. But plan to do a proper sealant repair as soon as possible. Duct tape won't keep water out reliably.
How do I match the paint color for the repaired area?
Take a small piece of your siding (from a hidden area) to a paint store for color matching. Many stores can scan the color and mix a custom exterior paint. Use a satin or semi-gloss paint that mimics the original finish. Apply with a small brush in thin coats. Let each coat dry before adding the next. Blend the edges to avoid a visible patch.
Why does my vinyl siding keep cracking at the seams?
Repeated cracking can be due to thermal expansion and contraction. Vinyl expands in heat and contracts in cold. If the panels were installed too tightly, they can buckle and crack. Proper installation leaves a small gap at the ends. Also, impact from hail, lawn equipment, or children's toys can cause cracks. Ensure the nails are not driven too tight, allowing for movement.
Should I replace the entire panel if the crack is long?
If the crack is longer than 6 inches or involves the locking mechanism, replacement is often better. A long crack weakens the panel and sealant alone may not hold. Replacements are straightforward: purchase a matching panel, cut it to length, and snap it into place. If you're unsure, a professional can do it quickly. Check with LGFMH Construction 's siding repair service for help.
Conclusion
Repairing a cracked vinyl siding seam is a job you can do in a weekend. It starts with a careful look at the damage. Then you gather a few simple tools. Clean the area well. Apply a flexible sealant. Smooth it and let it cure. That's it. You've stopped water from getting in and kept your home looking good.
I've walked you through each step with usable tips. Now it's your turn. Don't let a small crack become a big problem. Grab the materials, set aside an hour, and fix it. Your home will thank you.
If the damage is beyond a simple repair, or you just want it done right, consider hiring a professional. Companies like LGFMH Construction offer interior and exterior repair services that cover siding. They have the experience and tools to handle tricky jobs. But for a basic seam crack, you've got this.
Remember, a little maintenance goes a long way. Check your siding once a year. Look for cracks, gaps, or loose panels. Catching issues early saves you money and hassle. And when you do spot a crack, you now know exactly what to do.
Go ahead, grab that caulking gun, and give your home a little care. You'll be proud of the result.


Comments