How to Repair Crumbling Concrete Steps: A Step‑by‑Step Guide for Homeowners
- William McKracherne
- Mar 13
- 8 min read

When a stair's concrete starts to crumble, the whole porch looks neglected and unsafe. That gritty, crumbling feel under your foot tells you the step needs help now, not later.
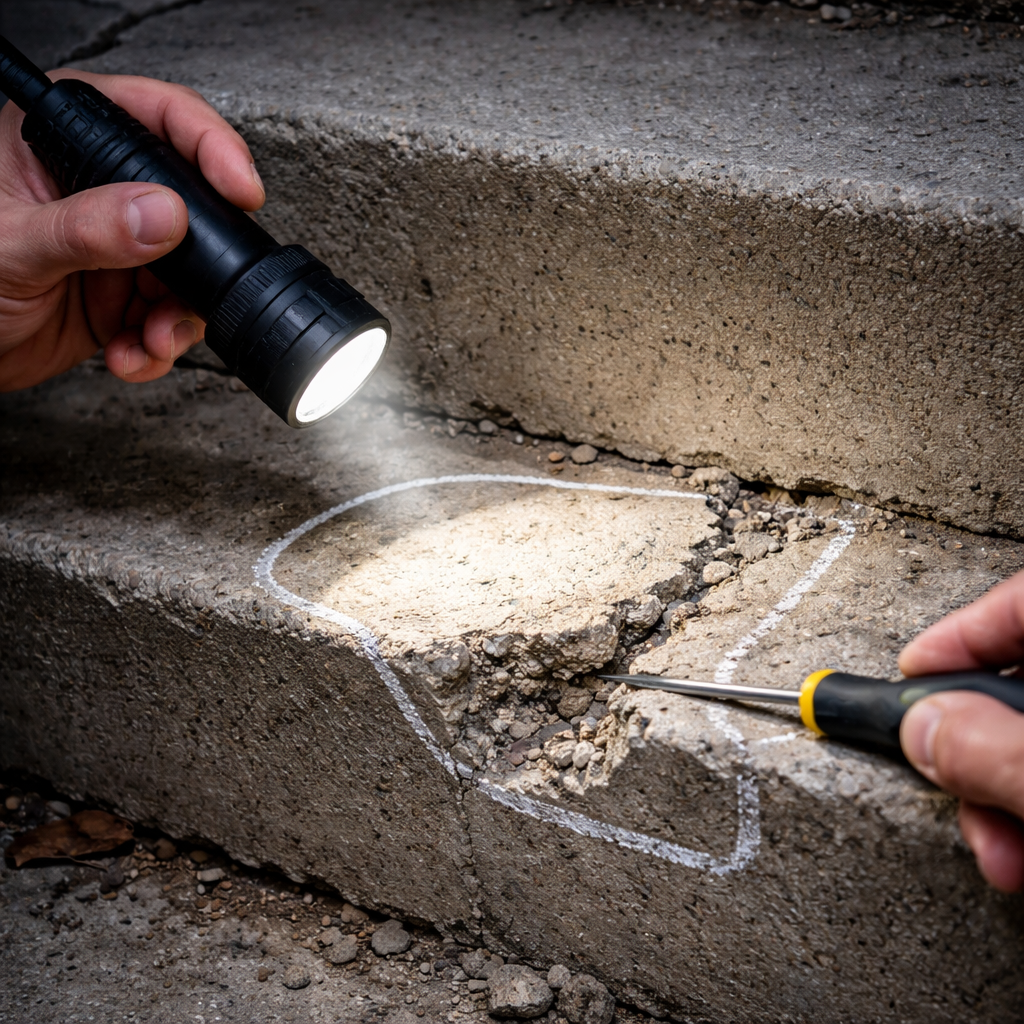
First, walk the stairs and mark every soft spot with a piece of chalk. Those are the places you’ll need to clean, patch, and seal. If you’re not sure how deep the damage goes, tap the surface with a screwdriver – a hollow sound means the concrete is breaking apart.
Next, pull off loose bits with a hammer and a cold‑chisel. Wear safety glasses; the shards can fly. Sweep away dust, then rinse the area so the new material can stick. A quick tip: mist the surface with water right before you apply the mix – it stops the new concrete from drying too fast.
Now blend a concrete repair mix. Use a pre‑mixed product that matches your existing slab’s color. Scoop it into a trowel, press it firmly into the cleaned void, and smooth it with a putty knife. Let it cure for at least 24 hours, keeping it damp with a spray bottle if the weather’s dry.
After it’s set, sand the patched spot smooth and apply a concrete sealer to protect against water and freeze‑thaw cycles. This final coat adds shine and keeps the steps looking fresh for years.
If the job feels too big or you’d rather skip the mess, LGFMH Construction can step in with professional interior and exterior repairs – they know how to bring a crumbling stair back to life.
For more step‑by‑step repair ideas, check out our Deck Repair Guide: Step‑by‑Step Solutions for Common Problems which covers similar tools and techniques you’ll need.
Step 1: Inspect and Assess the Damage
A cracked step is a warning sign you can’t miss. It feels rough under your foot and looks like it might give way at any moment.
First, walk the whole stair set and mark every soft spot with chalk. The chalk dot shows exactly where you’ll need to work later.
Look for any loose bits that flake off when you press with your fingernail. Those pieces will fall out when you clean, so pull them away before you patch.
Next, tap each marked area with a flat screwdriver. A hollow thud means the concrete is breaking inside, while a solid sound means the damage is only surface deep.
Also, feel the surrounding area for dampness. Moist ground can keep the new mix from bonding, so you may need to dry the spot with a shop‑vac or a dry cloth.
Take a flashlight and look for cracks that go down the side of the step. If you see water stains or rust on nearby metal, the problem may be worse than it looks.
Tip: work on a cloudy day or in shade if possible; direct sun can dry the mix too fast and cause cracks later.
Measure the depth with a ruler or a thin probe. If the hole is deeper than half an inch, you’ll need a stronger mix later.
When the damage spreads over several steps, calling LGFMH Construction can save you time and hassle. Their crew knows how to prep, patch, and seal both indoor and outdoor stairs.
Finally, wipe the area clean and let it dry fully before you move on to the next step. A clean surface helps the new concrete stick right.
Step 2: Clean and Prepare the Surface
Before any mix hits the stair, the surface has to be spotless. A dirty spot will stop the new concrete from grabbing, and you’ll end up with a weak patch.
Start by knocking off loose pieces with a hammer and a cold‑chisel. Tap gently so you don’t crack more than you need. Wear gloves and safety glasses, the shards can bite.
Grab a stiff broom or a shop‑vac and sweep away all dust. If you see fine powder, a brush with stiff bristles works better than a cloth.
Give the area a light mist of water. A spray bottle works fine; just damp enough so the surface isn’t soaking. Let it sit a minute, then wipe off excess with a rag. This stops the new mix from drying too fast.
If you spot oil, grease, or old sealant, scrub it with a mild detergent and a scrub brush. Rinse well and let it dry completely, moisture trapped under the patch will cause it to crack later.
For any deep cracks, run a wire brush along the edges. The rough texture gives the fresh mix something to cling to.
When everything feels dry to the touch, cover the surrounding area with a thin sheet of plastic. This keeps dust from settling while you work.
Need more detail on how to get the surface just right? Check out our proper surface prep guide for extra tips.
Finally, tape off the edges of the step with painter’s tape. It protects the surrounding floor and gives you a clean line when you smooth the new mix.
Now the stair is clean, dry, and ready for the repair mix. You’ve set the stage for a strong, lasting fix.
Step 3: Choose the Right Repair Material and Apply
Now the step is clean and dry, so you need a material that will stand up to foot traffic and weather.
For most shallow cracks, a pre‑mixed concrete repair kit works fine. It’s already blended, so you just add water and stir until it looks like thick oatmeal.
If the gap is deep or the step bears heavy load, a polymer‑enhanced mortar adds flex and helps stop future cracking.
Mixing
Put the dry mix in a bucket, splash in water a little at a time, and stir. Let it sit five minutes so the chemicals start bonding.
Before you pour, mist the patch area with a fine spray. The surface moisture keeps the new mix from pulling water out too fast.
Applying
Use a steel trowel to press the mix into the crack, starting at the deepest point. Pack it firm and smooth the surface level with the trowel edge.
Cover the repaired spot with a sheet of plastic for about 24 hours. The cover slows drying and builds strength.
Looking for more tips on choosing the right mix? See our guide on repairing a cracked concrete driveway for product advice.
Material | Best For | Key Tip |
Pre‑mixed concrete repair | Shallow cracks, light traffic | Match color, add water slowly |
Polymer‑enhanced mortar | Deep gaps, heavy load | Dampen surface before applying |
Epoxy filler | Structural cracks, water‑tight seal | Mix only what you’ll use right away |
Step 4: Finish, Seal, and Maintain the Steps
Now the patch has cured, it’s time to give your step a clean finish, a protective coat, and a plan to keep it looking good.
Start by sanding the dried patch smooth. A medium‑grit sandpaper will level any ridges without gouging the surrounding slab. Wipe away dust with a damp rag; a clean surface lets the next layer bond properly.
If you see any tiny holes or low spots, fill them with a thin layer of the same mix and let it dry. This extra step stops water from pooling later.
Apply a sealer
A concrete sealer is the last armor against water, freeze‑thaw cycles, and foot traffic. Use a brush or roller to spread a thin, even coat. Work in the shade on a dry day so the sealer doesn’t skin too fast. Let it cure per the label – usually 24 hours for a light coat. For tips on picking the right product, check our concrete sealer guide.
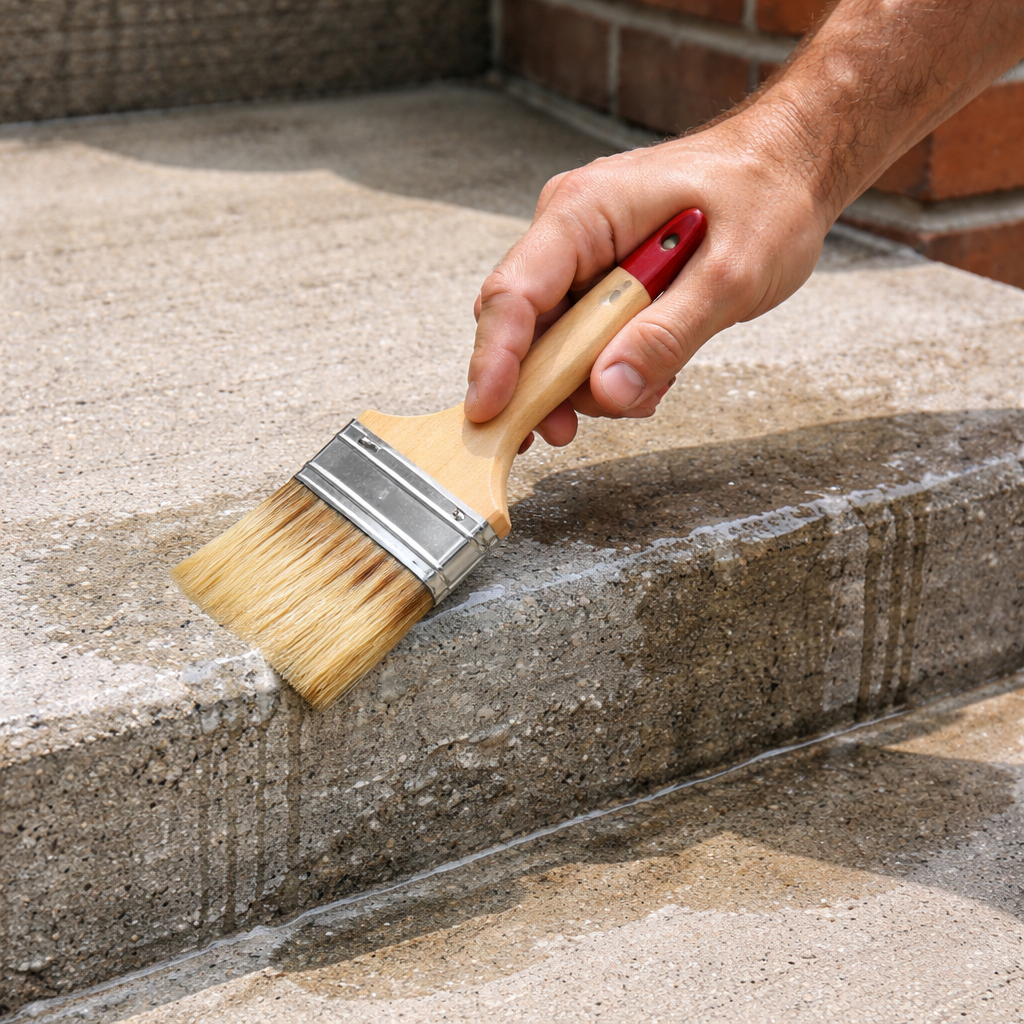
After the seal is dry, give the step a quick wipe with a dry cloth to remove any streaks. Your step now has a glossy, slip‑resistant finish that will last years.
Maintain the repair
Inspect the steps every spring and fall. Look for new cracks, chips, or worn sealant. Spot‑clean with a broom and reapply a thin seal coat if the surface looks dull. A quick seal touch‑up every 2–3 years keeps water out and saves you a full redo.
If the job feels too big or you want a professional hand, LGFMH Construction can step in. Their interior and exterior repair crew knows how to prep, seal, and maintain concrete steps for long‑term performance.
Conclusion
Fixing crumbling concrete steps isn’t rocket science. You’ve walked through the steps, patched the cracks, and sealed the surface. Now the job is done, and the stairs can handle rain, snow, and foot traffic again.
A quick habit that saves you future hassle is to check the seal each spring. Run a fingertip across the edge; if water beads poorly, a thin coat will keep the moisture out.
If the steps look worse than you can handle, a pro can finish the work fast and guarantee a lasting finish. LGFMH Construction offers interior‑exterior repair you can trust, so you won’t have to worry about the next winter.
Bottom line: spot the damage early, clean well, patch solid, seal tight, and keep an eye on the finish each year. Follow these steps and your concrete stairs will stay safe and look good for years to come.
FAQ
What makes concrete steps start to crumble?
Water that seeps into tiny cracks freezes and expands in cold weather. That pressure pushes the concrete apart. Add salt, dirt, or plant roots and the damage speeds up. Over time the surface flakes, called spalling, and the steps feel soft under your foot. Spotting the first signs early can stop a big repair later and prevent future slips completely.
How often should I reseal repaired steps?
A good rule is to check the seal each spring and each fall. If water beads and rolls off, the seal is still good. When you see it soak in or the surface looks dull, apply a thin new coat. Most sealers last about a year in harsh climates, so plan a quick re‑seal before winter. Doing this twice a year adds years to the life of your steps.
Can I fix crumbling steps myself or should I call a pro?
You can handle small cracks and shallow spalling with a pre‑mixed patch and a roller. The key is to clean, dampen, and press the mix in tight. If the damage runs deep, the concrete feels hollow when you tap, or rebar shows rust, it’s safer to let a crew like LGFMH Construction step in. They have tools for full depth repair.
Which patch material works best for outdoor steps?
For most home steps a ready‑to‑use concrete repair mix works fine. It matches the color and cures fast. If the crack moves with temperature, a flexible polyurethane filler gives a little give. For big structural cracks, an epoxy kit provides the strongest, water‑tight seal. Choose the product that fits the size and movement of the crack. This ensures the repaired area blends and stays strong over seasons.
How can I tell if a crack is too deep to patch?
Tap the crack with a screwdriver. A hollow sound means there’s a void behind the surface. You can also press a screwdriver tip into the crack; if it sinks in easily, the break is deep. When the void is more than a quarter inch, a simple surface patch won’t hold and you’ll need a deeper fill or professional help before water seeps in again.
What simple maintenance keeps repaired steps looking good?
Sweep the steps weekly to clear grit that can wear the seal. Rinse with a hose after a snow melt or heavy rain. Every few months, wipe the surface with a mild soap solution and a soft brush. Finally, run a fingernail across the edge; if it feels smooth and no fresh cracks appear, you’re set. A quick check each season keeps the steps safe and looking fresh.


Comments