How to Repair Rotted Door Frame: A Step-by-Step Guide
- William McKracherne
- Mar 2
- 18 min read

Ever walked up to your front door, reached for the handle, and felt that unsettling give as if the frame itself was about to give way? That moment of doubt – the creak, the slight rot you can see at the bottom – is more common than you think. Most homeowners notice it after a rainstorm or when a pet leans against the door, and suddenly you’re faced with the question: how do I fix it before the whole thing collapses?
We’ve seen dozens of families in Virginia Beach and Newport News stare at a rotted door frame and wonder if they need a full replacement or just a patch. The good news? In many cases, you can rescue the frame with the right tools, a bit of patience, and a clear step‑by‑step plan. And if you’re not comfortable swinging a hammer, calling a pro like LGFMH Construction can save you time and headaches.
First, identify the extent of the damage. Look for soft, spongy wood, discoloration, or any fungal growth. If the rot is limited to a few inches, you’ll likely need to cut out the compromised sections and insert new, treated lumber. If it’s more widespread, it might be smarter to replace the entire frame to avoid future leaks.
Here’s a quick checklist to get you started:
Gather a moisture meter – it helps you pinpoint hidden damp spots.
Get a pry bar, handsaw, and a drill with a wood bit.
Buy pressure‑treated 2×4s or a pre‑cut door jamb kit.
Have wood filler, epoxy, and a sealant on hand for finishing.
Step one: protect the area. Lay down a drop cloth and wear gloves. Use the moisture meter to confirm the wood is truly rotted and not just damp. Step two: carefully remove the damaged wood with a pry bar, cutting back to solid, sound timber. If you’re unsure where to cut, a good rule of thumb is to remove any wood that feels soft to the touch – you don’t want a hidden weak spot later.
Step three: shape your replacement piece to fit snugly. A snug fit reduces air gaps that can let moisture in again. Secure the new piece with exterior‑grade screws, and seal every joint with epoxy and a high‑quality exterior sealant. Finally, sand the repaired area, prime it, and paint to match the surrounding trim – this not only looks good but adds a protective barrier.
One homeowner we helped had a rotted frame right where the porch met the door. By swapping out a 12‑inch section of the jamb and reinforcing it with metal brackets, the door became sturdier than before, and the new paint held up through a rainy summer.
If you’d like more guidance on choosing the right door material or ensuring the replacement blends with your home’s style, check out our How to Fix Rotted Window Sill: A Practical Step‑by‑Step Guide. It walks you through similar wood‑repair techniques you can apply to your door frame.
TL;DR
Learn how to repair rotted door frame when your door feels spongy or shows rot; cut out the rot, fit treated lumber, and seal joints.
Follow our step‑by‑step guide to remove the compromised piece, install a snug replacement, apply epoxy and sealant, then prime and paint for a lasting fix.
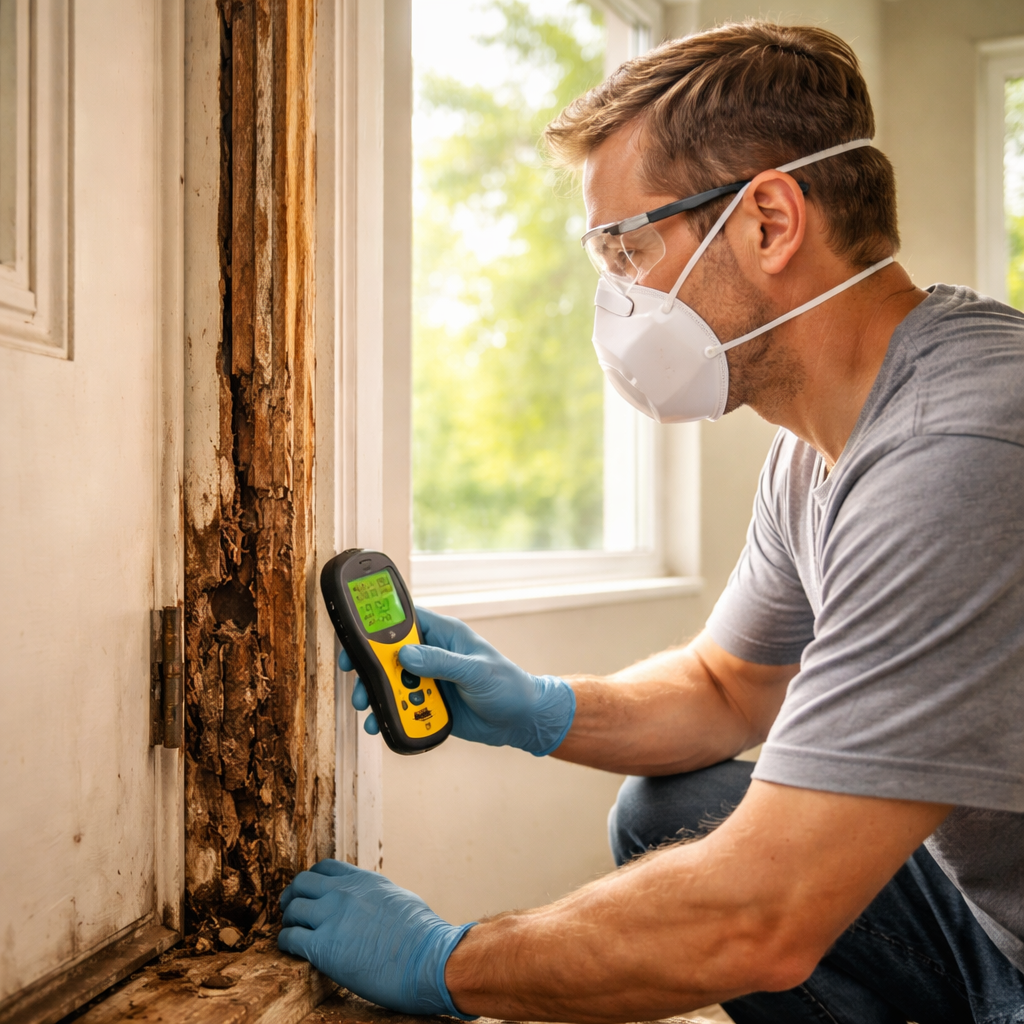
Step 1: Assess Damage and Safety
First thing's first – before you even think about pulling a saw, you need to know exactly what you're dealing with. That spongy feeling when you push on the door frame? It's the wood saying, "I'm tired, I'm wet, I'm about to give out." Take a moment, run your fingers along the jamb, and look for any soft spots, dark streaks, or powdery white fuzz – that’s fungal growth trying to eat the wood from the inside.
Grab a moisture meter if you have one; it’s a cheap gadget that can save you hours of guesswork. Anything above 20% moisture is a red flag. If the reading spikes in one area and drops in the next, you’ve likely found the boundary between healthy timber and rot.
Safety comes next. Put on gloves, goggles, and a dust mask – rotted wood can release spores that irritate lungs. And if you’re working on a door that bears the weight of a heavy entryway, consider propping it up with a sturdy brace so it doesn’t swing shut on you while you’re cutting.
What to Look For
Here’s a quick visual checklist:
Soft, mushy wood when pressed.
Discoloration – brown, gray, or black patches.
Fungal growth or a sweet, musty smell.
Visible cracks that run deep into the frame.
When you spot any of these, mark the perimeter with a pencil. You’ll be cutting back to solid wood, so a clear outline saves you from second‑guessing later.
Now, ask yourself: is the rot isolated to a single corner, or does it run along the whole jamb? If it’s the former, you can usually cut out a small section and splice in treated lumber. If it’s the latter, you might be looking at a full‑frame replacement – and that’s when you call in the pros.
Testing for Structural Integrity
Give the door a gentle nudge. Does it wobble? Does the frame flex? A door that moves more than a millimeter when you push it is a sign the surrounding studs may also be compromised. In that case, you’ll need to assess the studs behind the jamb as well.
One tip we’ve found useful at LGFMH Construction is to tap the wood with a hammer. A hollow sound often means the wood has rotted away inside, even if the surface looks okay. If you hear a dull thud, that piece is probably still solid.
Don’t forget to check the weatherstripping and any nearby insulation. Rot loves moisture, and a leaky roof or cracked siding can keep feeding the problem. Seal any exterior cracks before you start cutting – otherwise you’ll just be fixing the symptom, not the cause.
After you’ve confirmed the extent of the damage and made sure the area is safe to work in, you’re ready for the next step: cutting out the rotted wood and preparing the replacement piece. Keep your tools clean, work methodically, and you’ll avoid nasty surprises later on.
Remember, the goal isn’t just to patch a hole – it’s to restore the door’s structural integrity so it can weather many more seasons.
Step 2: Remove Rot and Prepare the Frame
Let’s get practical. Removing rot and prepping the frame isn’t glamorous, but it’s where you save the door from a bigger headache. If you can see a solid base beneath the decay, you’ve got a repair ahead instead of a full replacement.
First things first: protect the work area and your eyes, hands, and lungs. Lay down a drop cloth, wear gloves, goggles, and a dust mask. Then confirm how deep the rot runs. If the wood feels firm a short distance back, you can cut away the compromised area and leave solid timber intact. If the wood feels soft and spongy well beyond the surface, you’ll likely need a larger patch or a full frame section. In our experience, you get better results when you err on the conservative side—you don’t want to chase hidden rot later.
Assess the extent and plan your cut
Use a moisture meter to locate hidden damp pockets. Gently probe with a putty knife or screwdriver to feel for softness. Mark your cut lines clearly so you remove only what’s rotten and keep as much original material as possible.
Moisture meter
Pry bar, handsaw, chisel
Exterior-grade screws and corrosion-resistant brackets (if needed)
Epoxy, wood filler, exterior sealant
Wood preservative for fresh cut edges
So, what’s next? Step back and plan your cut. Don’t cut into load-bearing corners or structural members. You want to expose only rotten wood and leave the solid frame intact.
Shape and fit the replacement
Carefully measure and cut a replacement section from pressure-treated lumber that mirrors the jamb profile. A snug fit is essential—think precision, not guesswork. Dry-fit first, then tweak as needed so there are no gaps around the patch.
Treat the new edges with wood preservative and seal the back and sides with epoxy to lock moisture out. If there are gaps between the patch and the surrounding frame, fill them with epoxy or a compatible filler before anchoring.
Anchor and reinforce
Drive exterior-grade screws to secure the patch, using even spacing so the load transfers evenly. If the frame carries noticeable load from the door, add small metal brackets at the corners or a light header above the patch for extra rigidity. This isn't flashy, but it's what keeps the door aligned over time.
Double-check the door swing and weatherstripping as you go. A patch that shifts or traps moisture defeats the goal of a durable repair. Keep testing until you’re sure the door closes snugly and seals cleanly.
Finish and sealers
Apply a high-quality exterior sealant along every joint, then sand the repaired area smooth. Prime and paint to match the surrounding trim. A proper finish isn't just cosmetic—it blocks water and slows future rot from creeping back in.
Small asides sometimes help. For example, if you see rot spreading toward the sill or header, consider coordinating with a broader frame repair so the patch doesn’t become a leakage hotspot. In our shop, we emphasize a clean, weatherproof finish and a plan that keeps water away from wood. If you’d like a deeper dive into rot repair techniques, see this guide: How to Fix Rotted Window Sill: A Practical Step‑by‑Step Guide.
Step 3: Install New Wood and Reinforce Structure
Now that you've cut out the rotten section and prepped the opening, it's time to actually put the new wood in place.
First, gather your materials: pressure‑treated 2×4 or a pre‑cut jamb piece that matches the existing profile, exterior‑grade screws, a few metal brackets, a good wood preservative, epoxy, and a level.
Why pressure‑treated? Because the wood will stay outside where moisture loves to hang around, and the treatment gives it a built‑in shield against future rot.
Step 1: Dry‑fit the replacement. Lay the piece into the pocket and see how it sits. You'll often find a tiny gap or two – that's normal. Use a pencil to mark where you need to shave a little off.
Step 2: Trim to a perfect fit. A coping saw or a circular saw works fine. Take your time; a snug fit means fewer chances for water to sneak behind the patch later.
Step 3: Apply wood preservative to all freshly cut edges. This extra layer is cheap insurance.
Step 4: Position the piece and shim if needed. Small wood shims at the top and bottom keep the new jamb flush with the surrounding frame. Check with a level – you want the surface within a few millimetres of the original.
Now the real anchoring. Drill pilot holes through the replacement and into the surrounding studs, then drive exterior‑grade screws every 6‑8 inches. Keep the screw heads slightly below the wood surface so the filler can cover them later.
Do you wonder whether screws alone are enough? In many door frames the load transfers through the jamb, so we add a metal corner bracket or two. A tiny L‑bracket on each corner, secured with stainless‑steel screws, adds rigidity without looking bulky.
Step 5: Reinforce the top. If the door is heavy or you have a double‑door setup, a light header made from a 2×6 piece across the top of the patch spreads the weight. Screw the header into the studs on each side, then attach it to the new jamb.
Step 6: Seal every joint. Run a bead of high‑quality exterior sealant along the inside and outside edges of the patch before you start filling the screw holes. Once the sealant skins, use epoxy or a wood filler to smooth over the heads and any tiny gaps.
Step 7: Sand, prime, and paint. After the filler cures, sand the area smooth, then apply a primer that’s rated for exterior use. Finish with a paint that matches your existing trim—this final coat is the last line of defense against water.
A quick tip: before the final coat, run your finger along the joint. If you feel any cold spots where the wood is still damp, give the sealant a little more time to cure.
What if you’re not comfortable handling the header or brackets yourself? That's where professionals like LGFMH Construction step in – we can add those reinforcements quickly and make sure everything stays square.
Remember, the goal isn’t just to make the door look good; it’s to create a watertight, load‑bearing connection that will last for years. A well‑installed patch can hold up just as well as a brand‑new frame, especially when you follow these reinforcement steps.
If you’re still unsure which wood or hardware will work best for your home’s style, take a look at our guide on selecting the right door material.
Step 4: Choose Materials and Compare Options
Okay, you’ve cleared out the rot and you’ve got a clean opening. The next question is the fun part: what do you actually fill that gap with? It sounds simple, but the right material can mean the difference between a patch that lasts ten years and one that starts sagging after the first rain.
First, think about the environment your door lives in. Are you on a breezy beachfront in Virginia Beach, or is your home tucked behind a cluster of trees that trap moisture? Those details steer you toward a wood that either tolerates salt‑air, resists constant humidity, or simply won’t warp when the summer heat hits.
Here’s a quick way to narrow it down: grab a notebook, sketch the opening, and list three things you care about most—durability, appearance, and budget. Then match each priority to a material. Below is a handy comparison table that sums up the most common choices we see in the field.
Material | Pros | Cons |
Pressure‑treated lumber | Resists rot, readily available, affordable | Heavier, can bleed chemicals if not sealed |
Cedar (exterior‑grade) | Natural decay resistance, lightweight, looks good | More expensive, may need extra sealing |
Composite (fiberglass‑reinforced) | Ultra‑stable, low maintenance, no rot | Higher cost, harder to cut |
Pressure‑treated lumber is the workhorse most homeowners reach for. It’s cheap, you can find 2×4s at any big‑box store, and the chemicals inside fight off the fungi that caused the original rot. Just remember: once you cut it, the cut faces should get a coat of exterior‑grade sealant or primer, otherwise the preservative can leach out and look unsightly.
If you love a natural look and want something lighter to handle, cedar is a solid bet. It has oils that naturally repel insects and moisture. The trade‑off is a higher price tag and the need for a clear topcoat if you’re matching a painted trim. In our experience, a thin layer of marine‑grade paint over cedar gives you the best of both worlds—beauty and protection.
Composite materials, like fiberglass‑reinforced polymer, are the premium option. They won’t rot, warp, or shrink, and they hold fasteners like a champ. The downside? They’re tougher to cut with a regular handsaw—you’ll need a fine‑toothed blade or a circular saw with a carbide‑tipped bit. If you’re comfortable with power tools, the extra effort can pay off with a patch that practically screams “set‑and‑forget.”
Now, what about hardware? Exterior‑grade stainless‑steel or coated deck screws are a must, no matter which wood you choose. They resist corrosion, which is especially important in salty coastal air. Pair those screws with a small metal corner bracket—think of it as a “brace” that keeps the new piece from flexing under the door’s weight.
And here’s a tip that often gets overlooked: match the grain direction of your replacement piece to the existing jamb. When the grain runs the same way, the wood expands and contracts together, reducing the chance of gaps forming later. It’s a small detail, but it makes a big difference in the long run.
So, what should you do next? Grab a tape measure, head to your local lumberyard, and ask for a short piece of pressure‑treated 2×4 that matches the depth of your cutout. If you’re leaning toward cedar or composite, let the associate know you need a piece that’s already pre‑cut to a jamb profile—many stores will mill it for you on the spot.
Still on the fence? Take a look at our door material guide for a deeper dive into how each wood type holds up against Virginia’s weather patterns. It walks you through the same decision matrix we just outlined, plus a few extra tricks for blending the patch into your home’s aesthetic.
Bottom line: pick a material that aligns with your climate, budget, and finish preferences, seal every cut face, use corrosion‑resistant fasteners, and you’ll end up with a door frame that feels as sturdy as the day you installed it.
Step 5: Finish, Paint, and Maintain
Now the patch is in place, the screws are snug, and you’ve given the frame a solid backbone. The next question is: how do you make it look like it was always there and keep it from crying out for repairs next spring?
First, give the wood a good clean‑up. Grab a vacuum or a brush and sweep away any dust, wood chips, or stray epoxy. A quick wipe with a damp rag will remove lingering residue, but don’t soak the wood – you want it dry before you start priming.
Prep the surface
Even the most precise cut will have tiny imperfections. Lightly sand the patched area with 120‑grit sandpaper, then follow up with 220‑grit for a smooth finish. You’re not trying to turn the jamb into a polished table; just erase the rough edges so the paint adheres evenly.
And don’t forget the grain direction. If you matched the grain earlier, the sanded surface should flow naturally into the existing jamb. Run your hand along the wood – if it feels even, you’re good to go.
Next, apply a high‑quality exterior‑grade primer. Primer is the unsung hero that blocks moisture, seals the wood fibers, and gives the paint something to cling to. Use a brush or a small roller, depending on the size of your patch. One thin coat is enough; just make sure you feather the edges into the surrounding trim so the transition is invisible.
Tip: let the primer cure for at least 30 minutes – or follow the manufacturer’s timing – before you move on. Rushing here is a shortcut that ends in peeling paint later.
Prime and paint
When it comes to paint, pick an exterior‑rated product that matches the existing door color. If you’re not sure about the exact shade, a quick visit to the local hardware store with a paint chip can save you a mismatch. Paint in thin, even layers; two coats are better than one heavy coat that drips.
We like using a ½‑inch synthetic brush for the corners and a small roller for the flat surfaces. It gives you control without leaving brush marks. And while you’re at it, paint the surrounding trim too – the whole look will feel cohesive.
After the final coat, let the paint cure for 24‑48 hours before you reinstall any hardware or weatherstripping. This extra patience pays off when the door swings open and you don’t see fresh paint chips in the hallway.
Maintain the repair
Now that the frame looks brand new, keep it that way with a simple maintenance routine. Once a year – ideally in the dry season – give the jamb a visual check. Look for any new cracks, water stains, or softened wood around the edges.
If you spot a tiny chip in the paint, touch it up right away. A quick dab of primer and paint stops moisture from finding a way into the wood. And every few months, run a bead of clear exterior sealant along the inside corner where the jamb meets the wall. It’s a cheap insurance policy that most homeowners skip until it’s too late.
Another easy habit: keep the door threshold clean and free of debris. Leaves, sand, and pet paws can trap moisture against the jamb, especially after a rain. A quick sweep after a storm is all it takes.
And remember, the repair you just finished isn’t a set‑and‑forget job. Wood expands and contracts with temperature changes, so a little flex is normal. If you ever notice the door sagging or the frame shifting, a quick shim adjustment can restore alignment without tearing the whole thing apart.
For a deeper dive into keeping door components in top shape, check out our guide on how to replace an exterior door threshold. It walks you through related upkeep steps that protect both the frame and the threshold from the same moisture threats.
Bottom line: sanding, priming, painting, and a little regular TLC turn a functional patch into a seamless part of your home’s façade. Follow these finishing steps, and you’ll spend less time worrying about rot and more time enjoying a sturdy, good‑looking entryway.
Step 6: Tools & Materials Checklist
Now that you’ve assessed the rot and planned your patch, it’s time to gather the right tools and materials. Having everything on hand keeps you from stopping mid‑job and running back to the shed every few minutes. And yes, this is where the project starts feeling real—and doable.
Essential tools
Protective gear: sturdy gloves, safety glasses, and a dust mask
Pry bar, putty knives, and a straightedge to expose and fit the patch
Handsaw or miter saw for precise trimming of replacement wood
Drill with a set of exterior‑grade driver bits and a countersink
Chisels for cleaning edges and shaping the patch
Measuring tape, carpenter’s pencil, and a speed square for accuracy
Level to keep the patch square with the door frame
Moisture meter to verify dryness of hidden spots
Sanding block or orbital sander with 120‑ and 220‑grit paper
Caulking gun and a high‑quality exterior sealant
Small brushes or rags for applying preservative, epoxy, and paint touch‑ups
Patch materials
Pressure‑treated lumber or a pre‑cut jamb replacement that matches the jamb profile
Wood preservative for fresh cut edges to slow future decay
Epoxy or exterior wood filler to close gaps and level joints
Exterior‑grade sealant for sealing joints and patch surfaces
Primer and exterior paint to blend the repair with the surrounding trim
Marine‑grade or high‑quality caulk for any small gaps along the seam
Metal brackets or a small header if the patch carries door load
Hardware & fasteners
Exterior‑grade stainless steel or coated screws for corrosion resistance
Brackets (corner brackets or L‑brackets) to reinforce the patch
Exterior screws spaced evenly every 6–8 inches to transfer load properly
So, what should you do first? Lay everything out on a drop cloth and group items by step. Do a quick dry run with the patch to confirm you have a snug fit before you cut anything. If you’re unsure which wood to pick, consider our Door material guide to weigh durability, look, and cost.
In our experience at LGFMH Construction, a well‑stocked toolbox saves hours and prevents rework. The right tools don’t just speed up the job; they help you seal out moisture for good. And yes, we’ve helped countless Virginia homeowners patch frames that stayed solid through humid summers and rainy springs.
One last thought: always keep a clean work area. Debris can trap moisture against the jamb long after you finish. A quick sweep now and then is worth it.
Conclusion
By now you’ve walked through every step, from spotting the soft wood to sealing the final coat, and you can see that learning how to repair rotted door frame isn’t a mystery—it’s a series of small, doable actions.
If you ever feel stuck, remember the simple rule we live by: cut back to solid timber, fit a snug, pressure‑treated piece, and seal every joint. That three‑point habit stops moisture from sneaking back in.
So, what’s the next move? Grab your checklist, double‑check you’ve got fresh batteries, and schedule a quick dry‑fit before you drive any screws home. A tight fit today saves a costly call to a pro tomorrow.
We’ve also seen homeowners in Virginia Beach avoid future headaches by adding a thin stainless‑steel bracket inside the frame—just a couple of #8 screws and you’ve added hidden strength without changing the look.
Finally, a little maintenance goes a long way. Toss a reminder in your calendar for a spring and fall walk‑around: look for fresh paint cracks, run your hand for any soft spots, and touch up the caulk. Those five minutes keep the repair lasting years.
Ready to give your door a second life? Whether you tackle it yourself or call in LGFMH Construction for a hand, you now have the roadmap to get the job done right and keep the weather out.
FAQ
What are the first signs that my door frame is rotting?
Usually you’ll notice a soft spot when you press the wood with your fingernail or a screwdriver – it gives way like a sponge. Dark, spongy patches, a musty smell, or paint that’s cracking and bubbling are also red flags. In coastal towns like Virginia Beach, water pooling around the sill is a common culprit, so a quick visual check can save you a lot of headaches later.
How do I know if I need to replace the whole jamb or just patch a section?
Grab a moisture meter; any reading above 20 % is a warning sign. If the meter spikes in a tight, isolated area and the surrounding wood feels solid, a patch with epoxy or a small treated lumber insert will do. But if you’re getting high readings across a larger stretch or the wood feels mushy over several inches, it’s safer to cut back to sound timber and swap the whole jamb.
Can I use regular lumber for the replacement, or does it have to be pressure‑treated?
Exterior‑grade pressure‑treated lumber is the safest bet because it’s chemically resistant to rot and insects. If you prefer a natural look, cedar works, but you’ll need to seal it regularly. In our experience, the extra cost of pressure‑treated wood pays off in longevity, especially in humid climates where moisture loves to sneak into tiny cracks.
What’s the best way to seal the joints after the new wood is installed?
First, run a bead of high‑quality exterior sealant along every seam – top, sides, and bottom. Smooth it with a gloved fingertip so it fills any gaps. For extra protection, dab a little two‑part epoxy into deep corners before the sealant cures. Let the sealant set according to the manufacturer’s directions, usually a couple of hours, then you’re ready for primer and paint.
Do I need special screws for attaching the new piece?
Yes – go for #8 exterior‑grade, stainless‑steel or coated screws. They resist corrosion and hold up when the wood expands and contracts. Pre‑drill pilot holes about half an inch deep to avoid splitting the treated lumber. Three evenly spaced screws per side give a snug, secure fit without over‑tightening.
How often should I inspect my repaired door frame to prevent future rot?
Mark your calendar for a quick walk‑around twice a year – once in spring after the rains and once in fall before the heating season kicks in. Look for fresh paint cracks, run your hand along the edges for any soft spots, and check the caulk line. A five‑minute check now can stop a costly repair down the road.
When is it worth calling a pro like LGFMH Construction instead of DIY?
If the rot spans more than a foot, involves structural components, or you’re unsure about using power tools safely, it’s smart to get a pro involved. LGFMH Construction specializes in interior and exterior repairs, so they can assess hidden moisture, install reinforcement brackets, and finish the job to code. A quick consult can save you time, tools, and potential missteps.


Comments