How to Repair Rotted Door Jamb: Step‑by‑Step Guide for Homeowners
- William McKracherne
- Mar 3
- 16 min read

Ever walked up to a front door and felt that unsettling give when you pull the handle, only to see the wood around the jamb looking soft and spongy?
That moment of doubt – “is it just a scratch or is the door jamb actually rotting away?” – is something most homeowners experience, and it’s the first sign you need to act before the problem spreads.
When moisture seeps in, especially after a heavy rain or a leaky roof, the wood can deteriorate from the inside out, turning a sturdy frame into a weak, crumbling edge.
Knowing how to repair rotted door jamb isn’t about a quick patch; it’s about restoring strength, keeping drafts out, and protecting the security of your home.
In our experience at LGFMH Construction, we’ve helped dozens of families replace compromised sections before the rot reaches the studs, and the process is simpler than you might think.
First, you’ll want to confirm the extent of the damage. Tap the jamb with a screwdriver – if it feels mushy or the wood flakes off, you’re dealing with rot that needs removal, not just a surface finish.
Next, clear away any paint, sealant, or loose fibers using a scraper or a stiff brush. This step might feel messy, but exposing the raw wood lets you see exactly where the decay ends.
After the area is clean, cut out the rotten portion with a reciprocating saw or a handsaw, cutting back to solid, dry wood. It’s okay to make a slightly larger opening; you’ll fill it with a sturdy patch later.
Here’s where the real repair begins: measure the void, cut a matching piece of pressure‑treated lumber, and fit it snugly. Glue the patch with a high‑quality exterior wood adhesive, then secure it with corrosion‑resistant screws.
Finally, seal the repaired jamb with a water‑resistant primer and paint or stain that matches the rest of the door frame. This protective coat is the last line of defense against future moisture.
Does that sound doable? Absolutely. With a few basic tools – a screwdriver, a saw, some adhesive, and a brush – you can stop rot in its tracks and keep your entryway looking solid for years.
And if you ever feel stuck, remember that professional help is just a call away; a quick visit from LGFMH Construction can save you time and guarantee a watertight finish.
TL;DR
Fix a rotted door jamb by removing the decayed wood, inserting a pressure‑treated patch, then gluing, screwing, and sealing with primer and paint for durability.
With just a screwdriver, saw, adhesive, and brush you can stop water intrusion, or rely on LGFMH Construction for a fast, expert finish that lasts.
Step 1: Assess the Damage and Safety Prep
Let’s be honest: rotted door jambs aren’t just unsightly. They’re a moisture warning sign that the frame is losing its grip on your entryway. You’re probably thinking, where do I even start? That’s okay—we’ll break it down step by step.
Safety first: put on gloves, eye protection, and a mask. If the wood feels damp or spongy, there could be mold or decay behind the surface. Don’t rush this part; rot loves speed and carelessness, and you don’t want to make a bad problem worse.
Assessing the scope: how bad is it?
Light surface rot around the edge might respond to a patch, but deeper decay means removing to solid wood. Tap the area with a screwdriver or awl: if it crumbles, mark the boundary of good wood. You’ll need a clean edge to join patches or a new piece of lumber.
Check the surrounding casing, sill, and the stud behind the jamb—rot travels with moisture, and a patch on the face won’t fix a compromised frame. Take photos to map leaks and moisture paths so you can address both the rot and the source.
Planning your approach
Decide whether you’ll insert a patch or replace a section. Gather patch material, exterior wood glue, and corrosion‑resistant screws. If you’re unsure about the extent, refer to a rotted door frame guide to confirm your cut lines before you lift a saw. How to Repair Rotted Door Frame: A Step-by-Step Guide
Precautions: brace the door to prevent sagging and cover nearby surfaces to keep dust contained. Note moisture sources like leaks or poor flashing—the fix isn’t just what you replace, it’s stopping water from returning.
After you’ve assessed and planned, you’re ready to move to Step 2: removing the rotten material and fitting a patch. It’s doable with a few basic tools, and patience.
In our experience, the goal is durable, moisture‑blocking repair that looks good and feels solid—without turning your weekend into a scavenger hunt for parts. When done right, the jamb supports the door again and the entry stays draft‑free.
Next: Step 2 is removing the rotted section and installing a patch that ties neatly into the surrounding frame. You’ve got this.
So, what’s next? Check your patch for fit, seal it with exterior wood glue, and drive screws with a corrosion‑resistant bit. Then seal the repair with primer and paint, and finally verify the door swings smoothly without sticking.
In our experience, a well‑executed jamb repair is more about blocking moisture than chasing a flawless finish. You’ll sleep easier knowing the entry is solid again.
Does this feel doable? Yes—it's a practical, repeatable process you can follow this weekend.
And if you ever feel unsure, remember: professionals like LGFMH Construction are just a call away to ensure you don’t compromise security or insulation.
Once you’ve completed Step 1, you’ll have a solid base you can build from, and your door will close tighter, keeping drafts and moisture out for good this weekend.
Step 2: Remove the Damaged Jamb Section
Alright, you’ve got your pencil lines and a clean drop‑cloth ready – now it’s time to actually pull out the rotted wood. It feels a little like pulling a bad tooth; you know it’s necessary, but you’re hoping it won’t be too messy.
Start with a gentle pry
Grab a flat‑head chisel and a hammer. Slip the chisel into the scored line and tap lightly. The goal is to separate the damaged section from the surrounding solid wood without splintering anything you plan to keep.
If the wood is stubborn, back‑up with a reciprocating saw on a low‑speed setting. Work the blade along the cut line, letting the saw do the heavy lifting. Remember: a slow, steady motion gives you control and reduces the chance of accidentally cutting into healthy jamb.
Pro tip: keep a scrap piece of plywood underneath the jamb as you work. It supports the frame and prevents the chisel from digging into the wall studs.
Remove the piece
Once the cut is complete, you should be able to wiggle the rotted block free. If it’s still stuck, use a pry bar – place a small block of wood between the pry bar and the jamb to spread the force evenly. Pull gently; you want the surrounding wood to stay intact.
As the piece comes out, set it on your drop cloth. You’ll need it later for measuring, but for now just let it sit. You might notice that the opening is a little larger than your original cut lines – that’s actually a good thing. A slightly oversized cavity gives you room to fit a solid patch later.
Check the remaining wood
Now’s the moment to double‑check the “solid line” you marked earlier. Run your screwdriver or a thin probe into the exposed edges. If you hit dry, firm wood for at least a quarter inch, you’ve got a clean break point.
If you still feel a spongy spot, you may have missed a hidden pocket of rot. In that case, extend the cut a bit further until the wood feels solid all the way around.
Clean the cavity
With the damaged section out, brush away any loose fibers, dust, or crumbling debris. A vacuum or a hand‑held blower works well. You want a neat, flat surface for the patch to sit flush against the existing jamb.
Take a moment to inspect the edges for any nails or screws that may have loosened. Tighten or replace them now – a sturdy anchor point will keep your patch from shifting later.
What’s next?
Now that the void is ready, you’ll move on to measuring, cutting, and fitting a pressure‑treated patch. If you need a broader view of the whole door‑frame repair process, our full guide to repairing a rotted door frame walks you through every step, from removal to final sealing.
Take a breath, wipe down your hands, and get ready to bring that jamb back to life. You’ve already tackled the hardest part – the rest is just a matter of fitting the right piece and sealing it up tight.
Step 3: Choose Replacement Material and Compare Options
Now the cavity is clean and the edges are solid, the next question is – what should actually fill that hole? It’s not just about finding any piece of wood; you want something that will stand up to moisture, temperature swings, and the occasional bump from a door slam.
First, take a step back and think about the environment. Is your home in a rainy coastal town, a dry inland suburb, or somewhere in between? That will steer you toward either a highly rot‑resistant option or a more economical choice that you’ll protect with a good sealant.
Common material choices
Below is a quick rundown of the three most popular materials we see homeowners reach for after a rot cleanup.
Material | Pros | Cons |
Pressure‑treated lumber | Excellent moisture resistance, readily available, affordable | Heavier, may require pre‑drilling to avoid splitting |
Exterior‑grade hardwood (e.g., oak, mahogany) | Strong, attractive grain, long lifespan | More expensive, harder to source in exact dimensions |
Composite or PVC trim | Virtually rot‑proof, low maintenance, light | Can feel less sturdy, may expand/contract with temperature |
We’ve found pressure‑treated lumber to be the sweet spot for most repair jobs – it’s cheap, it takes a nail or screw without warping, and it’s treated to resist the very rot you just removed. If you’re aiming for a premium finish that matches the surrounding frame, a piece of exterior‑grade hardwood can be sanded, stained, and painted to blend seamlessly.
And if you hate the idea of future maintenance, a composite insert will sit there looking good for years, but you’ll want to make sure the surrounding wood is sealed well so water can’t sneak behind it.
How to decide which one fits you
Ask yourself these three quick questions:
What’s my budget? If you’re watching costs, pressure‑treated is usually under $5 per board foot.
Do I want the patch to match the existing grain? If yes, hardwood wins.
How much future maintenance am I willing to do? If you’d rather set it and forget it, composite is the way.
In our experience at LGFMH Construction, most homeowners start with pressure‑treated because it’s forgiving – you can trim it on‑site, and even if you over‑cut a little, the extra piece can be shimmed in without compromising strength.
Once you’ve picked a material, measure the opening twice, cut the patch a little larger (you’ll trim down later), and dry‑fit it. You’ll notice a snug fit when the patch sits flush with the surrounding jamb without any gaps.
Fast‑forward to the finish
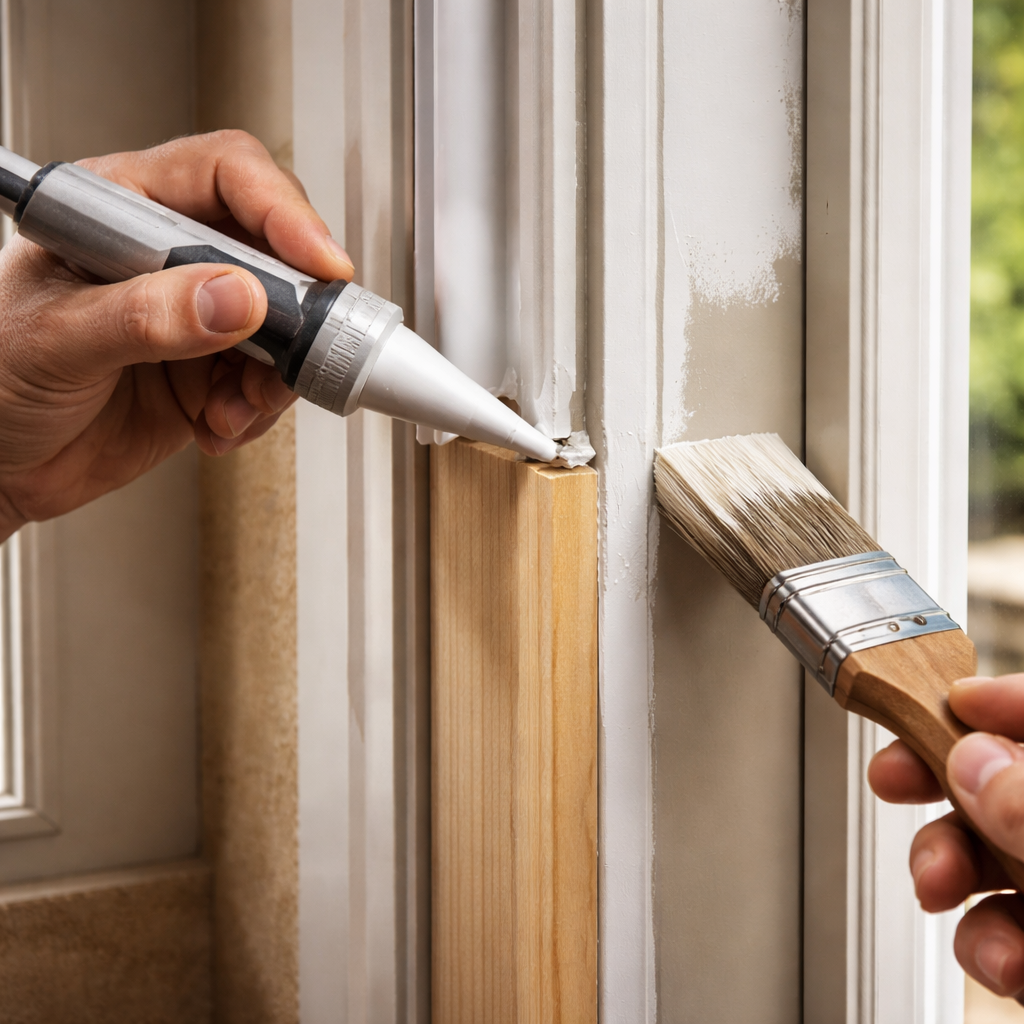
After the patch is in place, secure it with corrosion‑resistant screws (stainless‑steel or coated). Then, apply a high‑quality exterior wood adhesive to the joint – this adds a bond that helps the patch behave like it was always part of the frame.
Finally, seal the whole area with a water‑resistant primer followed by paint or stain that matches the rest of the door. If you’re unsure which finish to choose, our door material selection guide walks you through colour, texture, and durability considerations.
Take a breath, step back, and admire the solid wood you just installed. The hardest part – removing the rot – is behind you, and now you’ve got a durable, well‑chosen patch that’ll keep water out for years to come.
Step 4: Install the New Jamb and Seal Properly
Now the patch is dry‑fitted, it’s time to make it feel like it’s always been part of the door. If you’re still feeling a little jittery, that’s normal – you’re about to turn a raw cut‑out into a water‑tight barrier.
Secure the patch with the right fasteners
Start by pre‑drilling pilot holes in the new jamb piece. This prevents the pressure‑treated wood from splitting, especially near the edges. Use a 1/8‑inch drill bit for #8 screws; you’ll want a couple of screws every 6‑8 inches around the perimeter.
Grab corrosion‑resistant screws – stainless‑steel or coated deck screws work best. Drive them straight, not at an angle, so the patch sits flush. If you notice any tiny gaps, slip a thin shim of wood filler behind the screw head; it’ll push the piece tighter against the old frame.
Apply adhesive for a seamless bond
Before the final tighten, spread a bead of exterior‑grade wood adhesive on the joint. A generous line along the top, bottom, and sides does the trick. The adhesive fills microscopic voids that screws can’t reach, giving the jamb extra strength against wind‑driven rain.
Press the patch firmly into place and wipe away any excess adhesive with a damp rag – you don’t want glue seeping onto the paint later.
Seal every edge like a pro
Now comes the waterproofing stage. First, run a high‑quality, water‑resistant primer over the entire repaired area. Primer adheres to both the old wood and the new piece, creating a uniform surface for the finish coat.
Once the primer dries (usually 30‑45 minutes), follow up with a paint or stain that matches the rest of your door. For exterior doors, a 2‑coat acrylic latex paint with UV blockers is ideal. If you prefer the natural grain, a penetrating oil‑based stain works, but be sure it’s rated for exterior use.
Don’t forget the corners. Use a high‑performance exterior caulk (silicone‑acrylic works well) to bead along the inside corners where the jamb meets the door frame and the wall. Smooth it with a fingertip or a caulk‑smoothing tool – a neat bead prevents water from finding its way behind the wood.
Final checklist before you step back
All screws snug, no protruding heads.
Adhesive wiped clean, no squeeze‑out on the surface.
Primer fully dry, no tackiness.
Paint or stain evenly covered, no drips.
Caulk sealed corners, tool‑smoothed.
Give the repaired jamb a gentle push with the door – it should feel solid, with no wobble or flex. If something still feels loose, double‑check the screw depth and add a second screw if needed.
And remember, if you hit a snag or just want a second pair of eyes, our full guide to repairing a rotted door frame walks you through every nuance, from prep to final trim.
Take a breath, step back, and admire the work. You’ve just turned a rotted, vulnerable jamb into a sturdy, weather‑proof barrier that will keep drafts and moisture out for years.
Step 5: Finish, Paint, and Weatherproof
So you’ve got the patch in place and it’s dry to the touch. Now the real protection starts — finishing it right so drafts and moisture stay out for years.
First, confirm the patch is fully dry. If you used exterior adhesive, give it a full cure time before any primer or paint goes on. Wipe away any squeeze‑out with a damp cloth so the finish bonds cleanly.
Here's what I mean by the right groundwork: apply a high‑quality exterior primer over the repaired area. Primer helps the new wood accept paint evenly and blocks any tannin bleed from the patch or old wood.
Next, choose your finish. For a painted look, go with a two‑coat acrylic latex paint with UV blockers to resist sun fading and rain. If you love the natural grain, pick a penetrating exterior stain followed by a durable topcoat. Either way, aim for a color and sheen that blends with the rest of the door frame.
And don’t skip the edges. Run a bead of high‑quality exterior caulk along all interior corners where the jamb meets the frame and the wall. Tool the seam with a damp finger or a caulk tool until it’s smooth — no gaps, no squeeze‑out that dries as a rough edge.
Does this really need two coats? In most cases yes. Two coats give better color depth and longer weather resistance. Let the first coat dry completely before applying the second. Dry times vary with humidity and temperature, but in mild weather you’re usually looking at 24–48 hours between coats.
For extra longevity, consider a light protective topcoat on the most exposed surfaces. A clear, UV‑stable layer can dramatically extend life in wet climates, shedding water and reducing surface wear over time.
Finally, test the door operation. Close and latch a few times to ensure no rubbing or binding after the finish cures. If you notice a tight spot, a light sanding along the edge and a fresh coat of paint will fix it. Recheck the weather stripping and re‑caulk any tiny gaps if needed.
If you want a hands‑off finish that’s guaranteed to endure, LGFMH Construction can handle the entire finishing and weatherproofing process so you know it’s done right. For a deeper walkthrough of the repair itself, explore our detailed guide on how to repair rotted door frame.
How to Repair Rotted Door Frame: A Step-by-Step Guide
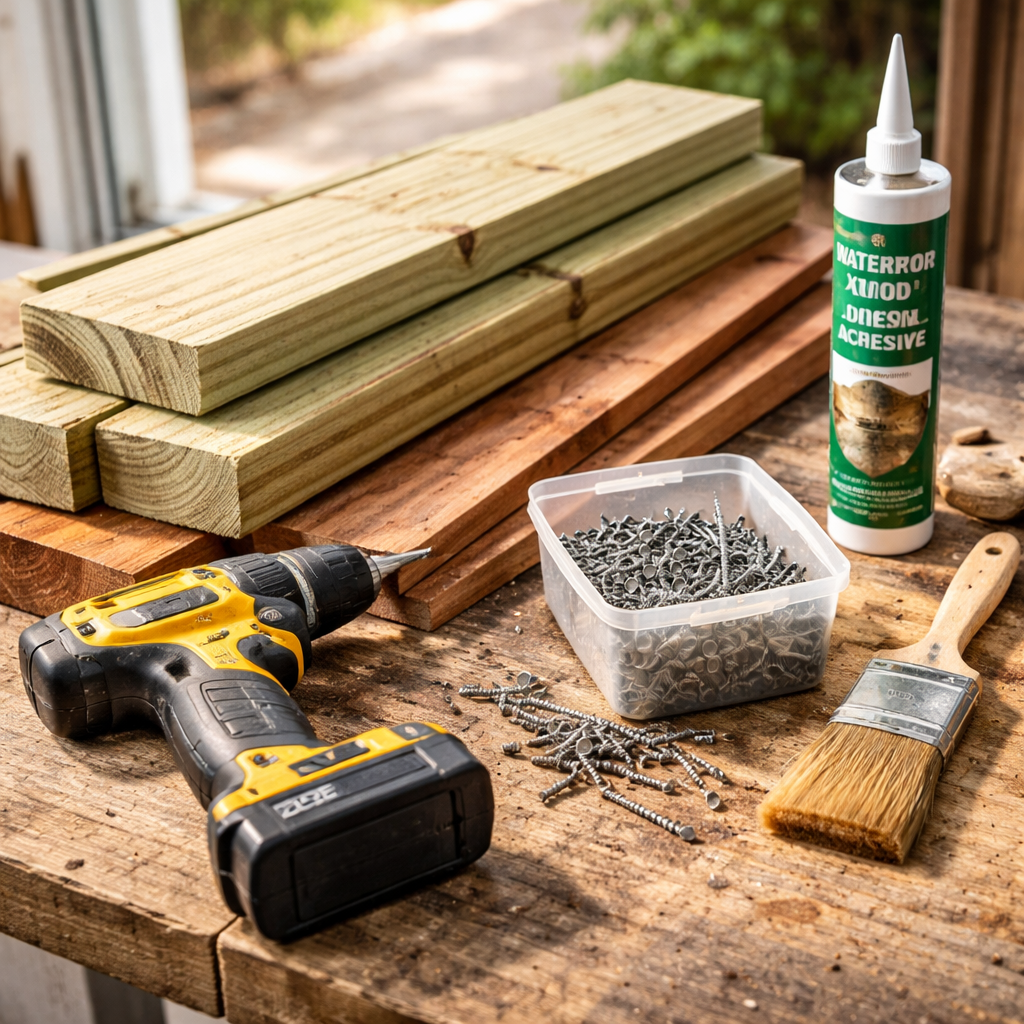
Materials & Tools Checklist
Alright, you’ve cleared the rot and you’re ready to rebuild – but before you swing that saw, let’s pause and take stock of what you actually need. A solid checklist saves you from frantic trips to the hardware aisle and keeps the job moving smoothly.
Core Materials
Pressure‑treated lumber– the workhorse for most DIY jamb patches. It’s cheap, resistant to moisture, and takes screws without splitting.
Exterior‑grade hardwood(oak, mahogany) – choose this if you want a grain‑match that looks premium. It’s a bit pricier but sands and stains beautifully.
Composite or PVC trim– virtually rot‑proof and lightweight. Perfect for a low‑maintenance fix, just be sure the surrounding wood is sealed well.
Exterior‑grade wood adhesive– a high‑bond polymer that fills microscopic gaps and reinforces the screw joint.
Corrosion‑resistant screws– stainless‑steel or coated deck screws, #8 or #10, 1‑½" to 2" long.
Water‑resistant primer– creates a uniform surface for paint and blocks tannin bleed.
Exterior acrylic latex paint or penetrating stain– two coats for durability; pick a finish that matches the existing frame.
Silicone‑acrylic exterior caulk– seals interior corners and any gaps where the jamb meets the wall.
Essential Tools
Reciprocating or hand saw – for cutting out the rotten section and trimming the replacement piece.
Chisel and hammer – handy for gentle prying and cleaning tight corners.
Drill with 1/8" pilot‑bit – prevents splitting when you drive the screws.
Measuring tape and carpenter’s square – accuracy matters; measure twice, cut once.
Utility knife – scores the cut line so the saw stays on target.
Sandpaper (80‑120 grit) – smooths any rough edges before priming.
Brushes or rollers – for adhesive, primer, and paint.
Safety gear – gloves, safety glasses, and a dust mask. Trust me, you’ll thank yourself later.
Do you ever feel overwhelmed by the sheer number of items? That’s why I like to group them into “materials” and “tools” – it turns a mountain into two tidy boxes you can lay out on a drop cloth before you start.
One tip that saves time: pre‑cut the pressure‑treated board a little larger than the cavity, then trim it down on‑site. That way you avoid the dreaded “piece is too short” panic midway through the job.
And if you’re unsure which material fits your climate, our comprehensive rotted door frame repair guide walks you through the pros and cons of each option, so you can pick the right one without guessing.
Before you close the toolbox, double‑check that you have:
All screws counted (you’ll need a few per side).
Adhesive tube not dried out.
Primer and paint matching the existing color.
Caulk tube with a fresh tip for clean beads.
Having this checklist on hand turns “I think I have everything” into “I’ve got everything”. It’s the small preparation step that makes the difference between a wobbling patch and a door jamb that feels like it was never damaged.
Conclusion
We've walked through every step, from spotting the soft give in the wood to sealing the final coat, so you now know exactly how to repair rotted door jamb without guessing.
Think about that moment when you finally fit the patch and the door swings shut with no squeak—that sense of accomplishment is what makes DIY feel rewarding.
If you hit a snag—maybe the rot runs deeper than expected or you run out of time—remember that a quick call to LGFMH Construction can get the job done right, saving you future headaches.
Key takeaways: always remove all softened wood, treat the cavity, use pressure‑treated or composite material that matches your climate, and finish with a flexible, paint‑able sealant.
Keep your toolbox ready: a saw, chisel, exterior adhesive, corrosion‑resistant screws, and a good primer are the only essentials you really need.
Before you close the project, give the jamb a final feel test—run your fingers along every joint and open the door a few times. Any draft or gap? Spot‑seal it now.
With the right prep and a bit of patience, the repaired jamb will protect your home for years, and you'll have one more skill under your belt. Ready to start? Grab your coffee, pull out that toolbox, and make that door frame strong again.
FAQ
What are the early signs that the door jamb is rotted and needs repair?
Rotted jambs usually announce themselves with soft spots, a spongy feeling when you press the wood, and that hollow sound when you tap. Look for discoloration at the bottom edge, a musty smells, or paint that cracks and peels where water pools. If you see loose screws twisting easily or hinges pulling away, that’s not just cosmetic—it means the frame is losing its grip. Do a quick moisture check on adjacent trim too.
Should I patch a rotted door jamb or replace the whole jamb?
In many cases you can patch the affected area with a pressure‑treated or composite patch, then seal well. But when rot has eaten into the studs or the frame integrity is compromised, a full jamb replacement saves headaches down the line. The decision hinges on depth, location, and climate exposure. If the patch would create gaps or weaken hinge alignment, call LGFMH Construction for an expert assessment—we’ll help you choose the most durable route.
Which replacement materials perform best for a rotted door jamb, and how do I choose?
There isn’t a one‑size‑fits‑all answer. Pressure‑treated lumber is budget friendly and easy to work with, but it expands with moisture. Composite jambs resist water absorption and stay flatter, though they cost more and cut cleanly. Hybrid wood‑plus‑composite options give you the look of wood with moisture resistance at the bottom. Consider your climate, maintenance budget, and whether you’ll paint or stain. We often guide clients toward composites or hybrids for high‑splash areas.
Can I repair rotted door jamb myself, or should I hire a professional like LGFMH Construction?
You can do a lot with basic tools, but the safest, long‑lasting results come from a proper assessment of moisture sources, correct patch sizing, and precise sealing. If the rot extends behind the jamb or if you’re unsure about electrical wires near the area, stop and call a pro. In our experience, a professional inspection ensures the repair won’t leak again next winter. We’re here to help with end‑to‑end repairs when you want a guaranteed finish.
What are the essential, repeatable steps to repair rotted door jamb from start to finish?
First, remove all soft decayed wood and treat the cavity with a wood preservative. Then dry‑fit a replacement patch, glue it, and screw it in with corrosion‑resistant fasteners. Seal the joints with a paintable caulk, prime, and paint or stain. Finally, check the door for smooth operation and adjust hinges if needed. Doing this in a controlled sequence minimizes cracking and ensures a watertight finish that lasts through 2026 weather patterns.
How can I prevent future rot after repairing the jamb?
Prevention is cheaper than a redo. Ensure proper drainage away from the sill, clean gutters, and redirect downspouts so water doesn’t pool near the threshold. Use a moisture‑resistant primer and paint, and seal all joints. Check annual caulking and re‑seal any gaps after heavy rain or snow. If you notice new staining or softness within a season, re‑treat promptly. If you’d rather we handle it, LGFMH Construction can craft a maintenance plan for you. We can tailor this to your home’s exact setup today.


Comments